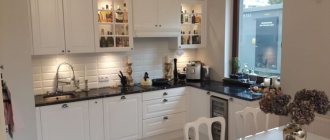
The kitchen is one of the places in the house where furniture is constantly in contact with water. As a result, the material wears out, and over time, swelling, cracks and chips may appear on it. Read on to learn how to protect your countertop from swelling.
When choosing a kitchen set, many first of all think about the facade, color, drawers, and the question of what kind of countertop should be fades into the background.
What is a Countertop Edge?
The main task of the chipboard edge is to protect it from moisture. This is especially true in the kitchen and all ends of the kitchen countertop need to be covered. The edge also protects you from the release of formaldehyde from the chipboard (chipboard) countertop. As an alternative to edges, special end caps for tabletops are sold.
Interesting materials:
What are the earrings called? What are hoop earrings called? What are wide sweaters called? What are women's wide trousers called? What are pants with a low waist called? What are pants with elastic at the bottom called? What are the names of the states in Germany? What are lilac daisies called? What are the terms of multiplication called? What are the names of the modern territories of compact settlement of Indians in North America?
Features of protecting kitchen furniture from water
There are always risk areas in kitchen furniture that need to be monitored especially carefully. This is a cabinet with a dryer, a sink and a cabinet with a washing machine. They are often the reason for repairs or replacement of the headset. When purchasing, it is better to give preference to moisture-resistant material. However, the manufacturer only provides a guarantee for a solid tabletop. First of all, the correct selection and installation of furniture is important.
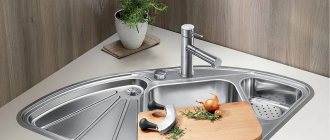
Correct installation of sink and faucet
When purchasing a sink, you should pay attention to the feature of the locking connection. The locks should snap onto the tabs and not just click. When installing, it is advisable to use silicone sealant. When drying, it forms a protective film that protects against moisture. A thick layer of sealant is usually applied to the joint between the countertop and the wall and the cutout under the sink. The sealant is easy to check for quality. To do this, leave the drop at room temperature for three hours. If it has frozen and does not leave marks on your hands, then the product can be safely used at work.
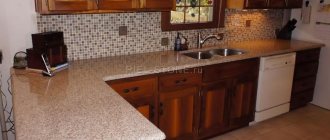
The table surface is the most vulnerable part of kitchen units.
Note! Experts do not recommend embedding the faucet directly into the countertop, as the faucet will sooner or later begin to leak. This will cause the surface to swell. An exception is made for drinking filters.
Drying installation
When choosing a dryer, you should pay attention to whether the set includes a tray. If it is not provided, then water draining from the dishes will fall to the bottom of the cabinet, which will subsequently lead to swelling of the surface. Good ventilation of the dryer is also necessary. To do this, make a small hole in the cabinet, which is designed in the form of a socket for the wire.
Most often, damage to countertops can be associated with manufacturing defects, improper installation or violation of operating rules.
Kitchen plinth protection
When choosing a kitchen plinth, it is better to give preference to plastic. The panel will close the gap between the cabinet and the floor. The design is equipped with grooves for fastening to supports and a seal that protects against the ingress of water and dirt. The advantages of the plinth are as follows:
- simplicity and ease of installation;
- a light weight;
- wide choice of colors;
- moisture resistance;
- different heights: 100, 120 and 150 mm.
The slab swells due to prolonged contact with water or improper care.
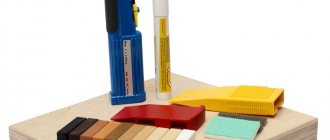
Protecting the edges of the tabletop
It is better to cover the edges with special strips, the choice of which depends on the installation method. The end is pre-treated with silicone. One of the popular techniques is to apply several layers of paraffin, PVA glue or varnish to the sections. Some people use self-adhesive tape or wide tape.
Blistering of the surface indicates that the installation was carried out with errors.
Making saw cuts
As a rule, the cut is made using an electric or chainsaw.
It is necessary to mark the cutting line by tracing the log in a circle (or along the oval line if the cut is inclined). When making a cut, you should try to maintain a plane to reduce the amount of grinding. Some craftsmen make special devices that make the work easier and help ensure the most even plane. However, if you need to make just one plate, you can do without additional devices - the time spent on their manufacture can be used for processing the cut.
Expert opinion
Korzhavin Daniil Dmitrievich
Designer of stylish home furniture
The task is quite complex and responsible. If you do not have experience and skills in such work, it is better to contact a specialist and ask him to make a cut according to pre-made markings. This will not take much time, but will significantly speed up the processing of the saw cut.
Laminated models and their repair
Laminated surfaces, despite their durability, also wear out. If the tabletop is swollen, you can fix it in the following way:
- heat the deformed area with a hairdryer;
- remove the damaged piece;
- treat the damaged area with glue;
- pour the prepared mixture of sawdust and PVA into the damaged area;
- compact the mixture with a spatula;
- the surface should dry within 24 hours.
If the surface is not only damaged, but also swollen, a number of actions should be taken to restore the shape of the slab.
How to choose material
The easiest way is to purchase a ready-made saw cut and look for suitable options in online stores. However, for many users it is more interesting to choose the material themselves and make a plate from a log.
To make a tabletop, you need a plate of the largest possible size. It can be obtained from large diameter logs, at least 500 mm (ideally more than 600 mm).
Coniferous trees predominate on the territory of our country. They have pronounced annual rings, straight-grained wood with a large amount of resin. It is the resin that can become an undesirable point, since it has poor contact with paint and varnish coatings. It is noteworthy that most conifers have a similar texture and are easy to confuse.
Hardwoods have a wide variety of textures. There are rocks with pronounced annual rings and a large number of pores. These are ash, acacia, chestnut. There are species with homogeneous and inexpressive wood - birch, maple. However, it is these rocks that have significant undulation in the lower part of the trunk. Therefore, it is recommended to cut them along the longitudinal axis.
It is difficult for an inexperienced person to determine by the type of log what it will look like when cut. This is a task that is not available to every professional - a tree trunk is a living organism, and its condition is extremely difficult to predict.
However, you can adhere to the basic rules:
- You should not choose a rotten log. You can knock on its side - if the sound is dull and “raw”, it’s better to look again;
- an uneven and knobby trunk in this case will only be an advantage, since its cut looks more attractive;
- the closer to the root the cut is located, the more interesting its texture will be;
- cracks or other imperfections, if not too many, can only decorate the tabletop (although they will have to be completely filled with epoxy resin or polyester putty).
Most often there is not much choice. There are few large trunks, since they are brought only to order. Therefore, you have to be guided by the main condition - size. If the size of the cut is suitable for solving the tasks, flaws can be corrected or hidden.
Helpful tips for preventing swelling
Be sure to take advantage of the kitchen assembly service. Otherwise, the company will withdraw its warranty obligations. It is necessary to take care of the installation of the hood. It will not only get rid of unpleasant odors, but will also protect furniture from condensation, steam and grease drops. Remove moisture from the surface in a timely manner and do not leave it wet overnight. Otherwise, the material will begin to swell. The base can be rubbed with stearin and then heated with warm air. After cooling, repeat the procedure several times. You can make a coating from a mixture of bitumen varnish and drying oil in a ratio of 1:5.
Any countertop must be sealed, the joints coated with sealant and promptly wiped with an absorbent cloth.
Sometimes repairing an old countertop is more expensive than buying a new one. To extend the life of furniture, it is important not only to install it correctly, but also to properly care for it in the future.
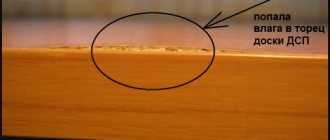
If there is the slightest detachment of the protective layer, penetrating water quickly leads to swelling of the base.
How to coat and treat chipboard from moisture
Due to its low cost and good performance properties, chipboard has become a very popular material. The main enemy of these plates is water. After all, sawdust increases in volume when wet and the base wrinkles. Next, we’ll look at how to increase the moisture resistance of the material.
Typically, manufacturers provide a warranty of at least 12 months on items such as countertops.
The first step towards moisture resistance
Even at the production stage, the process of resinizing the chips is carried out. Thanks to this, the fibers are saturated with resins and glued together. Formaldehyde resin itself is already a hydrophobic component of the product. A stronger substance is urea-melamine resin. The moisture resistance of chipboard is increased by the introduction of paraffin or its concentrate into the chips.
All joints must be covered: in places where sinks and gas stoves are inserted, an insulating layer is required.
Surface treatment of plates
It will not be superfluous to process the front and back sides of the slab. One of the effective techniques is lamination. A melamine film is laid on the treated board under high temperature and pressure. As a result, the film forms a single block with the plate. At home, chipboard is painted in several layers, following the following steps:
- all contaminants are removed from the surface;
- the plate is treated with heated drying oil;
- then treat with cold drying oil until a crust forms;
- dyeing process.
The surface of the stove is protected by a decorative film; it must not be damaged with a knife or heated, otherwise water will penetrate inside.
Important! Each subsequent layer of paint is applied to the completely dry previous one.
Processing joints and edges
Before processing, the joint should be cleaned and dried with a hairdryer. Next, a logical question arises: what is the best way to treat the edges of a chipboard tabletop so that they do not swell. PVA glue or sealant will come to the rescue. In places where there is no lamination, end and connecting strips made of metal and plastic are fixed.
Monitor the quality of the sealant regularly. Wipe up any water spills or splashes immediately.
Sealing chipboard joints on the floor
Floor slabs are regularly subjected to great physical stress and tend to move relative to each other. Therefore, putty does not help in this case. The seams are treated with a mixture of epoxy and crushed sawdust. The composition hardens instantly, so it is better to make a small batch. You can make a mixture of hot glue and sawdust. The glue penetrates deep into the porous structure and the joint stops moving. This is one of the budget and reliable methods. True, the glue takes a long time to dry and it’s better not to walk on the floor for a couple of days.