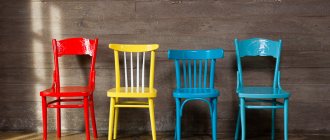
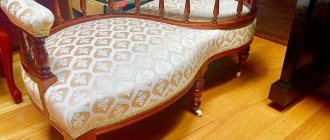
How to restore an old chair using decor
Even the most unsightly and old chair can be radically transformed with the help of decor. And this doesn’t require any special skill; the main thing is to choose the right type of decoration so that it fits into your interior.
Upholstery reupholstery
You can not only replace the upholstery, but make a soft seat instead of a hard one.
To do this, you need to cut out the base from plywood and then follow our recommendations:
- Using the old pattern or contour of the seat, cut out new upholstery from thick fabric with an allowance of at least 6 cm.
- Cut new foam to fit the seat.
- Cut batting or padding polyester with an allowance of 2-3 cm.
- First lay foam rubber on the plywood, then padding polyester so that it covers the edges of the seat.
- Lay the fabric and fold the edges so that neat and even folds are formed at the corners.
- Staple the fabric to the back of the seat. You can use small carnations with wide heads.
PHOTO: uiut.boltai.com Corners need to be fixed in several places
Decor with fabric, ribbons or jute rope
You can restore the second youth of old furniture in a simpler way, for example, by sewing a fabric cover and decorating it with ribbons. This is a great idea for periodically transforming the interior for the season or holiday.
PHOTO: uiut.boltai.com PHOTO: uiut.boltai.com
Jute rope looks especially beautiful in the interior. There are many techniques for wrapping the frame and seat, such as macrame or simply creating patterns on chicken wire.
PHOTO: uiut.boltai.com PHOTO: uiut.boltai.com
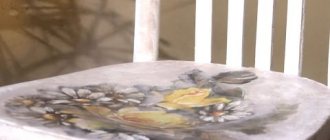
Master classes on decorating a chair using decoupage technique
An amazing transformation of old chairs can be done using the decoupage technique. This is a more complex type of decoration than reupholstery, requiring a certain amount of care, but the result will delight you for many years.
Paper
To decorate a chair using decoupage technique we will need:
- fine sandpaper;
- white water-based paint;
- decoupage paper or napkins;
- polyacrylic roller, brush, sponge;
- artistic brushes;
- acrylic paints and varnish or PVA.
Let's get started decorating old furniture.
Illustration Description of work
Clean the surface using sandpaper and remove dust.
Apply 1-2 coats of white water-based paint to the chair.
Use your hands to tear the paper into pictures.
Cover the surface of the chair with acrylic varnish in those places where there will be patterns.
Glue the decoupage paper and smooth out all the folds with your hands.
Decorate the back in the same way.
After drying, coat the entire surface of the napkin with varnish, paying special attention to the edges.
To give the chair a natural antique look, mix white and brown acrylic paints and use a sponge to lightly shade the frame.
Use a sponge to shade some elements of the design with paint.
Cover the surface with varnish.
Such work will create a special spiritual atmosphere in the house.
In the video you can see all the stages in more detail:
Watch this video on YouTube
Textile
While many people have heard about decoupage with paper, only a few know about a radical transformation using fabric. Nevertheless, a chair or stool updated in this way will last for many years.
We will need:
- matter;
- PVA glue or decoupage varnish;
- sharp stationery knife;
- brush.
Master class on updating a chair using decoupage technique using fabric:
- Remove the backrest and seat.
- Lay out the fabric and outline the back and seat.
- Cut the blanks taking into account allowances of 2-3 cm.
- Cover the outside of the seat with PVA. PHOTO: 10por15.com
- Place the cut on the seat, smooth it with your hands, then cover it again with PVA and leave to dry overnight. PHOTO: 10por15.com
- Trim off the hard edges and treat the sides with PVA to prevent the fabric from fraying over time.
- Repeat all steps with the back. PHOTO: 10por15.com
Painting a wooden chair
The workplace where painting will be carried out must be well ventilated to remove strong odors and harmful substances released by the paint.
Before work, carry out a wet cleaning of the room , remove dust, which, if settled on the surface of the chair, can spoil the result. It is especially important to achieve cleanliness if you want a glossy finish.
Furniture and floors in the work area are covered with film to prevent drops and accidental paint spills.
access to the chair from all sides to avoid unnecessary touching and moving during painting.
Before painting, they carry out final preparation - they clean the chair from putty deposits, small irregularities, and try to achieve an ideal surface . The first layer when painting is a primer . It should not be dark in color if the stool is light.
After drying, they are treated with sandpaper , removing any roughness that appears. The finishing layer is applied with a roller, brush or spray gun. The latter method is preferable for uneven parts and for painting carved fragments or holes.
If necessary, apply a second, sometimes third layer of paint; before doing this, be sure to allow the previous layer to dry completely.
Andrey Peregubsky
Furniture handyman
Ask a Question
The drying time indicated by the manufacturer does not always correspond to reality; for example, the drying time increases when drying in a cold or damp room. You must wait until you feel sticking when touched.
Wooden chairs can be coated with the following types of paints :
Nitro enamels and nitro varnishes add shine and gloss to the surface, are suitable for outdoor furniture, but are susceptible to cracking from impacts.
Alkyd coatings are easy to apply, flexible, almost odorless and do not emit hazardous substances when dried, but it is better not to use them if the chairs will be exposed to low temperatures.
Acrylic compounds are resistant to the external environment. Chairs should be painted in a well-ventilated area.
The chair is ready for use when the paint is completely dry. At first, be careful when handling a piece of furniture, especially with multi-layer coatings.
Inspection and search for defects
First of all, an old chair found in an attic or barn must be cleaned of dirt and dust, and then carefully inspected for defects.
The first thing that catches your eye is the shabby appearance, worn out paint and varnish. You can often find wood splintered at bends. Sometimes craftsmen who tried to strengthen the structure hammered nails into the legs or frame, thereby damaging the integrity of the wooden parts.
During the examination, you should shake the chair and sit on it. Such manipulations will allow you to determine whether the connections are loose and what actions led to the fact that it began to wobble and creak.
If the chair has soft upholstery, it could be completely unusable: the fabric is frayed, torn or completely missing, the filling has crumbled and fallen out.
The solid seat was made of plywood, which could delaminate over time and break off in places. In this case, the chair is given a second life by repair, complete replacement of the element or upholstery with fabric filled with foam rubber.
After a piece of furniture has been carefully examined, you need to figure out how to restore a Viennese chair with your own hands in one case or another.
Stylistic decisions
You can decorate chairs using decoupage in different ways. There are several interesting stylistic trends.
Children's
Decorating a bedroom for a baby is always a responsible task. A beautiful chair, decorated using decoupage technique, will definitely please your child and will make the room brighter and more unusual. The design of a high chair depends on what your baby likes. Choose napkins decorated with Teddy bears, cartoon characters or funny animals. You can also find on the Internet many pictures of characters from your favorite cartoons or fairy tales. Print them on thin paper and carefully decorate the chair with them.
When decoupaging children's furniture, try to take into account the child's taste, or better yet, involve him in the process. The baby will also be interested in working with paper, creating something bright and beautiful. The main thing is to control the progress of the work and varnish the surface yourself, without entrusting such an important task to a child.
Provence
Living rooms or bedrooms decorated in French Provence style are always stylish and fashionable. This trend is characterized by the use of antique-decorated furniture, so an artificially aged chair will come in handy here. It is recommended to take white as a basis, because it is the most relevant color for this exquisite French style.
A chair painted white can be additionally decorated with napkins with images of flowers. Roses, peonies, daisies and other plants would be appropriate in such an interior.
Shabby chic
The use of artificially aged furniture is also relevant for the shabby chic style.
Beautiful stools or chairs with backs, decorated using the decoupage technique, can be decorated with antique maps, flowers in pastel colors and other images. Such chairs look good in the interiors of living rooms, offices and even bedrooms.
Vintage
The design of chairs in vintage style also looks interesting.
You don't have to buy expensive antique furniture. It is quite possible to create a beautiful chair with your own hands using the simplest materials and thin napkins. By decorating a chair or stool with subtle patterns using paints and a brush, you will get a beautiful imitation of an expensive Viennese chair. It will find a place both in a chic, stylish apartment and in the interior of a luxurious country house.
Romance
A chair decorated with various romantic patterns will look interesting in the bedroom.
A pastel pink or burgundy chair base allows you to create the right atmosphere. In addition, you can decorate it with sublime prints or paint it with silver or gold paint.
Kitchen
When it comes to kitchen furniture, most owners prefer to choose something as practical as possible for this room. For this reason, many people refuse furniture made in white or pastel colors, which get dirty easily. For the kitchen, chairs or stools in lavender, blue or green colors, decorated with prints with images of food or interesting inscriptions, are suitable. You can also try to create an interesting composition consisting of several pictures on the surface of the chair.
The decoupage technique allows you to decorate both old and new chairs in an interesting way. Choose any style you like and change the appearance of old furniture at your discretion. The result will definitely liven up the look of your room and add personality to it.
Soft pie: materials, thickness
Before reupholstering a chair, you will have to study some information about what exactly to use when restoring a chair or armchair. Please note that you can use not only the materials listed in this paragraph. We have described the most common, synthetic, inexpensive, with acceptable characteristics. If desired or necessary, you can use natural analogues - copra in mats or rolls, batting, dried sea grass, horsehair, burlap and other materials that are exotic today and once traditional.
Most common materials
What materials are needed to reupholster a chair?
When restoring a chair or armchair, foam rubber or polyurethane foam (PPU) is used for the soft part. We are talking about foamed polyurethane foam, not sheet. There is also furniture latex. It and polyurethane foam differ from foam rubber to the touch. They are more like rubber (latex is generally like rubber); when stretched/compressed, they tend to return to their previous shape.
To be soft enough, the density of these materials should be 30-35 kg/m³. Foam rubber and polyurethane foam are sold in large sheets - the minimum size is 1*2 meters. So that's enough for more than one chair. Latex is usually available in some standard sizes, but is most often made to order.
Different thickness, density, rigidity, different manufacturing technologies
What is better to use for upholstering chairs - foam rubber, latex or polyurethane foam (PPU)? If we talk about quality and durability, then latex or polyurethane foam is better. They will last up to ten years or more without signs of wear, they absorb better and wear out less. The best of this pair is latex, but it is much more expensive than even polyurethane foam, not to mention foam rubber. Therefore, if you are on a limited budget, choose foam rubber. If durability is important - polyurethane foam or latex.
Now on the thickness of these materials. For the back, a thickness of 3-5 cm of foam rubber/PPU/latex is sufficient, depending on the degree of desired softness/hardness, but for the seat it is better to use materials with a thickness of 7-8 cm or more. If the base is solid - made of plywood, without springs or tapes - a thickness of 10 cm is needed. Otherwise the base will be felt.
The three most common materials are foam rubber, polyurethane foam and latex.
A padding polyester is laid on top of the foam rubber. Its thickness is small - 1 cm in a free state or so. It’s easier to navigate by density: 150-200 g/m². This layer is needed so that the foam/PPU/latex rubs less. This way, restored upholstered furniture will last longer.
If you want the chair or armchair you have reupholstered to last longer, another layer of spunbond is stretched over the padding polyester - this is a non-woven material made from a polymer melt using a spunbond method. Spunbond costs very little, but significantly extends the life of the seat. This layer is found in expensive furniture and increases durability (foam rubber/sintepon does not rub) and comfort of use (upholstery fabric does not fidget). A possible disadvantage is the accumulation of static electricity. But this is observed only when natural wool or silk is used in upholstery.
How to cut and fasten
The foam is cut to fit the size of the seat. The easiest way is to make a template at the initial stage: attach a sheet of cardboard to the seat, trace it and cut it out. This template will be needed more than once, so it’s better to make it.
It’s better to make a template right away, especially if you will be dragging several identical chairs
We cut out foam rubber and padding polyester strictly according to the template. In some cases, it is worth making it wider and longer by 3-5 mm so as not to feel the edges of the base. The cut foam rubber is glued to the base using furniture glue. There is a special glue in a can for foam rubber. It is more convenient to use, but it is not easy to find everywhere.
The padding polyester is laid on top - one side is more “rough”, so we place it on the foam rubber/PPU/latex, level it and smooth it with our hands. After this, it is problematic to separate the laid layers (you can try). If this method does not seem reliable enough to you, you can glue the connection by applying a mesh of suitable universal glue or the same glue for foam rubber.
Latex is usually made to order, so the edges are rounded for greater convenience.
One point: if the base of the chair is not rigid - springs, tapes, a snake - the glue you should use is not the one that forms a hard crust after drying, but the one that remains elastic.
If you decide to also use spunbond, it must be cut out with a margin, attached with staples to the base, evenly straightened and stretched. You should not pull too hard - the material is non-woven and is easily damaged. It just needs to lie without folds. Carefully trim the excess to the level of the chair/chair frame.
Selection of materials
To repair wooden chairs with an upholstered seat, in addition to a set of tools, you need the right material, in particular:
- foam rubber, padding polyester for the layer;
- suitable fabric for upholstery;
- springs for a specific type of product;
- plywood for restoring the seat;
- To make a pattern you will also need thick paper (cardboard) and PVA glue.
Foam rubber, padding polyester Upholstery fabric
Springs
Plywood
For reupholstery
The choice of fabric for covering is quite large. Each option has its own advantages that determine the feasibility of use in certain conditions:
- Tapestry is the most common material in the manufacture of upholstered furniture with a rich texture and texture. Strong, durable, practical, does not fade in the sun, and is easy to wash. And besides, it is antistatic (dust does not accumulate on its surface). An excellent choice for chairs in the living room or bedroom.
- Chenille is another popular option, a beautiful and inexpensive jacquard fabric, the special type of weaving of which ensures its softness and volume. The most practical and durable are samples of mixed composition, containing natural threads and synthetics. A significant disadvantage of chenille - strong hygroscopicity - does not allow it to be used for the restoration of kitchen upholstered furniture. But on chairs for dressing tables, such textiles are irreplaceable - they are velvety and pleasant to the body.
- Jacquard is a fabric with convex patterns obtained by complex weaving of threads. She is not afraid of grease stains and moisture, and therefore do-it-yourself “jacquard” restoration of chairs is the best option for upholstered furniture in the kitchen.
- Flock, or artificial velvet, is not afraid of animal claws, durable, easy to clean and wash, and therefore suitable for any room, including as ottomans in the hallway.
- Velor is a spectacular material, pleasant to the touch, but very impractical due to rapid wear. Good for chairs that are rarely used.
- Genuine leather looks beautiful, is extremely easy to clean, but is very expensive.
Separately, it is worth mentioning the leatherette. Of the various substitutes, eco-leather is the most successful. This material is good for its consumer qualities, and in general is almost as good as natural leather, but will last about 8–10 years. Unlike ordinary fabrics, this upholstery has its own operating characteristics:
- Leatherette does not forgive mistakes - leaving holes from an unsuccessful stitch, some of its types stretch greatly in one direction, but not at all in the other, which should be taken into account when cutting.
- As for genuine leather, it is easiest to work with material up to 1.5 mm thick (maximum 3 mm), since, most likely, you will have to sew several parts together. In addition, the leather must be dry when working to prevent shrinkage when drying.
How to properly sew covers of different models for chairs, tips for housewives To make the chair softer, foam rubber 40–50 mm thick (density 30–50 kg/m3) is used as a filler. The upholstery will be easier to install and stretch without wrinkles if an additional layer of synthetic padding is placed between it and the foam rubber. The color of the fabric for upholstering a chair depends on the overall palette of the interior.
Tapestry
Chenille
Jacquard
Flock
Velours
Leather
For frame
To restore an old chair, tools are selected depending on the work that needs to be done. To prepare them, use sandpaper of varying degrees of grain or a special mesh to remove old paint and varnish. After that:
- to preserve the visible texture of wood, stains, tinting compounds and varnishing are used (you will need a long-drying polyurethane varnish, since furniture varnish sets too quickly and is toxic);
- to change the color you will need the paint you like, a tray for it, a spray bottle, a primer, brushes and a paint roller, tape and varnish;
- for the aging effect - a special type of paint, solvent, varnish, rags;
stain
Polyurethane varnish Paint
Varnish with aging effect
Materials for sealing cracks are selected depending on their size:
- for very small scratches - retouching pencils, iodine solution;
- for shallow cracks, use special wax, carpenter's or car putty, as well as flour mixed with PVA glue;
- for deep ones - shoe polish, mastic (a mixture of turpentine and heated beeswax in a ratio of 3:4).
Napkins for decoupage
Wood putty
Corrector pencil
Advantages and disadvantages
Restoring old furniture is a creative process that allows you to restore beauty and functionality to interior items. A finished sofa, table or cabinet can be used independently, left as decoration or sold. Antique furniture is in great demand among collectors and lovers of retro styles, so there is always a demand for it.
Advantages of restoring furniture with your own hands at home:
- Savings on the purchase of a new item and the services of a restoration workshop. Much work can be done independently using available tools.
- After the work carried out, the furniture will last longer.
- You can discover your creative potential and realize complex ideas. You will not be rushed, which allows you to spend a lot of time on restoration.
- You don’t have to get rid of an antique item inherited from your ancestors. Perhaps the chest of drawers is treasured as a memory of your grandmother or evokes nostalgia for childhood. Many people find it difficult to part with old items left over from childhood.
- Old furniture will not spoil the new interior. This applies to items that were purchased to complement the interior, but then the design of the room changed. In this case, you need to create new furniture that will fit perfectly with the overall style.
You will get the wardrobe or sofa you need without tedious searching. At home, you will create an item that meets your requirements. And to do this, you don’t need to look for it in stores, order it on foreign websites, or have it manufactured by specialists.
But there are also disadvantages to restoring furniture yourself:
Without any experience working with furniture, you may encounter difficulties already at the stage of selecting materials
It is important to choose a coating that will protect the surface from insects and minor damage. You need to be able to work carefully with small details so as not to spoil the original drawing. To restore furniture, you need a separate room, preferably not in an apartment. If this is not possible, construction covers are needed to protect the interior. During repairs there will be dust, dirt, noise and unpleasant odors.
This is another reason to look for a separate room where your family members will not be.
How to work in decoupage technique?
Imitation of artistic painting by gluing ready-made drawings on a paper or fabric basis is called decoupage. Simple techniques, similar to conventional appliqué, are also perfect for restoring old furniture with your own hands. To work even in the simplest version you need to prepare:
- drawing for decoupage (pieces of beautiful wallpaper, napkins, fabric or a printed pattern will do);
- glue and varnish with special markings, but you can use regular PVA and transparent acrylic varnish;
- acrylic paint;
- scissors;
- rubber roller;
- fine-grain sandpaper;
- additional decor (outline, sparkles, gold leaf or bronze powder, etc.).
After the primer has dried, apply a thin layer of glue to the “painting” locations. Place the motifs cut along the contour on the adhesive layer and smooth it with a roller, carefully removing air bubbles. After drying, sand the drawing around the edges and varnish.
Assembly and finishing
When the chair frame is updated and the soft parts are covered with new upholstery, all that remains is to assemble the structure. The basic rule is to reassemble in the same order as you disassembled. The legs and backrest parts must be installed in the same grooves where they were originally, so the structure will not lose strength. The plywood on which the seat is attached is usually screwed to the frame; in Viennese chairs, glue acts as a retainer.
Knowing all the stages of restoring a chair, it is not difficult to create a stylish and unique object using finishing from an unattractive piece of furniture. Simply by painting the chairs in pink, blue, or pistachio colors, you can get a bright color accent to the interior in the “fusion” style.
When updating old chairs, the decoupage technique is used. This operation is performed using glue, varnish and a pattern on a paper base; it is convenient to use napkins. The paper with the selected pattern is cut or torn into pieces, then these fragments are fixed to the frame and seat using glue, and after drying they are varnished. As a result, this piece of furniture is completely transformed and becomes an art object.
In modern interiors, designers often use one or two antique-style items. For this purpose, chairs of antique designs are required. First, they are painted with white paint, then a thin translucent layer of gold, bronze or silver paint is applied to the entire chair or its individual parts, depending on the surrounding environment and the decoration of the entire interior. The final stage is a layer of craquelure varnish. It creates small cracks throughout the coating, giving a luxurious touch of antiquity.
These chairs can be finished in the Empire style. The frame, painted white, is painted with gold paint along the carvings; on smooth elements, you can copy a suitable pattern with a pencil and paint according to this pattern with gold paint. In this case, the seat is covered with a shiny fabric - satin, brocade, velvet. The composition turns out to be very effective.
The Provence style is popular today. The frame is painted in several different layers. For example, green first, white on top. The top layer is rubbed with coarse sandpaper so that the green base shows through here and there, then covered with blue, and sanded again with sandpaper. Next comes another white layer using sandpaper. This creates a layered effect.
This method is used to artificially age an object, creating the impression of many years of use and faded color. For upholstery of soft parts, light fabric with a floral pattern is suitable. You can also make covers or pillows from this fabric.
At home, the traditional seating area is a stool. It should also be designed in a new way. To add national flavor, the patchwork technique has proven itself well. In this case, pieces of fabric suitable for the design are purchased, and it is better to recycle used items of clothing. The fabrics are cut into scraps and combined so that the pattern does not merge, and they are pasted over the legs and seat of the stool. Everything is varnished on top.
When choosing a chair design, you should use the entire palette of your imagination or take a closer look at existing samples in art catalogs.
Festive decoration of chairs
Any table can become a luxurious accessory for any celebration. Decorating furniture for the holiday is a fun and very inspiring activity. Every detail of the decoration complements the atmosphere of the celebration, creating a special festive atmosphere.
- You can entrust wedding design to a specialist or try to make the decor yourself.
- Traditional decorations used at weddings are flowers and lush bows.
- Homemade chair covers decorated with lush satin bows look luxurious.
- Of course, the decor must match the setting and style chosen for the celebration.
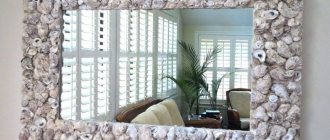
For traditional decoration, lace, silk, organza, bows, satin ribbons, artificial and fresh flowers are used. In a room decorated in a Mediterranean style, starfish, shells, blue-blue colors and accessories that support the nautical theme would be appropriate.
At an eco-style wedding, you can’t do without wreaths woven from living plants. In addition, flowers, branches and dry natural material are used.
By independently inventing decorations for a celebration, you can get a huge amount of positive emotions and create an environment that will exactly meet your expectations.
Do-it-yourself restoration of a wooden chair seat
There is no need to rush to move on to this stage of restoring chairs with your own hands. First you must wait for the glue to dry completely. Most chairs usually have a frame that is painted or varnished. If you want to transform it, then you can use the decoupage technique. Don't waste time while the frame dries. You can put it to good use and change the soft part.
Upholstery restoration
First you will have to remove the old fabric and stuffing. Inspect the wooden base very carefully - any defects found on it must be eliminated.
Next, you will need new foam rubber; you should attach the seat to it, trace it with a pencil and cut out a template with a knife. We do the same with upholstery fabric - having measured the shape of the seat, we cut out a new piece, not forgetting to include allowances for hems and the height of the foam. The fabric must be placed face down, foam rubber is placed directly on it, and the seat itself is placed on top of it. Now you need to stretch the fabric and align it well. We wrap the resulting allowances on the wrong side. Be especially careful in the corners of the seat - in these places you should lay out even folds, carefully bend the edges, and then secure everything well with a stapler.
If you do not have this tool, then instead of staples you can use small nails with a wide head.
Using a similar scheme, you can restore the upholstered back. Finally, the restored parts are attached to the frame. To do this, you must have metal corners and screws. At this point, the restoration of old chairs can be considered complete. Now you can continue to use the furniture, enjoying the result of your labors.
We use fabric
This material is used in various ideas.
To hide scratches and abrasions on an old chair, or to give a new one a different look, we put them in covers. It is possible to make “clothes” for both the upper and lower parts. You need to measure the parameters of the furniture, cut out rectangular or square covers in accordance with the figures obtained, and sew them along the marked lines. This option is convenient: you can make several sets, wash them, and change them according to the season or holiday.
Using the patchwork technique you have an excellent opportunity to hide small holes. You need to cut out colored squares (or other shapes) from fabric and sew them to the upholstery with a decorative seam (you can also glue them to imitate the presence of a large decorative seam). This way we get a fun patch and interesting decor.
If the above options are not suitable, you need to completely change the upholstery. We will look at this case in more detail below.
DIY chair decor
Original decor of chairs
Features of restoration of metal chairs
Unlike wood, metal chairs are more durable. If they break, they are more difficult to repair, and during restoration the product needs to be protected from only one “enemy” - corrosion. For metal, they buy a special primer and paint that have an anti-corrosion effect. Enamels are applied in several layers, and colorless compounds are coated in three to four layers. It is not recommended to use chairs and stools with a metal frame in kitchens and bathrooms, where the humidity level systematically increases. To remove the old layer of paint or varnish, the chemical treatment method is ideal for metal, since the material is not afraid of aggressive agents.
Features of decoupage
The method is distinguished by its relevance, simple execution, and results that exceed all expectations. The possibilities are so varied that any fantasy of the performer becomes a reality.
Each type of decoupage has its own peculiarity. But all of them will require a certain set of materials and tools for execution:
- photographs, napkins (special), glossy magazine clippings, printouts of thematic pictures, lace elements. In accordance with the idea, you can choose any option from this list;
- decoupage glue;
- sponge (roller) to smooth the surface;
- scissors;
- coating (varnish);
- tassels;
- material to remove excess glue;
- acrylic based paints;
- primer.
Seat update
While the wood frame is drying, work on the seat. Remove the upholstery from the upholstered seat. Look at the condition of the foam. Remove it if necessary. Cut out a new piece of foam and secure it to the seat using double-sided tape.
Place the old upholstery on newspaper and trace it with a pen. Cut out the pattern and transfer it to the new material. If the fabric is thin, make a backing for the foam from another dense material. Assemble the seat. Cover it with new fabric, securing it on the reverse side with staples from a furniture stapler.
Renew a dried out wooden chair frame. Remove the old varnish coating from it using a sander and sandpaper. Fill any old chips with wood putty. Prime the surface, and after drying, apply several layers of varnish with intermediate drying. Place the seat back into place.
Ready-made products
At a hardware store you can purchase stencils and stickers for furniture decor. Artistic talent is not given to everyone, so this solution is ideal for those who want to improve their furniture as quickly as possible.
Using a stencil and paint, the damaged area can be quickly masked, or the damage can be hidden with a sticker. The advantages of this method are speed. You don't need any experience to decorate furniture this way. It will suit everyone.
The downside is that without proper fastening, such decor is only a temporary measure if it is not fixed with varnish.
In addition, it is not so easy to find from the assortment of ready-made solutions something that is suitable in size, color and texture at the same time.
Method 2. Seat reupholstery
Most often, if a chair has a soft seat, then painting the frame is not enough to completely update it - you need to change the upholstery. Here are some photo examples of how reupholstering a seat can turn an old chair into a stylish piece of decor.
Office chair before and after painting, replacing the back and seat upholstery
By the way, if your chair or stool does not have a soft seat, then you can make it yourself: first cut the MDF base exactly to the shape of the seat, then follow our master class, upholster it and, finally, screw it to the chair frame with self-tapping screws.
To make a soft seat for a stool, just glue the foam rubber directly to the base, and then cover it with fabric, driving staples into the inside of the seat.
Stool with homemade upholstery
To work you will need:
- Anti-stapler (or its alternative);
- Furniture stapler and staples no higher than the thickness of the seat base;
- Textile;
- Foam rubber about 4 cm thick;
- Batting or padding polyester;
- Scissors;
- Serrated bread knife (with teeth);
- Screwdriver.
How to reupholster a chair with your own hands:
- First we need to remove the seat from the chair frame using a nail puller or a screwdriver.
- We remove the old upholstery using an anti-stapler and remove the filling if it is worn out (if it is in good condition, then it can be reused). Next, wipe the base of the seat from dust and dirt.
If the wooden base of the seat seems too old and unreliable, use it as a template to cut out a new seat from plywood.
- We place the seat on the foam rubber, trace its outline and cut it out.
- 1
- 2
- 3
- We cut the fabric and batting in such a size that they can be wrapped around all sides of the seat (along with foam rubber), leaving 10-15 cm free. This excess is needed to make it more convenient to stretch the material.
- So, we have four blanks: base, foam rubber, batting/sintepon and fabric. Now we need to put it all into a sandwich. First of all, we spread the batting, put foam rubber on it, and on the foam rubber - the base of the seat, wrong side up. Next, we simply fold the edges of the batting onto the seat and, slightly stretching the material, fix it with a stapler. The corners of the batting can be cut off, or you can simply bend them and fasten them in the same way.
How to restore a chair seat
- Once all the batting is attached to the seat, trim off any excess batting.
If desired, the foam rubber can be pre-glued to the base or stapled around the perimeter, retreating 5 mm from the edge of the seat.
- The most crucial moment has come - the stage of reupholstering the seat with fabric. Spread the fabric with the wrong side up and place the seat on it. Next, fold the edges of the fabric along one side and secure with a stapler. Now lightly stretch the fabric over the opposite side of the seat and secure it with a stapler.
- 1
- 2
Repeat the procedure on the remaining two sides and start decorating the corners - they need to be wrapped as shown in the photo below.
Chair after restoration
- We return the seat to its place and fix it with the “original” fasteners.
Helpful Tips:
- The soft seat of the chair can be additionally decorated with furniture nails around the perimeter.
- The upholstery fabric should be selected in accordance with the style of the chair. For example, traditional jacquard fabric is not suitable for a modern chair, and a classic chair with an elegant back is unlikely to “make friends” with fabric with a newfangled geometric print.
- The same fabric from which your curtains are made is ideal for upholstering a chair. In the interior, such a coincidence will look very harmonious.
- The print on the fabric can echo the carved crossbars as shown in the photo below.
For a more visual master class on upholstering the seat of an old chair, watch this video.
Progress
Cleaning, washing and drying the product
Restoration begins with cleaning the frame and seat. It is necessary to wash all parts with any gentle composition using soft cloths and sponges. It is important to do this as quickly as possible so that the natural wood does not get wet. Then dry the stool completely in natural conditions, away from heating devices.
To wash the stool, you can use soft napkins to avoid scratching the surface.
Removing old paint
To completely renew a chair or stool, it is necessary to clean the frame of the old covering.
There are several ways to remove paint or varnish:
- Mechanical. Using a sander or sandpaper of different grain sizes.
- Chemical. Some paint can be removed with acetone or factory remover. If necessary, re-process.
- Thermal. Using a hair dryer. When exposed to hot air, old paint or varnish becomes blistered and easily comes off the frame.
Chemical remover will soften the coating
Product repair
When disassembling a chair, the parts of which are fastened with a tenon joint, act carefully, trying not to damage the fastening points. To do this, you can lightly tap them with a hammer and try to loosen the tenon. When the chair is disassembled, use a chisel or knife to remove dirt and glue residues from the grooves. The elements are coated with casein or flesh glue, assembled and clamped with a clamp for 3 hours.
Types of tenon joints
Repairing a chair may involve the following steps:
- When loosening a bolted connection, you can place a metal or plastic washer under the nut, and then tighten the nut tightly.
- You can ensure a tight fit of the wooden fragments to the eyes by increasing the missing volume using thin pieces of wood.
- If a tenon breaks, a new part will need to be made.
- If the upholstery or soft filling is damaged, they are completely replaced. This stage can already be attributed to decorative design, since you can choose absolutely any color of the upholstery, design of the back and legs of the chair.
Tape (belt) clamp
Note! When choosing a design option for a chair during its restoration, the properties of the material from which it is made, the density of the wood, and its texture are taken into account.
Upholstery of an upholstered chair seat
In Soviet-made chairs, softness was ensured by a durable jute backing. Now other materials are used that caking less and do not lose shape when exposed to heavy objects. In addition, jute is expensive.
New seat backing products use:
- thin furniture foam;
- padding polyester;
- batting;
- coir is a material made from the nut of the coconut tree.
For upholstering chairs at home, foam rubber up to 5 cm thick is best suited for the backing. The top covering is made of any dense fabric.
Work algorithm:
The foam rubber is cut out strictly according to the shape of the seat. Coat the base and foam rubber with glue. If this is not done, over time, bulges will appear on the surface of the chair, and the backing will bunch up to one edge.
Connect and press the backing and the seat, allow the glue to “set.” Thin batting is stapled around the perimeter of the base.
Cut the fabric so that when stretching there is a margin of 5-7 cm on each edge of the seat.
The fabric is attached to the front and back of the seat from the bottom. Use a stapler. The upholstery is carefully straightened at all stages of work to prevent the formation of wrinkles.
When the covering is leveled, nail the material on the left and right sides of the seat. At the last stage, the upholstery is stretched and secured in the corners. Special care is required. Incorrectly driven staples are removed and the process is repeated.
To get the best result, upholstery fabric is nailed on top of the foam rubber and only then the finishing fabric.
When working with nails, additionally place a tape of thick fabric under them. Using a stapler eliminates the need for additional materials.
Painting a chair
Even the most old-fashioned or simply ordinary chair, say, a “Viennese” wooden, plastic, folding or office chair, can be transformed by painting. The main thing here is to choose the right color. Here are some inspiring examples where color alone saved furniture from ending up in a landfill.
Viennese chair before and after coloring
Folding chair before and after painting
Chair before and after staining
Chair before and after painting
Old Viennese chair before and after renovation
A few more examples of remaking the most common Viennese chairs made of bent beech, which can be found in almost every home or cottage.
Here are some cool ideas for painting stools.
Inspired? Then let's get to practice!
To paint the chair you will need:
- Acrylic paint, or preferably chalk paint, in one or more colors;
- Synthetic flat brushes (separately for primer, paint and varnish);
- Protective gloves (better to buy at a pharmacy);
- Primer for wood/metal (depending on the frame material);
- Wax or matte varnish (polyurethane or acrylic);
- Medium to fine grit sandpaper.
How to paint a chair with your own hands:
- Prepare the chair for painting: wash it to remove any rough dirt and dust, then sand it with medium-grit sandpaper to remove the top layer of old varnish or paint. The surface should be slightly rough.
- If you want to update a metal chair, then it is not necessary to sand it (although it is safer to sand off the top gloss), but before priming/painting, the frame must be degreased with white spirit.
- Also, you can avoid the tedious sanding step if you use chalk paint, but you won’t be able to do without a primer.
- If your chair is varnished, it can be removed with a special varnish remover.
- If the chair has any damage, such as scratches, chips or cracks, fill them with furniture putty.
- Wipe the chair from dust, wait for it to dry and apply two layers of primer to the entire frame, allowing each layer to dry for about a day. Between layers, it is advisable to sand the primer with fine-grained sandpaper (no. 220 is suitable).
- Take a new brush and paint the chair in 2-3 layers, allowing each layer to dry completely. Make sure that the paint does not smudge.
- If you want to paint a chair with a distressed effect, then first apply a dark paint, say dark gray or dark blue, to some places (for example, the edges of the seat, back and armrests), and then cover them with wax. Next, you should paint the chair with the main paint in 2-3 layers. And finally, lightly work with fine-grained sandpaper to expose the dark “substrate”.
- Do you want to achieve the effect of a perfect factory paint job? Then be patient: each layer of primer and paint (except for the finishing layers) will have to be sanded with fine-grained sandpaper. This way the coating will be as smooth and reliable as possible.
- To paint only certain parts or parts of the chair, use masking tape.
Treat the chair with wax or matte varnish. Voila, your “four-legged friend” has found a new life!
Helpful Tips:
- Don't know what color to paint your chair? You can't go wrong if you paint it white, because this color is the most versatile and goes well with any bright upholstery;
- Before painting, you can glue the stucco decor to the back of the chair using wood glue;
- You can achieve the effect of a very old and dirty Provence style chair using dark brown wax;
- Chalk paints are a relatively new type of paint that are not yet widely available. However, we recommend using it, because due to its thickness, increased adhesive properties and super-fast drying (in 30 minutes), it saves a lot of time and effort. In Russia, you can purchase chalk paints from designer Daria Geiler, and in Kazakhstan – from Vernenskaya Manufactory. You can also always order paints from foreign manufacturers - Annie Sloan and Rustoleum.
This video master class will help you better figure out how to paint an old chair with your own hands.
Decoupage technique
Decoupage allows you to hide unevenness and damage to the surface of the chair. In addition, you can choose a print to match any chosen style from Provence to techno.
The technique involves covering a chair with paper or fabric and then covering it with several layers of transparent varnish.
Decoupage with paper
The structure of the paper makes it easy to paste over not only flat, but also curved surfaces, including chair legs.
Work algorithm:
The chair is disassembled and treated with sandpaper, achieving the most even surface possible. Degrease.
If necessary, furniture is painted. If the chair is dark and the background should be light, it is first painted white, then in the chosen color.
Cut out the part of the picture you like. Lubricate the chair with PVA furniture glue and apply the cut out design.
Smooth the paper, achieving a perfect fit. Use rollers or soft cloth. If necessary, the paper is moistened with water to make it softer.
After drying, apply a new thin layer of glue over the design. Decorate with paint if necessary.
The final finishing consists of applying 3-4 layers of clear varnish. Each layer must dry completely.
To decoupage small surfaces, for example, legs, the paper is torn into fragments up to 10 cm in size. You can paint it with paint in the general style.
Decoupage with fabric
Decoupage with fabric is only suitable for seats and backs of chairs; legs cannot be processed.
Operating procedure:
The chair is disassembled and the surface is prepared. The fabric is laid out on the table. Place the seat and trace the edges with a marker or pencil. Make a pattern, departing from the intended line about 2 cm.
Cover the seat with glue: PVA or special for blending. Glue the fabric, carefully level it, remove folds and air bubbles. Apply a layer of glue on top of the fabric.
After complete drying, the material should become rigid. Using a stationery knife, cut off excess fabric strictly along the edges of the part to be pasted.
Apply another layer of glue to prevent premature wear and the appearance of fringe along the edges.
Decoupage with fabric ends by applying 2-3 layers of transparent varnish.
Working with the seat
If the chair seat is hopelessly damaged, it needs to be replaced:
- The easiest way is to remove the old one, trace it on a sheet of new plywood and cut it out with a jigsaw;
- the seat is usually screwed to the frame; in Viennese chairs it is fixed with glue;
- sand the uneven areas.
Master class on working with upholstery:
- Remove the seat from the chair frame, helping yourself with a nail puller and a screwdriver. The old upholstery is removed, the worn-out filling is removed, and the base is cleaned of dust and dirt.
- Place the seat on the foam rubber, carefully trace the outline, and cut it out.
- If the old fabric and batting backing are preserved, they are traced like patterns on the new fabric and padding polyester; if not, then they are cut so that they can be wrapped around a seat with foam rubber on all sides, leaving 10–15 cm free at the edges. They are needed to stretch the material well.
- All the blanks are folded - foam rubber is placed on the padding polyester, the base of the seat is placed on top with the wrong side up, the edges of the padding polyester are folded over the seat and, slightly stretching, they are fixed with a stapler, and the corners are cut off or, bending, fastened. The excess is trimmed off.
- The foam rubber can be glued to the base in advance or stapled along the entire perimeter, departing 5 mm from each edge.
- The covering material is spread out with the wrong side up and the prepared seat is placed on it, the edges of the fabric are folded on one side, secured with a stapler. Pull it slightly onto the opposite side of the chair seat and also fix it with a stapler. Repeat the operation on the remaining two sides, carefully shaping the corners.
- Return the seat to its place, securing it with the same fasteners.
If a soft seat was not initially provided for in the chair, it can be made into one using the method indicated above - by removing it, gluing the foam rubber and covering it with material, hammering the staples from the inside. The same technology is used to reupholster a chair with a backrest. But to disguise the staples on the back side of the back, they use fabric with a sewn-in edging to match the main fabric.
As you can see from the information above, restoring a chair yourself - old but durable - is not at all difficult. Sometimes it is enough just to update the surface by painting or reupholstering the soft part to make the item look neat and attractive. The result can be a truly unique piece of furniture that will perfectly match the interior.
Back restoration
To make the seat back very soft and comfortable, you need to use a compacted type of cardboard or thin plywood sheet that has exact and similar dimensions.
At the same time, plywood and foam rubber must also have the exact dimensions of the back of the chair. But the batting and upholstery during installation should have a small release tolerance of about five centimeters, but no more.
Also, to decorate the back of the chair, you need to install a pre-selected fabric for upholstery. It is stretched face down, and a piece of plywood is installed on its upper part.
The entire finished surface should not have any roughness, flaws or bumps, it should be perfectly smooth and even, and all excess should be cut off with a knife. After this, process around the entire perimeter of the seat and back, using braid or cord to hide all visible seams.
- Unusual interior design - photos of current design innovations for 2020
- Design of a room for a teenage girl in a modern style: 85 best photos of interior ideas
- Moroccan style apartment
Paint coating of chairs
What is a favorite chair? These are wonderful moments of returning to childhood... Or the memory of a loved one... Or even a chair can be a family heirloom, passed down from generation to generation. Or something else, but so dear that you don’t want to part with it.
But, unfortunately, a thing cannot last forever. Scratches appear on the furniture, the varnish cracks and peels. The appearance, alas, becomes unpresentable. However, restoring old chairs with your own hands will help preserve the item for some time.
Often, before varnishing a chair, it is necessary to completely remove old paint or varnish. This process requires patience and perseverance from the master. But the payment for labor will be fully consistent with the efforts invested.
Tips for decorating chairs
To radically change the appearance of the chair, you will have to arm yourself with:
- Screwdriver;
- Drill;
- Pliers;
- Construction stapler.
Ideas can be quite simple or more complex in execution. You need to rely on your own skills in working with the tool. Anyone can realize an interesting idea and create decor with their own hands.
When starting to update old furniture, you first need to understand what material it is made of. Then decide whether a light repair is enough or whether it is better to replace the upholstery completely.
Causes of breakdowns
Before you look for how to glue a wooden chair together, you need to understand what caused the breakdown. This type of furniture consists of many parts that are attached with glue. Over time, the joints become unstuck. It happens that the legs move away from the harness. They are usually attached using spikes.
Some products may have manufacturing defects. A man sits on a chair with wooden legs and falls because one of the legs falls off. Don’t think that furniture is no longer usable and should be in a landfill. Breakdowns of this type can be easily repaired with your own hands without spending a lot of money on repairs.
Restoration of a chair with seat upholstery
Reupholstering the seat is quite simple. After the layer of old upholstery and stuffing has been removed, you need to cut a piece of plywood that will become the base. You can make a pattern using the seat measurements and use it to cut out all three layers. Foam rubber is fixed on top of the plywood. Based on the size of the seat, a piece of thick fabric is cut out for covering. At the same time, do not forget to leave reserves for bending the material. Now all that remains is to fix the upholstery fabric to the seat.
Previously, special furniture nails (miniature ones with push-button heads) were used for this work, but now staplers with staples are more relevant. The backrest is made using the same algorithm: a base made of plywood, then padding, and the procedure is completed by fixing the upholstery material. If the seat is equipped with springs, then a layer of batting is placed in front of the foam rubber. Chairs that are upholstered in the same material as the curtains or rug in the room look stylish.
Decorating chairs
Sometimes it makes sense to radically change the color scheme of furniture. Chairs painted white or gold look very creative. Often craftsmen choose other colors for the wooden part of the chair: blue or light blue, pink or bright red. But then the upholstery should be pure white or with golden ornaments. The elegance of this design transports people to the times of Catherine the Second, reviving palace luxury.
White furniture can be decorated with gilded ornaments, simply drawn or made in the form of a bas-relief. Blanks for this type of decoration can be purchased in stores or cast yourself from plaster and glued on. Restoring and decorating chairs with your own hands in an antique style will add charm and originality to the design. Sometimes the edges of the upholstery are decorated with beautiful braid and tassels.
Chairs painted in a cubic style will also change the image of the room. And some will prefer floral or plant colors. In any case, surface coating will protect the item from corrosion and increase its service life. Therefore, the practical benefits that such a DIY restoration of chairs will bring are also obvious.
What to choose as a filler?
Most often this is sheet foam rubber. It comes in different thicknesses, the optimal thickness being 4-5 cm. You can use padding polyester as a lining between the fabric and foam rubber.
This method will simplify further stretching of the fabric and eliminate unnecessary folds.
- DIY cornice: a detailed description of how to design and decorate a stylish interior element (80 photos)
DIY folding chair: 110 photos, drawings, diagrams and sketches of convenient and easy options for creating portable chairs
- Do-it-yourself pouf: step-by-step instructions on how to build a stylish and original interior element with your own hands (105 photos)
Decoupage technique for the design of an old chair
This technique will help turn monotonous stools into original and beautiful objects that will decorate the main interior of the house. To create a design you will need napkins, fabric with a pattern, you can use leather appliqués. If you can get to the store, you can buy special cards for such equipment.
After you sand the chair, you need to seal all the cracks with putty and cover everything with water-based emulsion. Cut out the picture, apply glue and attach the drawing. Gradually you need to move from the center to the edges, thereby smoothing out the pattern. Let the surface dry and then varnish it.
Restoring an old chair with your own hands is not that difficult. The main thing is to do everything step by step
An old product can look like new if you pay attention to its design. You can paint it, make different upholstery, sew covers or use different design techniques
Then the chair will not only perform its functions, but will also become an addition to the interior of the room.
Don't rush to throw away old things. They can be useful for restoring an old stool. We've looked at different options for stool designs that anyone can make.
Benefits of working independently
By updating an old chair and making it modern, you benefit in two ways:
- You have the opportunity to change the image of the furniture to whatever you want. At the same time, adjust it to the main shades of the interior. And you don’t need to look for similar furniture in stores at all.
- Save time and money. Furniture restoration is often carried out using improvised means. Even the costs you incur for purchasing consumables are only 20-30% of the cost of a new chair.
Interesting: Restoring old furniture in a modern way
Important: before you begin decorative restoration of wooden chairs, be sure to check all fasteners. Tighten loose bolts or replace them with new ones. If there are cracks, chips, or debris, they need to be sealed decoratively. To do this, use special carpenter's wax. It fills voids in the wood, hardens and looks like an integral part of the chair.
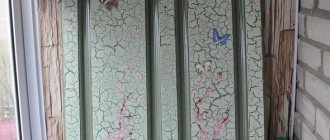
Craquelure
Complex coloring with a network of cracks on the surface is called craquelure. This way you can transform chairs, refrigerators, radiators, and any other old furniture and equipment. You only need special paint and varnish.
First, the surface of the chairs is painted or pigmented with a dark color, and then covered with light or colored paint. When both layers are dry, apply craquelure varnish on top, under which the top layer will crack. This is a two-step craquelure, but there is also a one-step one, when the base itself is visible in the cracks, and not the bottom layer of paint.
Ways to decorate chairs
There are decorating methods that won’t take a lot of time and money.
- For example, furniture covers, fabric headbands, artificial flowers and wreaths. This decor can be changed at any time; in addition, fabric or floral decor can be purchased ready-made.
- Long-lasting decor is painting or decoupaging chairs, which will breathe new life into old furniture.
Even without the skills of a furniture maker, you can update or decorate furniture by choosing the most suitable method. To do this you need to define:
- What is decor used for?
- How often will the decor need to be changed?
- What available materials are available?
Scuffs and brushing
The easiest way to make shabby furniture look stylish and eye-catching is to age it even more. Such chairs will complement classic interiors, Provence, boho, shabby chic, Scandinavian interiors and even loft. The fashion for retro and antiques regularly returns with short breaks. To make ordinary decorative abrasions, first paint the chair with colored paint: bright or pastel, to match your interior. After drying, thoroughly treat the surface with wax or paraffin and cover it with another layer of paint of a different color on top. As you begin to remove the wax with sandpaper, the bottom layer will begin to show through. The technique of creating real mechanical abrasions on wooden furniture is called brushing. First, choose and mark the places where they will look as natural as possible - corners, edges, edge of the seat, protruding reliefs. Brush the surface with a stiff wire brush, which will remove old paintwork and soft wood fibers.
Methods and types of restoration
Restoration in the literal sense of the word means returning an object to its original appearance without making any unauthorized changes. Such work is carried out by restoration specialists who have years of training behind them. They are trusted to restore rare art objects. In our case, “home” restoration allows for changes to be made to the design of chairs that were not previously included in the design.
The goal of this process is to create an original interior element, and not to restore authentic furniture. A variety of techniques are used during restoration. For some stylistic decisions, only a certain method is suitable, while others use a competent combination of techniques. One of the striking examples is furniture for the Provence style. To update an old chair, they combine painting (mostly in light colors), decoupage techniques and craquelure. The most popular restoration methods include the following techniques:
- Painting. The fastest and least labor-intensive way to restore chairs. Depending on the type of paint, the surface can be given a glossy or matte shine.
- Craquelure. This is a technique for artificially aging the surface, imitating “worn-out” wood.
- Decoupage. A popular technique for transferring images from paper (postcards, napkins) to the surface of a chair and then fixing the image with varnish.
- Artistic painting. Applying original drawings and patterns to the prepared surface of the chair. You can be guided only by a flight of fancy or use ready-made stencils.
- Adhesive films, tapes. Stick directly onto the chair. Their surface imitates the texture of natural materials: stone, wood, leather.
- Veneering. The chair is covered with thin sheets of veneer (cut wood) with an original texture. Additionally, the decor is secured with varnish.
- Lamination. The technique is similar to decorating using adhesive films or veneer, but the sheets are fixed not with glue, but with synthetic resins, which are pre-coated with the back side of the decorative paper.
- Inlay. Decorating a surface by attaching parts from other materials to it. For wooden chairs, pieces of marble, ornamental stones, mother of pearl, metals, and ceramics are used.
- Painting with a “scuffed” effect. It is carried out in two stages. First, the surface of the chair is partially covered with a layer of dark paint. She is allowed to dry. After this, they are additionally coated with wax. Now the entire product is painted in a light tone. After the composition has dried, the “darkened” areas are thoroughly sanded, exposing the lower layers of wax and paint.
Of course, the list is not limited to these methods. Chairs can be decorated using pieces of old leather, fabric, small fittings, and carved elements made specifically for this furniture.
List of materials and tools for restoration
Before starting work, it is necessary to assess the condition of the furniture and identify problem areas - damage to body elements, deterioration of the paintwork or unusable connecting components. After this, you need to draw up a restoration plan - repair or replace parts of the chair, restore the protective layer or improve the fasteners. Usually these works are performed in combination.
Depending on the type of restoration measures, the optimal set of tools and consumables is selected. The minimum configuration should include the following components:
- screwdriver or screwdriver;
- furniture stapler;
- hammer, jigsaw, grinder;
- a sheet of plywood, preferably four-layer;
- varnish and stain;
- set of brushes;
- clamps for fastening chair elements;
- screws, self-tapping screws.
For better connection of parts, it is recommended to purchase special wood glue.
Tools
There are many designs of chairs, but the basic set of tools remains the same. It is possible that something special will be required to make a particular model, and not everything from the list below will be used. In any case, a master who professes the “do it yourself” principle will find a list of the most popular tools for woodworking useful. It will allow you not to waste a lot of time looking for any “little things”.
You should have on hand:
- varnish;
- brush;
- drill;
- ruler;
- roulette;
- plane;
- hammer;
- chisel;
- screwdriver;
- pencil;
- screwdriver;
- drill 5 mm;
- hacksaw (saw);
- electric iron;
- furniture stapler;
- sharp shoe knife;
- wood glue (PVA glue);
- jigsaw (or regular jigsaw);
- clamps (clamping devices);
- grinding machine (sandpaper);
- mallet (wooden or rubber carpenter's hammer).
In addition to chipboard, the following consumables may be useful:
- furniture thrust bearings;
- edge processing tape;
- staples for furniture stapler;
- dowels or corners for the seat;
- foam rubber, as well as fabric or leatherette;
- confirmations and self-tapping screws of various sizes.
Replacing the soft seat
Before restoring the chair, you must then wait until the glue has completely dried. Then the product can be painted, varnished, decoupaged or decorated with painting. Everything will depend on the desire and imagination of the owner.
If your chair has a soft seat that needs replacing, now is the time to start. First you need to remove the old fabric and padding. If there are defects on the wooden surface, they must be eliminated.
Markings should be made on the new foam rubber. The old seat is applied to the foam rubber and outlined with a felt-tip pen. To cut evenly, you need to take a sharp knife. Then make a pattern on the fabric, taking into account allowances for hems and foam. Next, lay the pattern out face down on a flat surface. Foam rubber is placed on top, and then the seat. The seam allowances need to be turned to the wrong side, pulled tight and aligned with the front side. Align the folds at the corners, fold the edges and attach the material using a stapler. If you don’t have it on hand, you can use small carnations with wide heads. Secure the updated seat to the frame with metal corners and screws. If the chair has a soft back, then it is restored in the same manner as the seat.
A completely restored and transformed chair will serve its owners for many years.
Stool in the kitchen
When purchasing stools for the kitchen, you need to ensure that their “appearance” does not bring disharmony into the interior of the room. This will not happen if the size of the stool is taken into account when purchasing the product. For example, it must match the size and design of the table so that the table and stool form a single ensemble.
The color of the furniture pieces is also important, as they would decorate the overall design of the kitchen with their color scheme. When selecting, it is necessary to take into account the material of the product. If, for example, the apartment is decorated in a high-tech style, then kitchen stools with soft seats are definitely excluded.
When determining the quantity, you need to proceed from family needs (or from the number of family members). The main thing is that the pieces of furniture do not “capture” the entire space of the room. Their placement also depends on appearance.
Preparing tools
Having determined the degree of wear of structural parts, you need to stock up on the necessary tools. Let's try to figure out what is needed for repairs.
To strengthen the frame, you will have to acquire a chisel, wood glue or PVA glue, and wooden blocks to replace furniture tenons or spacers. Spikes are used to fasten frame parts.
If the legs of the chair are loose, the tenons must be removed, coated with glue and inserted into the structure, after which the elements must be fixed for several hours. At home, you can use a regular belt to tie parts together.
Chairs can be varnished, stained or painted. To remove the damaged coating, you need to sand the surface of the chair - it is not necessary to completely remove the old layer of paint or varnish, just level it. Here you will need coarse and fine sandpaper or a sanding machine. When completely changing the design, it is worth using a special composition that dissolves the paint - technical acetone.
After preparing the frame for new painting, you need to apply a primer under the paint - usually it is gray or white. Paint and varnish materials will be required. They are selected depending on the conditions of use, whether this household item will be exposed to adverse effects from moisture, steam or sun. Instructions are included with each coloring product. After reviewing it, choose the appropriate one.
Before varnishing, to preserve the wood, it is treated with stain, wax or oil. These furniture products come in a variety of colors to match the different colors of natural wood. After covering the frame of a wooden chair with a water-based stain of the desired color, a layer of varnish follows; when using a polymer-based stain, varnish coating is not necessary.
Next you have to decide what the seat finish will be. If it is a hard seat, then we paint it according to the same rules as the frame. If you have to deal with a soft seat, you need to stock up on foam rubber and fabric for upholstery. A furniture stapler with appropriately sized staples will come in handy here. The fabric can also be secured using special furniture nails and a hammer.
When working with a spring block, it may be necessary to replace the springs or the entire block. You need to ask in advance if these materials are available for repair work or if you need to change your strategy and abandon springs in favor of foam rubber.
Work process
Using a spatula, the old paint is removed, then the surface is sanded, first with coarse-grain sandpaper, then with fine-grain sandpaper. After which the stain is applied.
After 5-6 hours, excess stain is removed with a sponge, and paint is applied to the surface. After drying, you can rub it a little with fine sandpaper to create that same antique effect.
Worn areas can be left unpainted, or you can apply paint of a different shade and soften the transitions by rubbing it with sandpaper. The result is fixed with furniture varnish.
Detailed instructions for beautiful furniture decor will allow you to choose the most suitable way to add newness and freshness to your interior items.
Even the most old-fashioned item can be turned into a masterpiece using only available tools and a little time to spare.
For the most part, the longest process is drying, which requires no intervention. Otherwise, you can get an exclusive design for any piece of furniture only with the help of available materials, imagination and patience.