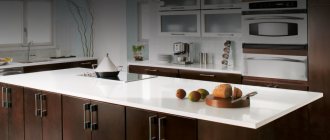
Hi all! Today we will discuss with you the euro-cut tabletop - what it is, what are the pros and cons, whether it can be done with your own hands, and how to make a similar project.
Countertops are multifunctional structures. Especially in the kitchen. After all, here it acts as a working area, performs decorative functions, and serves as a stand for various equipment, dishes and household items.
I think many people are familiar with the problem when the tabletop material swells and changes its size and shape under the influence of moisture and heat. This is largely due not only to the quality of the product, but also to the assembly.
The countertops come from the factory in a straight shape. But often you want to make the kitchen L- or U-shaped, or increase the length of the work surfaces. In this case, it is necessary to connect several elements into a single structure.
Tabletop connection
Required Tools
Whatever the type and color of the plank for the countertop and the countertop itself, it will have to be carefully installed. Connecting a pair of chipboard panels together is the only option for obtaining a corner structure. For work you will need, in addition to the bar itself:
- a pair of clamps (ties) for the tabletop;
- silicone-based sealant (colorless composition is recommended);
- household electric drill;
- metal saw;
- metal drills;
- Forstner drills of various sections;
- Phillips screwdriver or screwdriver;
- 10mm wrench;
- pliers;
- stationery pencil (the hardness of the lead is not important);
- a soft scrap cloth to wipe off excess sealant.
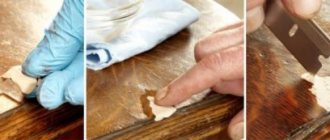
Technology
Let's say you need to join a pair of chipboard panels at an angle. In this case, a “no segment” connection can be practiced. Simply place 2 sections on the kitchen cabinet at right angles. But docking “through a segment” can also be made. This solution is more cumbersome. They resort to it so that they can install a corner cabinet.
In any case, the joint should be as tight as possible. The smaller the gap separating the ends, the better. Of course, it is difficult to achieve such a result on oval or rounded countertops. But even in this case, it is not necessary to call installers. You can simply install a special corner connector - its cost is much lower than the cost of the services of a specialist (who, moreover, will most likely buy a similar product).
A more aesthetically pleasing option for installing prefabricated countertops is to attach them using the so-called Euro-sawing method. This approach is suitable for products regardless of the edge shape. In such a case, the plank will have a more auxiliary and decorative role. It will only provide additional reliability for the connection of elements. The main fixation will be done by sealant and wood glue.
But euro saw is rarely used due to its high cost. In most cases, functional joining profiles are still used. Before marking the positions of the clamps, you need to make sure that the fastening will not interfere with the installation of the equipment in the countertop. And not only appliances, but also built-in sinks.
Another circumstance is that even if there are several ties, the prefabricated product will definitely be inferior in rigidity to the monolith. Therefore, the tabletop at the bottom will have to be firmly supported. After marking the screed points, the connecting strip will need to be attached to the end of the tabletop. Next, future new slots are marked with a pencil. A metal saw will help you make cuts along the lines.
Next, the internal excess is broken off with pliers. Using a hacksaw, saw off the plank to the desired size, leaving only a margin of 1-2 mm. The last thing to worry about is the reliable immersion of the screw heads. They should fit flush into the bar; if this is not ensured automatically, resort to additional countersinking. Next steps:
- using a 35 mm Forstner drill clamped in a drill, knock out blind holes to a predetermined depth, which guarantees the placement of the clamp pin exactly in the middle of the thickness;
- Having prepared blind holes, make 8 mm holes in the tabletop for studs;
- for the sake of increased accuracy, this hole is passed sequentially with a pair of drills;
- open longitudinal grooves are prepared in the countertop;
- tighten the connecting strip on the tabletop with self-tapping screws;
- cover the strip with sealant;
- insert the pin into the groove and into the hole of the mating part;
- evenly (one by one) tighten the parts of the tabletop with a wrench;
- As soon as the sealant begins to stick out, stop tightening and wipe the stain with a cloth.
Features of connecting strips for countertops in the video below.
Stages of work
When performing a Euro joint, you should not rely only on a photo, drawing or video instruction. It is recommended to carefully study this issue, look at reviews, recommendations of experienced people who have already walked this path. When you have received enough information on how to perform a euro saw, you can get to work.
In the case of joining elements with ties, it is recommended to initially secure all parts.
The process is divided into several stages.
If you do the Euro joint yourself, you must first buy a tabletop that will have a small margin in length. This need is explained by the installation features of the kitchen surface. Once the joint is formed, the slab will need to be cut.
When all the work is completed, you should let the sealant dry, and then remove dirt from the joints and finish the white or dark surface.
Trapezoidal corner design
This joining method is quite reliable and simple to implement; a special aluminum part is used for implementation. If you have the necessary tools, you can install the profile yourself or order the work from professionals.
If you don’t rush and do everything according to the rules, then the efforts to implement your plans won’t make you worry. The only downside is the presence of protruding elements in the form of a special device.
What is Eurobutt
Euro-sawing is one of the methods of hidden joining with the preliminary creation of a pattern. The work uses a milling machine. The manufacturer, in an effort to save money, performs the work on a cutting table.
The price is getting lower, but the quality still needs to improve. The difference in the height and radius of the ends reaches a millimeter or more.
It is almost impossible to disguise such a seam. If a manufacturer or seller unjustifiably reduces the price of a countertop, you should take a closer look at it.
It is possible that for the next 5-10 years you will have to admire not the smooth surface, but the jagged and uneven joints visible from afar.
If the ends are processed properly, a drawing is drawn up in advance, a pattern is developed, the surface will be almost uniform and smooth. The width of the gap will not exceed tenths of a millimeter. It will be difficult to find it on a dark or bright stove no matter how hard you try. The main condition is the use of a milling machine, not a cutting machine, and new patterns.
Disadvantages of Euro saw
Everything is clear about the advantages of the Euro junction. The owner receives a perfectly smooth surface without nicks, cracks, or discrepancies. But do not forget about the disadvantages:
- The tabletop is given a certain shape. You won't be able to change its configuration depending on your mood. It will not be possible to rearrange the set along another partition. Even laying a new apron won't help. The exception is absolutely identical walls;
- partitions and apron should be smooth, corners should be correct. Otherwise, the slab will not adhere closely to them. It will not be possible to eliminate the gap by moving the furniture. A small discrepancy is masked by the cornice, a large discrepancy will be visible.
Attention is paid to the alignment of the walls if the set has the shape of the letter “P”. A lot of time and money are spent on eliminating gaps
If the walls have significant unevenness and it is not possible to obtain smooth surfaces, choose other types of joining parts that are not so demanding on the environment, for example, using an aluminum profile and silicone sealant.
The advantage of this joining method is water resistance.
This is important when installing a sink
And after 10 years the surfaces will not swell and will retain their original appearance. Eurozapil is not the best option for rooms with high humidity.
Expert opinion Maria Vasilievna Mikhailova Manager of a furniture store. Knows everything about comfort and interior design
Plastic or acrylic are not afraid of water, but chipboard or MDF will swell very soon. This can be avoided by treating the ends and cuts with plumbing sealant before assembly.
Trapezoid - the best way to design a corner
Important: making a trapezoid yourself without sufficient experience is almost impossible, and factory modifications are expensive. But this is practically the only acceptable way to design and work out the working angle
Doing Euro-sawing at home with your own hands, as experts say, is possible, but only if you have the necessary tools and the appropriate skills. Installing an aluminum profile is a simpler option.
No professional skills are required for installation. The main thing is not to rush, look at different methods of joining.
Before cutting an expensive slab, make a model from cheap material.
If you don’t want to have protruding elements on the work surface, you’ll have to work on a Euro joint or cut. On one of the parts to be joined, the end is processed, on the other, the longitudinal edge is processed. The main problem is that the seam is not even, there is a corner with a smooth rounding. For a strong connection, the sections are covered with a layer of sealant, preferably colorless.
Important: if you are planning a tabletop with curves, it is better to initially purchase parts with a ready-made cut. Refinement is always more difficult; you will have to spend time looking for a good specialist who can work according to patterns and templates
Premises requirements
The quality of the assembly of a corner kitchen is affected by the condition of the walls and floors in the room. Smooth surfaces, straight verticals and horizontals, 90° angles are the basic requirements for walls and floors in the kitchen.
Advice. During redevelopment or renovation, new walls and partitions are erected from durable materials such as brick and concrete. The total thickness of the partitions is at least 10 cm. If the partitions are made of plasterboard, wooden inserts with a width of 15 cm or more are provided.
The repair is completed by the time the countertop is installed, as is the installation of sockets and laying of tiles. Before assembly begins, the room is cleared of unnecessary things, building materials and garbage.
Floor preparation
Similar requirements apply to the floor surface. It should be straight horizontally and have a flat surface. The angles of connection with the walls are 90°. A difference in the floor at the furniture installation site of more than 1 cm leads to the formation of gaps between the base and the cabinets.
Attention! The presence of a strictly right angle at the installation site of the corner kitchen helps to avoid problems when installing the set and the corner countertop.
After the walls and floor are leveled, proceed to the installation of the corner kitchen table.
What is the best way to connect two countertops at a right angle of 90 degrees?
L-shaped arrangement of furniture in the kitchen is a common option for most apartments, especially in older houses. To arrange the set, connecting the tabletops at an angle of 90 degrees with a small room area is the only option that allows you to fit everything you need. This leaves room for a dining table if the rooms are not combined.
The best solution to the problem is to level the wall before installing the furniture and achieve right angles and a flat wall surface.
A connection using an aluminum profile may be more practical than a Euro saw. During installation, the aluminum profile is treated with silicone sealant, which makes the connection airtight. The connection becomes impervious to water, so its location near the sink will not affect its service life and appearance.
In this case, the euro saw may begin to swell from water entering the gap. If the coating is plastic, then water will not spoil it, but more often chipboard or chipboard is used for kitchen countertops. When moisture gets on it, especially with regular exposure, it begins to increase in size. To prevent this, before installation, you need to carefully cover the ends with a waterproof sealant; a colorless plumber's sealant will do. Everything needs to be processed, all cuts.
A convenient option for placing parts of a prefabricated panel is a double connection with a trapezoidal part - it is placed in the corner, at an angle of 135 0 relative to the other two. The design with a corner element has 2 joints, which can also be connected with a euro saw or closed with profiles. Making a trapezoid yourself is very difficult; factory-made options are quite expensive. But this is one way of connecting - with an insert, which will create a more comfortable working surface and work out the corner better.
In principle, you can make a euro-sawing tabletop with your own hands - by purchasing a solid slab, but for this you need to have a special tool and solid skills in working with it. In this sense, self-assembly of the surface for the plank seems more accessible - normal connections can be made by a person who does not even have professional skills, if he puts in the effort and figures out how to connect two tabletops together.
Eurojoint (photo) looks more neat and forms a surface without protruding parts. The end of one part is processed, and the longitudinal edge of the other. The difficulty is that the cut goes straight along almost the entire length, and then smoothly turns to an angle.
All cuts are treated with sealant on two parts. On plain surfaces, especially dark ones, the connection between the tabletops will be almost invisible, but if there is a textured pattern, then you can determine the place of the joint.
If you do not buy parts with ready-made cuts for joining, then you can order modifications to the joint at the place where you purchased the slab or find a production facility with the appropriate equipment.
DIY kitchen assembly
Assembling a kitchen with your own hands - prepare an assembly diagram and fittings. There will be plumbing work and sealing of all joints. Stock up on the necessary tools, materials and knowledge.
Reasons for refusing free kitchen assembly
We refused free kitchen assembly for several reasons:
- Firstly, our plans were slightly at odds with the assemblers’ deadlines.
- Secondly, the “free” assembly only involved assembling the body: each tabletop cut, hole cut for a pipe, lamp, socket, shelf attachment and much more was measured in pieces and linear meters and paid according to the price list.
- Thirdly, the long price list for additional paid work was accompanied by a list of work that the assemblers do not perform. The last straw was the phrase in the contract: assemblers prepare furniture for installation of communications. In practice, it sounds like this: the assembled tables will stand chaotically in the middle of the kitchen. That is, it will be difficult to install communications and prepare food for the family during the installation process.
pros
- Aesthetic appearance. The main advantage of the euro saw is what the kitchen looks like after it. It takes on more expensive features, and quality work will immediately catch your eye. Of course, even small gaps will not go unnoticed, so you will need the help of a professional.
- Easy to care for. It will be a pleasure to care for a kitchen surface that is connected to the correct technique. Due to the fact that there will be no gaps at the joints, dirt and grease cannot accumulate between them, which greatly simplifies kitchen maintenance.
- No dampness. When installing the countertop, a sealant is used, which provides protective properties to the joints, preventing moisture and microbes from entering there. This way there is no dampness at all.
- Smooth surface. Achieving this is not at all easy, especially if you perform Euro sawing on your own and without experience. But a high-quality connection at a professional level will make the kitchen surface smooth.
- No edges. With a high-quality euro-sawing, the edges will not be visible, especially if the work was done on a dark-colored kitchen surface.
Minuses
- Difficulties with independent European sawing . To qualitatively connect parts of a kitchen surface, you need to have certain experience, skills and be able to use the appropriate tools.
- Subtleties at work . To perform a euro-sawing, you will need to perform delicate work, during which all parts of the tabletop must be in a certain position; they cannot be moved at this time. This arrangement requires compliance with certain standards, namely the presence of smooth walls, floors and correct angles. Otherwise, the countertop will not be able to adhere to the wall, which will create a visible gap.
- There is a risk of water getting into the seam . Water can get into the connecting seam, which will significantly deteriorate the appearance of the countertop and its service life. This may be more likely to happen where the sink has a joint. This only applies to countertops that are made of chipboard.
- Certain conditions are required . In order for the euro-cut to be done with high quality, the kitchen is required to have smooth walls and floors, which is not the case for everyone. Otherwise, the work acquires additional difficulties, which will not be easy for even a professional to cope with.
- High quality furniture . Smooth floors and walls are important conditions for euro-sawing, but it will be impossible to do it without high-quality furniture. So, if the surface initially has any defects, this will affect the overall appearance of the kitchen.
Tabletop connector - euro saw: hidden docking (photo)
A method of processing ends that uses patterns. To create it you need a milling machine. Only with high-quality equipment it turns out flawless.
Sometimes euro-sawing is produced on a cutting machine - this significantly reduces the cost of production, however, with such economical production, the ends are obtained with fluctuations of a millimeter or more. Therefore, when purchasing, you should check this point very carefully, especially if the price of a prefabricated kitchen surface is significantly reduced. A poorly made joint will not connect as it should, leaving gaps.
Correctly executed ends after assembly form a surface on which the gap is not visible at all - it is there, but its width is a fraction of a millimeter. If the coating is dark in color, it will not be easy to find where the euro-cut table top was cut (photo).
Such ideal quality can only be obtained using a router, and the patterns must be new or at least not worn out.
What is it for?
The tabletop is connected through a euro saw without any bending or height differences.
Using a euro saw, the tabletop is connected smoothly and without height differences.
There are three mounting methods:
- right angle - the canvases are placed at an angle of 90 degrees;
- with T-shaped aluminum profile;
- with a turn through the segment.
The most important thing in this method is to carefully sand the joints with a milling machine. If all conditions are met, the difference in height will be no more than a hundredth of a millimeter, and the joint is quite difficult to notice with the naked eye.
The joints must be carefully sanded with a milling machine.
Sequence of work
Before you start assembling it yourself, it’s worth watching a video and photo of the euro-cut tabletop, which will help you understand the details of joining the slabs.
When buying a tabletop, you need to choose the length of the slab with a margin, since after a successful connection it needs to be cut. The first thing to note in the work is the uniform arrangement of the main elements.
Note!
- Ventilation in the kitchen: basic rules for creating natural ventilation + design options and installation diagrams
- How to hide a gas pipe in the kitchen: 120 photos of successful examples from designers on how to beautifully hide a gas pipe
- Kitchen designer: how to use the program and make your own kitchen design, tips on planning in the online designer
Throughout the entire assembly process, care should be taken to ensure that both tabletop slabs are strictly horizontal and remain at the same height. When connecting elements with special ties, it is worth pre-fixing all parts involved in the work.
The docking procedure itself can be divided into several stages:
Appropriate cuts are made on both parts of the tabletop using a special template. After this, the slabs are joined together and the quality of the future joint is checked. If the result is satisfactory, you can proceed to the next step. If necessary, the slabs are adjusted to the desired size by cutting off the edges. Next, using a router, grooves for the screed are cut out on both halves
It is important to follow some rules; the depth of the finished grooves should be more than three-quarters of the thickness of the tabletop. After cutting, you need to check the practicality of the grooves by inserting ties into them
If everything is fine, you can proceed to sealing. Before the joint is finally formed, the edges of the slabs are coated with a special sealant (most often it is silicone with adhesive properties). This will protect the connection from moisture. After applying the composition, both halves are joined and pulled together.
After all the procedures performed, it is necessary to wait until the sealant has dried and carry out final processing and cleaning of the surface.
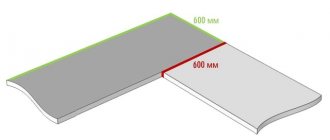
Dimensions
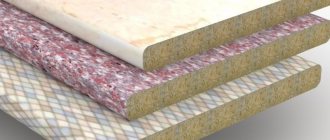
The thickness of the plank is directly related to its other dimensions. Here is an approximate correspondence for several models:
- with a thickness of 38 mm – width 6 mm, height 40 mm and length 625 mm;
- with a thickness of 28 mm – width 30 mm, height 60 mm and depth 110 mm;
- with a thickness of 26 mm - 600x26x2 mm (products with a thickness of 40 mm are practically not mass-produced, and they must be purchased to order).
Surface joining options
It’s good when a solid canvas is used for the table covering. It has no seams through which moisture gets in. This inevitably leads to damage to the material. And a seamless fabric looks better than one that has joints. But in some cases it is impossible to do without docking. It has to be done for corner kitchens and for long surfaces. The latter are “assembled” from two, and sometimes more parts. In any case, you can use one of three options.
Simple splicing
The two parts are adjusted to each other, coated with sealant and installed in place. The resulting joint is almost invisible. This technique has several advantages.
pros
- Simplicity and speed of execution.
- No special tools required.
- Attractive appearance of the finished panel.
Minuses
- Short-lived results. The sealant protecting the joint deteriorates over time, the slab absorbs moisture, swells and deteriorates.
- The docking station cannot support the weight of objects placed on it. You cannot place household appliances, heavy dishes, etc. on it.
- Splicing is possible only for perfectly even fragments. Even a slight deformation will ruin the result.
Professionals do not recommend using such a connection for kitchen countertops. It quickly collapses under the influence of temperature changes, moisture, and mechanical stress.
Instagram shkafpotolok
Docking with Euro saw
This joint is made after preliminary pattern processing of the ends. It's called Eurozapil. The parts are processed by a milling machine with high precision. The result is an interlocking connection; after its assembly, a seam less than a millimeter thick remains.
Advantages
- Low processing costs. No additional materials are required.
- Aesthetic appearance. On stone-like coatings, variegated and dark colors, the Euro joint is completely invisible.
- A sealant is used for the Euro connection, which protects the surface from water. However, a large amount of moisture is still undesirable.
Flaws
- Since a large amount of moisture is still undesirable, connecting the tabletop through a euro saw in the sink area is not recommended.
- The area where light parts are spliced is always noticeable, since it is impossible to cover the darker ends.
- Eurozapil is done only in production. To perform it, you need a machine that will process the ends of the workpieces exactly according to the pattern. At home, making such a connection is hardly possible.
Euro docking is only suitable for furniture that is intended for a room with smooth walls. Even a slight deviation from an angle of 90° gives a gap between the parts. This is unacceptable for a Euro saw.
Instagram arturkucherov
Finishing materialsHow to paint tiles in the kitchen: detailed instructions
With connecting strip
The connection is made using a T-shaped aluminum profile. In this case, both end parts of the joined fragments are pre-treated with sealant. The connecting strip is inserted between them and closes the seam. Let us list the advantages of the technique.
pros
- The splice is reliable, strong and durable. Additional reinforcement is possible if necessary.
- The seam is protected from moisture. It is allowed to be placed in “wet” areas of the kitchen, including near the sink.
- If the material is not joined exactly at a right angle, the resulting gap closes the profile. This is true when installing furniture to uneven walls.
- The docking technology is simple. If you wish, you can do all the work yourself.
Minuses
- The upper part of the metal strip protrudes above the surface, so it is impossible to make the seam invisible.
- The choice of colors for aluminum strips is limited. It is not always possible to select an element to match the coating.
All shortcomings can be considered conditional, because they do not affect the strength and durability of the resulting seam.
Instagram modulpro_irk
Flaws
- The kitchen room must have ideal geometry. The walls must be smooth, the corners are exactly 90 degrees, the finish of the apron must be smooth. Otherwise, the tabletop will not adhere closely to them. The resulting gap cannot be sealed. If the discrepancy is small, then you can cover it with a plinth; a large discrepancy will be visible in any case. This is especially important if the kitchen set is U-shaped.
These problems can be avoided if you level the walls and corners before ordering and installing furniture.
- The Eurojoint is similar in connection principle to a lock; the tabletop canvas is given a certain shape, which can no longer be changed. Therefore, kitchen cabinets or the entire set cannot be moved or changed places. If rearrangement is possible later, the kitchen surface will have to be changed.
- If the surface has a textured or clearly directed pattern, then the joint will be noticeable.
- You can't make a Euro saw at home. This is only possible in production conditions. If you try to perform this type of processing at home, then in order to do it efficiently, you must have certain experience, skills and the appropriate tool.
Eurozapil is a technology that allows you to create an invisible joint on the working surface of kitchen furniture, which plays an important role in arranging the kitchen space. A surface with an almost invisible seam will always look harmonious and will always be relevant.
Methods for connecting tabletop parts
Three types of connections for kitchen countertops are used:
- joint to joint without euro-saw;
- joint to joint using a euro saw;
- the use of a T-shaped profile made of aluminum alloy.
Euro-sawing is a method of processing the ends of a tabletop according to a pattern. That’s what it’s called – patterned. In this case, the ends are cut on a milling machine. Some manufacturers, in order to reduce the cost of the work carried out, use a format-cutting machine for this. The planes of the ends on such a machine turn out to be uneven with an allowance of a millimeter or more. Therefore, the result is an incomplete fit of the end planes and the appearance of gaps between the joined parts of the tabletop.
The ends processed on a milling machine may form a gap when joining, but it is very small - fractions of a millimeter. Therefore, it is not visible to the naked eye, and the surface appears solid. But this is achieved under two conditions: the milling machine must be level, and the patterns must not be worn out. In addition, on dark countertops the joint with the euro saw is practically invisible.
But these two types of connection have several disadvantages. Since the euro saw is a locking connection, it is impossible to rotate the parts of the plane relative to each other - the integrity of the structure will be interrupted and a gap will form between the parts. Therefore, if the corners in the kitchen are uneven, then when installing the kitchen set in the corner of the room there will be a gap between the wall and the countertop. If you try to close the gap by moving the plane, a gap will appear between the parts of the tabletop. You can hide the gap near the wall with a table furniture plinth. But if the curvature of the angle is large, then this device will not help.
But, if a U-shaped set was ordered for the kitchen, then it will not be possible to solve the current problem by any means. Sometimes, if the curvature of the walls in the room is small, then it is better to install exactly along the walls, and leave gaps between the parts of the tabletop. They will subsequently have to be covered with a T-bar.
The third method of connecting pieces of countertops using a T-shaped profile is carried out without a Euro joint, because the connection is closed from above with a profile strip. It should be taken into account that the main requirement for docking is tightness. Therefore, the vertical post of the plank and the ends are treated with silicone sealant.
The aluminum profile has another important advantage in comparison with the euro saw. Most often, the parts of the countertop are joined in the area where the sink is installed, which is usually mounted in the corner, because this is where the utility lines are installed.
Eurozapil has the least protection from moisture, so there is always a possibility that the tabletop material will begin to swell at the joint. In this regard, the aluminum profile is excellent protection, because it is treated with sealant both at the joint and along the wings of the vertical strip. In addition, it is almost impossible to disconnect such a connection. It can only be torn apart. Therefore, if water gets under the profile, the wings of the horizontal bar will prevent the plastic from swelling.
Difficulties
When purchasing corner kitchens with a countertop, it is worth remembering some nuances.
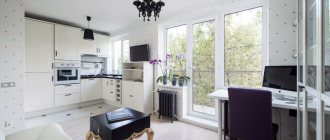
- Sometimes this element is located far from the window. It turns out that little light falls on it, which often complicates the work process. To solve this problem, you need to take care of additional lighting in advance.
- If the room allows, the longest part of the tabletop should be placed near the window. This way it will receive natural light and increase the working area due to the space on the windowsill.
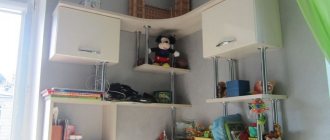
- It happens that a corner kitchen seems too heavy. The use of open shelves and facades will help change its appearance.
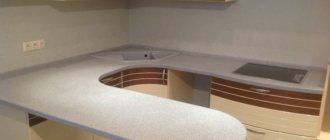
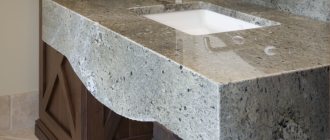
Making a Eurocut
Euro-sawing is a corner connection, for example, kitchen countertops at an angle of 90º. One tabletop is sawed deep, the other from the end, under one profile. On the back (bottom) side of the tabletop, recesses are milled for special ties. The saw cuts are treated with sealant or glue to match the color (tone) of the front surface, then both tabletops are pulled together. The resulting seam is almost invisible.
Joining countertops in furniture production is a very important process. It is almost impossible to make a high-quality joining of countertops without special tools. In our production we use equipment from German manufacturers, the FESTOOL brand, model APS 900. I want to say right away that this is quite expensive equipment, there are cheaper options, such as Virutex PFE60 (Spain), many manufacturers use homemade templates. This service of joining countertops will cost the customer from three thousand rubles; when manufacturing a kitchen set with us, this is included in the total price and costs the client much less.
I’ll try to briefly outline the technique for making a euro saw. Initially, we will trim the tabletops strictly at an angle of 90°, using a Festool TS 55 EBQ plunge-cut saw; in this case, a jigsaw is excluded, since the cut will be wavy, and the sawn-off end of the tabletop will serve as a limiting stop for the support rods (I call them “fingers”) APS 900 template.
These “fingers” are clearly visible in the photo; the template itself is rigidly fixed to the panel being processed using clamping clamps; the milling profile of the template has a special groove for this. In general, we can talk about this equipment for a long time, the photo shows only a module for making corner joints for kitchen panels, which is only part of the equipment of the MFS milling template; in fact, this is a multifunctional and multifaceted device that allows you to make rectangular and round cuts and other specialized operations with minimal time spent on precise rearrangements when carrying out various types of work, but more on this in the following articles.
To work, you will also need a router and a 30 mm copy ring. and a groove cutter with a 12 mm shank, D14 mm. It is precisely for these dimensions of the equipment that the guide groove of the APS 900 template is designed.
Router with installed copying ring and cutter.
Here you can clearly see the copy ring in the guide groove.
We mill the first shallow pass, the template is rigidly fixed on the panel, so without removing it, the excess can be sawed off with a jigsaw or milled completely (through and through).
It should look something like this. We see perfectly smooth, milled edges, without chips and a strictly vertical cut.
With the second tabletop we perform the operation in the same sequence, only first we turn the panel upside down and downside down. We turn it over to avoid chips on the decorative coating - we adhere to a strict rule: when working, the cutter should always touch the surface of the facing coating.
Selected internal groove for corner joint.
The next step is to make seating recesses for the ties, in our case we use ties for tabletops QUICK 35, Italliana Ferramenta, tightening is carried out in a matter of seconds using a 6 mm hex key or a screwdriver with a hex head, complete with a decorative plug.
APS 900 is equipped with a special template for installing ties with a diameter of 30-35 mm.
The result was a neat and precise groove.
We try on the tabletops relative to each other and see the perfect match of the manufactured ends. Gluing and screeding will be done directly during installation of the kitchen unit. This method avoids the use of aluminum joining strips, allows for easier maintenance and has a modern and presentable appearance.
We do European tabletop sawing at home.
More than 90% of all kitchen countertops on the market are made of chipboard. This material is available on the market, has an attractive design, has good performance characteristics and makes the kitchen more practical. If you have a smooth countertop in a straight line, then no problem arises; you create holes for the built-in stove and other accessories, and then carry out installation. If you have an L or U shaped kitchen, then problems arise at the corners. It is necessary to join different parts of the tabletop at a certain angle (usually 90 degrees), but this is quite difficult to do.
Joining a table top with a Euro saw
Previously, different parts of the tabletop were cut at a certain angle, joined together, and a special strip was installed for tightness. Today, euro saw
, because the first option did not show its best side.
Food particles got under the bar and water flowed in over time, which led to damage to the aesthetic appearance and performance characteristics of the countertop in these places. Today, Euro-sawing
at home, which completely solves the problem.
reviews about
, you will begin to understand that everyone leaves them only in a positive way.
This can be understood, because the procedure itself is quite simple; the master uses special templates and a cutter to create an accurate and invisible joint. Once the two parts are joined to each other, it will be very difficult to notice the joint with the naked eye. A transparent sealant is added to it, so the euro-cut
tabletop becomes airtight and its service life increases significantly.
The work can be done at home, it is not accompanied by a lot of dirt and does not create discomfort. The master takes precise measurements down to a fraction of a millimeter, so you will be satisfied with the result. The joint remains invisible, the angle is beveled and smooth, creating the impression of solidity of the entire structure. That is why the euro saw or plank
is in such high demand in the market.
What are the pros and cons of euro saw?
One of the advantages is that this method of connecting two parts of the tabletop leads to a monolithic structure. You do not see a connecting seam or cut, which, of course, has a positive effect on the design of the created kitchen. In addition to its attractiveness, the client is also pleased with the process of creating such a cut, because it is done at home, takes a minimum amount of time, and does not create a lot of noise and debris. An experienced craftsman will quickly make precise replacements and create an invisible countertop joint. It is also worth noting the advantages of the euro saw
and the fact that moisture, dirt or food particles do not penetrate into the joint, which extends the life of the chipboard.
Of the minuses, it should be noted that the Euro-saw connection
still does not create the same rigidity as a monolithic structure.
It is necessary to make sure that there is a strong support under this cut; the tabletop should not sag when pressing on it in the place of the euro-saw
.
But these are all the disadvantages of the euro saw
, you get an attractive and durable solution.
Advantages of the euro saw:
- The quick connection of tabletops using a euro saw
saves time. - The procedure is performed at home.
- The joint becomes invisible to the naked eye.
- The tightness ensures long service life of the chipboard.
Basic fasteners
To install the countertop you will need several types of fasteners. Their number depends on the dimensions and shape of the plate attached to the table. The master must prepare in advance:
- Tongues. These are elongated parts with locks that connect several elements into one monolithic structure.
- Metal or plastic corners with self-tapping screws - two thin plates connected perpendicular to each other. Used to prevent deflections when working with chipboard.
- Eccentrics. These are cylindrical bushings with plugs for screwing the tabletop to the base.
- Eurobolts are long screws used for tightening corners.
Also, fastenings can be combined. To do this, two types of connections are used simultaneously - mechanical and adhesive. In this case, tongues are used together with corners. This method is considered one of the most reliable when working with chipboard. It is what is most often used by professional furniture repair and installation specialists.
Tongues Angles with self-tapping screws
Ex class=”aligncenter” width=”1240″ height=”650″[/img]Eurobolts
Conclusion and recommendations
To prevent moisture from entering the seam, you should use a waterproof sealant and treat the joints with it.
If the walls are uneven, then a gap will form between them and the countertop. It will not be possible to close it simply by changing the position of the kitchen surface. In this case, you can try to close it with a table plinth, but this will only work if the curvature is insignificant. If the gap still remains significant, then you will have to level the wall.
If, when planning a set that will be installed with the letter “P”, there are uneven walls in the kitchen, then in this case gaps will be visible along all the walls. If the unevenness is minor, then they can be eliminated by installing it as close as possible to the wall. Work out all existing gaps on the surface separately and seal them with special strips, and file the sides adjacent to the wall.
Without professional skills, you can connect two tabletops with a euro saw, but you should take into account the following:
- The cut requires precise marks. For these purposes, you will also need to use a circular saw, when working with which you should try to avoid even small chips. Any gaps, even if they are minor, will eventually be visible.
- If the tabletop does not have a solid canvas, then there should be a support under it that will hold it. After the connection is made, you will need to press on the joint. When the surface remains solid and does not move, we can speak of a successful Eurocut.
- To ensure a smooth and high-quality cut, it is best to take a new cutter.
- If debris somehow gets into the seam, there is no need to try to get it out. The best option would be to wait for the sealant to dry and then clean the contaminated area.
Clear benefits
The low cost of euro-cut tabletops offered by different companies is complemented by high protection against moisture getting into the structure of the part. A room with high humidity is a dangerous place for wood that is not properly protected.
If the gap is minimal, then water will not in any way affect the durability of the coating and the furniture will last quite a long time. Before assembly, such saw cuts must be treated with plumbing sealant, which creates additional protection from moisture.