When is it worth doing your own restoration?
When concerned about the question of what to make from old furniture, it is first useful to assess its condition.
It is still better to get rid of an item with significant defects that simply falls apart. You can also throw away something that is inconvenient to use. Restoring such artifacts will cost a pretty penny, and the results are unlikely to be justified. But an item that looks unpresentable, but works well, is a good candidate for restoration, which you can do on your own or entrust it to professionals. Restoration is an expensive service, but if the item is rare and the defects are serious, it is better to use the knowledge and skill of professionals.
You should avoid doing your own repairs if the family has a valuable rarity, for example, a pre-revolutionary mahogany chest of drawers or a trophy trellis. It is easy to damage an item irrevocably if you make the wrong choice of coating and tools. In addition, by transferring the work to a restoration workshop, you will save a lot of time: it would be spent not only on the work itself, but also on searching, selecting and purchasing materials.
In other cases, updating your favorite chest of drawers or Viennese chair is not difficult at home. All you need is a simple set of tools and materials, plus accuracy and patience. It’s worth undertaking restoration if you can answer yes to the following questions:
- The item is easy to use and performs its functions properly.
- It is made of good quality material (for example, solid wood).
- You like it or it’s a cherished memory, and not just “a shame to throw away.”
- You will be able to carry out the necessary work yourself.
- The item will fit harmoniously into the new interior and become part of the overall picture. It may be necessary to change something in the rest of the design for it.
Interesting interior solutions
Before you update an old furniture wall from the times of the USSR, you need to make sure that its fasteners are intact and, if necessary, replace them. The set can acquire a more modern look if you do not display all its modules in one row, but distribute them in different corners of the room or apartment.
If the cabinets will stand as a solid wall, then you should do the following:
- remove mezzanines, glass and other doors, leaving only the lower shelves and drawers closed;
- attach cornices to the top of the wall;
- Decorate the side parts with columns.
You can beat the Soviet wall in a modern interior if you leave the bottom row of cabinets, above which you hang shelves and racks at different levels.
If the set is topped with mezzanines, you can update the old Soviet wall by making a fashionable hanging wall out of them. To do this, remove the doors and the back. The resulting sections are hung vertically or L-shaped. The shelves in such a module will have to be redone and, when filling them, the strength of the wall will have to be taken into account.
Pros and cons of do-it-yourself restoration
Do-it-yourself restoration has both advantages and pitfalls. The advantages include the following points:
- Saving. Restoration or reupholstery carried out on your own will cost 3-5 times less money than professional renovation of furniture in a workshop.
- No additional risks. You don't have to transport furniture or disassemble and reassemble it for transport. Moving from place to place has a detrimental effect on old things; At the same time, there is a risk of dropping something and completely ruining it.
- No additional costs. Transportation and loader services (when the house does not have an elevator) can significantly increase costs if you do the delivery yourself.
In order to polish up an antique chest of drawers or a cabinet, you need to be prepared for the following disadvantages of working independently:
- You will need to organize a place. Restoration is accompanied by noise, dust and pungent odors. The old layer of paint or varnish is removed in two ways: by sanding (dust is formed) or using a solvent. The room is organized so that it is easy to ventilate and tidy.
- Have time and patience. This is not a one-weekend activity. Depending on the complexity, the repair may take several weeks, and it will have to be done in the evenings after work. It will also take time to select and buy materials.
- Possession of the necessary skills. Some jobs require professional flair. Using a sanding machine you can either delicately correct a figured leg, or ruin it irrevocably.
Options for remaking Soviet furniture
Remaking old Soviet furniture with your own hands, which before and after has fundamental external differences, includes several stages:
- replacement of accessories;
- cleaning, removal of plaque, soot and dirt;
- repairs to eliminate cracks, abrasions and chips;
- decoration.
Using all your imagination, you will decide for yourself how best to use certain parts of the sets, what new purpose the table, chair, chest of drawers, etc. will have.
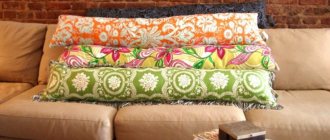
Padding
Reupholstery is used for old chairs, sofas and armchairs as an addition to frame restoration. For it you need to choose a fabric for the new upholstery. It can be velor, crepe, barakan, natural or artificial leather or any other material, depending on style and preferences. Also for work you will need a construction stapler, staples for it and a piece of foam rubber if the old one has become unusable.
It's no secret that over time, the upholstery of upholstered furniture loses its original appearance.
After removing the old upholstery and damaged foam, you need to attach a new one using small nails. With its help you can give the furniture the desired volume. Afterwards, the upholstery material is attached using a stapler.
Reupholstering furniture is a fun activity that does not present any particular difficulties.
Note! For ease of work, you can use fabric stitched to the foam rubber.
Aging
This is a fairly popular method of giving old furniture nobility and elegance. The following materials can be used for aging:
- Antique wax. Suitable for wooden surfaces that have been previously cleaned, degreased and stained. After it dries (after about seven hours), wax is rubbed in, on top of which a pattern can be applied. Finally, the surface is opened with varnish.
- Acrylic paint. Can be used for furniture made of any material. The required effect is achieved by combining two paints of similar shades, several layers of which are applied sequentially.
To obtain various types of aging, you can use acrylic paint, bitumen varnish, various waxes, and dry pigments.
Important! To achieve the effect, each layer must dry completely.
The paint is applied with a sponge. After finishing painting, you can go over it with sandpaper.
Do-it-yourself furniture restoration in Provence style involves artificial aging of surfaces.
Film
Using self-adhesive film you can decorate a wide variety of objects and surfaces. It is durable and resistant to mechanical stress, moisture and temperature changes. Before gluing, the surface is cleaned and degreased. After gluing, the film is leveled with a spatula to eliminate all bubbles.
For pasting furniture, films with a polymer-based outer layer are most often used.
Painting
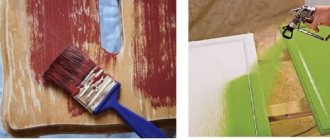
This extremely popular method should only be used on furniture made from cheap wood, otherwise its value will be lost. Before painting, you need to prepare the surface:
- soften the old paint layer with a solvent;
- remove the swollen paint with a spatula;
- sand the surface with sandpaper;
- apply a layer of primer;
- After the primer has dried, carry out additional sanding.
You can update your closet, chairs, shelves, racks or kitchen facades with your own hands - just repaint them.
Next, the oil paint must be applied with light movements to create a thin layer. You should move along the wood fibers. After complete drying (after about 12 hours), the surface is sanded, cleaned of dust and covered with a second layer of paint.
Having decided to paint furniture, you should take care of selecting new fittings that will match the style of the updated product.
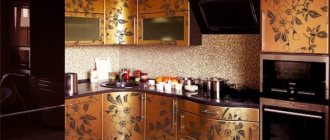
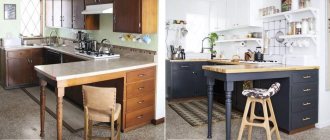
Decoupage of kitchen facades
Decoupage is a great way to update your kitchen set and give it a touch of Provence style. After the transformation, the facades will look as if talented artists painted them for you, but you will know that you made all this beauty with your own hands. You can put absolutely any design on cabinets and shelves, but usually they choose something related to plant and kitchen themes: images of fruits and vegetables, coffee, jars of spices and cereals, flowers, etc. Decoupage will help decorate facades with ornaments in the style of Gzhel or Petrikov painting. The main thing is to find a suitable drawing - no one limits your imagination.
Everyone can cope with the restoration of facades on their own:
- remove all doors, remove fittings;
- If the surface of the headset is perfectly flat and smooth, then you only need to wash it well to get rid of stains of grease and dirt. If there are defects, it is better to sand the surface. First use fine-grained sandpaper, and then coarse-grained sandpaper. If you have a sanding machine at your disposal, it will greatly simplify the process. If there are cracks, depressions, or pits, it is better to fill them with putty. When it dries, the treated areas are sanded again. After this, the facades can be primed, but many skip this stage;
- The decoupage technique is suitable not only for wood, chipboard and MDF - it can also be used to decorate plastic and glass facades. Preparing them for decoration is very simple - just get rid of all the dirt and grease;
- The easiest way is to use three-layer napkins for decoupage. Think in advance about which part of the façade the drawing will be located. Don't use images that are too small. Different cabinets can be decorated with pictures in the same style. The image can be glued to regular PVA glue;
- Now all that remains is to open the facade with acrylic varnish, it is better to use 3-4 layers, each applied after the previous one has completely dried. The easiest way to work is with a narrow brush with long bristles;
- All that remains is to return the fittings and install the facades.
If this is not your first work using the decoupage technique, then you can use not only special napkins. Experienced craftsmen know that fragments of wallpaper with a suitable pattern, and even maple for a kitchen table, will do, not to mention that the image you like can be printed on a printer.
Ideas for remaking Soviet furniture for inspiration
Sofa in the hallway
A sofa from an old cabinet.
A small homemade mattress or soft furniture pad and a couple of sofa pillows will allow you to turn an old nightstand into a comfortable and functional sofa with space for storing shoes that will fit perfectly into the interior of the hallway.
Kitchenette
Children's kitchen from an old TV stand.
An eye-catching TV stand can be turned into a children's kitchen, which the growing housewife will surely like and will fit perfectly into the interior of the playroom.
Buffet
Stylish kitchen rack from an old sideboard.
Don’t rush to get rid of a bulky and, at first glance, completely inappropriate buffet. The new color and slate stickers on the doors will turn it into a stylish and modern piece of furniture that will fit perfectly into the interior of a modern kitchen.
Pencil case for toys
Redesign of an old pencil case.
A boring narrow pencil case is an excellent base for creating a bright, spacious rack for children's toys. To transform it, you will need white and bright paint, as well as wide decorative molding.
Banquette
Banquette from an old cabinet.
An old cabinet, painted in a light shade that refreshes its appearance, complemented by a soft quilted seat, will become a stylish and functional detail in a modern hallway.
Sideboard in a new way
Magical transformation of a sideboard.
White paint and replacing the wooden sashes with bright curtains made it possible to breathe life into an old sideboard that previously wanted to be thrown into the trash.
Shelving
Door shelving.
Old wooden doors can be used to create creative shelving for books and decorative items.
Decoupage cabinet
Decpage of an old cabinet.
White paint and simple pictures using the decoupage technique will help to transform an old, nondescript cabinet. The updated cabinet will fit perfectly into the interior of a modern kitchen and will become its unique detail.
Patchwork style chairs
Renewing old chairs.
New upholstery in the now popular patchwork style and painting of some elements made it possible not only to update the old chairs, but also to turn them into ultra-fashionable interior items.
Decorated chest of drawers
Transformation of a vintage chest of drawers.
A little effort, imagination and bright colors will allow you to turn your grandmother’s vintage chest of drawers into a bright piece of furniture that will become a spectacular interior detail and something to wow all your guests.
Table with drawers
The sofa has turned into a comfortable ottoman
Table on wheels
The dressing table has become a work table
The carved back was useful for a mini-sofa
Wardrobe-soldier
Coffee table
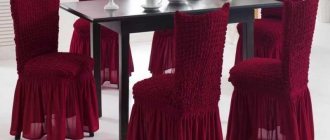
Worn chairs
All you have to do is change the upholstery and repaint the chair, and it will look like a creative designer has worked on it.
A chair forgotten at the dacha
Look how great it looks after the remodel.
Baushkin sideboards and buffets
Nowadays white furniture is very popular and looks quite stylish. So you can safely paint the sideboard, it will give it a second life! New modern handles will also improve the appearance.
If you are a fan of the shabby chic style, you can decorate your sideboard this way.
Cabinet Ideas
Budget option, but looks good.
Bookshelf from an old radio
Luxurious dark blue chest of drawers
The owner bought this chest of drawers from the 70s made of natural wood secondhand, paying only 300 rubles. Initially there were many cracks on it, and the veneer had defects. There were extra holes on the boxes that needed to be masked. The craftswoman wanted to get a chest of drawers in a deep color while preserving the wood pattern and scuffs.
The old varnish was removed with a grinding machine: careful preparation of the source is the key to a high-quality result. The defects were puttied and sanded, then covered with tinted glaze: 4 layers were required.
The legs and frames from the craft store were treated with walnut-colored stain. The total cost is 1600 rubles.
Black cabinet with engraving
The story of how this bedside table was remade is a complicated one: the owner found it in a landfill and several times wanted to take it back for “disobedience.” It took 10 coats of remover to remove all the varnish from the veneer! This took several days.
After applying protective oil, flaws were revealed, and the craftswoman partially painted them over. The owner was not satisfied with the result, so the cabinet was completely painted black. Only the legs remained intact.
Using a pencil, we drew a design on the door and drilled it out with a small drill with an engraver attachment. The result exceeded all expectations!
In order not to waste time on removing the varnish, you should sand the surface to a rough state, apply an acrylic primer and paint it with moisture-resistant paint in 2 layers. In this example, "Tikkurila Euro Power 7" was used. The top of the bedside table is covered with acrylic varnish.
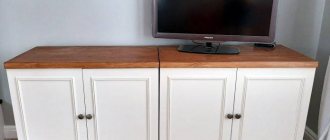
From the wall - into a stylish set
The owners of this brown “wall” took it to their dacha, and then decided to try their hand at remodeling it into modern furniture.
The chipboard covering was cracked and peeling off in places, so it was completely removed. The cabinet frames were dismantled and re-attached with Euroscrews. The parts were sanded, puttied and painted. The tabletops and legs were made from old boards, and the door layout was re-nailed.
Moldings were added to the front of the cabinet, making it unrecognizable. The result was three sets for different rooms: two bedside tables for the living room, a wardrobe for the bedroom and another set of three cabinets.
And here you can watch a detailed video about remaking a bookshelf from an old wall. The owners turned it into a TV stand.
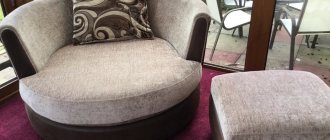
Armchair
The famous armchair, which was found in most Soviet apartments, is again at the peak of popularity today. Owners are captivated by its convenience, simple design and frame quality.
The owner of this specimen used foam rubber 8 cm thick for the back and 10 cm thick for the seat, also adding two layers of synthetic padding. Upholstery fabric with the effect of furniture screed in lemon color was purchased at the store. Rounded shapes were created by bending the foam overlapping the edge of the back and seat, as well as by stretching it tightly.
To paint the frame, inexpensive matte white enamel “PF-115”, tinted with black, was used. Painting was done with a velor roller in three thin layers.
After drying, it is recommended not to touch the chair for about two weeks - this way the composition will polymerize completely and will be stable in use.
Reincarnation of the Vienna chair
This old beauty was found in a landfill. It did not have a seat, but the frame was quite strong. The new seat was cut out of 6 mm plywood, and the base was carefully sanded.
In the 1950s, such chairs appeared in many homes. They were made at the Ligna factory in Czechoslovakia, copying the design of the No.788 Bresso model, which was developed by Mikhail Thonet in 1890. Their main feature is bent parts.
The owner covered the chair with “Tikkurila Unica Akva” without applying a primer: this was a mistake, since the coating turned out to be fragile and now there are scratches on it.
The craftswoman advises using “Tikkurila Empire”, the most popular and reliable coating. The soft seat was sewn by hand: matting fabric, spunbond and 20 mm foam rubber were used. The edging is made from braided bicycle cable.
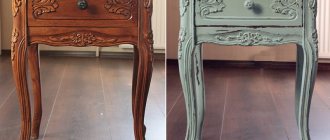
Soviet cabinet with painting
Another Soviet-made bedside table from 1977, which has transformed from a faceless object into a beauty with its own character. The owner chose a deep dark green color as the main color, which she used to paint the tabletop, legs and interiors, and covered the facade with white. The painting in a botanical theme was done with acrylic paints. The standard handle has also been replaced.
Today, vintage furniture is valued for its laconic design and legs, which give it an airy feel. Thanks to “raised” structures, the room appears visually larger.
New life for the sofa
You can repair not only small wooden objects, but also large items. This book sofa from 1974 was once reupholstered, but has worn out again. His mechanism broke and the bolts were bent. During the remodeling, the owner of the sofa saved not only the budget, but also the space: this model is very compact and takes up little space.
There is no foam rubber inside - only springs and a harsh canvas on a cotton backing, so the design is odorless. The frame is in satisfactory condition. The owner bought new hinges, a piece of furniture fabric and new bolts.
Thanks to the perseverance and patience of the craftswoman, the mechanism of the sofa was updated, and the soft part was reupholstered with new material. All that remains is to add a couple of decorative pillows.
Table makeover
Using the same technology, a banal coffee table can be turned into a modern piece of furniture. In this case, it was covered with wrapping paper. It is dense, adheres well and does not become limp when applying varnish.
Before starting work on decorating the tabletop, the legs of the old table and the edges of the tabletop were painted in a light color: this way it fits better with the new design style. Then the process of its transformation began.
When pasting, the panel is cut out significantly larger than the dimensions of the tabletop. It's necessary. The paper is glued to PVA and rolled with a roller so that there are no lumps or blisters. The surface must be absolutely smooth.
The paper is glued gradually, roll it with a roller so that there are no bubbles
After gluing, take sandpaper with fine grain (it is more convenient to work if it is attached to a block). By running it along the edge, they bend and at the same time separate the excess paper.
How to make a beautiful edge
Even cutting with a guillotine will not give you a fairly even edge. And with this method, it turns out professionally designed. There is no smell of amateur activity.
This is what the edge looks like when all the excess has been removed
After the glue has dried, the surface is coated twice with a thin layer of varnish. It should be applied with a soft brush in a small amount. Layers are applied in different directions: first along the long side, then across.
Bright bookcase
The owner decided not to sand this bookcase - she just primed it with Tikkurila Otex. The wooden lattice and overlays on the facades were made in a carpentry workshop from 6 mm and 3 mm plywood. The overlays are glued to the "Moment Joiner".
The outer sides and fronts are painted in Tikkurila blackboard color. Orange and turquoise coating – “Luxens” for walls, protected with colorless wax “Lliberon”. The back wall is covered with wallpaper. The handles are an old IKEA collection.
Boho nightstand with ornament
To repaint an ordinary vintage bedside table from Avito you needed:
- White paint "Tikkurila Empire".
- Aerosol paint color “rose gold”.
- Masking tape.
- Small foam roller (4 cm).
The author marked the drawing with masking tape and glued it, pressing it tightly to the doors. I painted it white using a roller in three layers. Allow 3 hours between each coat. After the third layer, I waited 3 hours and carefully peeled off the masking tape. I unscrewed the legs, protected them with tape, leaving the tips, and spray painted them. I collected it after it was completely dry.
Remaking furniture is always an interesting and creative process. Things updated with your own hands acquire their own history and add soulfulness to the interior.
Remaking old furniture step by step with your own hands
Stage one: out with the old fittings
Let's start with the simplest, but also the most basic - fastenings. Often creaking doors or doors that do not close completely become the cause of anger and irritability on the part of their owner. That is why, if you decide to remodel, then start small.
Buy new accessories: handles, clips, buttonholes. Now there are many variations of details: from simple and laconic to sophisticated. It all depends on the style that you would like to embody.
In addition, you need to prepare special materials with which you can seal the loose holes. This can be done using putty, a screwdriver, and dowels of different sizes.
Despite the fact that this stage of transforming old furniture into new is initial, you should not pay little attention to it.
In some cases he may appear first and last. Often, replacing handles or fasteners on cabinet doors is enough to give it new life and transform it.
Stage two: clean it properly
Remaking Soviet furniture is not an easy process, but very interesting.
This is where you can feel like a real designer, express your emotions and get a little closer to real art. Maybe you are not a professional cabinetmaker and don’t yet know all the restoration techniques, but you must know that any element should be thoroughly cleaned before transformation.
First, prepare a soap solution.
You will need soap and water. In this case, there are no special requirements for the cleaning substance. Now take a soft cloth, preferably cotton, and soak it in the prepared liquid. Wipe the furniture frame thoroughly, trying to remove all dirt and dust. Even the smallest piece of debris that you forget about can end up ruining everything. After all, it will manifest itself under a layer of paint, and under varnish, appliqué.
You can use an old brush to clean hard-to-reach nooks, cracks, and crevices. Just make sure its bristles are soft.
Stage three: let's start the repair
After you have wiped all the parts, the time comes when you need to remove the old coating.
This can be done using a simple sheet of sandpaper.
Walk it over the entire surface, ridding parts of old paint and varnish. If there are cracks on the furniture, you can fill them with putty, only then, when it dries, do not forget to sand the area again.
Stage four: let's start decorating
The final step is usually the creative process. You can choose one of the types of decoration and implement it yourself. Paint it, decoupage it, cover it with craquelure varnish, make applique – it’s up to you.
We talked about several general stages of remodeling old furniture in a new way with your own hands. Now let's look at the main ways and techniques that can turn your usual cabinets and tables into a real decoration for your home and make them the highlight of the interior.
Types of update
Before you update a furniture wall with your own hands, you should decide whether it is functional enough. If the answer is positive, it is enough to repaint it in a different color and add or remove decorative elements.
To make furniture more comfortable, retractable systems are being changed. In old chipboard cabinets, the guides are wooden or plastic. It is better to install modern ball and roller systems that allow drawers to be pulled out easily. Replace hanger pipes and door hinges. For convenience, deep cabinets are equipped with LED lamps.
When remodeling the wall, you can leave only the frame intact. Complete renovation of old furniture requires time and space to work and dry. Before you get started, you need to consider the following:
- style;
- color;
- decor;
- how and where it will be located.
In order to change the appearance of the wall, sometimes it is enough to replace the fittings and fasteners with new ones.
Restoration of an old wall
After a skillful transformation, furniture from the 50s and 60s in the minimalist or art deco style will look elegant. If the doors cannot be repaired, they must be replaced by ordering new ones of the required sizes from the factory. Most old walls have a monosyllabic color that imitates the color of natural wood. Modern facades can contrast with the body and consist of one or more colors. The latter option benefits from combining furniture with the tone of the walls and floor.
The benefits of creating new furniture from old ones with your own hands
Do you want to change the decor, introduce original ideas into the interior, so that old furniture sparkles with new colors? Take advantage of the huge number of ideas and methods on how to reconstruct outdated furniture.
You will bring your ideas to life and create magnificent things.
And every piece of furniture keeps its own memories and family traditions.
The furniture of old times had its main advantage - it was very strong, durable, and was made from natural wood.
Using all your imagination, you will decide for yourself how best to use certain parts of the sets, what new purpose the table, chair, chest of drawers, etc. will have.
You just can’t raise your hand to take such things to a landfill.
You think this is difficult to do. It's actually not that difficult. You will give things a unique look. There are many materials and methods you can use to repurpose your furniture yourself.
By restoring interior items, you can save a significant amount of money than by purchasing new furniture.
Take advantage of the huge number of ideas and methods on how to reconstruct outdated furniture.
Before you begin, decide which restoration method you will choose. Purchase the necessary components. Remember, in this matter you need diligence, endurance, and a serious approach. Maybe this will encourage you to start your own business.
You will delight not only your relatives, friends and acquaintances with amazing things, but also fulfill orders.