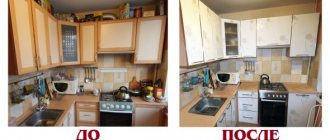
A good quality kitchen set can last for decades. But time passes, and the shine of the new furniture fades, stains, chips and scratches appear, and your favorite set or any of its cabinets are no longer pleasing.
There are two ways out of this situation: do some repairs and buy new furniture, or update existing cabinets and pencil cases. Moreover, in the second case, the cost of the issue will be minimal, and you will not have to deal with rearrangements. All you need is decorative self-adhesive film.
Unlimited possibilities of self-adhesive film
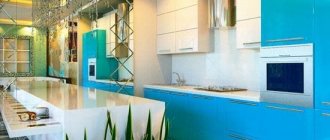
Kitchens covered with film look impressive both in photos and in real life. Surfaces are updated using vinyl or other film. The range of this material is amazing in its diversity, and the price pleases with its affordable price.
Decorative “self-adhesive” imitates:
- natural wood of different species;
- natural stone;
- ceramics and tile texture;
- leather and fabric.
In the photo - imitation wood.
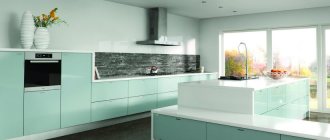
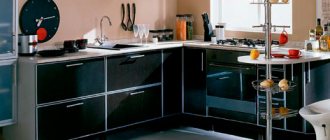
Its texture can resemble patterned silk, a colorful tapestry or cute chintz. The material is produced in matte and glossy versions. There are films with holographic and mirror patterns. And all this can be combined with each other, creating interesting effects, changing an ordinary kitchen cabinet beyond recognition, as in the photo below.
The price of the film depends on the manufacturer and the decorative surface.
Vinyl “self-adhesive” is quite practical because it:
- not afraid of moisture;
- does not fade in the sun;
- does not respond to temperature changes.
With its help, you can completely update the design of both the kitchen and the bathroom, transform the kitchen cabinet or the entire set.
Adhesive film is a good budget replacement for a full-fledged repair. Of course, you need certain knowledge and skills, but the video will help you quickly understand the intricacies of the process.
Stylistic moments
The method of decorating a kitchen window should correspond to the design style of the room as a whole.
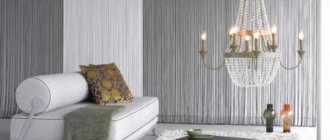
- In a romantic setting, lace, tassels, lambrequin, and fringe should appear in this area.
- In minimalist interiors there is a place for Japanese curtains or blinds.
- The eclectic direction of the kitchen decoration is emphasized by bright accents in the area of the window opening.
The decor of the kitchen window should complement the overall style of the interior
An attention-grabbing element can be tiebacks made from a material of unusual quality or a color that contrasts with the curtains. Rhinestones and floral patterns are not alien to eclecticism, so feel free to use these details in decorating the window area.
- For a country style, look for curtains with lace inserts, frills and floral prints.
- It is quite possible to design them with embroidery in folk style.
- For a high-tech interior, metal blinds or plastic products would be an excellent solution.
- In the eastern direction, bamboo models will be appropriate.
Kitchen window decor in country style
Which film should I choose?
First of all, you need to look at the thickness of the material and the manufacturer. German “self-adhesive” tapes are of good quality; their price depends on the thickness.
Dutch and Italian manufacturers have proven themselves to be excellent. You can choose something from budget series or take a closer look at exclusive products, but then the price will be quite high.
The most inexpensive are Chinese adhesive decorative materials from unknown manufacturers. However, low price should not be the main selection criterion, otherwise a beautiful kitchen decorated with self-adhesive vinyl film can quickly lose its appearance.
Not all adhesive materials intended for promotional products can be used in the interior. Some of them are designed for short-term use. Choose high-quality decor, and then the restoration will be durable, and a simple kitchen cabinet will become an interior decoration.
The color can be any. If you want to take a creative approach to kitchen design, place photos of fruits, vegetables or flowers on the facades, thereby decorating ordinary old furniture. The drawing can also be applied using photo printing.
Peculiarities
Most likely, self-adhesive film is present in your apartment even if this is the first time you have heard about it. The fact is that it is intensively used in the furniture industry for the external decoration of furniture made from relatively inexpensive and environmentally friendly MDF boards. Today, not all wooden products look like wood, and the same imitation of stone on the countertop is precisely the result of gluing with such a film.
In this case, the film does not perform any functions other than decorative , that is, there must be some kind of reliable base underneath it. Repairs made with its help have a purely cosmetic effect - for example, it makes sense to cover old doors with it, which are still durable and reliable, but have become somewhat worn out over the years of use and make them blush in front of guests.
Technology of pasting furniture with polymer films
If you decide to update your kitchen furniture using self-adhesive film, then first prepare the base. It should be understood that the decorative covering will not hide potholes and bumps, it will only disguise the stains, so all unevenness must be removed before pasting. A video with tips will simplify the workflow.
12 rules for working with self-adhesive tape
- The fittings and doors must be removed, and each kitchen cabinet (facades and frame) must be inspected for the presence of depressions and bulges.
- If there are defects on the furniture, all irregularities are filled with putty and sanded well.
- To calculate material consumption, you will need measurements of all parts of the kitchen unit. You need to carefully measure all the parts that you plan to paste over.
- All dimensions are transferred to the back side of the film. It is usually made of white paper, on which the drawn lines are clearly visible.
- When cutting, you should always leave a margin of about 1 cm. This will help in your work: if you start gluing the vinyl at the wrong angle, the margin will make it possible to correct the situation. All excess is easily cut off with a breadboard knife.
- Decorative self-adhesive film is cut with a stationery knife, curved lines are cut out with scissors.
- Then you need to degrease all the surfaces to be decorated so that the “self-adhesive” does not come off over time. Window cleaning liquid or other products are suitable for this. Grease stains need to be treated especially carefully so that the decorative finish does not come off.
- Pasting of kitchen units is carried out on a dry and clean surface, otherwise the “self-adhesive” will begin to bubble and peel off from the base.
- The film must be applied evenly.
- The backing is removed in several stages: first, only a few centimeters are peeled off, after gluing them, a little more is removed, and so on until the entire panel covers the part to be decorated.
- Smooth out the plastic decor from the middle to the edges. Air bubbles must be removed during operation. It is convenient to work with a plastic scraper, stroking the surface with a soft cloth.
- Small air inclusions are removed with a needle. The finished part can be processed through the fabric with a warm iron.
How to properly wallpaper a kitchen?
The procedure for gluing walls and furniture does not require any special skills, but for a good result you should still read the minimum instructions first. So, when repairing furniture, it is usually recommended to remove all removable parts first - this makes it easier to work with them.
There is usually a millimeter grid on the back of the film, which allows you to cut off exactly the required amount, but keep a ruler at hand - without it you cannot measure the dimensions of the surface to be repaired. You can use sharp scissors for cutting, but a stationery cutter is even better - this way the cuts will be without any scraps. Pasting is carried out exclusively on clean and grease-free surfaces , therefore they are first washed with soap and then, once dried, treated with white spirit.
In addition, the surface must be perfectly flat, therefore, if possible, it is pre-treated with sandpaper.
When everything is ready, the part to be pasted is measured, a piece of film is cut according to the obtained dimensions and placed on the part “face” up. If the dimensions are the same, in one of the corners a part of the backing is bent slightly and the adhesive side is pressed against the surface to be repaired. The substrate is folded back gradually as the film is glued, and the resulting air bubbles are removed using an elastic spatula . If during the gluing process the fragment is glued unevenly, the blot is corrected immediately by carefully peeling it off and re-gluing it correctly.
Some bubbles will inevitably remain, so after complete gluing they are pierced with a needle and also smoothed out with a spatula. For perfect smoothness and reliable adhesion, the glued surface is also passed through with a powerful hairdryer - the heating removes small wrinkles.
Difficulties in work and their solutions
Problems often arise with processing the ends and shaped parts of kitchen units made of MDF or other material. An industrial or household hair dryer will be a good helper in this case.
The restoration will go faster if you work together: one person stretches the material by heating it with a hairdryer, the other carefully glues it to the base.
It is easier to apply the self-adhesive tape evenly on a damp surface. To do this, lightly moisten cabinets and doors with a spray bottle. Water will not allow the material to immediately grasp the surface and will provide an opportunity to correct the work.
When cutting the material, you need to make allowances on each side. For parts with ends, do not forget to make cuts in the corners. First, they paste over the part itself, and then proceed to the ends. The rounded ends of MDF facades are treated with a hairdryer for a better fit.
Advantages and disadvantages of curtains in the kitchen, design of kitchen windows
Chic curtains are considered a traditional option for decorating a window opening, be it a kitchen or another room, especially since in retail outlets you can find a large number of color options, prints and the material from which they are made. The main advantages of using curtains to create a kitchen interior include the following:
- Large selection of colors. This makes it possible to select products that will most harmoniously fit into the design of the room and emphasize belonging to the chosen style.
- Maximum protection from the sun and prying eyes. Depending on the chosen model and material, it is easy to protect the kitchen from excess sun or bright street lights.
- Easy adjustment. If you choose curtains with eyelets, roller blinds or Roman curtains, you can independently regulate the room lighting.
- You can make curtains yourself. To do this, you need to take correct measurements and cut the fabric.
When using curtains to decorate a window in a kitchen with a balcony (or simply for a large window opening), you may encounter disadvantages of using textiles, among which are the following:
- absorption of odors;
- light soiling;
- difficulty in care.
You also need to take into account that if the curtains are chosen too long, then when there is a draft they can easily rise. If a hob is located nearby, the products may cause a fire.
Curtains for the kitchen should not only be beautiful, cozy, original, but also convenient for home use
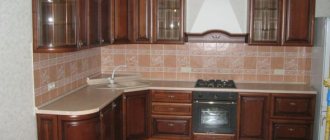
Restoration of facades with decorative film
The appearance of the kitchen largely depends on the cladding of the facades. If your kitchen has smooth doors without a relief made of chipboard, then they can be easily covered with vinyl film.
Updating kitchen MDF facades with convexes will be easier if you use an industrial hair dryer. Only a well-heated film can take the desired shape. If there are decorative details on the facades, they must be removed before pasting.
Replacement of the old film is carried out only after removing the previous layer. Remember that decorative film is only applied to prepared surfaces.
It should be taken into account that in production, MDF film facades pass through a special press, which makes it possible to obtain a smooth surface without flaws. At home, MDF can only be covered with self-adhesive.
Options for “new things”
Since the set itself is not yet falling apart, it is necessary to update the facades. This will benefit both the appearance and protect the material from moisture. There are two options for updating facades:
- Ready-made self-adhesive film
- Individual photo printing on adhesive paper
The owner of this kitchen settled on the second option, after which he indulged in thinking about the topic of photo printing. The original option with a separate picture for each door was rejected: the overall look would be too colorful. After some more thought, it was decided to choose a print with nature, “breaking” it with an apron would not affect the perception of the picture.
Interior renovation using film
Designers love polymer films. They have good plasticity and decorative properties; with their help you can quickly update almost any surface. Material suitable for decoration:
- tiles in the bathroom or kitchen;
- wall panels;
- doors;
- different furniture.
Films are available in different colors, with and without patterns. With their help, you can update your kitchen set and change old furniture in your home without extra costs. After all, the price of even the most expensive film will be cheaper than a new headset.
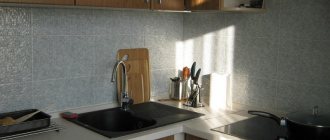
Restoring tiles using vinyl is not difficult. It is important to choose the right drawing here. Delicate chintz designs or films with textured embossing are suitable for the kitchen.
Complete the design with a decorative kitchen apron. Its restoration using film usually does not cause difficulties. The main thing is to carefully read the instructions on the roll.
Before gluing the tiles in the bathroom, you need to carefully prepare the surface - degrease it well. Otherwise, the film will quickly peel off.
What to do if the film comes off?
With the right decoration technology, the updated set will delight the owner with its design for several years. However, there are such unpleasant moments when the surfaces being glued begin to peel off.
To achieve the proper look, you will need scissors and glue (“Super Moment” or liquid nails). The glue is introduced under the film and pressed.
Another way is to heat up the place where the film has come off with a hairdryer. This will bring the melted glue into working condition, after which the film must be pressed tightly.
Fashion trends in curtain design
Fashion for interiors keeps pace with fashion for textiles. Interior exhibitions and works by famous designers set trends that are later reflected in the showrooms' offer. Let's see what current ideas have replaced outdated solutions.
- Matte
One should distinguish between the noble and unobtrusive shine of rich and dense curtain fabrics (satin, velor, etc.) and cheap, thin curtains. Tulle that glares in the sun will make the interior look cheaper.
- Conciseness
Better bright and monochromatic than colorful with a pattern. Prints are difficult to work with, and in such a small space as a kitchen, there is always a risk of overloading the interior with a complex pattern or design.
- Carelessness, eclecticism and bold combinations
Curtains can match the color of furniture or decor, but an exact match of shades is no longer necessary. You can and should play with different intensities.
- Current fabrics : for curtains - linen and cotton, for curtains - velvet, velor, satin.
- Roll and Roman - relevant for all times. From a fashion point of view, these are perhaps the most win-win and “eternal” styles. Only the fashion for colors and patterns can change.
The current colors and shades of 2022 are earthy, amber-orange, classic blue, the whole palette of sand shades, yellow-green, gray-green, peach, olive, red clay color.