Additional decorative elements significantly transform the design of each room in the house. Various boxes or boxes are used not only as an accessory, but also perform a practical function. Boxes made using the decoupage technique will look especially bright and unusual. You can use several design options, which will allow you to choose the style of the box for almost any interior design.
Currently, decoupage boxes are gaining more and more fans, which is not surprising.
Required tools and materials
Preparation is an important step in the technological process. It is recommended to select a suitable box in advance and think about the style of design and surface decoration.
Decoupage allows you not only to express your creative abilities with your own hands, but also to get an interesting thing.
Tools:
- casket;
- napkins with the necessary patterns;
- sandpaper;
- screwdriver;
- degreaser;
- glue;
- acrylic paints;
- acrylic lacquer;
- soft foam sponge;
- scissors;
- brushes;
- stain;
- candle;
- padding polyester;
- scraps of fabric for patchwork;
- cardboard;
- needle;
- threads
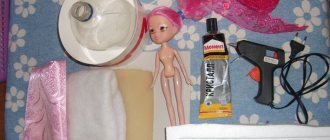
Necessary materials for creating a box using decoupage technique.
When decorating, special napkins designed for decoupage are used. As an alternative, ordinary paper products with bright patterns are suitable. In this case, it is recommended to carefully separate the lower layers of paper.
The box decoupage technique involves the use of these items.
Mirror box
You will need: acrylic plastic with a mirror coating, a ruler, felt, masking tape, good glue, a cotton swab, a construction knife.
Master Class
- Consider the size of the box. In our master class, the box consists of 4 panels measuring 12x6cm (rectangles), and 2 side panels measuring 6x6cm (squares).
- Mark the size of the panels on the acrylic plastic and, using a ruler, draw the construction knife well several times.
- Place the plastic on the edge of the table and make an even breakdown of each part of the box.
- Prepare one rectangular and two square blanks.
- Glue them together as shown in the image.
- Glue another rectangle to the structure.
- Apply glue to the top edges and carefully glue the rectangular panel.
- Leave the box blank to dry for 12 hours.
- Cut a strip of felt and glue it to the long side of the loose rectangular panel, then glue the structure as the lid of the box.
- Cover the inside of the box with felt.
- Leave the box to dry for several hours.
- Remove the protective film from the acrylic plastic and admire the mirror shine.
The mirror box is ready! I recommend watching this video!
DIY MINI Dresser box!
Watch this video on YouTube
Techniques and rules for performing decoupage
When working, you should follow a few simple recommendations.
Technological process
- Decorated surfaces must be cleaned of old coating using sandpaper. The varnish and paint are removed from the wooden box, the cardboard boxes are cleaned of dust and minor dirt with a soft rag.
Perhaps the most ideal material for decoupage is wood.
- When working with paper, the box will need to be cleaned of traces of glue. To remove it, you can use a soft rag or cotton pad and a degreaser. All metal elements are removed from wooden boxes using a screwdriver.
- The surface of wooden products should be leveled. When leveling, acrylic primer is useful.
The primer is applied with a brush.
- The design is carefully separated from the protective layer and applied to the surface to be decorated. It is better to apply the glue on top of the napkin, carefully smoothing out the resulting folds.
Such pictures for transfer can be purchased at a specialized store.
- Applying varnish after complete drying will help consolidate the result.
Leave until completely dry. Apply varnish on top in several layers.
What is needed for decoupage
Before you start decorating the box, you should prepare all the equipment necessary for the work. Purchase in advance: napkins, sandpaper, glue for decoupage, paints, a wax candle, adhesive tape and other raw materials for decoration, a screwdriver.
The list of required materials may vary depending on the chosen style. It is imperative that before starting the decoupage process, you need to prepare the working surface of the wooden box.
DIY decoupage boxes and boxes
Decoupage helps to create a bright and original piece of furniture from an ordinary and inconspicuous thing. This technique is especially popular in styles such as Provence, vintage, ethno and classic. For work, it is recommended to select napkins with images of flowers, birds, and bright patterns.
Decorating the box depends solely on the style chosen for decoupage.
Note. Many designers use the ideas of the decoupage technique when decorating the interior of the house.
Wooden bracelet box
You will need: a wooden bracelet, polymer clay and tools for working with it, round molds, paints, brushes, a glue gun, a white marker.
Master Class
- Roll out a layer of polymer clay.
- Press out a circle with a wooden bracelet - this will be the bottom of the box, then bake according to the instructions.
- Paint the bracelet yellow and leave to dry.
- Draw a pattern on the bracelet with a marker.
- Glue the bottom of the box to the bracelet using a glue gun.
- Prepare two round molds, one of them should be the size of the diameter of the bracelet, and the second mold should be slightly smaller.
- Roll out a layer of polymer clay and squeeze out circles using two molds. Bake the clay according to the instructions and glue the circles together. This will be the lid of the box.
- Cut out a “crown” from a layer of polymer clay, bake it and glue it in the center of the lid.
The “Pineapple” box is ready!
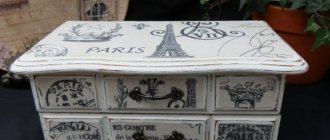
Decoupage in vintage style
Boxes decorated in vintage style are widely popular. A box made using vintage technique will have not only functional, but also attractive qualities.
Decoupage of a box is a creative activity, so even if you follow clear instructions, you will end up with an original thing.
When working with wood products, the surface must be thoroughly cleaned of old coating using sandpaper. Priming will help eliminate unevenness, chips and small cracks.
Reference. Priming must also be done inside the box.
The choice of shade depends on personal preference. It is recommended to paint products in dark, rich colors.
Painting should be carried out in several layers, each layer is applied after the previous one has completely dried.
The card is glued using glue. The bottom of the box can be decorated with a small strip of lace. After the glue has dried, the product is coated with varnish.
Paint, primer and brushes: which ones are better to choose
The necessary brushes can be selected in art and construction stores:
- Wide flat synthetic brush. It applies paint and primer, as well as glue and varnish. The pile should be gentle so that it is pleasant to rub across the skin of the face. Too hard a pile leaves a lot of marks.
- Tapered flat brush. With its help, narrow and small parts are painted. Both straight and beveled ends will do.
- Liner. Used for painting stems, thin curls and outlines. It should be the thinnest in the set, in size most often numbered 0. The longer the pile, the better.
- Artistic bristles. Used to artificially age the design, texture and texture. The pile should be hard, capable of slightly damaging a napkin or thin fabric. Preference is given to bristles of different lengths. The basis itself is broad.
- Fleitz. Used for varnishing the product. It should be very soft; when cleaning, do not use towels with lint.
- Fan brush. Optional, but some people use it for gluing and leveling napkins, as it has a wide range of piles.
As for paints, it is recommended to take the acrylic version, since, unlike watercolors and gouache, it has a number of advantages:
- fits on any surface;
- when dry, they turn into a waterproof film;
- wet acrylic can be easily removed with water.
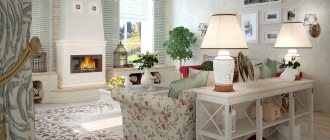
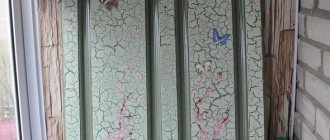
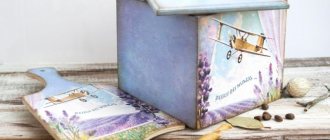
Decoupage in Provence style
Provence is distinguished by a large number of different additions, pastel shades and bright images. When decorating a box in Provence style, it is recommended to choose a soft palette: white, pale pink, beige. A suitable option would be to choose a round box.
Images of flower bouquets are suitable as a picture.
When decorating, the lid and body can be painted in different colors. To give the effect of antiquity, after the glue has dried, lightly sand the walls with sandpaper.
The final result is secured with several layers of varnish.
Addition. Provence is widely used in the design of a living room or kitchen. Boxes made using this technique will become original decor.
Box with roses (stencil)
In this master class, we combined several techniques for decorating a box with our own hands. Let's try to mix styles, textures and techniques. The main theme of this master class is fabric imitation using painting. Since not everyone knows how to draw well, we decided to use a stencil here.
A stencil design is attached, you can choose any one you like.
The master class is simple, even a beginner can handle it.
To work you will need:
- Casket or box.
- Acrylic primer.
- Acrylic paints.
- Tassels.
- Stencil.
- Masking tape.
- Sandpaper.
- Everything that can be useful for decoration: cord, ribbons, lace, braid, and so on.
If the box or blank is made of wood, you may need to sand it with sandpaper and varnish it. This way we will protect the workpiece from swelling.
We wait for it to dry and cover it with acrylic primer.
Dry and sand. Cover the bottom and top corners with masking tape.
We paint all sides of the box with any light acrylic paint. Thus, we make the bottom layer for imitation fabric.
We paint with a brush in a horizontal direction, applying the paint evenly and evenly. Next, let the workpiece dry, sand it with sandpaper and varnish it. We mix our light paint with the same beige paint a shade darker.
Popular articles Painting “Sunflowers” using nitgraphography technique
The paint should not be too thick, so be sure to wet the brush in water and squeeze it out. Apply it to the side with horizontal strokes.
Then take a sponge or brush and sweep it across the surface in a horizontal direction.
That is, we need to make an imitation of fabric. This will be one direction of our “fabric”. This is what should happen after processing with a sponge or brush:
We needed a layer of varnish to prevent the paint from being absorbed into the surface of the product. If it weren't for the varnish, we wouldn't have gotten such a textured surface. We do the same with all the side surfaces of the box: paint and wipe off the paint with a sponge or brush. It will be great if you apply varnish on top. We wait for the product to dry, put the same paint on a wet brush and paint the side parts, but this time vertically. We erase the paint with a sponge vertically. As a result, we should get “fabric”.
Dry and lightly sand the sides of the product. We choose a stencil for our pattern. Let's say this is a drawing with a rose.
We cover with tape the places that are not needed for decoration. We place the stencil on the side of the product.
Choosing colors for printing the pattern. In this master class these are yellow, burgundy, light green and dark green. We take paint onto a brush or sponge and apply it to the stencil. There should not be a lot of paint so that it does not flow under the template. Your brush should be semi-dry. Don’t rush, if the first time it didn’t turn out bright, you can go over it with a brush again. We remove the stencil and wait for the paint to dry. Turn the stencil over to the other side. Flowers should be arranged randomly. We paint the stencil.
This is what the side looks like. There should be no empty spaces; instead, draw leaves on the main background. Fill the empty space with small leaves.
Next, we make the rose drawing three-dimensional. When it dries, we apply our stencil to the familiar pattern. Secure with tape. Apply burgundy-colored paint to the middle of the rose, and use dark green paint to add volume to the leaf.
Next, sand the sides after the surface has dried. To complete the job, you can coat the sides of the product with several layers of varnish. It's time to work on the lid. Place strips of masking tape on the sides of the lid. We paint the lid in the same order as the sides. First, we varnish a light color, similar to the “fabric”. Then the “fabric” itself: paint horizontally with a brush, then vertically.
Dry the lid and place the stencil on it in different directions. Apply yellow and light green paints. We fill all empty spaces with small sheets. Apply the stencil again, paint the roses burgundy and the leaves dark green. Sand horizontally and vertically with a brush after drying. We admire our work and apply varnish in 2-3 layers.
We decorate the bottom of the box and the sides at our discretion. In this master class, the sides of the lid are painted yellow, and a cord is glued with a glue gun. At the bottom there is a velvet ribbon glued with Moment glue. Wooden legs are glued. It will be beautiful if you attach a strip of lace or gold braid, cord, and so on.
Decoupage in shabby chic style
This decoration method is similar to the option described above. When working, soft pastel shades are also chosen, preference is given to images with bouquets of flowers and birds.
Whatever material you choose, in any case, the box must be prepared first.
After the preparatory work, the chest is painted with dark paint. After complete drying, light paint of the selected shade is applied. After drying, the edges and top are sanded to create small abrasions (optional).
Prime the workpiece with acrylic primer.
The napkin peels off neatly. To work, you only need the top layer with the image. The picture is glued with glue.
Having placed the napkin on the desired field of the box, apply glue for decoupage.
At the end, we return all the elements removed at the first stage of work.
Advice. Round-shaped boxes look especially original, the image on which goes from the lid to the side wall.
The final stage is to cover the entire work with varnish.
Volumetric painting
Now let’s gain a little patience and start drawing with an outline. For this painting I use Tair glass contours, they are very thick and do not spread. Let's get started.
We outline the upper part of the petal with a white outline. The thicker the line, the more voluminous our pattern will be. Then, with a thin brush, we draw the paint to the center of the flower, as if stretching it.
We draw leaves in the same way. Add lines and dots to fill the pattern. Our drawing should dry well, or better yet, leave it overnight. In the conditions of the master class, we needed an hour, but this time is not enough for the outline, because the paint inside remains wet. This means the pattern can be easily ruined.
In the meantime, while the flowers are drying, we will move on to the next stage.
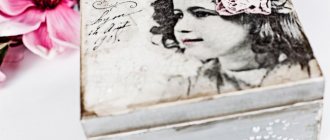
Decoupage antique jewelry boxes
Accessories designed in retro style are particularly sophisticated. This product can be used as a decorative element or presented as a gift.
One of the most common ideas is decoupage in vintage style.
After sanding and priming, the box is covered with dark paint. Varnish is applied on top, and the edges and edges are treated with a candle. After drying, the box is painted with the desired shade, the surface is rubbed with sandpaper until small abrasions appear. Napkins with images are glued to the lid or walls.
The internal area is covered with stain.
Reference. After the glue has dried, the edges of the napkins can be slightly sanded with sandpaper.
Progress
First, let's go over all surfaces of the cabinet with sandpaper, especially carefully - on polished ones; ideally there should be no gloss. Don't forget about the small drawers that are usually found in pieces of furniture.
Then use a ready-made primer or water-soluble glue diluted to the state of village milk to treat the sideboard using a wide brush.
When the coating has dried (from two to five hours depending on the air temperature), you can begin painting. For this we use acrylic paint.
Important! If it is very thick, it can be diluted with water, but not more than 5% of the total volume. We paint with the same wide (10 cm) brush, which we did not forget to put in a jar of water after priming so that it does not dry out
If it seems that one coat of paint is not enough, then you can apply another one.
We paint with the same wide (10 cm) brush, which we did not forget to put in a jar of water after finishing priming so that it does not dry out. If it seems that one coat of paint is not enough, then you can apply another one.
While the acrylic enamel dries, let's get to the fun stuff. We take ordinary three-layer napkins that we selected and bought in a store with large and small or the same pattern.
We tear off all excess with our hands (rather than cutting with scissors) and get decorative elements for decoupage. You will also need a multifora with a cut off white edge (you will get two parts), PVA glue, a spray bottle, a soft cloth and a small brush.
When the paint on the sideboard has dried and everything is ready, we proceed directly to decoupage. Lightly coat the places where you plan to transfer the flowers with PVA glue using a thin brush.
Important! The glue can be thinned a little
Then place an element of a three-layer napkin face down on one part of the multifora
Important! We do not separate the layers so that the drawing does not “creep” later.
Moisten with a spray bottle.
Cover with the second part of the multifora, without worrying about wrinkles.
And wipe thoroughly with a prepared cloth. All bubbles, wrinkles and even perforations will disappear before your eyes.
Now carefully remove the top film.
We calmly take the lower part of the multifora together with the pattern and apply it to the planned place on the sideboard, coated with PVA glue, with the film facing outward, since at first, before wetting, we placed the pattern face down. Using a dry soft cloth over the film, carefully rub the flower onto the furniture surface and carefully remove the multifora.
We wipe off excess moisture around the design, and coat the element itself with light movements of the brush with a thin layer of PVA.
The first element of decoupage is ready, you can proceed to the next one.
Important! All this action lasts only a few seconds and not because you need to hurry - you just don’t need to straighten anything for a long time. Although you should not tighten it, since a very wet napkin, even though it is three-layered, can tear when finally coated with glue
So, the process has begun and in five minutes half the job is done.
The same amount of time and the entire sideboard is covered in flowers.
And they didn’t forget about the boxes.
All that remains is to cover it with acrylic varnish after the drawings have dried.
And the new cabinet for the country veranda is ready.
In the same way, you can refine older furniture pieces.
Of course, such furniture is unlikely to be suitable for a modern city apartment, but in a dacha it’s the perfect place for it.
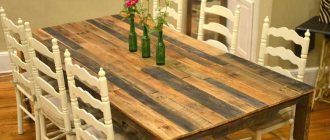
Since ancient times, household items have been decorated with painting or carving. And even those who do not know how to draw have access to such luxury. To do this, just master the decoupage technique in Provence style.
The use of this technique will extend the life of old and worn-out cabinets, chairs and tables. And besides, this will allow you to create a new interior style in your home and bring more novelty and tenderness to it.
This interior style appeared in France at the end of the 19th century. It was named after one of the provinces of this country.
The main idea of the Provence style is to bring a little rustic
interior and tranquility, which most residents of big cities lack.
The main characteristics of the style are:
Furniture for the Provence style should look as if you inherited it. That is, it needs to be aged during finishing.
Decoupage boxes in patchwork style
Patchwork is widely used in the field of handicrafts. Using this method, a large number of decorative items are made - from boxes to bedspreads and furniture capes. This chest can be used to store sewing supplies. The best choice for decoupage would be an unnecessary shoe box.
A vintage style box will be both practical and an excellent interior decor.
The box must be prepared for work: the surface is cleaned of dirt, traces of adhesive tape are removed using a degreaser. Cut blanks of the required size from the fabric. The front side is covered with decoupage napkins. A padding polyester is laid out on the wrong side and the edges are folded. The blanks are stretched onto cardboard and secured with threads. This element will be located on the lid. The side elements can be painted or decorated using a stencil.
After drying, fix the result with varnish.
From a shoe box
One of the simplest and most affordable options is a shoe box.
For work, prepare:
- shoe box;
- glue and scissors;
- thick cardboard;
- fabric or paper for decoration
The base is already there, so you can safely move on to the decor. The box is quite large, so there is plenty of room to roam around. The inside of the box can be decorated with soft fabric (for example, fleece), and the outside can be covered with colored paper or decoupage can be used.
You can go further and add rhinestones, sequins or glitter. There are a lot of options. Below are photos of jewelry boxes of this type.
The inside can be divided into sections using strips of thick cardboard covered with beautiful paper. This product is convenient to use for storing jewelry, cosmetics, threads and needles, creative materials and other small items.
Methods for thinning paper
An important step in the preparation process is thinning the paper. If this point is not observed, the image may lie unevenly, and the result itself will be significantly damaged.
A chic vintage box created using decoupage technique.
Options:
- Carefully coat the front side with varnish and secure the back side with tape. After drying, the top layer is easily removed, and the napkin itself turns out to be very thin.
- Water is useful as an additional component to the varnish. The front surface is covered with several layers of varnish. After complete drying, immerse the picture in water for about 30 minutes. After being in the water, the back half of the napkin can be easily rolled up by hand.
- When using photo paper, it is also useful to use varnish to cover the side with the image. The lower part is placed on a damp surface (for example, a towel). The layers will gradually begin to peel off. In order to remove the layer, you can pick up the corner with a stationery knife.
The scuffs and brown tinting on the vintage box give it a special old-time charm.
Available blank: decoupage box
The blank for needlework can be made with your own hands, which is quite simple and affordable. You just need to put together the optimal box and paint it according to your own taste. The basis can be a rack frame or a metal type replacement.
However, not everyone can make such an element on their own, so you can also purchase a box in a themed store, for example, Ikea. There you can choose a product for every taste! And only then decorate it in the style you like and a riot of colors.
A standard wooden box made of slats is suitable as a blank.
While working you need to stock up on:
- Free time;
- Patience;
- There is a sufficient amount of materials for handicrafts.
Decoupage on wood for beginners
If this is your first time trying to create work using the decoupage technique, then take an object with clear and even edges. Decorating such surfaces is much easier compared to round or distorted surfaces.
Decoupage of wooden boxes for beginners will be more accessible when using drawings on thick paper. They're easier to stick to a surface, so you're much less likely to ruin the image. The drawing must be made using water-insoluble paints. Otherwise, when processing with glue, the pattern may flow and become smeared.
Don't choose too complex compositions
Cut out the image carefully, paying attention to small elements. The more detailed you cut out the picture, the more interesting and attractive it will look in the final version.
If the picture has a suitable background, then it is better not to use scissors to create the template. It is enough just to tear the picture along the contour so that the edges remain torn. This way the image will fit better into the design of the item.
Vintage suitcase
If you are lucky enough to keep an old suitcase intact, then decoupage it with your own hands, using a napkin, in vintage style. This master class for beginners will clearly show how to do this.
Here are the accessories that will be needed in such a work process as suitcase decoupage:
- suitcase;
- napkins with a matching motif;
- glue;
- file;
- acrylic paints;
- acrylic varnish;
- candle;
- brush and roller;
- washcloth and sandpaper.
Clean the surfaces of the corners and repair the handle, and then degrease the suitcase with alcohol and leave it to dry. Rub all the edges of the suitcase with a candle stub, and then paint it with beige acrylic paint several times, allowing time to dry between jobs, as shown in the photo. In order to get the antique effect, use sandpaper to go over all the edges, as shown in the photo, and remove the paint. Choose vintage style napkins and peel off the top layer. Place them on a surface coated with glue and go over them with a roller. The most central design of the napkin is placed on the file, and water is poured on top. Then it is leveled with a brush and applied to the suitcase. Remove the file, holding the corner of the napkin, and cover the design with glue. Let the product dry.
Using a washcloth, blend the bronze-colored shadow over the entire surface and in the spaces of the image, as shown in the bottom photo.
The final touch is coating the suitcase with acrylic varnish and decoupage of the suitcase is completed. The master class in vintage style is completed, and such a musical suitcase will serve you for many more years.
Making chest decor
In order to breathe life into old things, you can decorate them yourself. It’s especially interesting that antique objects look great using the decoupage technique. Such ideas will be interesting, even for novice craftsmen.
Take an old chest and remove all the fittings from it. Now, cover it with a special remover for old paint, which will help remove the top layer of old varnish and stain. Wait thirty minutes and remove the top layer with sandpaper. Leave the chest to dry.
Once again, you should sand the chest, and then cover the entire surface with stain, except for the one where the paper motifs will be applied. For the best effect, mix several shades of stain and apply to the decorative item.
Apply several layers of primer to the material and sand until the wood is smooth.
Glue the pictures with glue to the sides of the chest, as shown in the photo.
Using a stencil, you can decorate the lid. To do this, apply construction putty and level it, and then quickly remove the stencil.
Take bitumen and apply it to the white pattern, and then, with a sponge soaked in alcohol or kerosene, erase the excess strokes, as in the photo.
The facade image can be made more subdued using craquelure, and then bronze construction powder. Acrylic varnish is applied on top of everything.
The vintage master class is completed, the decoupage of the chest is completed. The result is a wonderful antique product that will decorate any corner of your apartment or house. This decoupage of a chest will look relevant in the countryside.
As you have already been able to see by doing such master classes using the decoupage technique, creating such versions of products with your own hands is not easy, but very interesting and entertaining work that brings not only aesthetic pleasure, but also helps to diversify the same type of interior of an apartment, house or dachas
Vintage items have long been in fashion and are entrenched in the works of experienced needlewomen.
For beginners, it is recommended to watch videos and simpler master classes; it is better to start with them. When you are sure that you can duplicate decoupage lessons without problems, you can move on to a more complex level of skill. Don’t try to cover all facets of decoupage at once, do it gradually.
It is quite possible that such a hobby can develop not only into an everyday activity, but also into a job that brings material income. After all, almost every person has an old thing in their house that they inherited from their grandmother. Over time, it has lost its desired appearance and requires restoration. This can be corrected by a person who is dedicated to working in the decoupage style and can correctly make the necessary decor.
Examples of master classes can be found in large quantities on the Internet. On them, you are sure to find something suitable for you and your skill level.
Original ideas
A variety of techniques open up limitless scope for the flight of imagination . The choice of craftsmen is directly related to current trends in interior styling.
The following options are in fashion today:
- Gilding. This is done after gluing the pictures. The effect of gold leaf is given by potal (thin foil).
- Etching gives the wood from which the box is made a rich hue, while maintaining the texture of the material. As a mordant, you can use both improvised means (manganese, tea, blue) and complex chemical compositions.
- Crackle is artificial aging by creating cracks in a layer of paint or varnish. It is divided into single-phase and two-phase. Single-phase craquelure looks like a cracked layer of paint, through the cracks of which the lower layer of paint or the base of the product is visible. Two-phase craquelure is distinguished by a network of cracks on the box.
- Firing in sand. The sand is heated to 200 degrees and the product is kept in it until it darkens. If the desired tone of some parts is lighter, then it must be immersed in the top layer, where the temperature of the sand is lower and the wood is less susceptible to impact. This will help achieve a transitional shade from light to dark.
- Shabby chic with candles. The corners, joints and sides of the box are painted with a rich shade of paint. Then the bright layer is rubbed with candle paraffin and covered with light paint. The finishing layer is matte acrylic varnish.
- Spraying is done using a toothbrush. Droplets-splashes on the decorated box will create the effect of antiquity.
- Glazing is a technique borrowed from painting. Its distinctive feature is the transmission of the bottom layer of paint through the translucent top layer. The technique allows you to achieve beautiful color transitions due to the translucency of the layers.
- Dry brushing is a technique that is also borrowed from painting. This is a great way to give an item a retro feel. The point is that a small amount of paint is collected on the brush, the excess is removed and applied to the product with light movements. In this way, the relief is emphasized and abrasions are imitated.
- The “hot” method is ideal for gluing a napkin onto a flat wooden surface of a box that is not afraid of high temperatures. After covering the surface with two layers of glue and allowing each of them to dry, you should position the design and cover it with baking paper, then iron it with a hot iron.
- Decopatch is an imitation of patchwork technique. To create works using this technique, you can use various materials: from newspapers to special deco patch paper purchased in a specialized store.
This style is very easy to perform and does not require any special skills. The sizes of the pieces of paper depend on the size of the work; they can be glued slightly overlapping, forming a chaotic ornament.
Tips for thematic and compositional design of boxes
- For products that will be used in the nursery, it is best to use images of fairy-tale and cartoon characters, drawings of flowers and butterflies; the colors should be light and joyful;
- for those boxes that will be used in the kitchen, images of fruits and vegetables, flowers will be optimal;
- for boxes it is best to use common interior design motifs, such as Provence or kitsch;
- for boxes in which gifts will be presented, it is most natural to use motifs and colors that correspond to the gender of the gift recipient: for women, bright, rich colors, patterns and designs are suitable; men will be more pleased with discreet shades and images from the sphere of male interests (cars, weapons, armor, maps, etc.).
Decoupage a box is not too difficult and quite a fun activity. Proper efforts will give things a second life.