Thanks to drywall, the construction and finishing process has become much easier. Partitions and suspended ceilings are constructed from this material; it is used to level walls and create beautiful and unusual figures from plasterboard on the walls. Many private developers are trying to make the interior of their premises ergonomic and comfortable for living. In small rooms, it has become very popular to zone the space of the room with a partition, using various figured partitions and arches.
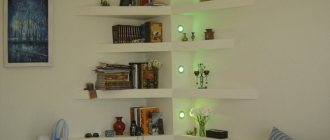
Plasterboard figure on the wall
Figures on the wall
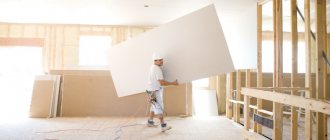
Working with drywall on walls is not that difficult compared to ceilings. Your hands don’t get as tired as when holding structures above your head. The work goes much faster, and the quality of the structures is better. Vertical walls can serve as an excellent field for realizing your creative ideas and fantasies.
Design on a plasterboard wall Figures can form entire compositions, which include shelves, niches, plasterboard arches, and original drawings. Some masters are able to recreate fragments of famous paintings on a plane.
Fireplace portal
Drywall helps to build an arbitrary structure around the fireplace portal, thanks to which the hearth succinctly fits into the style of the interior, looks neat, stylish, and original. However, the manufacture and assembly of such a structure should be entrusted to professionals, since high temperature and proximity to an open flame can lead to drywall fire. There are methods to ensure the fire safety of such structures, but this should be entrusted to professionals.
Drywall sheets are ideal for decorating false fireplaces that use technology to imitate “live” fire. Such fireplaces are completely safe, so they are used everywhere, and the plasterboard construction will help create the illusion of a real portal made of brickwork.
Box for decorative fireplace
Dry processing method
This is a simple option for creating figures from gypsum board, for which arched material is used. The thickness of the sheets is only 6 mm, thanks to which the plasterboard easily bends and takes the desired shape. When dry, the sheet can be bent 10 cm.
Dry method of bending drywall Before making a bend, construct the desired frame from a metal profile, on the sides of which cuts are made. The plasterboard element is placed against the profile and begins to be screwed with self-tapping screws for gypsum boards, carefully bending it along the structure. The screw pitch is 25 cm.
Important! Do not bend drywall using too much force, as it may break. The work must be carried out as carefully as possible. If the curvature is more than 10 cm, then small V-shaped slits can be made on the opposite side of the bend. The slots are made parallel, on the opposite side of the bend.
Example of arched drywall This method is simple, but the cost of arched drywall is slightly higher than regular drywall.
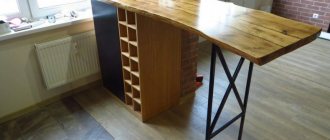
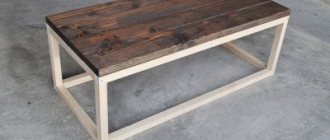
Bar counter
Using drywall, you can create a bar counter and decorate it in some original way. Such decorative elements look good in a variety of places.
First you need to make a frame. To make the structure as rigid as possible, it is better to use a solid profile for the corners. Using crabs, secure the guides and cross profiles. The frame should be stable. Make sure it is strong and install drywall. Racks can be made with niches or completely smooth. It will be necessary to putty the places where there are fasteners and joints.
Then sand the product and apply a coloring compound to it. After this, you can begin installing the lighting (if you want to decorate the resulting bar counter in this way).
For more information on how to make a drywall bar counter, see below.
Wet processing method
If there will be a large load on the structural elements, then it is worth using ordinary drywall for figured design. Only in this case will you have to use the wet method to create curvature, following the instructions:
- create a template from plywood or profile;
- Moisten the part from the outside with warm water; you can use a roller or brush for this;
- moisture will wet the cardboard layer and make the core soft, which will help bend the drywall;
Wet method of drywall processing - As soon as the part is sufficiently pliable, you need to immediately attach it to the template and leave it to dry.
Advice! There is another way that will help you get a bend. Fasten the sheet of drywall to a support and put pressure on it, leaving it for some time, during which the sheet will acquire the desired shape. The load should not be heavy, otherwise it will simply break the slab. If the curvature is more than six centimeters, then it is worth perforating the plasterboard fragment; to do this, roll one or two sides of the fragment with a needle roller, depending on the bend. Many small holes appear on the surface, which facilitate the rapid penetration of moisture into the core. Thanks to this fragment of gypsum board you can give it any shape.
Shaping the drywall sheet Important! If there are a lot of curves and shapes on the walls, then do not undertake the installation yourself; it is better to entrust this task to experienced craftsmen.
Window slopes
An excellent solution for decorating a window opening. This method is suitable for small apartments, since it allows you to use the available area, equipping it for storing all kinds of small items.
Using sheets of drywall, you can build a small sofa right next to the window. This will require wooden beams with a section of 50x50, which will take the main loads.
Glue mount
This is the easiest way to make a beautiful figure on the wall; just cut out the desired structure from drywall and glue it to the wall using silicate glue or tile mortar.
Attaching drywall with glue If desired, you can glue the drywall in several layers to make the figure on the wall more voluminous.
Surface preparation
The following manipulations need to be performed:
- Clean the surface from old coating, dirt and dust.
- Seal all cracks and irregularities.
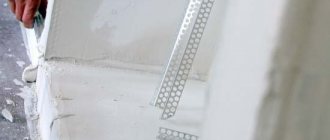
The edges of the profiles are cut with scissors. - To prevent fungus or mold from forming on the surface under the structure, it must be treated with antiseptic compounds and a primer.
- Enter the markings according to which you will subsequently carry out installation.
Once the marking is completed, installation can begin.
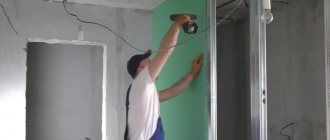
Making a frame
You should immediately pay attention to the fact that for curved ceilings and plasterboard structures you need to use stronger material than for a simple gypsum plasterboard partition. Therefore, the profile should have a cross-section of 75-200 mm, depending on the purpose of the structure.
For a shaped wall that will not be subject to heavy loads, you can take a profile of 50-75 mm.
In order to make a figure with a smooth bend, it is enough to make cuts on the sides of the profiles and bend them to the desired curvature. But if finances allow, then you can buy a special arched element, which consists of separate movable segments. The radial sections must be secured with jumpers.
Frame for a plasterboard figure on the wall You can first build a frame to which fragments of plasterboard parts are screwed. Or you can make a template, which is given the desired shape and then a curved element is created from gypsum board.
Headboard
You can also create a beautiful headboard from plasterboard material. First you will need to make a frame, and then cover it with plasterboard sheets. The resulting design is sometimes decorated with textile wallpaper with patterns or fabric. This headboard can even reach the ceiling.
If you don't want to create a frame, simply finish the drywall using leather or fabric. The product can be filled with foam rubber or padding polyester. Some decorate such designs with decorative buttons.
How to sheathe with plasterboard
The frame is ready, you can start attaching the drywall:
- we cut the material to the required sizes;
- We screw it onto the self-tapping screws, first the side fragments of drywall. This must be done very carefully, trying not to break the curved fragments;
- sew up the front part of the figure using plasterboard.
Now you can begin finishing the plasterboard structure. There are several ways to assemble the frame and cover plasterboard figures. The frame is attached to the finished fragment, and only then the structure is screwed to the wall and sheathed with plasterboard boards.
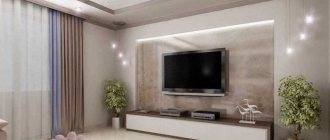
Covering a plasterboard frame on the wall The interior of an apartment in which one or more walls are decorated with beautiful figures looks very unusual and chic. If you make a niche on the surface for a TV, several shelves from gypsum plasterboard, for storing things or decor, then the interior will turn out to be ergonomic. Plasterboard figures on the walls, made in the corners, will help save useful space in a small room.
A figure made of plasterboard in the interior. A properly designed interior with the help of curly, curved structures will become the pride of the apartment owner, especially if it is made by hand.
Why gypsum board?
Everything is simple here - this material has several advantages:
- Extremely high prevalence. You can buy plasterboard sheets almost everywhere. As well as various components for working with it (profiles, screws);
- Drywall is plastic. Below we will describe in detail how to bend this material correctly. This will help you create literally anything, not limited to right angles and smooth surfaces;
- Easy to use. The skills of installing a frame and attaching drywall to it come quickly.
Important! In the complete absence of any knowledge in this area, it is not recommended to create complex figures, especially in order to obtain a 3D effect. The best choice will be simple designs that will help make your home original, and which we will talk about later.
Finishing plasterboard figures
For finishing you can use various finishing materials, for example:
- If you use wallpaper of a contrasting shade for cladding, you can get a magnificent accented interior.
Finishing a figure from plasterboard - By making a curved wall in the shape of an arch, you can divide the space into zones. This technique will help make a small studio apartment attractive. In addition, the sleeping area will be separated from the common area.
- Curly walls painted in various shades look very good. It is important to remember that curved structures must be designed in accordance with the overall design of the apartment.
- You can use gypsum decorative brick-like stone for finishing. This finish will make the loft-style interior attractive, without having to spend a lot of money and effort to build a real brick wall.
In fact, there are a lot of finishing options, it all depends on the tastes of a particular person.
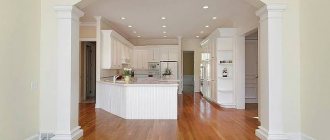
Column
With the help of plasterboard columns you can hide various communications and divide the space. Such decorative elements are suitable for rooms of various sizes. Column frames are attached to the ceiling and floor. Columns are usually installed in corners or next to walls. First you will need to process the plasterboard material using a needle roller.
Wet the drywall and give it the required shape, using a pre-prepared template for this. Installation work can only begin after the product is completely dry.
When you have installed all the plasterboard material, you can apply decorative plaster, paint, putty, and sand the surface. It is possible to use Venetian marble (such a coating will look simply fascinating on the surface), polyurethane, and gypsum stucco.
Photo selection of figured plasterboard structures for walls
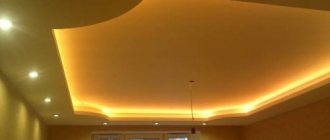
Lighting and backlighting
Any lamps can be built into a plasterboard box: from classic chandeliers to the latest LEDs. There are three classic lighting planning schemes - along the perimeter, by zones or by design accents.
Chandelier
When installing pendant chandeliers, remember that drywall is a fragile material, so the fasteners must go into the concrete base. Use special extension pins or attach the lamps directly to the frame elements. Lightweight shades can be fixed to the sheet using butterfly dowels, which redistribute the load.
Spotlights
Spotlights can be of different shapes, configurations and brightness, open and closed, rotating and fixed. Even rows visually enlarge the room, light around the perimeter provides uniform diffused lighting, and a curvilinear arrangement emphasizes the design concept. For installation, it is enough to cut holes in the drywall with a special nozzle and secure the cartridge.