A room with a dressing room means daily functionality and convenience. However, to achieve this, you must choose the right storage system.
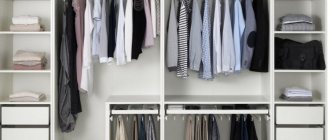
The wardrobe storage system from Ikea is not only a convenient way to store things, but also a stylish part of the interior of the room.
IKEA wardrobe systems are popular all over the world because they allow you to optimally and aesthetically place a large amount of clothes and shoes. Ikea designed them specifically for easy storage. In addition, the presented complexes require additional equipment with baskets, shelves, nets, etc., and this makes the operation of such systems more comfortable.
This wardrobe system will fit perfectly into any interior.
I’m also pleased with the possibility of placing them in any free corner of the room: you can even place them on the balcony, in the attic, etc.
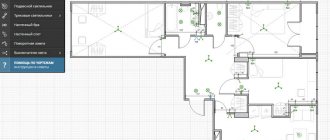
An old program for designing a kitchen, bedroom, office from IKEA (IKEA Home Planner).
The bedroom is the place where people spend most of their time at home.
Therefore, this place should be full of comfort, satisfy your needs and be perfection itself. IKEA has tried to help you design your bedroom. The kitchen is the second most visited
place in the house. Every woman should feel comfortable, enjoy the perfection of the environment, its functionality and beauty. The kitchen is a female outpost that does not tolerate male interference. This program will help a woman keep her secrets and organize her cabinets and shelves. Understanding its operation will not be difficult, because IKEA has taken care of it.
This design program will help you set up your own office or office and become a source of interior design advice. Choose from desks, cabinets, conference tables and more. Not only will you save time and money, but you'll also have a great workspace—showing off your business acumen.
Instructions with screenshots and videos
Scheduler start window
Here we choose where to start, there are options:
- Editing a ready-made wardrobe
- Create your own option from scratch if there is no suitable ready-made option.
This window has an additional function button “See.
appearance", when clicked, we switch to the view with facades or the view without facades (doors), and we see the proposed content. If you start with a ready-made version, you can also change the contents of the closet to your own version.
Working with a ready-made option in the designer
When choosing a ready-made option, we see a window in the wardrobe; under the main photo there are buttons for selecting the type of photo of this wardrobe, including a photo in the interior. At the top there is a button to return to the gallery, where you can continue selecting a suitable cabinet if you are not satisfied with this one.
To change the contents of the wardrobe and facades, click the “Change PAX” button
In the wardrobe change window there is a menu with two tabs:
- “Add product” - here we select frames, internal elements, decor.
- “Room plan” - here we design a room and see the external appearance of the cabinet in 3D mode.
Room plan
This is a full-fledged 3D editor, here we select the size and shape of the room, add niches, windows and doors.
Editing is intuitive; to edit, click on the walls; the active element is highlighted in blue and can be edited.
Internal filling of the PAX cabinet
To create a wardrobe from scratch or edit a finished version, go to the “Add Product” tab and drag the necessary elements into our virtual room and wardrobe.
IKEA wardrobe designer online
At the bottom of the planner window there are buttons for controlling the view and position, a ruler, etc. When you hover the cursor over the button, a hint about its functionality appears.
Choosing the contents of the wardrobe
IKEA PAX wardrobe planner - choosing fronts
The final result of wardrobe design
At the top right we see the price of our kit and an icon with stripes. This is a button to print and save our project; when pressed, a menu will appear. In it you need to select the items you need:
As a result we get:
- virtual photo of our wardrobe in the interior
- shopping list
- room plan
- arrangement of internal elements.
Detailed video instructions for working with the IKEA PAX planner
BESTO shelving planner program.
Stylish and original shelving for the living room will cope with all the tasks assigned to them. The BESTÅ shelving unit will fit into a living room of any size and will accommodate a TV of any size. On the left, on the right, above and below the TV there are convenient places to store your things. On open shelves, in drawers, behind glass or wooden doors... We put beautiful things on display for everyone to see. And if they are simply useful, we place them in ideal storage conditions. Special shelves for storing discs will put your audio and video library in order.
Open (in new window)
Other constructors
IKEA PAX is not the only online planner; there are other types of such programs.
Furniture designer ELFA
Preparing a project with a specification here will take 10-15 minutes. A significant disadvantage of the program is that it is not publicly available; a special key is required to work with it.
Website: mebelmne.ru
Planner Larvidge
which is valued for the perfect binding of elements to each other. Before you start planning, you can use the video instructions that are on the website. The Lavrij wardrobes themselves are easy to assemble, spacious and laconic.
Website: larvij.com
ARISTO
These wardrobes are made of high quality steel and allow you to place shoes and clothes even in a small room. In addition, they are suitable for storing household and sports equipment. The structures are easy to install and model by rearranging the shelves.
Website: www.aristo.ru
Wardrobe design software is a resource that lets you design a room in real time. It will help you rationally arrange furniture, calculate the cost of necessary materials and design a room that is comfortable for the family.
Preparatory work
Before starting repairs, it is necessary to resolve financial issues and determine price limits for yourself. The wide range of furniture presented in stores allows you to choose the most suitable product for yourself, both in quality and cost. One of the most popular manufacturers of furniture and home items is the Swedish company IKEA. Its products are very popular among Russian buyers, while the prices are much more affordable, and the goods are of higher quality than those of many domestic analogues.
Room measurements
Once the issue of choosing style, furniture and accessories has been resolved, and the price range has been determined, you can begin measuring the kitchen. To do this you will need a tape measure, a piece of paper and a pencil. Using a tape measure, you need to measure the height of the room (from floor to ceiling), the length of the walls, the width and height of door and window openings, niches, protrusions and other architectural details. The data obtained should be noted on a drawing made schematically by hand. It is also necessary to indicate the location of existing sockets, switches, ventilation and plumbing. Sockets that are planned to be added during the renovation process should also be marked in advance on the drawing.
Convenient furniture arrangement
Designers advise planning the placement of furniture according to certain rules, which will allow you to use every kitchen detail with comfort and convenience. An important aspect that you should first pay attention to is the “work triangle”. It includes: a cooking, washing and storage area. All three of these zones should be located in close proximity to each other.
Unfortunately, not every modern kitchen can boast a large area in which you can arrange furniture the way you want without any extra effort. But even in small rooms it is easy to take into account all the nuances and make the kitchen ergonomic. To do this, you should use some tips:
- It is better to prefer drawers to hinged facades. This will make it possible to compactly store kitchen utensils, and, if necessary, quickly find the desired item, thanks to modern opening systems.
- Space in small kitchens needs to be used to the maximum. To do this, a good option would be to functionally organize an area near the window by placing a cabinet with a work surface there. You can also replace the window sill with a countertop like in a kitchen set.
- For ease of work in the kitchen, it is better to place a countertop of sufficient size between the sink and the hob. This way, it will be easy to process food by taking it out of the sink and preparing it on the work surface for further cooking or frying on the stove.
- A lack of outlets can severely limit your kitchen's options. Therefore, even before repairs, you should decide how many there should be and in what place they should be located. For small household appliances standing on the countertop, it is better to install sockets in the apron area, and for built-in appliances and a refrigerator, at a height of 10 cm from the floor, behind the cabinets.
- In order not to clutter up the space on the countertop, it is better to use special rails with hanging containers in the apron area. So, the working plane will not be cluttered with all sorts of small objects, and everything you need will be at hand. The IKEA company offers original interior solutions for the kitchen, including roof rail systems.
IKEA household appliances
In addition to kitchen modules and other accessories, IKEA's assortment also includes household appliances. True, the selection is not as large as in specialized stores. But all devices are distinguished by their stylish design, high quality and long service life. In addition, they are easy to combine with existing furniture and create harmonious ensembles together. The IKEA range of household appliances includes all the items necessary for the kitchen: hobs, ovens, microwaves, hoods, coffee makers and other appliances.
PAX wardrobe from IKEA. Full review, interior photos
The PAX wardrobe system, like METOD kitchens, allows you to assemble furniture in accordance with the type of manufacturer. But is it so universal and will it solve your data storage problems? I will share with you my personal shopping experience, and also show you how the cabinet looks in a real interior.
How to assemble Ikea furniture with your own hands. Photo. Instructions. Adviсe.
IKEA has the ability to sell furniture at discounted prices, in part because the store sells furniture unassembled, giving customers the opportunity to assemble it themselves. Although this company's furniture is known for its simplicity and simplicity, assembly can be quite challenging.
The instructions included with IKEA furniture contain black and white illustrations with little or no explanation. But this does not mean that you will have to pay extra to IKEA for assembling furniture. If you take the time to follow the step-by-step instructions, you can assemble your furniture quickly and easily.
Here is a list of tools you will need:
- scissors,
- reversible screwdriver,
- socket wrench.
Assembling the Pax wardrobe in a vertical position. Assembling an Ikea cabinet.
Each assembled product is accompanied by fairly clear step-by-step instructions. The manufacturer approached the problem quite seriously - safety measures were observed when the buyer himself created a large item. The manufacturer’s diagram indicates the required number of people performing the assembly, the mandatory fastening of large-sized furniture to the wall, the area or size of the space required to assemble the structure.
But our internal room dimensions do not always meet European standards; the lack of an assistant and many other unforeseen circumstances will not prevent us from creating our own interior.
Let's consider a fairly common problem of low ceilings. For example: let's take the Pax modular wardrobe system - a beautiful and reliable design; cabinets with a height of 236.4 and a depth of 58.0 are in greatest demand. The instructions give recommendations that installing furniture in a house is possible with a ceiling height of at least 250 and two mechanics are required; the cabinet frames are assembled horizontally.
It is also possible to install the Ikeevsky Pax cabinet in a vertical position (we only give practical advice), with a ceiling height of at least 237 for a cabinet with hinged doors, 240 for a sliding wardrobe without recesses in both cases, and two people will perform this action. Our dimensions are indicated for the entire perimeter of the furniture, since the furniture consists of frames connected to each other, so the curvature of the floor and ceiling should be minimal.
We prepare the cabinet parts for standing connection:
1. We install the screw cylinders on vertical panels, glue thin felt rollers to the bottom of the same panels (safe movement of the floor structure), and remove the baseboard along the length of the cabinet to attach it to the wall.
2. Insert cams and plugs into the horizontal shelves.
3. Insert the plugs into the front plinth and install the leveling feet on the bottom shelf.
4. Prepare the back wall of the cabinet, drill holes for nails with a 1-1.5 mm drill, 5 mm from the edge.
5. Hold the panel vertically and insert the base.
6. Insert the bottom shelf, close the locks
7. Insert the top shelf holding the structure and close the locks.
8. Attach the second vertical panel. The wood dowels and rods on the panel should fit into their holes on the shelf.
9. Carefully place on the back wall and nail the vertical panel and bottom of the cabinet (Ikea has several sets of pieces for the back wall of large cabinets, 4 small ones or 2 pieces of fiberboard).
10. Nailing. The hardest stage is over. The article is ready. Pax furniture frames are attached to furniture straps.
11. It is recommended to drill out an Ikeevsky cabinet with heavy doors to the wall.
The cabinet frame must be level! Distortion of the geometry of furniture when attaching it to the wall is not allowed!
What you need to assemble furniture from IKEA
Low cost and high-quality design make IKEA furniture popular and in demand, but the problem of assembly is acute for every buyer. If you don't want to pay for the services of a professional assembler, arm yourself with three basic tools:
- Phillips screwdriver (preferably double-sided);
- scissors;
- socket wrench.
Usually this set of tools is enough to assemble any IKEA product from a simple table to a kitchen set.
Each product comes with an instruction manual, but it is rarely detailed. There are often no instructions. If you can't find the insert, go to the IKEA website and enter the eight-digit article number found on the package in the search and you can find the instructions. The box and instructions should be retained in case further disassembly and reassembly of the product is required during shipment.
The main mistakes when assembling a wardrobe - Pax coupe from Ikea
When installing a wardrobe on their own, the buyer sometimes encounters some problems.
The Pax wardrobe doors touch each other and do not move well along the guide.
1. The doors are mixed up. In older cabinet models, the vertical door frames are wider than the inside. Door frames closest to the furniture frame, o
... It is necessary to rearrange the roller system on the doors.
2. Do not overtighten the screws when tightening frames or installing casters. If the screw does not lock - it is torn or does not “follow” the thread - unscrew it with pliers, use a tap to “push away” the thread, and tighten the screw.
3. The roller has come out of the guide, the door latch is not closed. We install the roller and carriage into the guide and fix the plug.