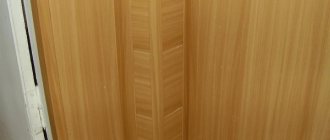
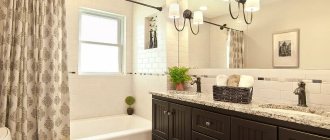
When planning renovations in a combined or separate bathroom, it is important to choose the finishing materials wisely. In this case, you need to take into account: usually this is a small room, in which it is periodically very humid and sudden changes in temperature are possible. But finishing is not only about ease of cleaning, but also about a harmonious appearance. Plastic panels meet all these criteria. Let's look at how to use them to decorate a bathroom.
Options for decorating a bathroom with plastic panels Source proraboff.rf
How to choose the right plastic panels
We do not touch on design issues; this is the topic of the following articles. Let's talk only about construction aspects.
Check mechanical strength.
The stronger the panels, the more durable and high-quality the cladding. Check them before buying, squeeze them with your fingers at the end. You'll be surprised how different the materials are, regardless of price.
There are cheap and durable PVC panels, and vice versa, expensive, but similar in strength to cotton wool.
The quality of the panels depends on the raw materials used, equipment and production technology. Never buy soft panels; if damaged, it is almost impossible to replace them.
Check the patterns to match.
Domestic manufacturers often sin. Complex multi-color patterns on panels require maximum responsibility from manufacturers.
Applying patterns is not a simple process; quality control must be carried out at all stages of production.
Installation of low-quality panels leads to the fact that individual elements on the lamellas do not match. If this happens with ceramic tiles, then by slightly adjusting the gaps the situation can be corrected; this cannot be done with panels.
We understand that it is difficult to check in a store.
Warn the seller that such a check will be done by you at home, be sure to take a receipt. At home, lay the panels out on a flat surface and carefully inspect all the joints, pay attention to how the lines of the pattern or design move from one panel to another.
Pay attention to the joints; there should be no gaps.
Unfortunately, some manufacturers manage not only to leave gaps, but also to make them uneven in width. The reason is low-quality raw materials, old machines and the human factor.
The defect becomes even more noticeable if modern spotlights are installed in the bathroom, cracks cast shadows, and the appearance of the walls and ceilings will upset even very undemanding clients.
The thickness of the panels over the entire area must be absolutely the same.
Connect the two lamellas and see if the joints lie in the same plane.
If there is a slight difference in height, then this is a defect. When the room is illuminated, shadows of varying widths are formed in these places, and the appearance of the wall will be irrevocably damaged.
Check the material for ductility.
If the panels are made of recycled PVC, it will crack during fixation. This is a significant defect; the strength of the fastening is significantly reduced. Recycled PVC is obtained after processing products from primary PVC.
The cost of raw materials is much cheaper, which tempts unscrupulous manufacturers.
Use the information when purchasing materials, do not create additional problems for yourself. Remember that high cost does not always guarantee the same quality.
Advantages and disadvantages of using PVC panels
This finishing material has recently become particularly popular.
It is made on the basis of so-called polymers, which eliminates the possibility of water permeability.
The production of panels is carried out in the form of panels measuring 3 meters, and their inner part is empty and perforated.
These dimensions make it possible to mount without using horizontal joints in absolutely any space.
The width of the PVC panel for the bathroom in this case has several standard sizes.
The front part can have a wide variety of patterns, shown in the photo of PVC panels for the bathroom, and the range of colors is quite wide.
The store mainly presents catalogs of PVC panels for the bathroom. The ends of the panels act as locks, which is extremely convenient during the installation process.
To finish the installation of PVC wall panels for the bathroom, it is not enough to purchase only the material; in addition, you will need external and internal corners, strips and borders.
The most budget-friendly way of finishing is considered to be DIY. The main advantages of this method include:
- low cost of materials;
- low payment for work performed;
- convenience and minimal time investment.
Read here! Application of Kirchhoff's laws
Special attention should be paid to several disadvantages, for example, low strength and poor environmental friendliness.
Cladding using the frameless method
This method is most often used when carrying out DIY repairs in old bathrooms, for example, Khrushchev-era buildings, where the walls are covered with a layer of paint, and the silicone adheres well to the base.
Frameless technology allows you to complete the sheathing in 1 day, and there is no need to drill the walls.
Required tools and materials
In addition to the plastic panels themselves, you will need silicone sealant, colored or transparent - it doesn’t matter. You will also need starting profile strips, internal and external corners, although in some cases you can do without these elements.
To remove silicone residues, it is recommended to use alcohol or gasoline galoshes.
Important! When using a solvent to remove sealant, you should first test on a small area of the panel so that the pattern does not wash off.
Tools that will be useful:
- Building level.
- Square, tape measure, pencil for marking.
- Syringe gun for applying silicone.
- A construction knife and a small grinder for cutting panels.
- A small metal spatula for inserting panels into the starting profile.
- Plastic spatula to remove remaining sealant.
To attach panels to a metal or wooden frame when covering boxes and bath screens, you will need a screwdriver and self-tapping screws.
Preparing the walls
Preparing painted walls involves dismantling protruding elements, sealing large chips and other defects with putty. The walls are washed so that they are free of dirt and lime deposits. Additionally, it is recommended to degrease the surface with an alcohol-containing product.
For safety reasons, you should not use gasoline or thinner for these purposes in an unventilated area.
Preparing panels
If panels with pattern matching are selected, the material is placed in one of the rooms in the order in which they will be installed, so as not to make a mistake with the pattern.
Before you start gluing the cladding, you need to decide where the installation will begin. Another important nuance for patterned plastic is trimming, since the strips are 2.7 meters long and the ceilings are usually lower.
In the example under consideration, it was decided to trim at the top and bottom so that the decorative border remained visible right up to the ceiling.
Note! If there is an imitation of tile in the picture, it is advisable that when tiling the wall above the bathtub, a whole “tile” extends from the side. This aspect is also taken into account when calculating the cutting length.
Installation of panels on walls
Installation of the first panel is the most critical stage, since the final result depends on the evenness and correctness of its gluing.
Let's consider the main stages and nuances of installing PVC cladding with sealant:
To prevent moisture from getting behind the cladding, and to ensure that the junction is neat and even, a starting profile is glued to the floor covering using sealant, into which the lower end of the panel is subsequently inserted.
The first panel is leveled from the corner. If the walls are uneven (filled up), the strip is cut so that it is installed strictly vertically.
If you do not set the first strip, the entire cladding will lie unevenly and the design will move off.
Sealant is applied pointwise to the back of the panel, after which the strip is pressed against the wall surface and leveled and pressed tightly along its entire length.
Subsequent strips are glued in a similar way, paying attention to the alignment of the pattern.
The walls above the bathroom are sheathed according to a similar pattern:
- The starting profile is glued to the side.
- Silicone is applied to the back of the plastic and into the groove of the starting profile to ensure maximum tightness.
- The bottom edge of the panel is inserted into the groove, after which the strip is glued to the wall.
Typically, joining panels in the corners of a room is done using a corner profile, which is put on the end of the plastic. But for cladding with a pattern, it is very difficult to select additional elements to match the tone, so to seal the corner junction proceed as follows:
- After installing the last strip, the remaining space is completely filled with silicone.
The first strip is installed from the corner, and the protruding remains of the sealant are removed with a spatula. After this, it is recommended to wipe with gasoline or thinner to completely remove traces of silicone.
This corner connection is sealed and is not noticeable, since the pattern is not interrupted by a corner.
Note! When installing the first strip from each corner, it must be leveled. If the walls are a little full, the panel will have to be cut diagonally (to a cone) in order to position it strictly vertically. For diagonal cutting, a grinder is used.
When going around the risers, a frame is built, which is also covered with plastic, which is secured with silicone and self-tapping screws. The same fixation method is used when covering the screen under the bathtub with plastic.
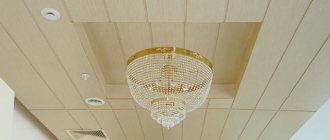
Ceiling finishing
Now let's look at how frameless ceiling cladding with plastic panels is produced step by step.
Since the object considered as an example has a wooden ceiling, it must be treated with an antiseptic. The easiest way is to pour the product into a bottle with a hand sprayer and apply the antiseptic to the wood.
The next stage begins after the bioprotection has dried.
The plinth is cut to the size of one of the walls, and the cut is made at an angle of 45° to connect with the plinth on the other wall. To prevent a gap from forming between the wall and the baseboard, it is glued to the wall sheathing using liquid nails.
It is also recommended to apply a thick layer of adhesive to the top of the baseboard to ensure it adheres to the sub-ceiling.
Note! For additional fastening of the plinth to the ceiling, you can use screws or staples. But this method has a drawback - the panel dangles in the widened groove and does not hold tightly enough.
Therefore, it is better to apply a thick layer to the top shelf of the baseboard.
Three more plinths are attached in a similar way, and the fourth part is mounted at the very end, after attaching the last strip of plastic.
Installation of ceiling panels begins after the glue that glues the baseboard has completely set.
To accurately cut the strips, measure the distance between the plinths and add 3 cm - this is the distance the panels will go into the plinth (1.5 cm on each side). Plastic is cut with a sharp knife or grinder.
Advice! At this stage, it is calculated what width remains after installing all the entire strips. This is necessary so that at the end you do not end up with a narrow insert, which will spoil the beauty of the finish. It is best to ensure that the outer panels on both sides of the ceiling are cut to the same width - symmetrical trims look more attractive.
Another nuance arises if the room does not maintain a right angle between the walls. In this case, the outer strips are cut slightly at an angle to make this tapered cut as inconspicuous as possible.
The ceiling plastic strips themselves are quite easy to install:
- First, one edge of the panel is inserted into the baseboard and pushed in until it stops.
- The panel is then bent slightly in the middle so that the other end can be brought in.
- After the second edge of the panel is inserted into the plinth, it is moved back 1.5 cm so that the strip fits into the grooves at approximately the same distance.
- The strip is then pressed tightly against the previous panel so that the slots of the lock joint fit tightly into each other.
Additionally, the strips are attached to the base with self-tapping screws. To avoid gaps when pressing the edges of the panel, plastic scraps are placed under the self-tapping screw. Also, you don’t have to fasten the edges: 3-4 fixation points in the central part are quite enough.
The installation of the last panel is slightly different from the installation of other strips.
Since it is more difficult to insert, it is cut so that at the edges it fits into the plinth by 1 cm. Next, the cut strip is inserted completely from one edge, while the second end freely reaches the groove of the plinth without bending the panel. After this, the strip is simply pushed into the second plinth by 1 cm.
To prevent the panel from sagging, it is pressed along the edge with 3-4 screws. They can be made hidden: the first layer of plastic is drilled, and a self-tapping screw is screwed into the hole, which presses the strip behind the second layer.
Installation of the last (fourth) plinth also has its own nuances:
- The upper part (the groove for inserting panels) is cut off from it with a knife.
- Liquid nail glue is applied to both sides.
- After this, it is applied to the installation site and pressed against the wall and ceiling panel.
At this point, covering the ceiling with plastic using the frameless method is completed.
Panel processing
PVC panels are easy to process. This can be done in various ways:
- A special (assembly) sharp knife. Longitudinal cutting method: using a foot rod, measure the area to be cut. Cut the panel along its entire length, bend the lamella along the cut, and cut completely. Transverse method: measure the cut area, make a cut in the lamella including the jumpers between the sides of the panel. Bend the material and cut the panel completely.
- Grinder with a metal disc.
- Cutting with a hacksaw is time-consuming and difficult; it can be used if there is no other tool at hand.
Sheathing using frame technology
A more familiar and common option is finishing the bathroom with plastic panels and constructing a frame. This allows you to fix the cladding without first leveling the walls, and also to hide all communications behind the cladding.
Required tools and materials
To carry out the work you will need:
- perforator;
- dowels and screws;
- wooden beam for mortgages;
- guide and rack metal profile;
- straight hangers;
- polyurethane foam;
- corrugation for electrical wiring.
Preparing the walls
Wall preparation involves dismantling the old finish and sealing large defects that affect the load-bearing characteristics of the partitions. Additionally, the walls are treated with a deep-penetrating primer for mineral surfaces with antiseptic additives.
Also at this stage, water and sewer pipes are laid out, electrical wiring is laid to sources of consumption.
Note! The electrical wire is laid in a corrugated tube, which is attached to the base (wall or ceiling) with special clamps.
Frame installation
To construct the sheathing, a galvanized profile for plasterboard is used, since wooden blocks are susceptible to rotting and warping when used in wet conditions.
The frame posts are mounted in the corners of the room and secured to the wall using direct hangers.
Horizontal jumpers are attached to the vertical posts in increments of 40–60 cm, to which the plastic trim will subsequently be attached. To connect profiles at an angle of 90°, the edge of the profile is cut and placed on the top shelf of the guide and attached to it with self-tapping screws.
In places where attachments are installed: cabinets, shelves, heated towel rail attachments, and so on, additional jumpers (mortgages) are provided. To ensure that the fastening of the equipment is as reliable as possible, it is recommended to reinforce the profile with a wooden insert, which is fixed with self-tapping screws.
A frame for the box is also assembled around the riser.
Advice! To give additional rigidity to the frame in places where any elements are attached, it is recommended to foam the space between the mortgage and the wall. You can also foam the corners: this will make the frame less noisy.
A similar frame structure is assembled on the ceiling base for its cladding.
Installation of PVC cladding
The bathroom trim starts from the ceiling. Along the perimeter, a starting profile is attached to the metal guides, into which the edges of the panels are inserted. The strips are attached to the cross members of the frame with self-tapping screws and a press washer. To ensure that the junction of the panels is minimally noticeable, they are tightly connected to each other.
But there are models with a selected edge, which, after joining two strips, forms a V-shaped seam. Therefore, when choosing a material, you need to pay attention to this nuance.
After covering the ceiling, they begin to install the plastic on the wall frame:
- The starting strip is fixed at the bottom and top. It can be glued to the floor covering with silicone to create a sealed joint.
- The panels are inserted into the grooves of the starting profile and fixed to the frame with self-tapping screws.
- When connecting two panels in the corner of a room, use a corner profile.
To make the finish look cohesive, the outer stripes of one row must have the same width. This is calculated before the first strip is attached. Another option to decorate a corner beautifully is to bend the panel and attach it without using additional corners.
To do this, 2-3 cm is cut out from the back side of the plastic (the front part should remain intact). After this, the panel can be easily bent in the desired direction to form an outer or inner corner.
Tips for choosing panels
Before purchasing, you need to imagine the design of the room and focus on a specific idea, taking into account the features of the room.
Basic recommendations
- For a small bathroom, it is appropriate to choose light shades, thus increasing the visual volume of the room;
- An interesting solution is the arrangement of plastic panels of different sizes and designs. For example, you can combine contrasting tones;
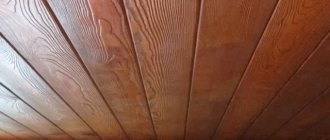
- The wooden texture will allow you to decorate the room in an ethno style;
- You should not combine polyvinyl chloride cladding with expensive materials, such as marble. In this case, the interior will turn out tasteless;
- If desired, you can choose plastic panels for tiles. Thus, the decoration of the bathroom can be done in a classic or neoclassical version - with columns, friezes and borders;
- Photo printing allows you to create an individual design, thanks to modern paint application technologies;
- Sheathed walls go well with slatted ceilings.
Disadvantages and advantages of plastic panels
Plastic panels are an affordable and modern material with which you can decorate your bathroom with high quality and style. The material has the following advantages:
- as a facing material, plastic melts only at a temperature of 400 degrees;
- environmentally friendly and safe;
- can last a long time without visible damage;
- the structure of the plastic will not be damaged even with prolonged exposure to moisture;
- easy to maintain and clean;
- there are no conditions for the growth of fungi and bacteria;
- there is no need to use special cutting tools;
- there is a wide range of colors and textures on the market;
- simplicity and speed of repair work when the need arises;
- affordable price.
However, this type of finishing also has a number of disadvantages:
- It is imperative that the installation be carried out correctly; if the work was carried out with errors, the material may diverge during operation;
- even with minor mechanical impact, traces may remain on the surface;
- release of toxic gas during fire; may be inferior to tiles in terms of external characteristics;
- When using such panels, it is necessary to ensure good ventilation to avoid the appearance of fungus and mold.
Panel installation
Plastic slats are mounted in several ways:
Installation on a wooden frame. After the necessary material has been purchased and the walls are prepared for repair work, it is necessary to mark the wall for the location of the slats.
- The first rail must be installed ten centimeters from the ceiling.
- The second rail is attached near the floor. Dowels are used as fasteners.
- Stretch a rope between the slats, following which you need to install the remaining slats.
- Secure all corners with a stapler, the angle of which should be strictly 90°. Measure the height and width of the wall to adjust the slats to the desired size.
- Place the first panel in the corner and secure it to the frame with a stapler. Next, install all the slats in the same way.
Installation on a metal frame. The principle of installing the frame is similar to installing wooden sheathing, only instead of slats, metal hangers are installed.
- Metal slats are mounted in the hangers, which are attached to the hangers with self-tapping screws.
- The slats are attached using press washers and self-tapping screws.
- Main. Avoid making mistakes during installation of the structure; for this you need to use a plumb line.
- It will be possible to correct errors only after installing all the slats, and this is very troublesome and expensive.
For which styles is plastic finishing suitable?
When choosing options for decorating a bathroom with plastic panels, you need to take into account the overall design of the room. For example, if we are talking about classics, it is better to avoid plastic altogether.
The same advice applies to a bathroom in the Provence, country or art deco style - here it is more appropriate to use natural materials and decorate the walls with plaster or waterproof wallpaper, in combination with tiles for the bathroom.
Modernism or minimalism is another matter; in such directions, plastic is used very actively.
The design of the panels is very diverse - from imitation of ceramic tiles, natural wood or stone, to ornaments reminiscent of wallpaper and spectacular panels with photo printing. Therefore, you should not be afraid that plastic will not allow you to bring creative design ideas to life.
In addition, the panels can be perfectly combined with other finishing materials. A striking example: the lower part of the walls is covered with clapboard and the upper part is plastered.
Which is better - panels or tiles
The answer to this question will depend on your desires and needs:
- Tiles (tiles) are a more difficult material to install, so it is recommended to buy it for people with experience in laying tile blocks. In addition, tiles are a fairly expensive material, so you will have to save up money to purchase them. Tile makes it more difficult to decorate a wall and create a full-fledged design (for example, flowers), although some people like an abstract tile pattern.
- Panels are a more versatile and simple material. Installing panel cladding does not require precise alignment of the walls, and plastic or acrylic panels are cheaper than tiles. It is easier to match the panels to the color of the toilet and bathroom. In addition, it will be much easier to install the material, so even a person without much experience in finishing work can cope with this task.
Equipment and additional elements
When finishing a bathroom or toilet with plastic panels, the following types of components are used:
- Universal corner. It is a plate bent at a right angle. The part is used for finishing internal and external corners.
- Skirting for floor and ceiling. Part of the profile is placed under the panels, the other side covers uneven cuts and surfaces.
- Outdoor corner. Helps to beautifully decorate the outer corner, hiding unevenness.
- Inner corner. It differs from the external one in the size of the sides. The wide part is placed under the lamellas, the narrow part is used to hide irregularities.
- Connecting corner. Used to connect panels without a lock. It is used when the length of the lamellas is insufficient for finishing the surface.
- Start/finish profile. It is installed when laying the first and last panels. Sometimes a finishing guide is used instead of a universal angle.
- F-shaped corner. Placed at joints and can replace casing.
- Sheathing plank. It is considered the main element of the frame. The part is made of metal or plastic.
- Klyammer. Used to press panels to sheathing. Allows you to remove slats without damaging them.
- Fastening elements. The material is secured with self-tapping screws, staples or liquid nails. The choice of fixation method depends on the installation method of the cladding and the quality of the walls.
Main selection criteria
Finishing a bathroom with PVC panels, in particular, the manufacturability of this work directly depends on the quality of the purchased material. When purchasing PVC panels, you should pay attention to the following factors:
- The number of stiffeners in the product. The greater their number, the higher the strength level of the panel;
- No signs of deformation or other flaws. On a quality product, there should be no damage or unevenness on the stiffening ribs. If there are any, then most likely the technology for their production or storage was violated;
- Uniform paint application and image clarity. There should be no paint smudges or blurred outline of the pattern on the PVC panel;
- Same size for all panels. This will facilitate the installation process and ensure that there are no gaps between the elements. Therefore, it is better to purchase material from one series.
Calculation of the number of panels and additional elements
The bathroom has a small area and a large number of corners. Therefore, measurements take a lot of time. The more transitions, the more unusable material residues there will be. When implementing interesting ideas that require creating a drawing, the amount of waste increases.
When calculating the material, you need to take into account a margin of 15%. Measuring the number and length of corners will help you understand how many corners and profiles you will need. Additional elements are inexpensive and can be purchased in large quantities.
When calculating the components of the sheathing, it is taken into account that they are placed in increments of no more than 0.5 m. The guides must be installed at the junction of the walls and the ceiling or floor, near doorways. Reiki are placed here in any position of the final element.
It is not possible to determine the exact number of fasteners. They are bought in packs.
Preparatory work
The quality of the entire installation of plastic panels depends on the correct implementation of the preparatory stage. Preparation of the surface of the walls and ceiling depends on the installation method:
- With adhesive technology, a special requirement is placed on surface leveling. First, all previous coatings are removed. Then, it is necessary to putty all obvious defects (dents, cracks, etc.). The next stage is plastering. It is applied to level the surface, and it is necessary to ensure not only a flat plane, but also to remove deviations from the vertical and horizontal. Finally, improved adhesion of the adhesive composition is ensured. For this, a deep penetration primer is used. Before installation, the surface must be thoroughly dried. The panels can only be glued to a completely dry wall.
- Frame technology does not require perfect surface leveling. Only pronounced defects are puttied to eliminate the risk of further destruction of the walls. The surface is cleaned only from old coatings that do not have sufficient strength. It is important to eliminate areas with mold and mildew. To do this, they are treated with special antiseptics. Most often, a solution of copper sulfate is used.
At the stage of preparation for cladding using frame technology, the condition of the pipes should be carefully checked. It is best to replace metal pipes with plastic or composite ones.
Attention! You cannot install plastic after it has been left for a long time at temperatures below 10 °C. In this case, the panels must be kept at room temperature for at least 24 hours.
Ceiling methods
There are several ways to properly sew a ceiling with plastic.
Installation of panels on a rough ceiling
The rough ceiling does not require special preparation. The finishing elements are laid as follows:
- Treat the surface.
- Antiseptic compounds are applied to the base and left until dry.
- It is recommended to install a waterproofing material, such as polyethylene film.
- The joints are taped.
Measure the distances between walls located opposite each other. The skirting boards are cut so that when two parts are combined, an angle of 45° is formed. It is not recommended to fasten the part with self-tapping screws. When installed on an uneven surface, the additional element will sag.
Liquid nails are used for fixation. At this stage, only 3 skirting boards are installed, the fourth is installed after laying the cladding.
- Panels are cut. The element fits into the plinth by 2 cm. Having measured the distance between the walls, add 1.5 cm to the resulting value. The remaining 0.5 cm makes installation easier.
- Re-measure the ceiling. If there are minor errors, they are eliminated by changing the size of the gaps between the lamellas. It is recommended to align the panels in hidden places. Open areas must have smooth joints.
- The end of the lamella is inserted into one plinth. The element is slightly bent and the second end is inserted into the opposite profile. The long side is inserted into the third plinth.
- Pressing the lamellas tightly against each other, they are fixed with staples. The more tightly the elements are installed, the stronger the connections will be. When fixing on an uneven ceiling, pieces of plastic are placed under the end of the panel. This will help prevent cracks from appearing.
- After installing the entire elements, measure the width of the uncovered part of the ceiling. Taking into account the obtained value, the material is cut using the previously selected method.
- The lamella is inserted into 2 skirting boards. One edge is connected into a lock, the second is secured separately. The element is fixed with liquid nails or self-tapping screws.
- The fourth plinth is removed from the base part. The remaining part is treated with glue and installed on the wall.
Installation of panels to the ceiling on a metal frame
This method is used when finishing an uneven ceiling yourself. The work is carried out as follows:
- Mark the installation locations of the supporting profiles. The parts are placed in increments of 0.5 m. If there are pronounced irregularities, hangers are used. They are mounted in the same way as on the walls.
- 3 skirting boards are glued using liquid nails. If there are no right angles, the cuts will have to be adjusted. The plinth is attached both to the wall and to the metal frame. After applying the plastic element, it is removed for 2-3 minutes. After reinstallation, the correct position is checked with a level. The corners are sealed with sealant.
- The ends of the lamellas are inserted into the baseboards. The finishing material is laid along the long side of the ceiling. This reduces the number of cuts and waste. The plastic sheathing is attached to the profiles with self-tapping screws.
To prevent the screwdriver bit from coming off from damaging the finish, place a metal spatula on the ceiling when screwing.
- The finishing panel is cut, taking into account the dimensions of the uncovered part of the ceiling. The back side of the fourth plinth is removed. The remaining parts are lubricated with glue and pressed to the base. After the glue has dried, they proceed to placing the lighting fixtures.
Preparing the walls
The main requirement for the surface on which plastic slats are mounted is that it must be flat.
- To do this, the protrusions on the walls must be knocked down and the recesses sealed with cement mortar.
- The permissible height of irregularities is up to one and a half centimeters.
- Wash the walls from dirt and degrease with a product containing alcohol. It is better not to use gasoline and thinner.
It is recommended to treat the walls with antifungal agents to prevent the growth of harmful bacteria and mold.
Dealing with them later, after the panels are installed, will be much more difficult. To do this, you will have to dismantle the panels, carry out processing, and re-repair the bathtub with panels. Between the wall and the panels is the most favorable place for the growth of fungal bacteria.
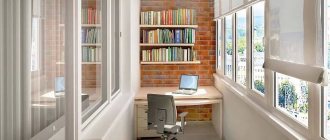
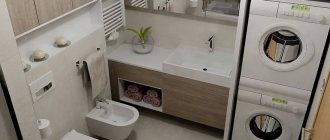
Photo: PVC panels in the bathroom interior
Why PVC
One of the decisive factors in choosing to finish a bathroom with panels is their low cost, wide selection and ease of installation, which is quite easy to do with your own hands.
Sufficient surface density and a variety of color options are complemented by the important water resistance and hygiene.
Among other things, not every apartment’s walls are suitable for laying tiles, due to dilapidation, unsuitable wall material or their uneven surface, which requires expensive repairs. Moreover, boring colors can be easily and inexpensively replaced yourself.
PVC material selection parameters
There are a significant number of products on the market, which can confuse the consumer. To avoid buying unsuitable material, read the certificates and labeling in advance. Cheap sheets made from low-quality PVC easily break during installation, and their texture fades.
Types of PVC sheets
Standard panel dimensions are:
- Width – 20-35cm;
- Length 270-300cm;
- Thickness 8-10mm;
Standard panel
Structurally, between the front and rear walls in one panel there are stiffening ribs, on which maximum strength depends. Therefore, when choosing, you need to check for strength. It is enough to press down the panel with your hand. If the bend is noticeable, it is better to refuse to purchase this sheet.
Do not purchase panels in the following cases:
- If damage is noticeable on the sheets, or stiffeners are broken;
- The texture of the facial wall is blurred or blurred;
- The surface has a different tone from one edge to the other;
- Different panel sizes;
- There are some scratches.
Care
Selection of products
For correct care, you need to familiarize yourself with several rules:
- First, protect your eyes, hands, and skin from contact with detergent. Wear personal safety equipment – hat, gloves.
- Remove all hanging items, if present.
- If there are large seams, you need to clean them with a rubber spatula.
- To clean PVC panels, use a soft, non-scratch sponge. For rags, you can use those that do not have lint.
- To protect the casing, do not allow the water to overheat above 40 degrees.
- When choosing a detergent, choose liquid or gel detergents. Powders can leave minor cracks, which become clogged with dust and spoil the appearance of the structure;
- After you finish cleaning the plastic with dust, be sure to rinse the solution with clean water. This way, fading does not occur.
- If the coating of PVC panels is glossy, additional treatment with polish will be required.
- Before using a new detergent, it is advisable to check for reaction with the material. Apply a small amount in an inconspicuous area, then wait 15-20 minutes. If visual changes appear, the product is not suitable for use.
Caring for panels
Using polyvinyl chloride sheets as a facing material for the bathroom is a good choice for people who do not have free time to install tiles or other materials. Quick installation, low cost and an abundance of color schemes are the main advantages of plastic, which is why it has become in demand.
How to choose material
The choice of design remains with the buyer; here we will look at how to choose the highest quality panels:
- The more stiffening ribs, the more resistant the material is to physical stress.
- The stiffeners should look smooth, intact and undamaged. Any defect in the future will affect the quality.
- Print quality is important. Before purchasing, inspect the front side for fuzziness of the edges of the design and uniformity of color.
- To avoid problems with joining, the panels must have absolute geometry; there cannot be any distortions.