Beautiful and high-quality ceiling structures are a sign of the excellent taste of the owners. It is pleasant to spend time and relax in such a bedchamber. Drywall is a very popular material, as it fits perfectly into any interior and perfectly highlights the different nuances of a room, making it unique.
Drywall will allow you to create a wide variety of ceiling structures and bring to life the most striking design ideas
Drywall is inexpensive, easy to install and allows you to experiment with the color and shape of the ceiling. With its help, you can disguise defects and any shortcomings of the room, and realize your fantasies. Let's look at the features of different formats - with several levels, original design and three-dimensional figures. It’s easy to choose a suitable plasterboard ceiling in the bedroom based on the photo, comparing the presented visual solutions and design possibilities.
Advantages and disadvantages of plasterboard ceilings
Drywall has numerous positive characteristics:
- environmental friendliness - natural materials are used in the production of drywall, which allows it to “breathe”. And this creates the possibility of natural air circulation in the bedroom;
- versatility - thanks to drywall, you can implement the most non-standard and unusual design ideas;
- fire resistance;
- soundproof;
- the ability to hide surface unevenness and utility lines;
- relatively low cost ;
- ease of processing, installation and light weight;
- aesthetics.
But along with the positive properties, there are also some disadvantages:
- low moisture resistance;
- plasterboard structures are usually solid, so if there is significant mechanical damage, the entire ceiling may have to be replaced;
- When installing drywall, the height of the bedroom is reduced from 10 to 25 cm.
Material advantages
The use of a plasterboard wall in the bedroom is justified due to its properties:
- the flexibility of the material is used for the construction of shaped forms;
- resistance to loads due to the use of a metal frame and fasteners;
- the ability to decorate the surface with a variety of finishing materials;
- the hollow design is suitable for additional shelves and compartments, and also hides communication lines;
- Light correction, installation of spotlights and LED strips are possible.
Plasterboard or suspended ceiling - which one is better to choose for the bedroom?
A huge variety of finishing materials makes it possible to install suspended and suspended ceilings in the bedroom. The most popular options are plasterboard and PVC tension structures, as well as their combination.
Each of these materials has its own advantages and disadvantages. Comparing these coatings will help you make an informed and informed decision.
- Installation speed. A single-level plasterboard ceiling is assembled during a working day by two builders. A stretch ceiling can be installed by two workers in 3-4 hours. But at the same time, the film is made in production according to preliminary dimensions, and this can take from 1 to 3 weeks.
- Labor intensive installation. A plasterboard ceiling takes longer to assemble than a suspended ceiling. But to install a plasterboard ceiling, you can use tools available in every home. And for a stretch ceiling you need a gas gun, which is capable of heating the air up to 80 degrees without damaging the electrical wiring.
- Environmental friendliness. PVC film contains petroleum products. Drywall consists of cellulose and gypsum - natural materials.
- Possibility of mechanical damage. It is quite easy to damage a stretch ceiling - this can be done even with a cork from a champagne bottle. To damage a plasterboard ceiling, you will have to apply force.
- Smell. Drywall does not smell at all, and when finishing it, water-based paints are used, which also do not smell. After installation, vinyl film emits a rather strong, persistent and unpleasant aroma for 1-3 weeks.
- Moisture resistance. PVC does not allow water to pass through at all. Drywall, including moisture-resistant ones, is “afraid” of water, and prolonged contact with it threatens to destroy the drywall.
- Maintainability. Minor damage to drywall can be repaired in a couple of hours using a spatula and putty. On PVC film, small cuts can be patched, but this is temporary - the film will have to be changed in any case.
- Light reflection. PVC has a glossy base, so it reflects light well, making the bedroom visually larger. Drywall is matte, so it does not create visual illusions of increasing space.
- Number of levels. Using plasterboard, structures consisting of several levels are created. PVC film is mounted only in one level.
Step-by-step instruction
To do the work yourself, you need to prepare measuring and electrical tools. All kinds of measurements are carried out with a tape measure, a plumb line, a building level and upholstery thread. Mark the surface and make markings using chalk and a mechanical pencil. Cutting and slicing of material is carried out with a stationery knife, saw, or metal scissors. To fix the fasteners you will need a screwdriver, impact drill or hammer drill.
Construction material is purchased in the required quantity according to the scope of the proposed work. In addition to profiles and drywall, you will need reinforcing tape to seal the seams. Putty and primer are applied with a special roller and spatulas.
Advice. If the premises are small and the workspace is small, deliver building materials as needed.
Preparatory work
First of all, draw up a drawing that includes all structural elements and materials used. You will need to take measurements, and based on them, calculate the required amount of building and consumable materials. Next, clear the work area and begin beating horizontal and vertical planes. Using a tape measure, plumb line and level, mark lines for the profile guides.
Cutting the material
The next step will be cutting the galvanized metal profile to measured dimensions and cutting out the plasterboard sheets. Please note that vertical posts are cut 1 cm less than the height from floor to ceiling. If it is necessary to fasten along the entire perimeter, the profile guides must be securely sewn. The profile is secured using a hammer drill and dowels at a distance of 30–40 cm from each other.
Frame installation
We install into the grooves and fix the racks using a screwdriver and self-tapping screws. The pitch between the profiles is set according to the required strength and load-bearing capacity of the structure from 30 to 60 cm.
Important! The more the structure is subject to load, the more strength you give it, reducing the distance between the supporting profiles.
Sheet cladding
Having assembled the metal frame and installed the wiring cables, proceed to cutting and installing plasterboard sheets. First, carry out installation on one plane. The sheets are mounted with joints on the profile base and fixed with screws.
Advice. The fasteners are screwed until the screw head is completely immersed in the body of the plasterboard sheet.
Then mount the remaining planes of the partition. The areas after the fasteners enter are treated with sealant and the entire surface is primed. Reinforce the corners of the planes with a special corner. The gaps at the junctions of the wall with the ceiling and floor are sealed with plaster. The seams at the joints of the sheets are plastered with a special solution, and the surface is puttied with a starting mixture. Further processing is carried out with finishing finishing material.
To create a decorative plasterboard partition with your own hands, you will need a little effort, patience and a few necessary tools. Approach the process creatively, follow the step-by-step instructions, and the result of creating a partition for zoning your bedroom yourself will allow you to enjoy new comfortable living conditions.
Types of plasterboard ceilings
Plasterboard ceilings vary in the number of levels.
Single-level
A single-level ceiling has the appearance of a flat surface with ceiling skirting boards around the perimeter. Typically, such structures are installed in rooms whose height is no more than 3 meters. Such designs are easy to implement.
Two-level
Two-level ceilings are usually installed in bedrooms with an average area. If the room is small, then it is better to avoid large ceiling elements, since they clutter up the space.
When constructing two levels, a sense of style and moderation is required. As a rule, such ceilings are made in the form of a frame around the perimeter of the bedroom. Frames can be oval, round, rectangular.
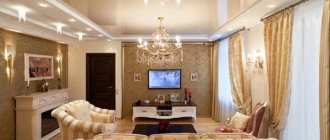
Multi-level
Multi-level structures include structures of 3 or more levels. They are installed in spacious bedrooms and are a complex geometric composition. These are one of the most popular ceilings.
Many levels in the design eliminate the feeling of emptiness and allow for zoning of space, for example, highlighting the bed area.
Various design options allow you to visually both reduce and enlarge the room.
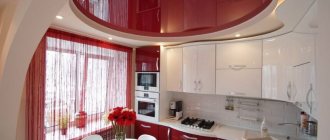
Variants of shapes and figures on the ceiling
The properties of the material allow even extraordinary ideas to be realized. The most popular ceiling geometry for the bedroom is:
- Circles and ovals. Such ceiling structures are usually made in a two-tier format, where the niche space takes an oval or round shape. They are able to visually adjust the space.
- Rectangles and squares. The classic type of suspended ceiling is suitable for a multi-tiered frame. With this design, a niche is made in the form of a rectangle or square and can visually enlarge the room.
- Triangles. A particularly bold decision when decorating a bedroom in an ultra-modern style. The frame for drywall is created in several levels, the highest of which takes a triangular shape.
- Non-standard. Abstractions and other unusual designs (flowers, leaves, swirls, clouds, etc.) that do not belong to specific geometric configurations.
The photo shows a two-level ceiling in the shape of a circle.
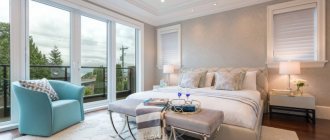
Plasterboard ceiling design for a small bedroom
For small bedrooms, a single-level ceiling is most relevant. It will not visually reduce the space and perfectly level the surface.
A traditional flat ceiling is the cheapest option, but less popular. Now designers offer options for plasterboard ceilings with original lighting, stucco molding or wallpaper.
On single-level ceilings, an open lighting system is usually used. Holes are drilled in the external ceiling structure and lamps are inserted into them. They can also be mounted on the surface.
A hidden lighting system is used for multi-level ceilings. They have niches in which LED strips or lamps are built in. Thus, the ceiling is illuminated directly.
Chandeliers are placed in the center of the room. For small bedrooms, the best option is a ceiling-mounted chandelier.
Multi-level ceiling
Multi-level figured ceilings for a bedroom made of plasterboard look best. A similar structure is created from three or more stages of drywall, which are attached at different heights.
- This figure is quite complex, but gives the bedroom a truly luxurious look. Therefore, this design is best left to professionals. This method of decoration gives a wide scope for imagination and allows you to realize the most original ideas. In addition, it helps to zone the room.
- In this case, light glossy colors should be used, possibly combined with other materials, for example, with stretch ceilings. Photo wallpapers are not suitable here, as they will unnecessarily clutter the space.
- First of all, you should realistically assess the height of the ceiling. This design is quite voluminous and takes up a large amount of space. Therefore, the multi-level option is suitable only for the lucky owners of high ceilings.
Adjusting a narrow bedroom
The smaller the bedroom, the smaller the various decorative elements on the ceiling should be, or they should be small. In small and narrow bedrooms, it is advisable to avoid installing a multi-level structure.
A transverse strip will help to visually expand a narrow bedroom, dividing the room into equal zones. It starts at the head of the bed, smoothly flowing to the ceiling.
However, with properly selected lighting and professional design, even a narrow bedroom will not seem so.
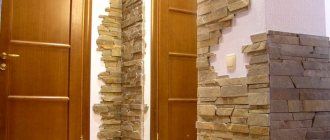
Construction and use of niches
Plasterboard finishing can include various niches in the bedroom. These elements can be used for built-in furniture, bookcases and shelves at the head of the bed, for placing various decorative and artistic products - small sculptures, vases, paintings, engravings, prints. Niches are also made specifically for installing household appliances in them - televisions, stereo systems. Next to them are usually shelves for storing disks. The design of niches can be done using natural or artificial materials - wood, finishing stone, ceramic tiles, mirrors that visually increase the volume.
Decorating the walls with plasterboard in the bedroom can be done with your own hands, without the help of construction workers. To do this, you just need to acquire the necessary tools, show good taste, creativity and accuracy, and also follow certain instructions. Then the bedroom design will delight you and your family with its unique appearance for a long time.
Color spectrum
One of the main components of creating a cozy bedroom is the color of the ceiling. More recently, ceilings were simply white, but now designers offer various shades, each of which has its own effect on a person’s psycho-emotional state.
Blue
This color is perfect for bedrooms with low ceilings as it visually expands the space. However, this color is considered cold, so it is advisable to dilute it with bright elements.
In multi-level ceilings, blue color is used in tandem with light shades: gray-blue, sky.
Yellow
This color creates a feeling of peace and warmth, relieves tension. On multi-level ceilings, yellow looks great with blue, orange and sand.
Green
This is the color of nature. It is better to decorate the ceiling in the bedroom in light shades. It wouldn’t hurt to use a plant theme in the interior.
Red
This is an aggressive and exciting color. But its soft shades are quite acceptable for decorating the ceiling in the bedroom.
Interior use
Niches have excellent decorative properties, but for owners of small bedrooms it is important to provide functionality to every corner of the room. Most often, a niche is given one of the popular and useful purposes.
- The niche is used as a storage system - a rack or cabinet. Shelves are built for books and souvenirs, and if the niche is large, a full-fledged wardrobe is built in there.
- The niche can also be used as a container storage system if each tier is equipped with doors or drawers. This option is suitable for storing small items - cosmetics, handicrafts and jewelry.
- The frame design of niches is used as a decorative frame for photographs, wall lamps and other interior items.
- A long niche with a wide shelf located along the headboard is used as a bedside table, on which you can even install table lamps.
- Lighting built into a niche is used as a replacement for table, floor and wall lamps.
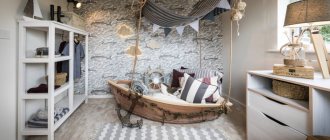
An interesting design solution is a niche that smoothly turns into a multi-level ceiling. Drywall is a multifunctional material that helps to radically change the geometry of space. Therefore, the niche often flows into partitions and multi-level shelves. Niches are also used to install transformable bed structures - during the daytime, the bed is raised in a niche using special mechanisms. Arrangement of a sleeping place in a niche has been popular since the fifteenth century. The bed can be hidden behind a canopy or curtains; sometimes the sleeping place is not entirely hidden in a niche, but only the headboard is hidden. In a children's bedroom, a large niche is suitable for installing a bunk bed, where the lower part can act as a workplace.
A TV in a niche is an original design technique for decorating a bedroom. Of course, a Soviet CRT TV is unlikely to look appropriate in a niche, but a flat wall-mounted version on movable brackets will delight you with both functionality and decorativeness. A shallow niche is made for the TV, twice the size of the device itself. This is done to ensure normal air circulation and protect against overheating. Special shelves for speakers are also installed in the niche if we are talking about installing a home theater.
Niche design
The size and shape of the niche directly depend not only on the imperfections in the geometry of the room. The stylistic component of the interior plays a big role. For classic style trends, portal niches with a radius top and back wall are perfect. Niches can be decorated with unusual edging that imitates stucco. The use of wooden baguettes is also acceptable. Such structures are quite large in size, so they should not be placed on top of each other. In this case, the niches are located symmetrically relative to the piece of furniture - on the sides of the TV or bed.
Design of plasterboard ceiling in the bedroom
The design of the ceiling in the bedroom should be combined with the interior of the room and create an atmosphere of relaxation and comfort. To achieve this goal, consider the following nuances.
The height of the ceilings and the area of the room are the main points that are taken into account when choosing the shape of the ceiling and its design.
It is advisable to mount an oval or rounded ceiling with smooth curves that merge into each other.
Although no one forbids experimenting: creating wavy shapes, ceilings with 2 or 3 drops, geometric shapes or abstract images.
The choice of ceiling colors is of no small importance. Colors should be pastel, soft and warm. These shades will create the ideal atmosphere for relaxation and sleep.
It is necessary to correctly calculate the lighting and select lighting fixtures. For example, LED strips hidden in niches and illuminating the ceiling create a deep, spatial effect.
Decorative lighting is used to illuminate a specific area of the bedroom.
A plasterboard ceiling will hide the unevenness of the ceiling, and engineering structures, including wires, will be hidden under it.
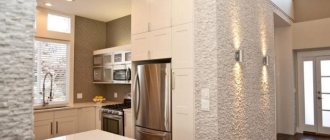
Types of zoning
There are two types of zoning:
With the open method, a wall structure of various geometries is constructed to delimit adjacent rooms or zones. Used in most cases for decorative purposes. The functional approach lies in the arrangement of hidden structural elements. With the closed version, a durable structure is built that complements the load-bearing wall with a geometric element.
Advice. To separate functional areas in the bedroom, select the necessary lighting fixtures, taking into account the required brightness in a particular place.
It is possible to highlight all the necessary zones in the bedroom by installing a plasterboard partition of the required shape, and using lighting to delimit them. This approach will change the perception of space, and with the use of geometric structures of different sizes, the sense of visual volume will increase.
The design solution for the design of the partition should not break the volume and disrupt the integrity of the space, or exclude the possibility of free movement around the bedroom.
For a one-room apartment, the separation of office, guest and sleeping areas does not require a complex main wall. The use of a lightweight design allows for the execution of all the necessary figured arches and niches. The separation of decorative levels at different heights will emphasize the smooth transition from one zone to another while maintaining the visual illusion of volumetric space.
If many hanging elements are required, the frame is reinforced during installation with additional metal profiles with stiffeners, and the niches are placed in a checkerboard pattern.
Advice. To achieve comfort, isolate the sleeping area into a long, non-passable part - closer to the window and away from the entrance.
When constructing a more complex volumetric frame, it is possible to obtain a number of space-saving solutions:
- niches for textile materials, linen and stored clothing;
- built-in decorative elements, aquariums and rockeries;
- arrange electrical appliances, TV or audio system;
- build a special fireplace into the structure;
- hide communications and lighting fixtures.
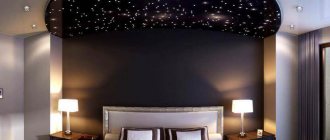
"Starry sky" in the bedroom
For centuries, humanity has been fascinated by the twinkling stars and the cold blue of the starry sky. Therefore, people want to observe this natural phenomenon in their homes.
Among the many design options for the ceiling, the theme of the starry sky is especially popular. This is a rather original finish and, in principle, technically simple to implement. Let's look at a few popular options.
- The easiest and fastest option to recreate the starry sky in the bedroom is to hang fluorescent wallpaper or panels. A picture of the starry sky has already been applied to them. During daylight hours, the wallpaper accumulates energy, and when darkness falls, it begins to glow. But they last for 3-4 hours.
- The effect of a starry sky can be achieved using ceiling lamps or projectors, which at the same time serve as a night light. Provided that a person has the makings of an artist, it is possible to paint an already installed ceiling with luminescent paints. In this case, during the day it will look like a normal one, and only begins to glow at night.
- The modern and most used way to recreate the starry sky involves the use of a special light generator with optical fibers. They are similar to fishing line, but serve to transport a beam of light. Optical fibers allow you to create various effects - from the northern lights to the fall of a comet.
- It is easier to mount optical fibers on PVC film, but this is quite expensive financially.
- You can recreate the starry sky on a regular plasterboard ceiling. It will take more time, but it will be cheaper, and the effect will exceed all expectations. Installation is simple, but labor-intensive. It is necessary to drill holes in the drywall with a diameter of up to 2 mm (approximately 80 pcs/m2) and thread optical fibers into them. Then secure them with glue. To maximize the effect of a starry sky, you can thread several threads through one hole or leave them at different heights from the ceiling surface. You can enhance the impression by applying a pattern to the ceiling with fluorescent paint.
Modern technologies make it possible to observe not just a static starry sky or twinkling stars on the ceiling. You can create the effect of passing comets, moving galaxies, exploding stars or Saturn with rotating rings.
A plasterboard ceiling with a starry sky in the bedroom is a unique and truly magnificent sight that will amaze the imagination. Children are especially delighted by the ceiling with a starry sky.
Lighting is the key to success
With the advent of drywall into our lives, it has become possible to use additional lighting sources in any room. The bedroom occupies a special place in this situation, since this is where many people read before going to bed.
Note! Properly selected lighting will help create not only a relaxing, but also a romantic atmosphere in the bedroom. But for a child’s room it is quite possible to create the atmosphere of a real fairy tale.
For plasterboard ceilings of different types of devices, it is possible to use any type of additional lighting. It can even be built into a single-level structure. The following types of lamps can be used in the bedroom:
- LED strips. They come in either one color or change color;
Note! The best solution would be to hide the tape on a special shelf, which will make the lighting invisible from below. This creates a “floating air effect”, which creates a romantic or fairy-tale atmosphere in the bedroom.
Floating air effect
- Spotlights. Such lighting fixtures are usually placed along shaped elements, which makes it possible to highlight one or another fragment of the ceiling when using different lighting modes.
Spotlights
When designing an additional lighting system, it should be connected separately from the main one. This way you will get several lighting modes that will highlight certain areas of the room or the entire room. In addition, spotlights, chandeliers and LED strips can be combined on the same ceiling. Just make a separate switching mode for each lighting fixture. This way you will not only achieve significant freedom in lighting options, but you will also be able to highlight each design element in different ways.