Nowadays, a healthy lifestyle is very common. And table tennis can be a great way to keep fit while also having fun. At the same time, it is not necessary to sign up for a gym, just get your own tennis table. And in order not to buy expensive equipment, you can always assemble the table yourself.
Expert opinion
Strebizh Viktor Fedorovich, leading construction foreman
The corner will protrude 2-3 mm above the tabletop; you need to rest the hacksaw blade at an angle against this side and pull it with a force of 5-7 times along the entire length. If you want to clarify something, please contact me!
A little history
The name "Ping Pong" appeared at the end of the 19th century. A number of historians believe that the game owes its appearance to the rainy weather of Foggy Albion, which forced tennis matches to be interrupted.
To be absolutely precise, table tennis and ping-pong are two different sports, but in everyday speech they are very often used as synonyms.
The whole difference between Olympic and amateur sports lies in the “clothing” for the rackets. Table tennis uses rubber-coated rackets, while ping-pong uses either uncoated or cork-and-parchment-coated rackets.
The first set for the game was released by Jaques of London in 1891. Well, many modern home craftsmen know how to make a tennis table without resorting to the services of branded salons and stores and willingly share their knowledge on their own websites.
Varieties
The exciting game of table tennis charges both adults and children with positive emotions, which is why it is very popular. Anyone can play it and have fun. You need to take care of a special table. Its design is simple, which allows you to make the product yourself if you wish.
Before you begin to implement your plan, it is worth deciding on the type of suitable tennis table.
- Stationary. This option is perfect for outdoor installation. It can be moved, but cannot be folded.
- Folding. The model will help save space. Such a table can be folded at any time and placed in a convenient place where it will not disturb anyone.
- Adjustable. This option can be adjusted to the height of the players. The product is easy to use and suitable for children.
- Mini tables. These models are great for transportation. You can take them with you to nature, on vacation. They will not take up much space in the trunk of the car. This table should only be placed on a flat surface.
- With a concrete countertop. This product for outdoor play will serve for a long time. He is not afraid of rain, wind, or the scorching rays of the sun.
- From glass. Durable, shockproof glass is used to make such tables. The model does not deform under the influence of moisture.
It is necessary to decide in advance on the area where you plan to install the tennis table. There should be plenty of space around the table so that players can move around freely.
As for the floor covering, it must be hard and perfectly level.
For indoor play
According to the table manufacturing diagram, you will need:
- legs (8 pcs.);
- crossbars (4 pcs.);
- lateral ligaments and spacers (2 pcs.);
- clamps (8 pcs.);
- countertops (2 pcs.);
- hinge plate, brackets, axle (8 pcs. each) and lugs (16 pcs.).
On the World Wide Web it is not difficult to find photographs of a tennis table with a step-by-step explanation of how to assemble such a product.
Equipment and accessories
When choosing ping pong equipment, pay attention to the selection of accessories: rackets, balls and nets.
Tennis table nets:
- They come in synthetic, cotton and metal. Synthetics and metal are suitable for public places; cotton is appropriate for the home model. Metal mesh is less susceptible to deformation and weather.
- Standard parameters 183x15.25 cm.
- The tension of the mesh is regulated by a cord located in the upper part. If the mesh is removable, then it is equipped with fastenings with clips or screws.
- The rules do not stipulate color, except for a white edge 1.5 cm wide. It is considered mandatory.
- When purchasing a table, a net may be included, with the exception of professional models that are not equipped with a net.
Table tennis rackets are divided into three groups:
- For newbies. The speed and torsion values reach 50, the control is 100 percent.
- Advanced. Torsion and speed increase to 70, control decreases to 90%.
- Professional. Torsion and speed indicators are 100, control - 90%.
When choosing table tennis balls, pay attention to the number of stars on the packaging:
- Cheap and simple ones have one star. They are short-lived due to the poor quality of the material and rough seams.
- High-quality balls are rated two to three stars.
- Balls for professional sports are ITTF certified: their strength is the highest.
Second option
Knowing the standard dimensions of a tennis table (2.74 by 1.52 and height 76 cm), you can make sports equipment in the simplest way.
Sheets of plywood and legs are purchased. Everything is held together with self-tapping screws, the product is painted, and in just a couple of hours the table is ready!
Note!
DIY induction heater ♨️ - reviews of the best manufacturing options. Varieties of homemade device designs + step-by-step master class (160 photos)
- Do-it-yourself Gauss cannon: TOP-130 photos of the best ways to create it yourself. Design features + master class for beginners
DIY clamps - a step-by-step master class for beginners. Schemes for manufacturing different designs + 170 photos
Kitchen table: dimensions and standard
Before choosing a kitchen table, pay attention to the style of your room, what size it is, how much financial resources you have for the purchase, and how many people are in the family. Choose a model with standard sizes
Ease of use and operation is the most important thing.
In order to calculate the dimensions, use a certain rule. The width and depth should be calculated taking into account the use of the surface - 60-40 cm. The middle part of the table should have a free area of at least 20 cm - it is needed for serving. And therefore the minimum width is 80-85 cm. The length depends on the number of people and the size of your kitchen. Therefore, the length is selected individually. Rectangle is the standard shape. It can seat four people behind it. There are folding and sliding models. Their surface length and width may vary. The height of the transformer also changes. Sliding tables thus turn from a standard one into a large dining table, with a length of up to 3 meters.
What sizes are there:
- For 4-6 people – 150-90 cm;
- For 8 people – 110-200 cm;
- Up to 12 people – 110-320 cm.
The most convenient option for everyday use is rectangular. Your chairs should also move away without any problems. Consider the size of the kitchen and how your door is positioned.
Outdoor table
Making a folding table is more difficult, but such equipment is much more practical. The difficulty lies in the large number of connections and parts that must be carefully adjusted to each other.
You shouldn’t get hung up on exact measurements – a couple of millimeters or even centimeters are not decisive. The most important condition for a normal product suitable for playing is a flat and smooth table surface.
Particular attention should be paid to the material - if the product will be constantly outdoors, materials such as fiberboard or chipboard cannot be used. Even covered with several layers of paint, playgrounds made from these materials will very quickly lose their shape and bend.
Tabletop
As you know, a ping pong ball freely falling from a height of 1 foot, which is equal to 12 inches or 305 mm, should bounce straight up at least 10 inches or 254 mm from the top of a proper table tennis table. However, an oblique rebound is also of great importance in the game, especially if the throw is cut, i.e. The ball rotates quite quickly.
Ideally, a ball with an oblique rebound should fly off as a physical point from an absolutely hard and elastic surface. What spoils the throw is the influence of the already mentioned sliding, sticking, rolling and rolling of the ball in the interaction of these factors. We won’t go into theory, it’s complicated. Coriolis at one time developed a theory of playing billiards, which is not in last place in mechanics. Manufacturers of billiard tables, cues, and balls know it and use it, but billiard players, who will cut any theorist on the table like a nut, begin to shake in the name of Coriolis. So let's move straight to practice: what material would be better for the top of a tennis table?
Boards
Made of boards in a noble way, like the top of a dining table - definitely not. Unless the wood used is expensive, selected fine-grained wood: bog oak, ash, walnut. Since half a century ago, tournament tennis table tops have been made of teak or ebony. The tabletop of a ping-pong table, made of ordinary pine boards according to all the rules of furniture art, will soon go in waves imperceptible to the eye. You can somehow throw at such a ball, but if you cut it a little, the opponent just grins.
Plain plywood
Amateurs most often make tabletops for tennis tables from plywood, especially since a couple of standard 1525x1525 sheets are more than enough for the top of a folding table, see below. The smallest commercially available sheets, 1475x1475 mm, are also suitable for an amateur table.
The oblique rebound from the plywood is correct, but sluggish, i.e. the ball sticks a little before flying away and loses some of its energy. You won’t be able to get completely excited on a plywood table. This drawback can be mitigated by painting with water-based acrylic paint in 2-3 layers, which will also increase the moisture resistance of the plywood. For the same purpose, before painting, it is advisable to impregnate the sheets on both sides with a water-polymer emulsion.
Another problem with plywood tennis tables is sagging and warping of the tabletop as a whole. Here the only way out is a non-separable table on a rigid box-shaped base with struts of a design similar to the one in Fig. on right. Some of its advantage is that the entire support can be made of 100x30 and 150x40 boards. Tabletop thickness from 16 mm. It is attached to the supporting frame along the contour with self-tapping screws 60x4.2 in increments of 100-150 mm; the fastener heads are puttied. For an amateur table this is acceptable, because... Only very experienced players can serve on a rebound from the edge of the field.
Chipboard, DSP, etc.
Another option for a table top for a tennis table is laminated chipboard (LDSP) or cement-bonded particle board. Laminated chipboard should be matte; The glossy ball slides and goes to the side so that it is noticeable even to a beginner. DSP is heavy, but good for its moisture resistance; a tennis table with a tabletop made of DSP, painted with acrylic, can survive more than one winter outdoors.
The advantages of chipboard and DSP for the tabletop of a tennis table are also that they are produced in sheets (slabs) of sizes 2750x1500, 2750x1750 and 2750x1830 mm. This allows you to make the tabletop of a courtyard or outdoor stationary table one piece, which, of course, increases its durability and anti-vandal qualities. In the latter respect, the good thing about chipboard and fiberboard is that they are non-flammable and repairable (potholes can be filled with putty). Laminated chipboard is available painted in different colors, but DSP will have to be painted. The thickness of the table top in both cases is 16 mm.
The bad thing about both materials is that the oblique torsional rebound from them is anything but the same as the hand gave. But for amateur outdoor play this does not matter, because... in the open air and the “cool” pros are just throwing around; The very subtleties of the throw are affected by both the air temperature and the uneven heating of the table, racket, and ball by the Sun. And the lightest breeze, of course.
As for flat slate sheets, the ball sticking to it and its scrolling is even greater. And the material itself is heavy and fragile; a crazy hooligan can split the tabletop with a bottle he just drank. True, flat slate is cheap, but this is its only advantage.
Necessary materials
In order for the table to “tolerate” any weather conditions (heat, direct sunlight, cold, rain, snow), it must be made of either plastic or laminated, water-repellent birch plywood.
This is the material that is best used when making a do-it-yourself tennis table for the outdoors. The thickness of the material used should be in the range of 16-20 mm.
The traditional color for gaming tables is green. If you purchased plywood of a different shade, you should paint the playground in the desired color, this will only enhance the “capabilities” of the playing surface to withstand precipitation.
Note!
- Do-it-yourself electric scooter - a master class with step-by-step instructions for doing it yourself. Tips and simple patterns for beginners + the best photo reviews
- DIY rocking chair: TOP-120 photos of the best manufacturing options. Master class on creating a rocking chair at home
- Smokehouse from a gas cylinder - the best master class on making a homemade smokehouse with step-by-step photo diagrams for beginners
Since transporting a standard sheet of laminated plywood is extremely difficult, you can purchase a couple of sheets of a smaller size, and on the spot, during work, fasten them together using a beam of a suitable size.
Important! Complete moisture resistance will be provided by edging the edges of the table top with an aluminum profile.
General characteristics
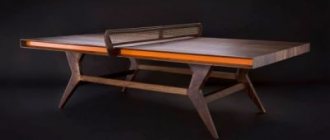
If we consider the classic version of the ping pong table, it has the following dimensions:
- length 2.74 m;
- width 1.525 m;
- height 0.76 m;
- mesh height 15.25 cm;
- the mesh protrusion on the sides is 15.25 cm.
One of the most basic indicators of the quality of a table is the rebound of the ball from the playing surface (English: Rebound Factor). The ideal rebound is measured in this way: from a height of 30 cm, the ball is released without effort, and for the first time it should bounce to a height within 25-30 cm. This indicator should be the same over the entire area of the tabletop.
Parameters of a classic tennis table.
Why is this factor so important? The quality of the ping-pong game will depend on the rebound of the ball. With a small rebound, the game will become too slow, sluggish, and will lose all excitement and passion. The ball's bounce rate is directly related to the characteristics of the tabletop - the material and its thickness.
Thickness and color
The thickness can vary between 12-28 mm for tables with different purposes (outdoor or indoor), but in any case, the playing surface must provide a standard ball bounce.
Gaming tables also necessarily have markings - there is a white border 2 cm wide along the edge, and a dividing longitudinal strip 3 mm wide is strictly in the center.
The surface color can be blue and green, and amateur models also use brown and gray. Interestingly, the shade of the playing surface can influence the nature of the game:
- blue color promotes excitement;
- and green - for proven tactical decisions.
The surface can also be glossy or matte. It is recommended to use a matte surface - there is no glare on it, so it is much easier to track the ball and play effectively.
All tennis tables can be divided into the following groups:
- Professional. The thickness of the table top for such models is 22-28 mm, the weight can reach 140 kg. The table is highly stable and provides the best playing conditions.
- Amateur. The tabletop is somewhat thinner - 16-19 mm; MDF or chipboard is often used to make the playing surface, intended for indoor use.
- All-weather. As the name suggests, the product can be placed both outdoors and indoors. To ensure resistance to water, temperature changes and UV rays, the surface is made of plastic and coated with special protective compounds. All-weather models are lighter in weight (up to 70 kg) and can be collapsible or stationary. The thickness of the tabletop is within 12-20 mm.
Folding tennis table.
The folding design has several significant advantages - firstly, saving space for storage, and secondly, the ability to play alone by fixing the other half of the tabletop vertically.
You can make a tennis table with excellent characteristics with your own hands if you use competent instructions, drawings with measurements and photos. We offer you several design options for different conditions.
Also read: DIY country table.
Legs
The table must be strong and stable, because... During game battles, opponents may accidentally lean on or push him. It is better to make the supporting base of the platform from a metal frame. For this you will need:
- four pipes measuring one and a half meters;
- squares - four one meter long and the same number two meters long;
- eight half-meter squares.
Frame assembly
Let's look at the instructions on how to make a frame for a tennis table at home.
Step No. 1. Using two-meter squares, we connect a couple of pipe sections and weld them together. The first crossbar is located twenty centimeters from the top edge, the second seventy centimeters lower.
Note!
- Do-it-yourself compressor: TOP-130 photo reviews of finished compressors. Step-by-step instructions + diagrams and drawings
- Do-it-yourself wind generator: TOP-170 photo reviews of finished devices. Detailed DIY instructions for beginners
- Do-it-yourself spot welding - the best master class on making homemade spot welding with step-by-step photo diagrams of do-it-yourself work
Step No. 2. Align the assembled frame and weld it.
Step No. 3. A similar operation is carried out to design the second pair of table legs.
Step No. 4. In the place where the table is installed, holes more than half a meter deep are dug, sand is poured in and the legs of the tennis table are dug in.
Step No. 5. The table legs are fixed in the ground with cross-shaped mortgages. Using a spirit level, it is necessary to achieve the most uniform height of the table legs.
Step No. 6. The holes are filled with bitumen or cement.
Another way to make a tennis table
To assemble the table legs, you will need a 20x40x4 mm profile pipe, 6 m long, and 16 m of steel angle with equal 20 mm shelves, at least 3 mm thick. To give the tabletop exceptional resistance to moisture, its edges must be edged with an aluminum corner profile 20x20x1.2 mm, you will need sections of 280 and 160 cm - two pieces of each.
We dig in and shake up the table legs
A tennis table must be very stable. Its base, a metal frame, must be made conscientiously.
First, cutting the parts:
- Profile pipe: 4 pieces, 1.5 m each.
- Angle steel: 4 pieces of 1 m and 4 pieces of 2 m.
- the rest of the corner into 8 parts of 0.5 meters each.
We place two sections of pipe in parallel and connect them by welding with two two-meter crossbars made of angle steel. The first is installed 20 cm from the upper edge of the leg, the second - 70 cm below the first.
First, we assemble the frame using millimeter tacks, align the diagonals of the rectangle formed inside, and only then weld the seams tightly. The second pair of legs is assembled in the same way.
- In the place where the table is installed, you need to mark a 150x100 cm rectangle with pegs and lacing.
- With an indentation of 10 cm in each direction from the cord, the turf is removed and a small trench with a depth of a bayonet or a little more is dug; the bottom must be thoroughly cleaned. At the corners of the trench you need to dig four pits 75–80 cm deep and 50 cm wide so that the center falls exactly on the marking peg.
- Pour 10–15 cm of dry sand into each pit and insert the legs so that the upper ends are 80 cm above the ground. Align the legs in a horizontal plane using a long rule and a slatted level; the process will be more convenient if you place broken bricks under the lower crossbars.
- Connect the pairs of legs together with 1.5-meter sections of the corner, shift the attachment points by welding 50–60 mm below the longitudinal crossbars. After assembling the base frame, you will need to remove it from the pits, from now on you will not be able to do without the help of a partner.
- At 100 mm from the lower end of the legs, we weld cross-shaped embeds from 50 cm pieces of corner that will hold the table in the ground. Each welding seam on the product must be cleaned from slag with the angle grinder, and if necessary, more metal must be deposited on top. Afterwards, the pipe is degreased with acetone and coated with a phosphating primer, followed by the application of two layers of enamel of any type.
- After drying, the frame is installed in place, but now to level it you need to slightly embed the legs into the sand with gentle blows on their upper ends to a level of 75 cm from the ground.
- After this, the pits are filled with broken bricks mixed with soil and spilled with a bucket of water every 25 cm.
- Once the legs are in place, the top ends should be level. By laying the profile with a bubble level on the legs in pairs, the horizontal plane is checked.
If necessary, adjust the length of the legs by grinding off the excess with an angle grinder.
On top of each leg it is necessary to weld a square or triangular plate made of sheet steel with a thickness of 2 mm. The right-angle plate is aligned with the outer corner of each support so that the main part faces inward of the table.
Drawing game lines
In order for the table to be ready for play, markings must be applied to it. A white line 3-5 mm wide is drawn in the middle of the table. Before applying paint, you should use masking tape to mark the boundaries of the center line, this way you can clearly draw the boundary without getting dirty.
Stepping back from the edges along the entire perimeter of the site by 15-20 mm and also marking the boundaries with tape, we apply white paint to indicate the playing area of the table.
DIY table tennis table | TTBlog of the Ping Pong club
- Rebound rate is close to ideal
- Durability
- You can use an already laminated sheet, which eliminates the need for further processing and painting
- Convenient sheets measuring 2750 x 1500mm
After assembling the tennis table, all elements must be primed. If plywood was used for the tabletop, then additional painting of the playing surface will be required.
Before applying paint, the surface must be cleaned . It is recommended to paint in two layers (allow the first to dry before applying the second layer) and use matte paint to prevent glare on the playing surface.
After painting, the surface must dry, which will take at least a day .
At the final stage, markings are applied to the table. To do this, a white stripe, the thickness of which is 20 mm , is used to edge the playing field. The playing field itself is divided in half by a white line, the thickness of which should be no more than 3 mm .
Tip: to apply markings, use masking tape and spray paint.
Help : you can also make a table for a summer house, a gazebo or a folding table for a picnic.
Expert opinion
Strebizh Viktor Fedorovich, leading construction foreman
Please note that the plane of the playing surface must be level; if you use wood materials, check the slab for chips and protruding knots. If you want to clarify something, please contact me!
Assembly
The last stage of work on making the table will be attaching the playground to the metal base. This can be done in two ways.
First option. Three or four holes are drilled in each table leg plate and the tabletop is secured with screws.
Second way. Through holes are drilled in the table legs, as close to the surface as possible. The playground can be fixed motionlessly either with pieces of reinforcement or with massive wooden splinters inserted into the holes. This option allows you to remove the platform and store it in a dry room during the winter.
Using scraps
When making a folding tennis table with your own hands, a certain amount of scraps remains. From these, as a bonus, you can make several rackets for the game. Markings are applied to a piece of plywood:
- draw a rectangle with dimensions 2x16 centimeters;
- semicircles with radii of eight centimeters are drawn on the wide sides;
- from the center of the picture we draw a rectangle with dimensions of 3.5x18 centimeters;
- cut out the racket with a jigsaw;
- use glue to thicken the handle;
- We clean the glued parts with clamps.
All that remains is to glue the shock-absorbing material to the shock part of the product and you can start playing in the fresh air.
Step-by-step instructions for making a table tennis table with your own hands
For clarity, we took one of the most popular schemes for assembling a tennis table with our own hands. We do not claim its authorship and do not guarantee the correctness of the dimensions given in it.
For supports and a frame for installing the tabletop we will need:
- board 25 x 100, length 1050mm - 6 pcs. We will use them to connect the legs;
- board 30 x 100, length 2200mm - 2 pcs. Needed for longitudinal supports;
- timber 50 x 50, length 750mm - 6 pcs. We will make legs from them;
- block 30 x 50, length 850mm - 4 pcs. To strengthen the tabletop;
To connect supports, bars, boards to each other you will need:
Do-it-yourself tennis table: what to make it from (plywood or chipboard), what size to make it, how to assemble it yourself and paint it for the street or cottage
It is not advisable to split the tabletop into more than two parts, because joints and fastening lines are only permissible under the mesh.
Expert opinion
Strebizh Viktor Fedorovich, leading construction foreman
Visual examples showing how all stages of such work are carried out are the best help for any tennis pioneer, so here is a video, the comments to which prove its usefulness. If you want to clarify something, please contact me!
Folding option
The dimensions of plywood sheets sold on the market are perfect for making a folding table. In general, this material has the disadvantage that it sags over time, so it is better to make the tabletop from two sheets.
The joint and possible minimal gap at the location of the mesh are quite acceptable. When choosing a material, special attention must be paid to its quality. The surface must provide the necessary quality of rebound of the ping pong ball.
Important! Choose first or second grade material. One side of the plywood must be sanded. Use the cutting service when purchasing material so as not to have to do this work on site.
Looking at the pictures of the tennis table, you will notice that the tabletop is made of a maximum of two sheets. A larger number of pieces sharply reduces the quality of the playground and it is not recommended to make it from more than a couple of pieces of material.
Candidates for the role of tabletop
Building sports equipment is not too difficult. The question needs to be posed differently: how to make a tennis table of high quality, reliable, convenient, ideal? And in this case, the material that is chosen for the countertop comes to the fore. Typically, several types of raw materials compete for the role.
Plywood
This material, the range of which is very large, is suitable for the manufacture of folding models. Its advantage can be considered the absence of the need for additional surface treatment, which will take time and cost. When purchasing plywood (FB, FSF), you must choose grade 1 or 2, the product that is marked “Ш1”. It means that the material is polished on one side. The standard sheet width (1525 mm) is ideal for making a tabletop consisting of 2 halves.
Such material, unfortunately, has some disadvantages, the main one being sagging. To eliminate this possibility, a rigid box-shaped base with struts is made for the tabletop. Boards assembled into a structure using self-tapping screws will cope with its role.
Another disadvantage is the reluctant rebound of the tennis ball from such a table. It is corrected by applying a double layer of acrylic water-based paint to the surface of the plywood, each of them must be completely dry. The surface is first cleaned, puttied, and after the composition has dried, sanded. A bonus of all operations will be the improvement of the water resistance of the countertop.
Laminated plywood
A variety with such a coating is preferable because a tabletop made of laminated material will not be deformed. Its basis is moisture-resistant birch plywood, moreover, it successfully resists mechanical stress.
The undoubted advantage of this option is the ability to choose the color to your taste. A relative disadvantage is the higher price, but a tennis table made of laminated material will serve its owners much longer.
Chipboard (chipboard)
This is the second contender, often used to create fairly massive stationary sports equipment, but when choosing, you need to look only at high-quality materials. It is even better to purchase a laminated type of raw material. In order not to do unnecessary work, they usually buy a green or blue sheet.
The standard sheet size (1750x2750 mm) makes it possible to obtain a tabletop with minimal adjustment; it (as well as the processing of the ends) can be ordered upon purchase. The cost of such a tennis table will increase when compared to a plywood product, but this sports equipment will be more reliable and durable.
Fiberglass
This is a great option for an all-weather outdoor table. The optimal sheet thickness is 10 mm; a suitable shade can also be found. The advantages of fiberglass are high strength, but low weight of the material. Fiberglass is not subject to deformation, is not flammable, but despite all its good qualities, it has a drawback - high cost, but it is absolutely justified.
The base can be MDF (LMDF), OSB. For the role of frame and supports, boards, wooden beams or metal (corners, aluminum pipes) are often chosen, but the latter materials require special tools and equipment. Other, sometimes unusual, street candidates included:
- aluminum composite panels;
- concrete with self-leveling floor covering;
- plexiglass;
- flat slate;
- plastic sandwich panels;
- thick textolite;
- cement bonded particle boards.
The main requirement for an ideal material is to guarantee a standard rebound (or close to it) of a tennis ball. A ball released into “free flight” from a height of 300 mm should bounce off the table surface by 250 mm. This indicator should be the same on any part of the playing surface.
The desire to save money can ruin a tennis table that has not yet been made. If you buy a slightly curved or knotty beam, or buy corners made of tin (as a replacement for steel goods), then the sports equipment will turn out to be weak, unstable, and unreliable, so it is unlikely that you will be able to enjoy playing on it.
Details
Work begins with preparing the largest part - the gaming table. If the pieces of material are not cut at the place of purchase, then they should be brought to standard sizes.
In order to increase the service life of the tabletop, its ends should be treated. The edge is cleaned with sandpaper. Even more reliable protection is edging the edges with squares.
The supporting frame is made of half-meter bars and longitudinal beams. Height-adjustable furniture legs can be used as supports.
Assembling and installing the countertop
- To begin with, a frame is assembled from 40x50 mm timber.
- It is better to take the actual dimensions at the outer corners of the already installed supports from the profile pipe.
- If the base is made without deviations, then the dimensions of the frame along the internal perimeter should correspond to 2080x1040 mm.
- You will need two beams with a length of 2160 mm and three with a length of 1120 mm.
- It is advisable to join the beams with a half-timber overlay or a tenon joint.
- The frame is assembled rectangular with a crossbar in the middle.
- Instead of the crossbar, which will be at the junction of the two halves of the tabletop, you can use the remaining strips of plywood in one layer or folded in half. If the halves of the table are joined with strips of plywood, then it is advisable to place them on glue and then additionally screw them in with screws along their entire length, in two rows.
- To combine the tabletop with the frame, strips of plywood are cut into three parts, the central part should fall between the long sides of the frame, and the short ones on the outside, not reaching the edge of the tabletop 7-10 cm, so as not to interfere with the installation of the mesh.
- The frame and tabletop halves are connected together using metal furniture corners and screws. The corners are distributed evenly along the inner and outer perimeter of the frame in increments of approximately 30 cm.
- The most vulnerable place of the tabletop is the ends; they should be reliably protected. Simple painting or end-tape will last 2-3 years, then chips and blisters will appear. Therefore, it is better to edge the table with an aluminum corner: we precisely cut the parts according to the final dimensions of the table: 1525 and 2740 mm, and make a cut inward at 45° for the ends that meet at the corners.
- In the centers of both shelves we make 3 mm staggered holes, the step in each row is 60 cm.
At the bottom ends of the tabletop, you need to chamfer 2.5–3 mm and apply silicone hot glue to the edge; use white plastic rods. An assistant should heat the applied bead of glue with a hairdryer until the end of the plywood is completely covered with it, then the aluminum corner is pressed tightly until excess protruding appears. Pay special attention to filling the corners.
After the glue has dried:
- Drill through the plywood with a 3mm drill bit through the holes in the corner.
- Countersink the metal to 7 mm.
- Reinforce the edging with 12mm countersunk screws.
- From the front side, excess glue is cut off with a sectioning knife. The corner will protrude above the tabletop by 2–3 mm; you need to rest the hacksaw blade against this edge at an angle and pull it with force 5–7 times along the entire length. Along this groove, the edge is broken off with pliers, then the end is finished with an abrasive stone until a 2 mm chamfer is obtained.
Final design
The assembly process is not difficult. It is advisable to make reinforcements in the places where the legs are attached. Load distribution is achieved by installing metal plates at the points of fastening with bolts or screws.
All that remains is to carefully secure both sides of the tabletop to the frame and make the necessary markings.
Country competitions
Active recreation in an ecologically clean place is a great option to strengthen your health and boost your immunity before the long cold months of the year. Building a tennis table for a summer cottage is not difficult.
The main condition is the availability of free space of 5x7 meters. Having the necessary materials - sheets of plywood, a couple of three-meter boards, self-tapping screws, you can safely get to work.
Choosing a tennis table for indoors and outdoors
How to choose a tennis table for your home? It's simple - it must meet the following characteristics:
- amateur or training category;
- folding design;
- table top made of MDF or chipboard.
Buy a tennis table
If you do not plan to periodically remove the table from the room, then you should abandon all-weather models.
The outdoor tennis option can be selected from the recreational or training groups, folds up and is labeled "all-weather". In this case, melamine or aluminum are more suitable as a countertop material. Moisture-resistant plywood will last less, so it is still recommended to bring such tables under the roof in bad weather.
Build process
The simplest construction trestles of the required height are made from available materials. Then:
- trestles are installed at the same level;
- the boards are laid and screwed with screws to the length of the tennis table;
- sheets of plywood are laid over and secured with slats;
- The table top is sanded and several layers of antiseptic are applied to it.
If, when leaving your summer cottage, you do not have time to disassemble the table and insulate it from the effects of precipitation, it is recommended to sew a cover from waterproof fabric. This way you can protect the product from damage, and during your next visit to the dacha you can again organize a family ping-pong tournament.
Making your own table
Many people like to play table tennis, but not everyone has the opportunity to purchase a professional table for this exciting game. Yes, there is no need for this. You can try making a tennis table with your own hands.
The product can be stationary or assembled. The size of the table tennis table is 760 mm high from the floor level. It must stand on a hard surface, have a flat surface, and there must be free space around it.
Required materials and tools
Before work, you need to decide where the product will be located and what its dimensions will be. Prepare materials and tools in advance.
You will need:
- sanded plywood (2 sheets, 1525 x 1525 mm, 12 mm thick or more);
- edged timber (5 pieces, 50 x 50 x 300 mm);
- metal brackets for attaching legs (4 pieces);
- self-tapping screws (5 x 89 mm - 38 pieces, 3.5 x 49 mm - 45 pieces);
- bolts for connecting brackets with legs - 4 pieces;
- antiseptic for treating wooden surfaces;
- wood putty;
- green and white spray paint;
- hacksaw;
- drill;
- welding machine;
- tools for applying primer and paint.
Plywood is sold in the required width; you only have to adjust it in length.
Blueprints
The product must comply with the parameters, otherwise it will be inconvenient to play. It is necessary to prepare not only materials, tools, but also drawings. The drawings indicate everything down to the smallest detail, even the mesh size.
The drawings are made clear and understandable.
Assembly steps
Before you finally assemble the structure, you need to prepare all the parts.
If the product involves a removable tabletop, then special brackets will be required that will act as fastenings and ensure quick disassembly of the table.
You need to make holes in the brackets for self-tapping screws.
For a plywood tabletop you will need two sheets of 1525 x 1525 mm. Cut 155 mm from each sheet. The junction of two plywood sheets will be strictly under the mesh.
Treat the cut timber with an antiseptic. Dry it.
To avoid confusion of elements, they must be numbered.
Once all the parts are ready, you can begin assembly.
Step 1. Mark the timber and assemble the frame using self-tapping screws.
Step 2. Screw metal brackets to the corners to strengthen the frame.
Step 3. Fit the legs to the fasteners, remove excess wood. The matching of the leg and the mounting socket is very important.
Step 4. Place the beam in the socket and screw it to the bracket. To do this, use bolts.
Step 5. Screw 4 beams to create a frame.
Step 6. Attach the tabletop to the frame using self-tapping screws. Drill holes, attach the lid to the frame and twist.
Step 7. Wipe the surface of the countertop thoroughly with a cloth. Apply a layer of putty to a clean surface. Let dry thoroughly.
Step 8. Paint the tabletop in two layers. The first layer must dry, only then apply the second layer.
You need to correctly calculate the length of the beams that will be under the tabletop. In order to prevent deformation of the tabletop, the bars must be made shorter than the length of the playing surface.
Table layout
After the lid of the product has dried well, you need to apply a special marking 2 cm wide. It is located in the middle of the product and parallel to each edge. Use masking tape to mark the boundaries of the markings. For application use white spray paint.
How to make a folding ping pong table
There is a sport close to table tennis - ping pong. There are sports federations for ping pong. The main difference is the use of rackets with hard rubbers.
Folding ping pong tables are suitable for playing indoors, while stationary ones are suitable for playing outdoors. A classic table will have standard dimensions, just like for table tennis. If the area of space does not allow you to accommodate a product of this size, then it can be made smaller. For teenagers, the height of the product can be 700 mm. A mini-stol for playing can even be 110 x 61 mm in size and have a maximum weight of 17 kg.
Many people would like to throw a ball at home, so folding structures are in great demand. The roll-out folding table makes it possible to perform different ping-pong exercises alone. When one half of the tabletop is raised, it plays the role of a bumper shield.
The mechanisms of folding products are complex, but you can create a homemade ping pong machine. When folded, the tabletop halves can be secured with detachable brackets.
You need to start work with a drawing and preparation of parts.
The drawing must indicate the dimensions of each part:
- The tabletop can be made of boards or plywood.
- To create a frame, it is better to use steel corners.
- In order for the frames to be rigid, they are strengthened with transverse corners.
- It is necessary to make holes on the side of the frames for attaching the legs and struts of the platform.
- Carts require boards up to 25 mm thick. For struts - up to 20 mm thick, 60 mm wide.
- For the legs, 80x20 mm boards are required; for their fastening it is better to use bolts with wing nuts.
This will allow you to fold the product if necessary.
You can make a folding table on wheels.
It is better to number all the parts and elements on the blanks so as not to confuse them.
The necessary furniture casters can be purchased at a specialized store.
Having prepared all the material, you can start working.
Step 1. Make holes for the bolts on the legs.
Step 2. Strengthen the upper parts of the legs with metal plates.
Step 3. Attach bushings to the holes for a stronger fixation.
Step 4: Level the playing surface. Install a nut under each leg.
Step 5. Fasten the legs in pairs using self-tapping screws.
Step 6. Install the countertop using self-tapping screws. It's better to mount it on the reverse side.
Step 7. Paint the countertop. Apply markings.
The roll-out folding simulator for outdoor play is ready for use.