Our grandmothers and mothers found the pleasure of home creativity in making boxes from scrap materials. Moreover, the materials for such crafts are simple, and they are found in every home. And the finished products can be used as a handmade gift or simply to store various necessary little things in them.
Postcards always remind you of the holiday and the people who presented them.
Therefore, they can be made not only for a special occasion, but also as an interior detail, choosing materials and decor accordingly. How to make boxes from postcards with your own hands with step-by-step instructions will be of interest to many.
If you have a lot of postcards accumulated in your house, don’t rush to get rid of them, but rather give them a second life.
How to make boxes from postcards with your own hands
Open your closet and you're sure to find materials for a card box. These beautiful, bright, multi-colored cardboard masterpieces of printing that accumulate around the household are no longer needed, but you can’t just throw them away.
In this article we will look at how to make a box from postcards with your own hands.
With a reasonable approach, they can still serve. And they will become the basis for boxes of postcards made by yourself. Lovers of home crafts will especially appreciate this opportunity for home creativity. Using ready-made patterns, needlewomen can make exquisite boxes or beautiful gift boxes.
It will give a special flavor to the entire room where it will be located.
You can choose cards that match the style so that the box fits harmoniously and becomes an integral part of the interior.
Postcards should be selected approximately the same size and the themes of their images should be similar to each other. You will need scissors, regular sewing needles and different types of thread depending on the options for the future product.
These cute little things bring comfort and joy to your home.
Many families have accumulated whole mountains of postcards.
And finally...
You can build any form of crafts: boxes from postcards in the form of a temple, a locomotive, a train, a bus, a sofa, an armchair, a tower, a bottle, a clock, a boat, a samovar. To do this you need to make the diagram correctly.
Create an external image of the box and divide it into geometric parts. It will be convenient to see the shape of the product on a checkered sheet. In this case, complex crafts will have main load-bearing parts and decorative ones. Learn on simple album sheets using glue or tape, and then reproduce everything on postcards and thread.
After the holidays, greeting cards remain in the house. Almost everyone just has them on their shelves collecting dust. But you can make many useful things from them, for example, a box. To make it you will need:
- postcards
- knitting threads (for example, “Iris”)
- crochet hook 1.5 mm
- thick sewing needle
- hole punch (or other device) for punching small holes
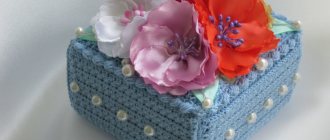
We cut out blanks from postcards and punch holes at equal distances around the perimeter. We tie the blanks with single crochets (in each hole - 3 double crochets). Then we sew the blanks together with a thick needle and thread of the same color.
This box is from the distant past, and for some from childhood, but nevertheless, even today such crafts do not lose their popularity for several reasons: they look very attractive, they are made quickly, they do not require a lot of material, and they can still be made use in everyday life. There are a lot of advantages to such products. Since the box can be made in different sizes, it can also be used as a gift box, containing a surprise. Today's master class will tell you in detail how to make it from postcards with a step-by-step description, as well as providing diagrams, photos and video materials.
A simple do-it-yourself box
The eye of the selected needle should be wide. Choose the motives of the drawings at your discretion. We choose threads to match the patterns on the postcards, or vice versa in contrasting colors.
You can make a beautiful box from postcards with your own hands.
Note! Instead of regular threads, use cotton floss yarn, which is made by hand or machine specifically for needlework.
By following the instructions step by step, the craft can be made by those who have not yet had time to get involved in needlework.
Let's proceed step by step.
- First, let's decide on the sizes.
- Making a box with your own hands will require a diagram. It will allow you to clearly see the order in which the work is performed. All panels, the bottom, side inserts in the form of diamonds, the upper component of the lid with side segments are schematically reflected.
- After cutting out the two bottoms, they should be aligned with their back sides.
- Lines are drawn along the perimeter of the postcard inside the box, retreating from the edges by a centimeter. Using these actions we designate a line.
- Using decorative stitches, we sew the resulting two-layer part along the edges. For this we use floss threads folded several times. To avoid knots sticking out from the outside, we begin the stitching process from the side that will be inside the finished product.
- We use the same technique to connect the remaining parts with a double layer.
- At the end of the process, we sew the blanks by hand and sew them together.
Make holes on the parts, stepping back half a centimeter from the edge. This process can be done with an awl or a sewing machine without thread.
Carefully sew all the parts together in the following sequence: the bottom and legs, then the slices and all the front parts, the inside of the box.
Here's how to make a box with your own hands quickly and easily.
The royal box of postcards is ready!
Tips from needlewomen
Making boxes from postcards with your own hands is also called scrapbooking. In this area, needlewomen have long created a list of tips that will help even a novice craftswoman cope with the task:
- You should definitely select cards according to style (for example, you should not combine New Year’s images with flowers, it will look ridiculous);
- Before starting work, you must create a sketch of the future box, as well as count the number of elements and make patterns;
- if the cardboard is too thick, then punctures are best done with an awl;
- floss threads are most suitable for sewing together elements, but if they are not available, then you can use ordinary sewing threads, but folded 3-5 times;
- Do not neglect the decor - the use of various decorations will help create a real masterpiece.
How to make an oblong box
In this case, you can decide on the size and theme yourself. We use fairly thick threads. For a box of postcards with our own hands, we develop a diagram with dimensions - 80x165x55 (standard in millimeters).
You will need: postcards, floss threads, a needle with a wide eye, a ruler, a simple pencil.
We cut out three blanks 80x165, two of which are needed for the bottom. We use the rest together with another 165x100 rectangle for the lid. Next, we will prepare 2 parts for the inner box (50x80 and 50x165) and 2 for the outer box (80x70 and 165x70).
Redraw the drawing and make patterns of parts.
We move on to marking with a pencil and ruler and then cut out the parts. Under the base and for the lid we will cut out 8 and 2 side flaps, respectively. All postcard details will be duplicated with cardboard ones to give the future product strength.
Create the bottom of the box in this way: take 2 postcards and connect them together with the sides without a pattern.
Now it's a matter of technique. Using a sewing machine without thread, we go along the edges of all the cut out parts, putting together postcards and cardboard to create holes. Now we sew everything together by hand using a blanket stitch. You can experiment with the shape of the seam.
Make the first puncture from the wrong side so that the knot remains inside between the cards.
We connect the sheathed parts. We use a simple seam for two parts of the bottom. We sew on the short and long sides, bend them into an arch and sew them together, securing them with a flap. We alternately process the straight and semicircular sides.
Place adjacent pieces one on top of the other and pull the needle and thread through the horizontal stitches between the stitches to create a weave.
After the frame has emerged, we sew in the bottom and tighten the corners. The cover is sewn to one of the selected sides. If desired, you can add legs.
The classic box is ready!
The simplest master class
It would be correct to call this box a box of postcards sewn with thread. Any girl who has learned to hold a needle in her hands can do it. Of course, very little children should do needlework with their mother or grandmother.
Before making a box of postcards, take scissors, glue, a ruler, an awl, thread, a needle and 12 postcards - 11 of the same size and 1 large. They will need to be fastened together 2 at a time and made:
- 4 side parts;
- bottom;
- cover.
Postcards dedicated to the same theme, for example: floristry, cities or painted animals, will look beautiful together. You can choose a color scheme from similar or contrasting shades, using a color wheel or on your own, the main thing is that it looks good.
The easiest way to make a rectangular box, the bottom and two sides of which are the same size as a postcard (11 of them are the same), and the two sides are squares with a base equal to the narrow part of the workpiece. Making a box out of postcards:
- We prepare two sides and a bottom. We glue the cards two at a time so that the pictures face outward. Then we poke holes around the perimeter with an awl, retreating approximately 5 mm from the edge. To make the box look neat, we make a puncture on the side of the card, which will look outward in the finished product. Sew the edge using overcast stitches.
- We also make the square sides of the box.
- For the lid we need a regular postcard, scraps from the squares and a larger postcard for the top. We cut the length of the latter to the standard size, and make the width a few centimeters larger. The larger the allowance, the larger the lid will be. Connect the long edges of the top and bottom parts. We cut out semi-ovals that will close the cavity formed on the sides. We sew the parts with overlock stitches.
- We assemble the box. First we sew the sides, inserting a needle into the existing holes, then sew the bottom. Separately assemble the lid. Using an overcast stitch, we connect the top and bottom, then insert and secure the end parts.
- All that remains is to attach the lid.
Making such a box is easier than describing the process of making it. Don’t forget to help your child work the corners: from one hole we draw three stitches - one on the edge of the corner, the other two on opposite sides.
How to make surprise boxes
Despite the simplicity of the manufacturing process, this product will contain cute surprises. We will need sheets of colored cardboard, made ourselves or purchased paper moths. You will need paper for scrapbooking, double-sided tape, and transparent colorless plastic.
Both on a holiday and on a weekday, each of us will be pleasantly surprised by a box with a surprise made of paper.
A surprise box (Magic Box) is a unique gift that is suitable for all holidays.
The pattern is simple. We take a square sheet of cardboard according to the size of the box. Stepping back from each edge, draw parallel lines. We cut out the squares at the corners and get a cross. We bend the structure along the sides of the central square, getting a box. We draw out the lid according to the dimensions of the bottom (plus a few millimeters) adding two centimeters on each side. Fold along the lines and glue.
Making a surprise box with your own hands does not take much time and brings a lot of pleasure.
The outer sides can be decorated with anything you want (drawings, cutouts, glitter, etc.). We attach butterflies to strips of colorless plastic with tape to the ends, and glue the other end to the bottom of the box.
An original postcard-box with a do-it-yourself surprise.
Note! The surprise could be other insects, plants or mythical creatures.
Literally anyone can make gift boxes with their own hands.
When the lid is opened, the box splits into four parts, releasing the creatures hidden inside.
You can make boxes with surprises with your own hands in honor of a romantic holiday.
Box-Tunnel, or postcards-box-tunnels
This is also more of a decorative DIY postcard box than a practical one. But at the same time it deserves due attention. Just look at this beauty!
Tunnels are such thick boxes, often in the shape of a cube, closed on all sides except the front (only in front, or front-to-back). If you look closely at this cube-tunnel, you can see several levels of depth, thanks to which we feel the volume. Each level of such a postcard box has its own decorative elements. And all this together creates its own magical story. You can install battery-powered LED lighting inside - then it will not be just a postcard, but a beautiful handmade lamp.
In the depths of the blog there is a master class on how to create such a postcard with your own hands: Easter souvenir tunnel. If you don’t quite understand how tunnels are made, then go to MK, everything is shown there step by step.
Homemade birthday cards as a gift for mom
From a young age, we got used to giving our mother handmade crafts and postcards. After all, mother is the most dear person in our lives, who shares grief and joy with us. Therefore, who else but her should give a piece of herself invested in the creation of a beautiful postcard. Whether it’s March 8 or a birthday, or maybe some other occasion, mom accepts our gifts with a smile. This tradition has become so entrenched that it is still very important to make such postcards, especially since a lot of modern materials have appeared that will help you create a truly masterpiece.
A handmade card will always be a very valuable gift for mom.
If you were allowed to make a craft card, for example, for a birthday, with your own hands, then, apparently, you have already become familiar with the appliqué technique. Volumetric applications made from ordinary as well as unusual materials look especially beautiful. For example, you can create dandelions or asters using pencil shavings, and beautiful butterflies from silk scraps, which are then attached with glue or threads.
From pencil shavings you can make various elements for a postcard, for example, dandelions
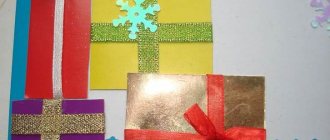
In fact, there are many techniques that allow you to create an original postcard. We will look at the main ones later, but for the simplest one you will need ordinary materials that you have on hand. So, you can take cardboard, draw a vase and the outline of a bouquet on it. You will also need colored paper, which needs to be cut into squares of different sizes, rolled into balls, which should then be used to fill the outline of the bouquet, after placing it on glue. The result is fluffy flowers.
Appliqués with paper lumps will help make the card three-dimensional.
Note that such a postcard can be given not only to your mother, but also to your grandmother, teacher and even your beloved woman, only by decorating the postcard with the queen of colors - a rose, which can be made using curly scissors, cutting out spheres in a spiral with them and twisting the shape with a quilling tool.
Roses for a postcard can be made from paper by cutting them in a spiral
Applique technique
Making Christmas cards with your own hands is a good reason to communicate with children, tell them the meaning of the holiday, the history of the appearance of the New Year's attribute - the Christmas tree.
An equally popular Christmas companion is the angel. To make an applique, it is convenient to print the drawings on a printer.
Stars, the child will make a month on his own. For this, ordinary food foil is useful.
For the postcard you will need:
- colored cardboard;
- foil;
- blue felt-tip pen;
- white round napkin with an openwork pattern;
- PVA glue (it becomes transparent when dry);
- scissors.
Progress:
- for the base of the postcard you will need a sheet of blue double-sided cardboard;
- the inscription “Merry Christmas” is made on a fragment cut out of a napkin, it is glued to the lower right corner;
- the rest of the space is decorated with stars;
- a crescent or moon is glued in the upper left corner; it can be covered with a gray figured cloud;
- An angel is glued inside the card on the right side, the design is printed on standard white paper, then cut out along the contour, after which the details are drawn with a felt-tip pen;
- Congratulations are written on the left side; it is better to print out the finished text. The corners of the left side are decorated with the openwork edge of the napkin.
Pointed casket with diagram
We suggest making a more complex version of the box from postcards. Step-by-step instructions, a diagram and the needlewoman’s own imagination will help you get a truly exclusive chest in which you won’t be ashamed to put even expensive jewelry. This master class is intended for experienced needlewomen accustomed to sewing and painstaking work; neophytes are better off starting with something simple.
First you need to decide on the idea of the box. It must be designed in a certain style and color scheme. You will need identical or similar postcards. To collect postcards for a craft, you may have to grab your friends' supplies or go shopping. The inside of the box can be a different color or plain. If choosing cards for this purpose is a problem, use colored paper or leftover wallpaper for it.
Making patterns
To make the box strong and voluminous, place a spacer made of thin cardboard, whatman paper or other durable paper between the outer and inner parts. It is on this that we will draw templates:
- Using a compass, draw a small circle and divide it into 6 equal parts with dots.
- From the center we draw lines 8 cm long through the marks. We connect the ends of the segments with straight lines - we get a hexagon.
- Cut out the template. We make two more of the same parts (3 in total are needed).
- Take one hexagon. On each segment directed towards the center we place a point, making an indent of 1.5 cm from the edge of the template. Connecting the marks. We get two congruent hexagons nested inside each other. We cut out the middle and get the inner side.
- Draw out the side of the box. It looks like an ellipse, truncated on both sides perpendicular to the major axis. The height of the part is 9.5 cm, the width of the base and top is 8 cm, the minor axis (the widest part) is 10 cm. We cut out six identical parts.
- For the lid, draw a concave cone with a base of 8 cm and a height of 12. We cut out six parts from cardboard or whatman paper.
Cutting out the parts
Now we attach the templates to the postcards and try on how to cut. The exact number and size of postcards were not specified in advance, since much depends on the print. If the design is small or abstract, you can simply attach the details to the cards, transfer the outline and cut them out. But most of the pictures require thoughtful arrangement of the template; more cards will be needed, since there will be a lot of waste.
We cut out each detail from the postcards using templates in duplicate. If this is a problem, one set can be cut from the wallpaper. Glue the parts together. Each consists of three parts:
the outer one, cut out from a postcard, which will be noticed first of all, since it is the outer side of the box; medium, which is a blank made of cardboard or whatman paper; internal - it represents the inner surface of the casket and can be made from a postcard or a piece of wallpaper.
It is better to use PVA glue for paper - after drying it becomes transparent and elastic. Even if one of the parts is dirty, it will not be visible
It is important that all parts of the same type are absolutely identical. If necessary, trim them with scissors
Layout of the casket
Slowly (it will take a lot of time) we assemble the box:
- Place the part on a soft surface with the outer side up and use an awl to make a contour of holes, retreating 5 mm from the edge. The distance between the punctures should be the same - this can be achieved by first marking them with a pencil.
- Using a strong thread (you will have to apply force, a weak or thin one will simply break) we sew each part with a buttonhole stitch.
- We begin assembling the box from the side fragments. The surface with the postcard should “look” outward. We try to ensure that each stitch fits into the finished hole.
- We sew on the hexagonal bottom, and the pattern should be turned outward.
- We attach a hollow hexagon on top with the pattern facing outward.
- Assembling the cover. First we sew the pyramid, then we attach the remaining hexagon to its base. There should be surfaces covered with postcards on the outside.
- Sew one side of the base of the lid to the box.
The proposed master classes are designed to show what different boxes are created from ordinary postcards. They can and should be modified and improved.
Design methods
The retro style boxes look very nice. This decor is very easy to make.
- First you need to cover the entire surface of the chest with white acrylic paint, then dry it with a hairdryer and leave until completely dry.
- Those places where you plan to create “scuffs” should be rubbed with a candle. You need to process the corners in a similar way.
- To create an antique effect, the coating must be rubbed with sandpaper.
- At the final stage, you should cut out the patterns you like from decoupage napkins, fix them to the surface and brush them on top with a brush dipped in PVA.
- Dry the casket and coat it with clear varnish.
In general, the box can be decorated with absolutely any materials - old unused jewelry, beads, buttons or decorative stones. You can use ribbons and lace.
Master class on making a paper box in the video below.
Memorable gifts in original packaging
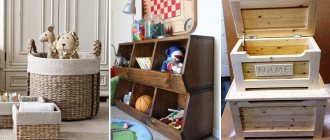
You can buy anything as a gift to people dear to your heart, but when the work of your own hands is attached to it, it is doubly pleasant. Using the same technique or common materials, you can decorate boxes, frames and photo albums. Small shells, dried flowers, gem crumbs or other natural material are suitable for this.
You can create a beautiful gift wrap by wrapping the box in burlap and decorating it with twine flowers.
Most often, to decorate a gift cardboard box with your own hands, you select something from the category of decorations:
- beautiful buttons;
- artificial pearls;
- small and medium beads;
- small beads;
- pieces of a chain, old brooches, earrings, pendants.
Decorating shoe boxes is not only useful, but also very exciting.
You can decorate gift publications (books, notebooks, diaries) with such materials. A specially designed cup box makes a trivial gift an especially memorable gift. A beautifully decorated shoe box makes great packaging for home baked goods. In an original container you can present something to your boss or friend for a sweet feast. These are chak-chak, cookies, homemade chocolates or cakes according to your own recipe (it will be written inside on the lid).
Paper box decor
To decorate the box you will need:
- compact box;
- paper for the base (photo printout, textured wallpaper, hologram);
- good glue;
- stapler and tape.
You need to wrap the box and lid with background material, but so that there are fewer bends. The corners need to be folded very carefully and the paper secured by cutting off the excess.
Just “try” the paper to the box and fold the edges as shown in the photo
Carefully fold the paper along the marked fold lines, then unfold the sheet and make cuts
Place the box on the blank and glue the paper with a glue stick
The bottom of the box can be lined with velvet paper or thin cardboard, which will hide the folded corners. We wrap the lid in the same way.
If you are using double-sided paper, the cover can be covered with the reverse side
Next, we decide how to decorate the box with your own hands on the lid in an original way - the decor can be voluminous. These are ribbons and paper figures - hearts, flowers, stars. The decoration of the lid can be varied depending on what will be stored inside or presented as the main gift.
Decorating with fabric
Leftover beautiful fabric is an excellent material for needlework, think about this when thinking about how to decorate a shoebox with your own hands. Pasting will not work, since the adhesive substance often bleeds through the fibers. You have to limit yourself to tightening the box and its lid. You can secure the fabric with double-sided tape and staples.
Let's prepare fabric, lace, glue, double-sided tape, thread and stapler
Suitable for covering a cardboard box:
- leather and eco-leather (imitation leather, dermantine);
- velvet and velor;
- jacquard and brocade;
- denim;
- thick silk and linen;
- furniture flock and artificial suede;
- guipure (for decoration only, it is difficult to hide seams and corners).
The pattern of colored fabric is also important; it will give additional meaning to the gift and decorate the box with your own hands. Bright colors will make the offering more spectacular, polka dots and flowers will make it feel homely, hearts and roses will make it more sensual and romantic.
We cut the fabric to size, stick tape on the inside and cover all sides of the box one by one.
We secure the edges of the fabric with glue at the corners and then decorate them with lace.
For the lid of the box it is better to use a different fabric - the decor will be much more interesting