Requirements for kitchen curtains
Having decided to make kitchen curtains with your own hands at home, it is important to know what requirements the curtains on the kitchen window must meet.
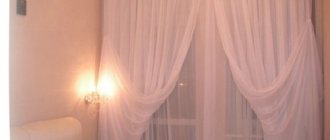
When choosing a kitchen window design, it is better to give preference to simple models and calm tones, since the kitchen is a place for relaxation and eating.
The selected curtain option should fit harmoniously into the design project of the room. Curtains that are too thick and expensive are not suitable for the kitchen; they will look out of place.
Preference should be given to lightweight options. Often curtains on a kitchen window play a decorative function. Therefore, they may partially cover the window and not reach the floor covering.
Curtains in the kitchen should fit organically into the design of the room and not attract much attention.
Curtain "Birds" in a rustic style
We will need:
- yarn (100% cotton, 280 meters per 50 grams), 140 gr. white;
- cr. No. 1.25-1.5.
Finished product size: 50 cm high and 74 cm wide.
Scheme
Description
Chain from 193 century. p. + 3 v. p.p., fillet pattern according to s.. For 1 empty cell, perform 1 s. s n. and 2nd century p., for 1 filled cell we do 3 s. with n..
Replace the 1st s. s n. each row for 3 v. p. and finish 1 s. from n to c. p.p. of the previous row.
Increase of 1 filled cell. at the beginning of the row: 6 in. p.p., 1 s. s n. in the 5th and 6th centuries. p. from the cr., at the end of the row 3 x 1 s. from 2 n. at the base of the previous loop.
Decrease of squares at the beginning of the row: we knit ss over the decreased squares, at the end of the row we leave the decreased squares without knitting.
We straighten the curtain and dry it under a damp towel.
Optimal fabric option
When choosing textiles for sewing kitchen curtains, it is wiser to choose a calm color scheme. In order to make the right choice, it is important to consider the size of the room, the overall color and style of its design.
Considering the specifics of the room, the best option would be fabrics that are easy to wash.
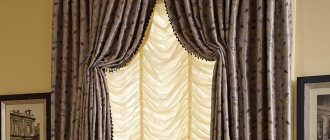
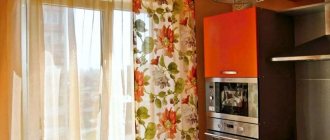
For a kitchen space decorated in a classic style, simple-shaped curtains in warm colors would be appropriate; for a country style, a material made of cotton fabric with floral motifs is ideal.
A kitchen designed in a minimalist style requires an addition to the window in the form of a Roman, Japanese or roller blind to match the kitchen furniture.
Do-it-yourself bead brooch - 105 photos and video description of how to quickly and easily weave a brooch- DIY bird feeder - step-by-step master class and ideas for beginners and schoolchildren (155 photos)
- Do-it-yourself beads: 120 photos and video description of how to weave beads
Factors to consider
Coping with the task of sewing and decorating is not difficult. What is important here is simple adherence to the rules given in the article, the ability to cut and work with a sewing machine.
But before choosing fabric, taking measurements and sewing, you need to decide on style, color and other aspects that affect the overall appearance of the room in the future.
There are a number of rules that should not be neglected. Here is a list of recommendations, taking into account which you can avoid mistakes.
- It's no secret that using a color palette you can achieve the visual effect of reducing or expanding space. Dark colors will visually reduce the volume of the room, and light colors will, accordingly, increase it.
- It is recommended to choose fabric for curtains that is darker or lighter than the main color of the walls. Otherwise they will merge.
- The presence of a horizontal pattern on the fabric can also expand the space, and a vertical pattern can make the ceilings high.
- When choosing fabric, it is worth considering that some types require certain care. For example, natural silk and velvet do not “like” washing; only hand cleaning is allowed. For fabrics prone to fading in the sun, a lining is required.
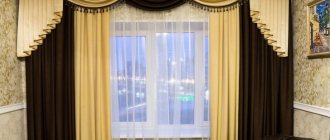
- Heavy fabrics decorate the interior, but require the installation of a reinforced cornice, as they are heavy.
- Curtains made of linen with lavsan are good for kitchens; the shimmer of the fabric will add an impression of lightness.
Roman curtains
Will easily fit into the interior of a room decorated in a minimalist style. Their advantage lies in the economical consumption of fabric for production.
The Roman version of curtains is practical and functional. The manufacturing technology requires some effort, but the result in the form of a modern and original kitchen window decor will be a source of special pride for the owners.
What is a matting
Matting is an environmentally friendly material and is used not only for curtains, but also for furniture and other interior accessories. Visually, this fabric is a little similar to linen, but this is only at first glance, and besides, the technology for its production is different. Modern matting is somewhat different from what it was before, and obviously for the better. It is even more dense and durable, therefore it is able to completely protect the room from the penetration of sunlight.
The method of weaving fibers was invented by our ancestors, and consists of alternately laying two threads on top of each other, which ultimately gives a checkerboard pattern. Today's technology for producing matting differs from what was originally invented; the fabric is impregnated with auxiliary substances, which gives it additional properties that it did not previously have. Among them are strength, density and lightness.
The modern range of this fabric is varied; it can be either plain or printed, on both sides, which is especially valuable for sewing curtains. Another innovation is the use of lining.
- The particularly valuable properties of matting include its low flammability, ability to retain heat well and not allow light to pass through.
- It also has high noise-insulating properties and strength, while the matting fabric is light and relatively soft, pleasant to the touch - just what you need for cutting curtains.
- The matting drapes beautifully, holds its shape perfectly, does not wrinkle, is quite easy to care for, and collects little dust.
- Since it is hypoallergenic, it can be used in rooms where allergy sufferers and children live.
French curtains
The use of this model requires a certain interior style. They look light and airy, and sewing requires some experience and a successful pattern.
Curtains for the kitchen “Housewife”
We will need:
- yarn (100% cotton, 400 meters per 50 gr.);
- cr. No. 1-1.25.
Finished product size: 82 x 114 cm.
Knitting density: 17 cl. x 15 cl. = 10 x. 10 cm.
Schematic illustration
Description
We crochet a chain of 418 v. p. + 4 v. p.p. and continue along cx.. After the last row, we perform 1 row for the holes for the plank: in. p.p., 11 p. from 4 n., * 5 v. p., skip 5 p. base, 10 s. from 4 n.*, from * to *, ending with 11 s. from 4 n and after that we perform 1 r again. With. from 4 n..
Edging: 2 in. p.p., 2 p. without n., *1 picot (= 4 v. p., 1 ss. back to the 1st v. p.), skip 1 st. st., 3 s. without n.*, from * to *, close the cr. R. using ss..
Curtains with ties
A special feature of this model is the fastening of the canvas to the cornice using ties. It is very easy to sew such curtains; they look very original in the interior.
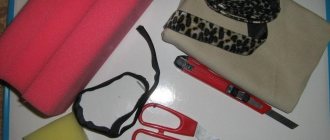
Master class No. 1. Eco-curtains made of linen
Materials: linen fabric for curtains, thick decorative braid in a contrasting color (ours is organza ribbon), scissors, ruler, chalk, sewing machine.
To make the work go faster, make the loop patterns in advance. Measuring the width of curtains will be more accurate if you sew samples.
Instructions on how to cut curtains:
1. Measure a piece of fabric.
2. Mark the locations for the hinges.
3. Finish the edges.
4. If desired, you can make wide folds at the places where the hinges are attached.
5. Set aside the fabric and start stitching.
6. Measure the length and width of the loop with a string on the cornice. Work a further 6 steps with each stitch.
7. We cut a rectangular strip according to the following pattern: length (12 cm) * 2 widths (6+6 cm) + allowances of 1 cm on each side. (The width of the loop should be 1 cm larger than the braid on each side).
8. Fold the rectangle in half from the wrong side, sew with an indentation of 1 cm from the edge.
9. Turn it inside out and iron it so that the seam is in the middle.
10. Sew the braid exactly onto the seam and in the middle of the loop.
11. Sew the loops to the fabric.
Ready. Decorate the window, and voila - admire it!
Master class No. 2. Roman blinds (simple pattern)
Materials:
- Coarsely woven fabric. For complete light insulation, we came up with a blackout curtain textile option. In other cases, thick linen or gabardine will do.
- Thermal tape-web 1 centimeter wide. The paper-based tape will stick without an iron.
- Textile glue: can be found at any craft store.
- Plastic blinds with a working mechanism; A used version with worn records will do. The main thing is to rise and fall.
- Helpers: pencil, ruler, chalk, scissors, tape measure, iron.
Our actions step by step:
1. We measure the size of the future curtain.
If you are mounting it on a window, then the width of the window (WHO) + the height of the opening (VP). If the mount is to the wall, the width of the opening (W) + the height of the opening (VP). We measure out the main fabric: ШО*ШП + allowances of 3 cm on each side. Let's cut it off.
2. Seal the edges of the bottom and side parts.
3. We lay the web along the extreme line, fix it, and remove the paper. Fold it again.
4. Iron with a cold iron to fix. In the case of thermal tape, follow the same steps, only with a hot iron. Do not touch the top edge!
5. Glue the top cut to the cornice. Apply glue to the front part of the cornice strip, as in the photo.
6. Next, we apply the cornice to the upper edge of the curtain from the inside out so that the edge bends slightly towards the upper end, 2-3 mm is enough.
7. Let's remodel the blinds. Cut the length to the length of the curtain. We remove the extra slats, leaving only the weighting for the bottom and the number of folds.
Roulette to the rescue. Involve your little helpers in this activity. They will count the steps for the staircase of the size you need. Ready development helper