It is the tiles that protect the walls from splashes of grease during cooking. Recently, brick masonry has become extremely popular. Today we will tell you how to properly lay hog tiles on a kitchen backsplash, and all the intricacies of this process.
In fact, the apron is one of the most vulnerable parts of the work area. An alternative to the “hog” is tempered glass - skinali, other ceramic tiles and even artificial stone. The choice is often made depending on one’s own preferences and the specifics of the interior design.
Main dimensions of hog tiles
Kabanchik is a rectangular ceramic tile that resembles a brick.
Initially, it was used for cladding buildings, then it migrated to the walls of the subway, which is why in the USA and Great Britain it is called “subway”. The boar has three main sizes:
- small 7.5x10 cm;
- large 10x20 (10x30) cm;
- large 28.5x8.5 cm.
Since large tiles visually make small-sized kitchens smaller, a standard size of 10x20 cm is used for them. Any product is suitable for spacious rooms.
The master's work is afraid
Laying such demanding tiles as “hog” requires experience and some ingenuity. Therefore, to get a good result, we advise you to invite a good tiler. In addition, it is necessary to strictly follow the technology for laying ceramic tiles and use only certified materials: putties, primers, tile adhesives and grouts. Don’t skimp on high-quality finishing materials, then you won’t have to regret wasted money and time.
Don’t be afraid of the difficulties of installing a “hog”, because all of them can be overcome, and the result is so good that over time you will forget about them and admire the beautiful design of your room.
Types of hog tiles
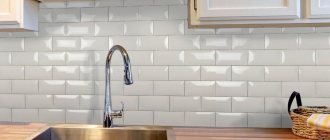
A distinctive feature of the hog is the chamfers - beveled edges running along the perimeter.
With chamfer
Chamfers (or facets) add volume to the product. The glazed surface looks especially impressive with them.
The photo shows a kitchen in chocolate shades, tiled with convex tiles with bevels.
Without chamfer
Flat products without a chamfer look laconic and are used if you do not want to overload the space with relief textures.
Popular media formats
If you have a small kitchen, you need to choose small tiles to create a backsplash. For a spacious room, you can use large fragments of finishing material. To minimize trimming, it is necessary to choose slab sizes such that they are a multiple of the planned height and width of the apron.
It is advisable that the apron tiles fit under the furniture at the top and bottom, then it will have a complete look. The usual height of the working area is 50-60 cm. In the area of the gas stove it is usually a little higher, since the ledge under the hood is also covered with tiles.
One of the most used for decorating a backsplash is 20x20 square tiles. The universal “hog” competes with it in popularity. This format fits well into interiors of different styles. This tile is also sometimes called “subway”. The sizes of boar tiles for a kitchen apron come in different sizes; the most popular size is 7.5cm x 15cm.
It is convenient to purchase medium-sized tiles with holes for the “hog”. It is much easier to lay than shallow ones. Even a beginner who decides to decorate the kitchen on his own can do the installation.
Emerald tilesSource postroika.biz
In most cases, 10x10 squares allow you to lay ceramics without cutting, which is why they are often chosen for decorating a backsplash. For a small room, this is a win-win option, since it allows you to visually expand the space, and the kitchen units will look better against its background.
10x10 tiles are easier to install in areas with difficult access. Also, due to its good contact, it is often used in combination with decor and panels. A significant disadvantage of small tiles is the presence of many seams, but with high-quality grouting this is not so significant.
Cozy kitchenSource profiplitka.ru
Square ceramics with a width of 6 and 12 cm are suitable for interior design in Provence or Scandinavian style. The light or pastel colors of these tiles are suitable for small spaces. In combination with small fragments of the flooring, such tiles will visually expand the kitchen and make it brighter.
Ceramic tiles for the kitchenSource abcceramica.com.ua
In Soviet-era interiors, square slabs 16 by 16 and 18 by 18 were often used. These universal sizes have still not lost their popularity because they look good in kitchens of different sizes and styles. Most often they can be seen in the design of panels and combinations with different decor.
Patchwork styleSource www.cosedicasa.com
The slab size of 24x24 cm is usually not used for miniature rooms; it is used to decorate the work area of large kitchens. In small rooms it is permissible to lay them diagonally so as not to narrow the already small space.
Relief ceramicsSource dizainkuhnibest.ru
To give the work area the appearance of a stone or wood slab, ceramics with large fragments up to 48 cm in length are used. To simulate decking, take tiles 18 or 12 cm wide.
Rectangular ceramics also remain relevant for decorating the work area. The most popular sizes are 10x20, 20x30, 25x33 and similar formats.
Beautiful beige kitchenSource distgroup.by
To simplify the design of a kitchen apron, an imitation of small 10 by 10 tiles is used. Due to the presence of divisions, it looks similar, but the masonry surface has fewer seams. Elements sold in sizes 20 by 20, 20 by 30, 30 by 30 and more. The more, the faster and easier it is to install.
Decorative inserts are used in combination with background plain tiles. These elements are much more expensive, but they enliven a monotonous and boring background, introducing rich notes into it.
Tile backsplash color
Since the demand for boar is great, manufacturers are producing more and more new types of tiles, using the entire color palette, and also playing with textures, imitating natural materials.
White
This color remains popular due to its versatility. Ideally harmonizes with any shade, does not attract special attention, adding “air”.
The photo shows a kitchen with a white apron, originally located on the lower part of the wall.
Black
A deep black splashback is a bold and incredibly stylish way to highlight your workspace. The dark hog looks luxurious, but has a small drawback: any dirt is clearly visible on its glossy surface.
The photo shows a youth kitchen in which not only the apron is decorated with hog, but also the wall above the doorway.
Blue
Sky or dark blue tiles look original and add freshness to the interior.
Beige
An apron of a neutral shade fits well into a kitchen of pastel (milky, blue) tones. Sometimes it serves as a backdrop for bright furnishings.
Grey
Another universal apron color that is suitable for both light and dark kitchen facades.
Color
Color gives a kitchen its own character. A multi-colored apron will create a unique interior. And red will attract attention and create an atmosphere of hospitality.
Orange
If the kitchen lacks light and comfort, using an orange apron would be a great solution.
Yellow
The sunny yellow color of the apron adds cheerfulness to the interior or serves as a bright accent.
Green
Olive, pistachio, mint, light green – shades of green in the kitchen interior give a feeling of calm and natural harmony, and improve your mood.
The photo shows a kitchen with natural motifs. An olive splashback with a border harmonizes with the natural textures of the countertops and cabinets: marble and wood.
Lilac
This shade is rarely used for hog tiles. The lilac color gives the kitchen not only tenderness, but also uniqueness.
Features of care
Many people question the use of a “hog” in their own kitchen, despite the fact that the finishing material itself is one of the most practical.
Such fears are completely unfounded, because the glaze covering the surface of the tile makes it very smooth and resistant to the settling of dust and dirt.
If minor dirt appears, you can easily remove it with a damp cloth.
Therefore, in practice, there will be no more problems with the “hog” than with an apron made of ordinary tiles or mosaics. In addition, dust, dirt, grease splashes and stains from a damp sponge will not be as visible on a light-colored work area compared to dark shades.
Aesthetics will also benefit, because in this case the surrounding space will look much neater and tidier.
"Boar" will be the optimal solution for small spaces. Light glossy shades are endowed with the ability to optically expand the surrounding space.
The only drawback is the presence of depressions at the joint, into which various contaminants can become clogged. Removing them is sometimes not always easy, but this is not a reason to refuse such a design if you like the idea itself.
Apron design
A kitchen apron, lined with a hog pattern, can stretch along a corner or occupy the entire wall. Depending on the area allocated for it, various types of coatings and additional decor are selected.
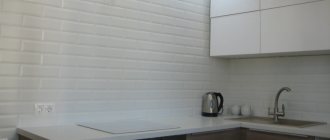
If the set occupies the entire wall, it is recommended to use glazed products. The glossy finish effectively reflects light, visually expanding the space.
Hog with a matte finish is less common. It is used in interiors where gloss is stylistically inappropriate, or in kitchens with an abundance of shiny surfaces.
The photo shows a black kitchen, the glossy apron of which is favorably illuminated by built-in lamps.
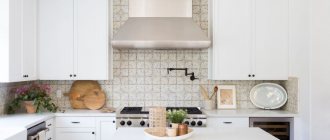
The hog can easily be combined with other tiles, for example, when you need to highlight the area between the stove and the hood. The mosaic, inscribed in the apron with a thin strip, looks harmonious.
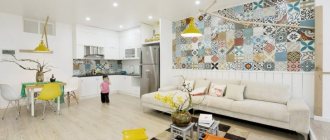
The photo shows a small kitchen, decorated with an emerald-colored apron and patterned tiles in the stove area.
You can also combine different colors and layout methods.
Materials
In the production of kitchen tiles, manufacturers use different raw materials. In this case, the choice of the priority option will be based on the resources of the specific style that is embodied in the kitchen. For example, someone likes majolica, which is resistant to aggressive environments. Others like terraglia, which is made from the best grades of clay, sand and flux.
Some people use gres or ceramic granite for tiling the kitchen work area. Others prefer clinker (clinker tiles), which is highly aesthetically attractive. Also on sale is cotto or the so-called Tuscan stone, which is made from clay from the Mediterranean and Central America.
Conventionally, all types of material can be divided into several main groups. Kitchen backsplash tiles are:
- ceramic;
- glass;
- mosaic;
- mirror;
- stone;
- self-adhesive.
Each type of material has its own characteristics and therefore differs in performance characteristics. Ceramic is a common type of material that is most often used when cladding wall coverings. It is made from a charge mass that includes kaolin, sand, quartz, mica and mineral oxides. It is often decorated with a beautiful pattern or ornament; it can imitate the texture of the required material; it can be smooth and embossed.
Tiles can be pressed and extruded. It is either pressed followed by firing, or forced through special equipment with further cutting and firing of the resulting layer. It is thinner than floor cladding.
Mosaic tiles are nothing more than small squares of identical size. You have to be especially careful when gluing them to the wall, because even a 1 mm deviation can hopelessly ruin the overall appearance of the finished apron. This material is often used to accentuate the apron, laying out certain panels and sketches from the mosaic. Knowing this, brands have developed a type of grid mosaic.
This type of raw material is unique in that it already contains a specific pattern of different tiles and is divided into separate blocks. There is no need to suffer and create a drawing, like assembling a puzzle. It is glued in composite blocks, like standard tiles.
Glass tiles differ from ceramics in composition. Despite its fragility, it is quite practical in everyday life, does not absorb foreign odors, does not burn, and is easy to clean. In addition, it is aesthetically attractive and has the ability to visually increase space, which is typical for glass. In contrast, a mirror one cannot boast of aesthetic appeal during long-term use. Over time, darkish spots appear on its surface.
Self-adhesive tiles are an alternative to well-known types of tile cladding for kitchens. Essentially, these are PVC tiles with different types of textures, which are glued onto a prepared base. This cladding can reproduce the texture of ceramics, stone and even marble. However, if this material is easy to install, it cannot be called practical.
Photo of tiles with a pattern
There are products, like regular tiles, that imitate natural textures: marble, brick.
A boar with an ornament, pattern or inscriptions is often found in the Scandinavian or Provence style.
Material advantages
The boar used for facing the apron has a number of advantages:
- Good sanitary and hygienic properties. Microbes do not accumulate and do not multiply. Dirt does not collect on the surface due to low porosity. Cleaning is easy.
- Various selection of colors and patterns.
Products are made to order with an original pattern or printed photograph
- High temperature resistance. The production of the material takes place in an oven with a temperature of 1000 degrees.
- The simplest installation method does not require expensive equipment.
- Eco-friendly, harmless material does not cause an allergic reaction.
Disadvantages: it is expensive and breaks easily.
The finish is great for a wide variety of styles.
Which grout should I choose for backsplash tiles?
First of all, it is worth considering its composition: grout based on epoxy resins, which is resistant to dirt, is best suited for the kitchen. If we talk about the palette, then for a plain neutral backsplash it is recommended to choose a grout that is similar in color to the tile itself. White and gray grout are considered universal.
The photo shows a burgundy-colored apron with matching grout, which “dissolves” the seams without focusing attention on them.
If you need to make an accent apron, you can use contrasting combinations. For example, black grout on white tiles will add a graphic touch to the interior. If the tiles are dark, white joints will highlight the texture or interesting shade.
The photo shows an example of contrasting grout. Without it, the wall above the work area would look empty and unfinished.
Method 1 – “Cutting corners? No, we haven’t heard”
The simplest solution is to cut the tiles “straight” and rely on the miracles of grout. Forget about the different adhesion between the end of the tile and its front side, ignore the chamfers, and just ugly cover everything up with more grout. And then the rapid destruction of the corners is ensured, since, as already mentioned, the front surface of the tile does not have the same adhesion as the end cut, and the grout will simply fall off soon. Plus, grouting will not be able to follow the contours of the angle formed by the chamfer of the tile, and the end result will look in the “Soviet Department” style.
Is this why you purchased expensive tiles? Obviously, for those who need quality, this option is no longer available.
Boar tile layout options
If you use plastic panels that imitate a hog, there will be only two cladding options: vertical and horizontal. But the rectangular shape of the individual tile elements allows you to lay it in several ways:
- Vertical with offset. A method by which you can visually lengthen a tiled wall.
- Horizontal staggering. The most common option is when the tiles are laid offset, like a brick.
- Horizontal stackable. A neat seam-to-seam method with an emphasis on geometric accuracy.
- Vertical stackable. A method designed to emphasize the severity of lines in the interior.
- Diagonally. The elements are placed at an angle of 45°. This option is suitable for small kitchens, as it visually expands the apron area.
- Herringbone. The tiles are laid in a zigzag pattern to create a beautiful pattern.
The photo shows a black vertical hog, adding respectability to the interior.
Styling Basics
Laying tiles correctly, especially if they have a bevel, can be a challenge. But, if you have a certain patience, tools and minimal knowledge, you will be able to do everything yourself. The main thing is to make all the calculations correctly, distribute your own forces and be prepared for certain difficulties.
Preparing the base
Any tile, and the hog is no exception, requires appropriate preparation of the walls. This nuance should be given special attention, since the final result depends on it.
Some craftsmen prefer to “level” minimal differences in the plane with tile adhesive, which is quite fair for deviations from the plane of 1–2 mm. In all other cases, it is recommended to use cement-sand plaster.
Before each stage of work, be it leveling or gluing tiles, it is always necessary to degrease and prime the base. This will significantly increase the adhesion of the wall and ensure a high-quality installation of the “hog”. If the rough coating consists of smooth concrete surfaces, ideally it is advisable to additionally treat the concrete with contact.
How to lay in corners
The plate format already initially involves making many cuts during the laying process. The main inconvenience is the chamfer, which makes it difficult to trim evenly. It is necessary to pay attention to even corners and high-quality joints.
Most craftsmen prefer to cut cuts at 45 degrees, which entails high costs for the customer. That is why it is ideal if there are as few joints of this kind as possible.
It is very inconvenient to place the “hog” in corners, both internal and external. Typically, in such places, regular tile trimming is carried out. The end can be further processed, for example, with ordinary fine sandpaper.
Next, the tiles are unfolded so that the cutting falls inside the row, and the entire edge is directed into the corner. This will make the junction of two vertical surfaces perfectly smooth and clear. If the “hog” is without a chamfer, the work will be even easier to complete. Especially when it comes to the external corner for which the bevel is being made.
Laying technology
There are different ways to stick a “hog”, but the most popular is the “staggered” option. In addition, some designers order styling with a side-by-side offset of 20–50% or in a herringbone pattern.
One of the conditions for successful completion of the work is maintaining the same distance between each plate. Otherwise, there is a possibility that the horizontal will shift, which will make the end result, to put it mildly, uninteresting in principle.
When choosing a tile with a chamfer, it is worth considering that it requires special care when making a seam. The volume of the plates attracts quite a lot of attention, which is why all the flaws and nuances become very noticeable.
The seam must be made perfectly even, as thin as possible, regardless of the method of laying the “hog” and the color of the selected grout mixture. It is advisable to discuss all these points with the master before starting work.
You immediately need to understand which crosses for tiles are best suited. Actually, they set the width of the seam.
With traditional classic tiles, it is considered quite normal to choose a cross of 2–5 mm, which allows you to hide any inaccuracies and errors using jointing, but in the case of a “hog” this is unacceptable. This kind of plate looks ideal with a seam of up to 1.5 mm. That is why no mistakes should be made here.
Calculation and marking of vertical rows
Since the “hog” has a specific profile, it is recommended that before installation you consider the issue of its placement on the wall.
If you plan to “stick” the plates only on the apron, then it is desirable that the furniture adjacent to them should be on the flat part, and not on the chamfer.
The situation is similar with the baseboard, in the case of laying tiles to the floor. Otherwise, the “hog” will look bad due to the loose fit of objects or baseboards, as well as the appearance of noticeable gaps.
That is why, before laying the tiles, you need to make an accurate calculation of the placement of the first row, as well as the total number of plates. Typically, craftsmen are additionally given a laying diagram for their work. Knowing what thickness crosses for tiles will be used and the size of the plates, it is possible to complete the task with a minimum error of up to 1 mm.
Note that making any adjustments on paper is much easier than doing it while working on the wall.
How does a boar apron look in different interior styles?
Hog tiles are so multifunctional that they will fit into any interior.
Provence (“French country”) combines rustic simplicity and sophistication. The apron can have a pattern or, conversely, act as a backdrop for cozy little things and an antique set.
White tiles will fit into a spacious loft with rough textures, which will serve as a contrast to industrial furniture. An interesting option is when the smooth glossy coating of the apron echoes the textured brickwork.
Due to its laconic shape, the boar will harmoniously fit into both modern and Scandinavian kitchen styles.
The photo shows a kitchen in a modern direction with herringbone tiles.
In the classic style, a beige hog will find its application, highlighting the splendor of a luxurious set and rich decorative elements.
A little history
Example of façade cladding
Previously, façade tiles were called boar tiles. The finish imitated brickwork and was most often used on the facades of Art Nouveau buildings at the beginning of the twentieth century.
The informal funny name “boar” was strengthened due to the fact that the blank, covered with glaze, had two through holes at the end, which made it look like a pig’s penny. After being hit with a hammer, the blank split into two equal halves, having a smooth surface on the front side and a rough surface on the back. Thanks to this shape, the tiles were convenient to stack and transport.
Manufacturers
Modern versions of kabanchik (subway) tiles are usually sold in trade organizations under their own names, which were named by the manufacturers. There are a lot of options on sale with different sizes and shapes of surface relief. The main feature remains only the aspect ratio - 1:2, which allows you to create the correct cladding patterns.
Among the most popular manufacturers from the budget sector are the following.
- Cersanit. A Polish enterprise that launched production in Russia in 2010. The assortment includes different types of tiles, including boar-type models, monochrome or with various thematic “kitchen” patterns.
- Estima. Russian enterprise established in 2001. The boar model is only a very small part of the total production volume.
- Jade Pottery . Another Russian manufacturer producing high-quality products on Spanish and Italian production lines. About 10% of the entire range of retail chains is supplied by this manufacturer. The quality of the tiles is practically not inferior to European standards.
Manufacturers supplying material at an average price level.
- Vitra. Turkish company operating since 1991. We produce high-quality products that are known in all countries of the world. The assortment also includes boar tile models.
- Creto. Russian manufacturer of ceramic tiles. There are two lines of hog tiles, with imitation of natural materials (wood and stone).
- Kerama Marazzi . A joint Russian-Italian enterprise operating since 1988 on the initiative of the Italian side. Today there are three factories in Russia that produce a wide range of different types of cladding. There are several lines of boar tiles, although only one series has a standard aspect ratio.
Companies whose products can be considered to be of the highest level.
- Ragno. A manufacturer from Italy, whose products appeared on the market back in 1949. Among the boar-type tile models, we can highlight the WOODESSENCE line with a non-standard aspect ratio (width 100 mm, length 700 mm). The cost of 1m2 is from 3600 rubles.
- Italon. Italian company, part of the Atlas Concorde group. Since 2006, the Russian branch has been operating with production facilities in Stupino. A large volume of products is produced, including two model lines of hog tiles. The cost of 1m2 starts from 2580 rubles.
- Carmen. A Spanish company that is part of the APE CERAMICA production holding. The company's assortment, in addition to other products, includes 4 model lines of boar tiles. The cost of 1 m2 starts from 3,500 rubles, but the quality of the material is very high.
Expert opinion
Mezentsev Sergey Petrovich
Residential renovation and finishing specialist
Only some manufacturers are listed. The assortment of specialized stores includes products from a huge number of domestic and foreign companies, which have high quality and external indicators. However, it is not advisable to select a material only by the name of the manufacturer. First of all, you should consider its parameters - aspect ratio, color, and other indicators.