There are many creative ideas used by furniture makers when making their own masterpieces. A bright, original and memorable product that will perfectly decorate a modern interior and create a unique atmosphere is a coffee table with an infinity effect. Making it is not very easy, but it is quite possible if you have some skills in working with wood and glass.
You can place a table with lighting both in an office space or in a country house, as well as at home. LED lamps used in the assembly of such furniture are absolutely safe for human health, as well as for the environment. Such lamps are durable and economical, so using a table with an infinity effect will not lead to increased energy consumption.
The illusion of an endless tunnel is created by using two mirror surfaces and LEDs located between them. The colors of the lamps used can be any, but experts say that red diodes can make the tunnel deeper, since red color is less prone to scattering than other colors.
To control the backlight, you can use the on/off button or a special remote control.
What is special about the design of a table with an infinity effect?
The originality of the design of such a table lies in the use of two mirrors and LED lighting placed in the tabletop. This table is most appropriate in a recreation area, that is, in the living room. It will fit into such interior design styles as modern, high-tech, minimalism. By attaching wheels to the legs of the table, you can easily move it around the house.
Such tables look good in various interior styles. Using a mirror as a tabletop allows, on the one hand, to prevent scratches, and on the other hand, makes the structure fragile and susceptible to strong mechanical influences.
Mirror surfaces are afraid of high temperatures, high humidity and direct sunlight.
A mirror surface is used as a tabletop for this table.
Answers to a reader question
In our locality it is not possible to purchase or rent a milling machine.
In addition, cutters are expensive. How else can you make grooves for glass? A shelf for supporting glass (like a groove) can be easily made without special tools. It is enough to attach a flat strip of glazing bead, a board or a piece of chipboard to the side wall of the frame, stepping back from the top edge by the thickness of the glass.
Do I need to fasten the decorative frame in any way?
The described table model was chosen as the simplest to manufacture. We can say that the frame is a conventional name. The individual planks are simply attached to the base. They do not need to be fastened together, which simplifies the work. It is important to fit the cut corners tightly so that there are no gaps between them. Cashing doors is done in the same way.
How to hide holes for screw heads? Sawdust is mixed with wood glue and the recesses are filled with the mixture. After drying, the surface is treated with sandpaper and covered with paints and varnishes.
Did the article help? Please rate
3 / 5. 2
Andrey Peregubsky
Carpenter-furniture maker
Discussions
How the infinity illusion works
The illusion of an endless tunnel is created by reflecting a light source in two mirror surfaces at the same time.
Due to the fact that light has the property of scattering, the effect of its gradual attenuation is created somewhere in the depths.
Due to the peculiar reflection of light, such tables create the illusion of an endless tunnel. An important condition for creating such an illusion is selecting the correct distance between the mirrors. Experts recommend installing mirrors at a distance of approximately 8 cm from each other.
Theoretical basis of an infinity mirror (light well)
Instructions for making a table with an infinity effect
Our grandmothers used the effect of creating an illusory endless tunnel, placing a candle between two mirrors during Christmas time. It arose due to repeated reflection of the light source from a real and imaginary mirror surface. A schematic diagram of this effect is shown in the figure below.
If you want to know more about why a reflected mirror surface has the same optical properties as a real one, open a quantum physics textbook. Well, we will continue the story about how to use this effect (with modern light sources), but for those who are ready to accept this postulate a priori.
Is it possible to make a table with an infinity effect with your own hands?
A similar model can be ordered on the Internet, but it is quite expensive, so it is better to try to make it yourself. Making a table with an infinity effect with your own hands is not difficult, but it will require you to have minimal skills in working with wood and glass, and some skills in working with tools. It is also necessary to understand the principle and diagram of connecting LED strips.
It is quite possible to make such an original table at home with your own hands.
Interactive table
Here you will learn how to make a beautiful interactive coffee table that will amaze you, amaze you, and maybe just make your head spin a little! The sides are painted, clear coated and engraved. The table contains more than 960 LEDs, each of which is controlled by 24-bit color. The LEDs make up a total of forty infinity mirrors, culminating in one stunning composition. The design features 4 hidden USB ports, each capable of charging up to 2A. In addition, the table is equipped with an inductive charging pad, which is clearly laser engraved.
To top it all off, there are 2 AC outlets for those who would like to plug in a laptop or charger. The final feature is a hidden LCD touch display that allows you to fully control the table's functions. Of course, this project is not for beginners. You must have good woodworking, electrical skills and the ability to adapt to any challenges during assembly. This is a complex design, but for those who want to try to make such a backlit table with their own hands , the result will be amazing. So, if you take on this project, you will have to invest a lot of time and effort. If you want to challenge yourself, this is definitely for you.
The basic instructions in this tutorial rely heavily on the use of CAD drawings. The drawings show individual parts and components and you should be able to interpret them to assemble the table.
Skills
- Must be able to read and create CAD models and drawings.
- Be able to design your own parts if you want to make changes.
- Good understanding of wiring and programming.
- Be able to open CAD models in case the drawings are difficult to interpret
If you decide to take a risk, read the large and very detailed instructions on the website, link below under the gallery. Everything is there, a list of materials, tools, wood specifications and separate instructions on how to work with CAD drawings. Everything else depends only on your perseverance.
Photo source: www.instructables.com/id/Beyond-Infinity-Table-the-Interactive-Coffee-Table/
What tools and materials will be needed
You can make an infinity table from mirrors and lighting from any regular table you have at home, removing the standard tabletop.
The first step is to remove the old countertop from the table. If you want to create a table from scratch, then you will need:
- material (chipboard, MDF, plywood or wood);
- self-tapping screws;
- mirror;
- translucent mirror or glass with a mirror film attached;
- sandpaper (or sanding machine);
- Super glue;
- LED strip with programmer, microcontroller, wires and power supply.
As an alternative to the LED strip, you can use a regular New Year's garland, then accordingly there will be no need for other lighting equipment.
If desired, the LED strip can be replaced with a regular New Year's garland. Wood as a table material will look richer, but will also cost more. It is also more durable than chipboard or MDF and is not subject to rotting. It is worth noting the high environmental friendliness of wood. It is best to choose red LEDs, since their light scatters the least and, accordingly, the depth of the tunnel will be greater.
What determines the depth of the tunnel?
To make a table with an infinity effect with your own hands, you need to determine how deep the tunnel will be. For this, several factors are taken into account:
- The level of transparency of the film applied to the top of the structure. The glass may be initially tinted. You are also allowed to stick the film yourself.
- If you use an LED table, then in this case the infinity effect will depend on the distance between the mirror sheets.
- Backlight brightness. Its high intensity provides a pronounced illusion of depth.
To get infinity, you need to install the mirror correctly. The more LEDs placed between the reflective surfaces, the more pronounced the tunnel. The main loss of light due to reflection occurs in translucent glass - each subsequent glass becomes less intense. You can increase the brightness if the distance between the LED strips is greater.
Step-by-step manufacturing instructions
Prepare all tools and materials for work in advance. Find a drawing on the Internet on special forums with the indicated dimensions of all parts. And then we will look in detail at how to make a table with an infinity effect with your own hands.
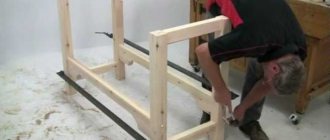
Create a box
The bottom of the tabletop box will be a sheet of plywood or chipboard. It is necessary to screw 4 boards to it along the outer perimeter, and at a distance of 5 centimeters from the edge there are four more boards. Thus, the boards should form 2 rectangles, one placed inside the other. There should be a small gap between them, sufficient for laying the wires.
When making a box, do not forget to first clean the boards with sandpaper or treat them with a sanding machine.
All parts of the table and its frame must be smoothly sanded. After the box is ready, coat it with varnish and leave to dry.
Selection of mirrors and their installation
Glue the mirror face up to the bottom of the box you assembled. Please note that it must completely match the dimensions of the inner rectangle of the box. Installation of the upper translucent mirror is carried out after placing the LEDs.
The mirror cover is mounted on the table only after all the LEDs have already been placed.
Installing the backlight
Glue the LED strip to the inside of the small rectangle of the box. Lay the wires coming from the LED strip into the gap left between the rectangles. The wires from the lighting can be routed inside one of the legs for a more aesthetic appearance of the entire structure.
The LED strip is glued to the inside of a small rectangle of the box.
Glass fastening
Glue an overlay wooden frame with wide edges. Its external dimensions must exceed the external dimensions of the table box, and its internal dimensions must be smaller than the dimensions of the rectangle on which the LED strip is attached. After making the frame, grooves must be made along its inner edge, the height matching the thickness of the translucent mirror. Place a translucent mirror in the resulting grooves, reflective side down.
The translucent mirror is attached with the reflective side down. You can secure it with glue. Screw the overlay frame with the installed mirror to the table frame using fasteners with decorative heads. That's all, the coffee table with the infinity effect is made by hand.
Rules for assembling the structure
All wooden parts of the table must be smoothly sanded and free from any irregularities in the form of chips or burrs.
Remove the protective film from mirrors and glass only after completing all work. To avoid short circuits, follow all safety rules when working with electricity. Carefully study the diagram for connecting the LED strip to the power supply.
The wood glue you will use to make the table should be waterproof.
When assembling the table, use only waterproof wood glue.
Connecting LED strip
Let's move on to the tape itself. Measure the LED strip of the required length according to the dimensions of your aluminum sheet.
In total you will need two segments. Solder them together in parallel.
Then glue it onto an aluminum backing.
Please note that for greater safety in places where contacts are soldered, it is advisable to place paper tape under the tape.
It will act as an insulator and prevent a possible short circuit to the housing.
Technically, the lamp is almost ready. You can apply voltage to it and turn on the toggle switch.
However, it all looks rather unattractive. Additionally, direct light from LEDs without diffusion is not very good for the eyes.
Interesting options for tables with lighting
Instead of LED strips, you can use other light sources. For example, LED lamps are more suitable for large tables. And if you use neon lamps in the design, the light from them will be soft and unusual. The backlight can be either single color or combined. You can install a controller that allows you to select a constant or flashing operating mode.
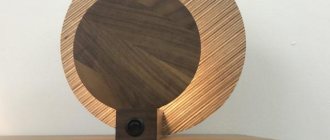
In addition to monochromatic lighting, you can use combined lighting for tables with an infinity effect. In addition to using LEDs around the perimeter of the table, you can place LEDs on other shapes. For example, if you place several round figures with LED backlighting in the center of the table, then when the backlight is turned on, the visual effect of columns will appear, continuing endlessly. In addition to using this effect on a coffee table, you can also use it on a kitchen or work table.
How to calculate the width of an additional mount for a table top?
For fastening from above, a special frame is made, the width of which is calculated as follows: the thickness of the outer frame is added to the width of the cut gutter with a couple of centimeters in reserve, which helps fix the tabletop using the frame.
The frame is assembled from four wooden blanks and fastened with self-tapping screws. Then, using bolts, they are screwed to the outer frame, capturing the tabletop frame with LEDs. Remember that the holes are drilled in advance to prevent the wood from splitting during operation.
Assembly
Desk height: how to choose the right one?
The assembly process is simple. If all of the above elements are at hand, then you only need to be careful.
- Glue the frame slats with silicone sealant to the mirror on the side of the reflective surface.
- Attach the RGB LED strip to the inner surface of the frame, and lead the power cord through a hole pre-drilled in the frame rail.
- Cut the mirror film to the width of the frame.
- Apply silicone sealant to the frame and place glass with a mirror film on top (mirror surface inward).
Now all that remains is to decide what to do with the ends to cover the wooden frame.
- If everything is done carefully and the frame slats are planed, then the ends are painted.
- Using an aluminum U-shaped profile is an excellent solution for a Hi-Tech design.
- Use a plastic cable duct without a cover.
The same silicone sealant is suitable for securing the profiles.
Testing
The thermal imager showed fairly uniform heating of the LEDs with a maximum heating of the crystals of 58C
The glass heats up to 35C and should not crack.
The cat wonders how much time for a good night's sleep was wasted
Recently, decorating modern interiors with “infinity mirrors” has become very popular. The design is based on an LED strip, which is often used by interior designers to bring their most daring and creative ideas into reality.
In this article we will reveal all the nuances of making such an unusual lighting design for a room as an endless light well. You will learn what it is and how to make such a mirror yourself.
From the article you will learn how many mirror surfaces are needed to create a light tunnel with luminous points, as well as what materials are needed and how to make a lamp with an eternal effect with your own hands.