Restoration
Restoration is the longest and most boring stage, but at the same time the most important. You won’t do the splits without first warming up your muscles, will you? So the chest of drawers needs to be carefully prepared for the upcoming changes. Don't be alarmed - we have prepared step-by-step instructions for this process.
Stage 1. Internal examination of the chest of drawers. We remove and measure damaged boxes and parts in order to buy/make new ones.
Tip: take a close look at the handles and legs of the chest of drawers. If they vary slightly in shape or size, there's a good chance they were handmade. In this case, it is better to change all the fittings.
Step 2: Clean the surface with soapy water. For hard-to-reach areas, use an old toothbrush.
Stage 3. Remove the top layer of paint or varnish. To do this, apply acetone to the prepared surface and cover the chest of drawers with film or oilcloth for an hour to enhance the effect.
Stage 4. Remove any remaining paint or varnish with a spatula and carefully sand the surface with a sander. For small parts we use sandpaper or a sanding sponge.
Stage 5. Cover chips and scratches with wood putty.
Stage 6. Final. Cover the chest of drawers with paint or stain using a brush/roller. Then we coat it with varnish, and then apply one or two more layers of paint. The final coat of varnish remains until the bitter end. Then fanfare sounds and fireworks are heard.
Tip: when choosing a color, be guided by the style and color scheme of the interior. Muted shades and pastel colors are suitable for the bedroom.
Manufacturing
The step-by-step scheme for making any chest of drawers includes a number of stages. The main ones are: cutting and processing of parts, frame assembly, installation of partitions and drawers. Secondary: attaching handles, decorating. Each of the points must be performed in accordance with the rules, then the product will turn out to be of truly high quality.
Material cutting
Cutting chipboard and similar sheet panels can be done on your own or using special machines. Professional cutting services are offered by distributors of tile building materials and furniture manufacturers. When choosing this option, the cost of a homemade chest of drawers will increase slightly, but the ends of the sawn elements will be more accurate.
Features of chests of drawers for TV, types by shape, filling, size
When cutting chipboard yourself, you should remember the need for 1–2 mm of margin on the edge. In such cases, the jigsaw must be electric, the support of the sheets must be stable and level, and the furniture maker’s movements must be smooth and precise. The stage ends with checking the model, adjusting the parts and drilling holes for the confirmations using a drill 0.5 mm smaller.
Edge processing
At this stage, the ends of the parts are carefully inspected for defects and covered with self-adhesive edges. Step-by-step actions:
- Chips and similar irregularities are covered with wax.
- When planning to use the chest of drawers in conditions of high humidity, the ends are coated with sealant.
- After eliminating possible defects, the ends are covered with a protective film, heated with a hairdryer or iron.
Frame assembly
Any model of a chest of drawers is assembled with your own hands according to the general principle:
- In pre-marked areas, drill holes for screws of slightly smaller diameter.
- The parts are joined and connected with confirmations using a screwdriver.
- To check possible deviations, a square is applied to the corners of the assembled structure.
- Directly during assembly, lines are marked on the side parts for attaching the guides, starting from the bottom, with a mandatory 3 mm gap between adjacent drawers.
Installing the table top and bottom
The assembly of any product begins from the bottom, with sequential fastening of the sidewalls and transverse shelves (if any). And only then, after checking the angles of the structure and marking the guides, the tabletop is screwed to the chest of drawers. There are no problems when working with simple, flat surfaces. The upper part is attached using confirmations and plastic furniture corners from the inside. Any additional elements of the chest of drawers (shelves, folding table) are fixed at the end, after checking the stability and correct assembly of the entire structure.
Attaching legs or wheels
Cabinet furniture made from lightweight board materials in most cases does not need legs. Problems with joining the walls are solved using a recess at the bottom of the chest of drawers on the reverse side. But it is advisable to equip heavy, frequently moved or stylish models with supports, thrust bearings or wheels. Such elements are screwed at a distance of at least 50 mm from the corners, at an equal distance from each other. The method of fastening depends on the type of leg and is specified before assembling the chest of drawers. In some cases, corresponding holes are pre-drilled in the bottom.
Rear wall installation
The back part is fixed with confirmats and finally strengthens the structure. Not only the corners, but also the diagonals of all the main elements of the chest of drawers must be checked. Deviations from the specified sketch of more than 1 mm are not allowed. The part is screwed in the absence or after elimination of any defects.
Tips for placing milk oak chests of drawers in the interior
Assembly and installation of boxes
This stage begins with assembling the boxes:
- The side parts are connected first and only then, after checking the diagonals and angles, the bottom is attached to the boxes with self-tapping screws.
- The second part of the guides is mounted to the sides.
- The pull-out elements are sequentially (starting from the bottom) inserted into the chest of drawers, pulled out and pushed in. Correctly assembled and installed boxes move smoothly, without displacement.
The given instructions allow you to make your own chest of drawers both from chipboard and from any board materials, including plywood or solid wood. The difference when working with denser varieties appears insignificantly, namely in the grinding of the ends and the use of more reliable fasteners. It is also necessary to remember that when assembling a chest of drawers on confirmed mats, there is no need to coat the joints; when using tongue-and-groove elements or mounting on dowels, the opposite is true.
Dresser decor for the bedroom
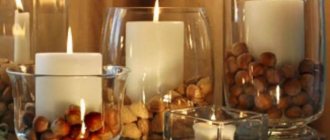
After restoration, you can safely begin decorating. For decoration, everything is used: from beads, coffee beans and old newspapers to nails, apartment numbers and plastic figures. The only limit is your imagination (well, you shouldn’t take away your children’s favorite toys). To know where to start, we’ll introduce you to a couple of ready-made techniques and inspiring ideas.
How to correctly assemble the simplest option at home?
To make the simplest chest of drawers with your own hands, you need to: draw a drawing of it, select the optimal manufacturing materials, prepare tools and have some free time.
Scheme and drawing
Designing a piece of furniture is necessary in order to avoid errors in the manufacture of parts and when assembling the structure. At the design stage, it is necessary to think about its location in advance. The size of the chest of drawers and the type of construction will directly depend on this. After all, a chest of drawers can be made high and narrow, wide and low, and with any number of retractable drawers.
You can make a drawing of a future chest of drawers in different ways:
- find a suitable option on the Internet;
- draw it yourself with a pencil on a piece of paper;
- use special computer programs for cutting furniture items.
Important: the drawing must indicate the height, depth and width of the product, as well as the installation of fittings and guides.
Tools
The materials we will need are:
- screws;
- confirmations;
- plastic mounting angles;
- nails;
- MDF;
- chipboard;
- Fiberboard.
Prepare the following tools:
- screwdriver;
- drill for confirmations;
- confirmation bat;
- Phillips screwdriver;
- awl;
- ruler and pencil.
Step by step manufacturing and assembly instructions
In this article we will look at making a simple chest of drawers with four drawers, measuring 1100 by 800 by 500 cm. Its facades will be made of MDF. To reduce the cost of the chest of drawers, chipboard can be used to make the sides.
The most important and crucial step in making furniture yourself is detailing. We will need to prepare:
- tabletop measuring 1100 by 500 cm;
- top insert 1100 by 50 cm;
- bottom insert 1100 by 66 cm;
- 4 facades – 1100 by 162 cm;
- bottom – 1100 by 484 cm;
- rear wall with dimensions 1100 by 678 cm;
- 2 stiffening ribs 1028 by 100 cm;
- 8 drawer fronts with dimensions 970 by 127; 8 sidewalls for drawers 450 by 127 cm;
- 2 bottoms for drawers 970 by 418 cm;
- 3 partitions for drawers 418 by 127 cm;
- 2 bottoms for fiberboard boxes measuring 100 x 448 cm.
As for the principle of assembling a piece of furniture, everything here is extremely easy and simple. All details are collected by confirmation:
- First, the frame of the product is assembled, consisting of the sides and bottom.
- Next, markings are made for the guides.
- Now let's move on to assembling the chest of drawers
- We attach the back wall to the box at a right angle.
- We install the drawers and check them for ease of opening and closing.
- We fix the tabletop of the chest of drawers with self-tapping screws.
- We begin installing the fronts on the drawers and screwing on the handles.
That's the whole simple process of making and assembling a chest of drawers from MDF with your own hands.
Tip: if you need more capacity, try making a cabinet from chipboard, furniture board or even cardboard. And a rocking chair or corner sofa will sit comfortably nearby.
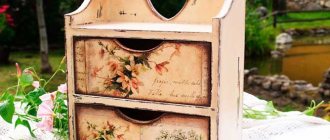
Decoupage
Necessary materials : pictures for decoupage, scissors, PVA glue, roller/brush for painting, varnish.
According to Wikipedia, decoupage is the decoration of objects using napkins, pictures, fabric or photographs. The technique is suitable for beginners. All you need is to cut out the illustration you like along the contour (you can use decoupage cards, ordinary three-layer napkins, postcards) and glue it to the selected area with PVA glue. Mix 2 parts glue with 3 parts water and cover the picture with the finished mixture. A final coat of varnish, and an ordinary chest of drawers turns into a work of art.
Modern ideas in the interior
The design of modern living rooms opens up wide possibilities for choosing storage systems. Simple forms are a win-win solution for arranging furnishings in loft, modern or Scandinavian styles. When placed together, chests of drawers look like one piece, providing a functional storage system.
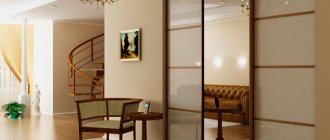
A model with a mirror can serve as a dressing table. A table lamp or interior lighting will attract the eye, highlighting the beauty of decorative elements with the help of lighting.
For an always relevant classic, it is better to choose a chest of drawers that combines smooth lines and voluminous decor.
Stencils
Necessary materials : stencil (or lace napkin/old tulle), tape, acrylic paints, sponge/brush, varnish.
Another simple but effective technique. We fix the stencil on the surface with tape and carefully apply paint of the desired color. Afterwards, carefully remove the stencil and wash it. To make the result pleasing for as long as possible, cover the resulting pattern with matte varnish.
You can use old lace doilies or unnecessary tulle as a stencil. The principle of operation is the same, but it is better to replace acrylic paints with spray paint - the pattern will be clearer. The end result will be original furniture that will fit perfectly into a romantic girl’s bedroom.
How can you decorate an old chest of drawers?
Provides many techniques for updating interior items, including chests of drawers. These include:
- Decoration when using paper. If a person wants to change the color of the item in question, you can use old wallpaper or pieces of beautiful paper. These elements are glued to the surface of the furniture using PVA glue. You can also use an adhesive intended for wallpapering. The same principle should be taken into account as when gluing wallpaper, that is, after applying the glue, you need to leave it for a few minutes so that the paper gets wet. For example, in a children's room you can decorate using an old geographical map. This idea is popular now.
- Using sticky paper or stickers . They help decorate furniture in unusual ways. In this case, simple vinyl film is often used for this purpose. If the master shows imagination, the film helps him create a unique piece of furniture. The disadvantage is that if glued incorrectly, the plank will be quite short-lived in use. When using such material, it will be possible to cover all the imperfections of the furniture.
- Using decorative elements to decorate a chest of drawers . Buy them at a hardware store. In addition, you can make it yourself by cutting out the elements with a jigsaw.
- Decoration with fabric . This technique was popular during the Soviet period; chintz lining was in fashion.
- A new technique called patch decor . It is understood that when using PVA glue, pieces of fabric are applied to the chest of drawers. It can also be cords and other elements.
In addition, you can highlight the use of lace.
This method is also popular. Lace can act as a stencil that helps create an openwork pattern. The coloring agent is applied using an aerosol. You can use lace several times. The master can choose the technique that suits him best.
It is also useful to read: Branches in floor vases for the interior
Antique decor
Required materials : acrylic paint, roller or brush for painting, sandpaper, gold leaf, glue, varnish.
An antique decorated chest of drawers is suitable for a bedroom in country or Provence style. It's funny that even the marks of time have to look stylish, so you have to work a little. On the prepared surface (5th stage of our list) we apply two layers of acrylic paint in contrasting colors. After the paint has completely dried, we sand the corners and protruding areas with sandpaper.
If you want to give your chest of drawers a feeling of former luxury, additionally use thin foil called gold leaf. Apply glue to the selected areas, and then place the gold leaf on top. Give it at least two hours to dry and remove any excess. The final stage of work, as you probably already guessed, is varnishing.
Features of drilling and assembling a chest of drawers with your own hands
Once absolutely all the parts are ready and you have the necessary tools, you can begin the most interesting part of the work - assembling the chest of drawers. In this case, the steps are:
- On individual elements you need to mark the places where the fastenings will be located (screws or dowels). For greater accuracy, it is better to rely on drawings.
- First, take the tabletop and attach it to the walls - here you will need corners or strips. After this, a strip is attached to the structure, which will serve as the bottom.
- Next you need to attach the legs or wheels to the bottom. If you attach wheels, the product will be easier to move.
- The next step is attaching the back wall. For it, fiberboard is taken, which must cover the ends of the side walls, table top and bottom. Attach the back wall with small nails.
- After this, you need to assemble the drawers and attach the guides for them in certain places.
Your product is ready. Install it in the planned place, lay out things and use the new piece of furniture
Important! It is best to check the evenness and stability of the structure at the stage of attaching the back wall; for this purpose, its diagonal size is measured. If there are any irregularities, they are immediately eliminated
If you do everything as the instructions for making a chest of drawers with dimensions, drawings and details say, then creating a chest of drawers will not be difficult even for a beginner. In addition, you can always watch training videos.
For chests of drawers made of wood, traditional finishing methods are best suited: painting, varnishing.
Volumetric decor
Materials needed : stencil, masking tape, acrylic putty or volumetric paste, spatula, acrylic paint, brush/sponge, sandpaper.
The stencil comes into play again. The first step is to attach the stencil to the surface. Next, apply putty and level it with a spatula. After we remove the stencil, we patiently wait for it to dry completely.
In the finale, there are two ways to develop the scenario: either we cover the chest of drawers with acrylic paint, or we create the already familiar scuffed effect. To do this, paint the surface with one color, then rub the three-dimensional pattern with a candle and cover everything with paint of a different shade. After drying, sand it with sandpaper. Done, you are amazing!
Design solutions
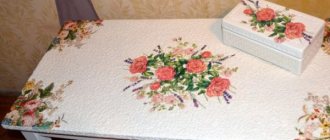
The decor of an old bedside table or decorating a chest of drawers with your own hands is determined by the style of the interior. You can use wallpaper, lace, choose a floral print, fabric upholstery of drawers, paint, or put names and memorable dates on the surface. You can decorate the entire front panel using coffee beans, buttons, beads, beads and other elements. If this is a living room, it is better to use presentable panels of restrained color, but for a bedroom or children's room you are given complete freedom of choice. Decoupage techniques, English style, volumetric decor, and antique decor never go out of fashion.
Nightstands are updated according to the same principle. But how to decorate a plastic chest of drawers? The best choice would be decoupage. The same work is carried out as indicated above, with the exception of grinding. For plastic, special paints of various colors and primer are provided.
Decoupage
How to decorate a chest of drawers using decoupage technique? This is a real haven for imagination. Decoupage involves decorating furniture using special cards and three-layer napkins. You also need to get white acrylic paint, PVA glue, scissors, a roller and a sponge. The process begins by applying paint with a roller to the entire surface of the chest of drawers. Next, start cutting out the images you want. To give an antique look, after complete drying, go over the product with sandpaper. This must be done carefully, following the lines of the wood.
Apply PVA glue to all pieces to glue them to the chest of drawers. Lubricate the front side of the pictures with the same glue, which will protect them from external influences. If these are flowers or ornate patterns, they can be extended with patterns of lines and curls protruding onto the surface of the nightstand.
Decoupage can also be done using fabric. This will allow you to decorate the facade to match the interior.
In English style
But DIY chest of drawers design is not limited to the idea of decoupage. An old product is ideal for the English style, even if it has noticeable defects. You will need four colors: white, red, blue and brown. The first three are acrylic paint, the last is oil paint. Other useful materials include putty, spatula, toplazur, masking tape, sandpaper, decorative nails, brushes and rollers.
The fittings are removed from the chest of drawers and the product is cleaned. Afterwards, the surface is covered with an uneven layer of putty: the more careless, the better. Paint the chest of drawers with white paint and mark off the areas to be painted with tape. Dilute scarlet and blue paints. The spotting that may appear during the dyeing process is only a plus. The table top and sides are sanded. The finished work is covered with toplazure (use a sponge for this). The ideal tone of toplazuri is “walnut”. Then drive in decorative furniture nails and install fittings darkened with oil-based brown paint.
Antique
But how to decorate a chest of drawers with your own hands if it is too old-fashioned? Lovers of country and Provence will appreciate the antique decor. This design is popular now, and to work you will need the following:
- sandpaper of various grain sizes and hardness;
- sponge;
- brushes and screwdrivers;
- craquelure varnish;
- wax candle;
- 2 colors of acrylic paint.
Remove the hardware, drawers and tops of the dresser. Sand the entire surface and wipe with a wet sponge. Apply the first coat of paint and leave to dry. The following abrasions will be intentional, and they are done with sandpaper and a candle. Then apply paint of a different shade (to your taste) and wipe with a sponge the areas that were covered with wax: in these places the paint will rub off. The final stage is the decoupage technique or original painting. Next, everything is covered with craquelure.
Volumetric decor
DIY decor for a TV stand, buffet, closet or chest of drawers. This technique is applicable to any furniture and does not require large expenses. You will need stencils that can be easily cut out of cardboard. You also need masking tape, sponges, brushes, a spatula, any acrylic paints (white and brown are most often used), bulk paste or acrylic-based putty.
Dresser decor in this style begins by removing the fittings and pulling out all the drawers. The stencils are attached to the surface and covered with putty. Straighten with a spatula and leave the three-dimensional pattern to dry. You can make the furniture monochromatic or highlight the created elements. If it is a highlight, simply rub the raised parts with wax in the same way as the previous method, and after covering the paint, wipe it off on the waxy areas. This is a good way to restore an old one or add a special charm to a new chest of drawers.
We paint the chest of drawers in an original way
Required materials : paints (acrylic, slate, marker board paints), masking tape, varnish.
Play with color: paint drawers or dresser legs in different tones, or use today's popular ombre effect (when the color fades to a lighter or darker shade). This can be achieved by mixing the selected tone with white paint. For each subsequent shade, increase the amount of white. Number of shades = number of boxes.
Do you prefer straight lines and clear shapes? Then cover the chest of drawers with stripes or geometric designs. To do this, you will have to make friends with masking tape: apply a base color, stick the tape with the desired pattern, and then cover the surface with a different color. Your new striped friend is ready!
Chalkboard or dry erase paint can transform an ordinary dresser into a space for love messages, tic-tac-toe games, and drawing. Write down dreams, inspirational quotes, or simply create a menu for the day here. Beautiful and functional – everything we love.
Sizes and shapes
Currently, there is a huge variety of models differing in size and shape.
- A narrow chest of drawers helps to decorate the interior of a modest-sized room. It saves space in cramped walk-through spaces.
- Long storage system is suitable for spacious rooms. Thanks to the ability to visually make the wall wider without hiding the volume of the room in height, such furniture fits well even into an apartment with low ceilings.
The photo shows a large white chest of drawers in the living room. A low model with a laconic design does not visually reduce the space of the room, allowing you to store a lot of things.
Several chests of drawers of different sizes can be used in one interior, as shown in the photo. The uniform style of such furniture brings integrity to the design of the living room.
- A tall chest of drawers allows you to effectively use the space of a small room or a place to the side of the window. In a spacious living room it needs to be balanced with other furniture.
- The corner model is widely used due to its functionality. Due to the complex shape of the interior space and greater depth, it is a little more difficult to organize storage in such furniture than in a rectangular model.
The compact triangular model allows you to use even a small space in the corner, as shown in the photo. This solution is suitable for cramped living rooms.
Place your hand on the dresser handles
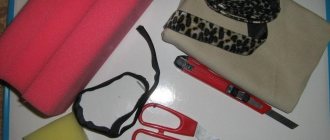
Materials needed : replacement handles (toys, ropes, wine corks), drill, bolt, washer and nut, glue, marker.
If you're tired of the look of your dresser, you don't have to bother with spatulas, sanders and paints. Just replace old handles with children's toys, ropes, keys, branches, wine corks. Yes, yes, you heard right. This is one of the simplest and most original ways to upgrade. We have detailed instructions on how to do this.
Master class on chest of drawers restoration
On thematic resources, connoisseurs of old things and those who like to create something with their own hands will find wonderful master classes. The videos show how to restore and restore an old chest of drawers, provide detailed step-by-step instructions, talk about the necessary tools and materials, and reveal the features of decoupage.
You can get many ideas for decorating furniture from master classes.
Master classes will help you do everything correctly, in the required sequence.
Decorating a chest of drawers yourself is a great opportunity to show your artistic taste and create an updated and completely unique interior object. A simple thing can be turned into an example of almost any stylistic direction.
Thanks to the art of decoupage, you can turn a simple boring thing into a unique art object.
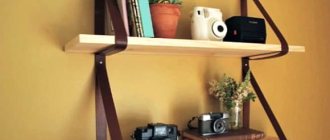
Turning a chest of drawers into an open storage system
Materials needed : replacement for boxes (wicker baskets, suitcases, wooden boxes).
Another way for those who don’t want to bother. To turn a chest of drawers into an open storage system, simply remove the drawers and replace them with something more original. For example, wicker baskets or old suitcases. Just. And how impressive!
You don't have to have an art education to give furniture a second life. It is enough to arm yourself with the necessary materials, discard ideas about right/wrong and simply allow your inner child to express itself.
If the number of options makes you dizzy, take our style preference test. At the same time, you will learn something new about your inner designer.
What can you put on the chest of drawers?
Flower pots, figurines, travel souvenirs, family photo frames or flower pots can be used to decorate the chest of drawers.
Bright objects can liven up a pastel-colored living room. To avoid diversity, you need to select decorative elements that match each other in style and color and match the atmosphere of the room.
A great idea is to place an aquarium on a dresser at the back of your living room. In this case, you should discard the remaining decorative elements.
When choosing a design, it is important not to overwhelm the environment. Some elements can be placed on the surface, and paintings, mirrors or clocks can be hung on top.
On the chest of drawers are books, a table lamp and plants. The photo on the left shows how these elements can be combined with each other and with furniture in style, color and simplicity of lines.
Whatever the style of the interior, if it contains only furniture, it looks unfinished and soulless. Additional decor is used for beauty and creates a special aura. You can use a variety of accessories to decorate the top of your chest of drawers. Here are some decorating tips:
- when decorating a chest of drawers, a mixture of shapes and textures looks good;
- You can place colored boxes, boxes or stacks of books on the tabletop;
- flowers in vases or vases look great on any similar piece of furniture;
- a candlestick is considered an exquisite element of tabletop decor;
- not only above the chest of drawers, but also above it you can place paintings or frames with photographs - you should not leave the wall empty.
LINK! A practical and aesthetic idea is to hang a mirror above the chest of drawers. Also, this accessory should not be too big or too small.
So that you don’t choose a vase, candlestick or something else to decorate this piece of furniture, their size should be at least half the size of the mirror. The higher the better.
The principle of a dynamic interior is that high and low decorative elements should differ significantly in height. Do not overload the tabletop with accessories.
Another tip: DIY decorative elements will add exclusivity to the interior.
Whatever the design of the room, the lack of decorative elements makes it dull and unfinished. Furniture can create a special atmosphere in a room, refresh and complement it. You can decorate a chest of drawers with completely different things. Decoration Tips:
- The decoration looks impressive by mixing different shapes and textures.
- Boxes and boxes of different sizes and made of different materials will look good on the countertop.
- Natural and artificial flowers and dried flowers in pots and vases always look good on any surface.
- Decorative candlesticks and stands will update and complement the interior.
- Frames with family photographs and small paintings will look original on the tabletop, as well as on the wall.
- A medium-sized mirror is the most practical option for decorating a room.
The principle of internal dynamics is decorative elements of different heights. Remember that accessories and decorations should be at least half the height of the mirror, or even higher. You can decorate the top of the chest with anything. The choice is limited solely by your fantasy and imagination. Handmade accessories always look elegant and sophisticated.
Interesting ideas for decorating a chest of drawers:
- Flashlight;
- Alarm clock with original design.
- Figurines and souvenirs.
- A beautiful box of cosmetics.
- Jewelry box or stand.
- Pots with live plants.
- A service or jug with cups.
- Board games.
- A dollhouse or garage is an option for a child's room.
- Stationery in a beautiful organizer.
- Children's crafts.
- Household appliances, humidifier, small TV.
- A bowl of fruit.
- Box with accessories for creativity.
Updating children's furniture
When it comes to restoring children's furniture, you can experiment with custom colors, fun designs and patterns. An old chest of drawers will look quite original with drawers painted in bright and contrasting colors. Yellow, red, blue, green or purple will fill a child's room with light and fun. The tabletop can be painted in a calmer shade, it will be more practical.
The decoupage technique is also quite often used to decorate children's rooms, because you can always collect colorful pictures with your favorite characters. This will allow you to create an even more original chest of drawers with your own hands. The child’s hobbies will help you decide on the theme of the design, and on numerous thematic resources you can put together a ready-made master class that tells in detail what to do and in what sequence.
Experts recommend that schoolchildren restore the chest of drawers by covering the old wallpaper. As a result, the furniture will look interesting and stylish. It is very important that the restoration of a children's chest of drawers takes place with the direct participation of the child himself. It is he who can be the author of the idea for a new design.
Preliminary preparation
Before starting finishing work, in order to give the furniture a new look, it is necessary to carry out a number of preparatory measures. The first step is to remove all the contents from the drawers - the chest of drawers should be completely empty. To carry out decorative finishing activities efficiently, it is recommended to disassemble the chest of drawers into its component parts. All fittings have been unscrewed. The drawers are open. The swing doors are removable. If necessary, the tabletop can be removed. All this is necessary for a more detailed and in-depth study of each individual element. The output will be a product of the highest quality.
Further stages of work:
- Removing old coating. This is the most important component of restoration work, because decorative finishing is applied exclusively to a clean and impregnated surface. To get rid of any paint coatings, you can use a special solvent and a regular spatula. If it is necessary to remove plastic film, experts recommend arming yourself with a hair dryer. A small area is heated, the coating peels off under the influence of hot air and peels off smoothly. Then gradually clean all the furniture piece by piece.
- Eliminating cracks, leveling the surface. The procedure is carried out using putty, which is applied to the entire area of the chest of drawers. Carefully process each element and section of furniture, then allow the product to dry completely - sometimes this can take at least a day.
- Smoothing the treated surface. It's worth using a sander at this stage, but if you don't have one, sandpaper will do. Particular attention should be paid to corners and transitions. The final goal is a perfectly flat surface.
- Primer. This is a necessary basis for decorative finishing.
For primer, it is recommended to choose a special composition for working with wooden furniture.
Apply paint remover Remove old paint layer
Walk through hard-to-reach places Sand the surface Sand small parts with sandpaper
Find any deep damage with putty Sand down the fill points Ready
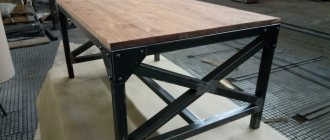
Preparing and assembling the chest of drawers
To begin assembly, you need to prepare the materials. According to the drawing, boards of the required size are cut using a jigsaw.
If you do not have such experience, you can order boards of the required size at any hardware store.
When all the parts of the required size are available, you can begin assembly:
Mark the fastening points on each part. Do this using a ruler/tape measure
It is important that on each identical part the fastening points completely coincide with each other
Using the marks obtained, assemble the chest of drawers with self-tapping screws.
Mark the location for the guides. The first guide should be marked from below the bottom (the inside of the chest of drawers): step back 30 mm and mark the first fastening point (for one guide, look for 4 points on each side).
It is necessary to find the attachment points for the remaining guides using the formula: Height of the drawer (front) + 3 mm – 25 mm.
Assembling the walls and bottom of the drawers. Mark the connection points and connect.
Screw the second parts of the guides to the bottom of the drawers. Insert the drawers into the chest of drawers and check if they slide out well. Screw the back of the dresser. Install fittings (drawer handles and decor).
Assembly is easy to do. The most important part is accuracy and correctness of calculations. If all points are followed correctly, you will get a good piece of furniture in the desired color and desired shape.