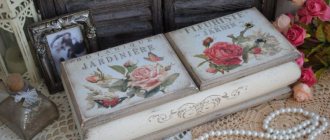
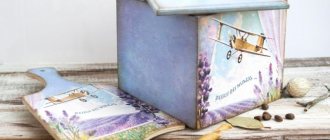
Exquisite box decorated using decoupage and craquelure techniques
Currently, decoupage boxes are gaining more and more fans, which is not surprising. After all, decoupage allows you not only to express your creative abilities with your own hands, but also to get an interesting thing. Even corresponding books appeared on sale. What is decoupage? This is a special technique with which you can transfer any picture to a surface. In this article we will look at the decoupage technique for a box.
What is needed for decoupage
Before you start decorating the box, you should prepare all the equipment necessary for the work. Purchase in advance: napkins, sandpaper, glue for decoupage, paints, a wax candle, adhesive tape and other raw materials for decoration, a screwdriver.
The list of required materials may vary depending on the chosen style. It is imperative that before starting the decoupage process, you need to prepare the working surface of the wooden box.
Volumetric decor of the box
When creating a three-dimensional decoration, decoupage is partially used. Just as in previous cases, the workpiece must undergo special preparation: cleaning, degreasing, sanding. Then the product needs to be primed.
- A drawing is placed on the dried box, which is coated several times with varnish, special putty or structural paste.
- The drawing should become voluminous. It is attached using PVA glue in the selected location.
After assembly, the box is coated with another layer of varnish.
Execution steps
The first and main step is the preliminary preparation of the working area of the box. Since we are talking about wood, the entire surface of the box needs to be thoroughly cleaned with sandpaper. The quality of the treated area affects the quality of decor application.
The second step is to remove all elements from the metal. You can perform this task using a screwdriver. After removing these parts, the working area must be completely covered with acrylic paints, so-called tinting must be performed.
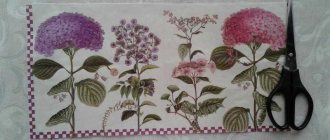
The third step requires careful execution. It is necessary to transfer the selected image to the treated area. Craft shops offer a wide range of napkins for decoupage.
They usually come with instructions for beginners. It correctly describes how to carefully separate the part with the image from the rest of the napkin.
The next step is to fix the transferred image on the work area. To do this, use specialized glue for decoupage. You need to wait for it to dry completely before moving on.
The final step will be to coat the box with varnish. To improve its appearance, the varnish is applied in several layers. After the varnish has completely dried, you can begin decorating the box. We attach all the metal elements to where they were originally.
The decor of the box is influenced by the decoupage style that was chosen at the very beginning. According to him, there are situations when you do not need to add decoration elements. Or perhaps vice versa: when decorating the box, various details are added and the fittings are replaced.
Painting the box
In order to create a unique product using the painting technique, you do not need to be a professional artist. Of course, some patterns can only be applied by professionals, but there are also ways for a simple craftsman to decorate the work beautifully.
For example, you can use special stencils that are sold in craft stores. There are single- and multi-layer varieties. The images are varied, you can choose to suit every taste and subject.
The set of materials for work includes a blank for decoration, paints (preferably acrylic), brushes, a stencil, and a primer coating.
As mentioned earlier, at the beginning of work, the box needs to be prepared for work: cleaned, degreased, sanded, primed. A primer is necessary so that the selected colors are not distorted during application.
After priming, the base tone is applied to the product, then the box is varnished. A stencil is attached to the selected surfaces and the design is painted over. It is better to use thick paint to make the drawing clear. But often it has to be tinted again. When the applied pattern dries, the workpiece is varnished.
Styles in which decoupage is performed
If, when choosing a gift, the choice fell on making a box in the decoupage style, then you need to figure out what types there are.
Depending on the technique used to perform decoupage, several varieties can be distinguished:
Making the box in vintage style. This is a well-known technique for decorating a wooden box. Its essence lies in special aging. There are many master classes on making boxes in this decoupage style. But the meaning of them all boils down to one thing: the paint is applied in several layers and in excellent shades.
The darkest shades of the selected paint are used for the base, then we treat the work area with varnish and leave it to dry. When the varnish dries, cover the area with candle wax. This manipulation will slightly erase the varnish and help achieve the desired effect.
- Rice paper for decoupage - step-by-step instructions for use, features and subtleties of use (110 photos)
Decoupage of bottles - step-by-step instructions and description of the progress of decorating with various materials (110 photos)
- Napkins for decoupage - manufacturing features and tips for use (85 photos)
The next step is to cover the entire work area with paint of a lighter shade. We wait for it to dry completely and sand the waxed areas with sandpaper. We clean everything down to a darker layer of paint. Wipe the box thoroughly from working dust and leave to dry completely.
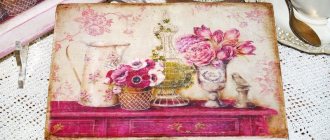
To emphasize the antiquity of the box, you can use a sponge to treat the corners of the box. This should be done with a dark shade of paint. The image that will be applied to the box can be selected on the Internet or in a store.
Variety of Provence. It is characterized by the use of light paint. Most often, this technique is used to transform rounded boxes.
The shabby chic variety does not differ in execution technique from vintage and Provence. A distinctive feature is the use of light shades and floral themes. This style is used when decorating various surfaces, and not just boxes.
To create a more complete picture of the distinctive features of all styles, you need to look at photographs of decoupage boxes. There are many of them on the Internet.
Decorate a box using vinyl wallpaper
Often, after renovation work, scraps of vinyl wallpaper remain in the room. They can be a wonderful decoration for a jewelry box.
To work you will need:
- Pieces of wallpaper
- PVA glue
- A piece of cloth or paper towel
- Acrylic paints of different colors
- Varnish and brushes
To decorate the box, you need to cut out parts that fit the size of the area to be decorated. This can be either a small area or the entire box.
- The glue is applied to the product or to pieces of wallpaper, then the surfaces to be glued are firmly pressed against each other.
- To achieve a better effect, you can add a small amount of water to the glue.
- Thick wallpaper paper should be saturated for better adhesion.
- During work, it is recommended to ensure that no bubbles appear under the pieces of wallpaper.
After the box has dried, it can be painted in the chosen shade and varnished.
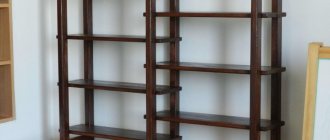
The purpose of the chest of drawers and its color
When choosing a design for a chest of drawers, it is important to consider in which part of the house you will place it: bedroom, living room, children's room or dining room.
Bedroom furniture should have many drawers of different sizes; such models are presented in abundance on the Ikea website. As a rule, the upper compartments are small and are intended for storing accessories and linen. The lower ones are more impressive and can accommodate bedding. If you attach a mirror to the tabletop, you can combine the chest of drawers with the dressing table
Bedroom furniture should have many drawers of different sizes; such models are presented in abundance on the Ikea website. As a rule, the upper compartments are small and are intended for storing accessories and linen. The lower ones are more impressive and can accommodate bedding. If you attach a mirror to the tabletop, you can combine the chest of drawers with the dressing table.
It is better to choose calm pastel colors for this piece of furniture for the bedroom. These colors can be: beige, soft pink, white, milky, cream.
Chests of drawers for the living room have more of a decorative function. Such furniture is decorated with beautiful carvings or all kinds of inserts made of leather, rattan and even precious metals. The color palette should match the overall design of the room.
If the chest of drawers is intended for the kitchen, then models with opening doors and drawers are best suited. The color should be in harmony with the rest of the furniture in the room and the tone of the walls.
For a child's room, a chest of drawers with large drawers is suitable, in which you can put toys, books, pencils and all the accessories necessary for a child. This time you can experiment with the palette.
Methods for thinning paper
An important step in the preparation process is thinning the paper. If this point is not observed, the image may lie unevenly, and the result itself will be significantly damaged.
A chic vintage box created using decoupage technique.
Options:
- Carefully coat the front side with varnish and secure the back side with tape. After drying, the top layer is easily removed, and the napkin itself turns out to be very thin.
- Water is useful as an additional component to the varnish. The front surface is covered with several layers of varnish. After complete drying, immerse the picture in water for about 30 minutes. After being in the water, the back half of the napkin can be easily rolled up by hand.
- When using photo paper, it is also useful to use varnish to cover the side with the image. The lower part is placed on a damp surface (for example, a towel). The layers will gradually begin to peel off. In order to remove the layer, you can pick up the corner with a stationery knife.
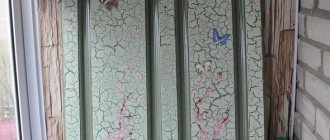
The scuffs and brown tinting on the vintage box give it a special old-time charm.
Mosaic technique
A fairly simple way, even for a beginner, to decorate a box with your own hands is the mosaic technique. Parts can be small or large, from materials of different shapes and textures. For decoration you will need:
- brush with rolling roller;
- scissors;
- polymer clay;
- plastic or colored glass;
- glue and varnish;
- cardboard;
- talc;
- satin ribbon.
A DIY jewelry box decorated with glass and ribbons will be an excellent gift for a young girl.
First of all, circles are cut out of cardboard, which will form the appearance of the product. To decorate the inside of the box, it is recommended to use polymer clay of any color. You can use a bobbin to create the shape. It is carefully covered with clay, avoiding the formation of bubbles and carefully smoothing the joints. The excess is removed, and the finished forms are dried in the oven.
On the outside, the walls are treated with talc, which will greatly facilitate the process of laying glass or plastic. Elements of different shapes are cut out from the latter. Mosaic pieces are glued onto the finished base in a chaotic manner or patterns are formed. A satin ribbon is attached to the lid, forming a loop. The final stage is finishing with varnish. If the mosaic is made of glass, this step is skipped.
Decor of the box with eggshells
The most unexpected materials can come to help in creating unusual decor. For example, you can decorate the workpiece with paper napkins and eggshells.
After creating the decor, it will be difficult to determine what it is made of. The operating algorithm is as follows:
- You need to prepare eggshells and grind them
- Clean the box, sand it, prime it
- Apply glue to the box
- While the glue is still wet, lay out pieces of shell on the selected surface.
- After the glue has dried, apply paint in one or several layers
- Spread the design with glue and spread it on the surface of the box.
- Apply another layer of glue
There are many ways to create an interesting and beautiful product with your own hands. Such a box will undoubtedly become a favorite and necessary thing for its owner.
Shabby chic for the box
Even a novice craftswoman can create beautiful decor for a box in this style. The blank is covered with beautiful paper or fabric. Then add decorations from beads, ribbons, and lace.