Decoupage furniture in the Provence style is a great way to get inexpensive but very attractive interior items. Various techniques for decorating furniture are used precisely for the purpose of creating truly unique decorative products, and the most optimal solution would be to use decoupage.
Such a simple technique can be mastered at home; moreover, you do not need to spend large sums of money on the purchase of exclusive furniture. Today we will tell you more about the decoupage technique and its application on furniture.
Decoupage furniture in Provence style
Technology Provence
You can decorate furniture in different styles.
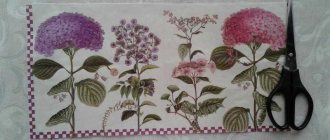
The Provence style is considered the most gentle, romantic, cozy, and homely. Most often, kitchen furniture is decorated in this style. After all, in the kitchen, delicate little things are very important to create a cozy atmosphere. Provence is a fairly popular technique. It is associated with the village, so it is relevant in the kitchen with the sea and the sun, with the smell of herbs, trees, and brings you closer to nature. The technique should include several necessary colors: white, cream, beige, pale yellow, pale green, pale blue, faded turquoise, faded orange, terracotta. Also, the Provence style is characterized by motifs of flowers, natural and artificial leaves.
Provence is simplicity, naturalness, uncomplicatedness, tenderness, warmth.
Images
For the Provence style, pictures associated with sunny France are selected. The most common ornaments are:
- small wildflowers;
- rural landscapes;
- poppy or lavender fields;
- kitchenware;
- still lifes;
- Pets;
- spices;
- Small children;
- angels;
- retro photographs;
- images of a rooster, which is a symbol of France.
Useful tips
Useful recommendations from experienced craftsmen will help you create the perfect product and avoid many mistakes:
- If the surface is not monochromatic, then you need to remove the old paint using sandpaper, and then paint the surface the same color.
- For beginners, it is better to use standard geometric objects.
- If you are using a printout from the Internet, it is better to use a laser printer so that the colors do not blur.
- Before applying the design to the surface, it is recommended to place it in cold water. This will minimize the number of bubbles.
- To smooth out the glued pattern, you need to wet your hands in water.
Within an hour after gluing, you need to monitor the picture. It is during this period that new bubbles may appear, which need to be smoothed out in time.
Decoupage of furniture in the Provence style can not only become a wonderful hobby, but also bring good income. This technique is very exciting and absolutely inexpensive. Furniture created with your own hands will be unique and will delight guests and owners for many years.
- Previous postHow to use moldings in the interior to separate wallpaper - original ideas and photos
- Next entry10 ways to zone a room using a partition with your own hands: photos and design techniques
× We recommend watching How to beautifully and originally decorate a Christmas tree for New Year 2022: photos, stylish decor and ideas How to decorate a fireplace for the New Year with your own hands: original ideas and safety rules
Decoupage kitchen
Decoupage in the kitchen will update the decor, add cleanliness, freshness, and newness. Women spend a lot of time in the kitchen. The interior can become boring, but thanks to this technology you can add at least something new to the boring interior. Provence style would be an excellent choice.
If it is impossible to purchase new furniture, kitchen decoupage will help to temporarily refresh the interior and old furniture. In the kitchen, furniture wears out and gets damaged faster than in other rooms. Therefore, some defects can be covered with a beautiful pattern suitable for the kitchen.
Kitchen decoupage will help the creative housewife realize her most fantastic dreams and desires for decorating kitchen furniture.
Decoupage furniture in Provence style
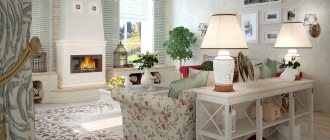
The most noticeable detail of any room is the furniture. If you decorate it in the Provence style, then you are guaranteed the effect of a simple cozy rural house, furnished with taste.
To give it even greater exclusivity, they use all sorts of techniques: they create scuffs, shadows with the help of paints, golden or silver leaf to make the paints look faded - they tint the surface with spots of paint of a different color, use craquelure varnish, which cracks after drying, as if the furniture was painted many years ago.
To decorate in the Provence style, it is better to choose furniture with many drawers, curls, and carved elements. Cracks after craquelure should be filled with gold or silver paint; the surface of the furniture, after painting with the main paint and drawings, should be blotted alternately with gold, brown, and black paints.
All these small details will give a second life to old or new furniture - they will create a unique product, imbued with the charm and luxury of yesteryear.
Methods for aging furniture
Currently, interior designers know several ways to age furniture:
- mechanical impact, which causes small cracks, scratches and other damage;
- chemical exposure using vinegar, ammonia or craquelure varnish;
- thermal exposure using a blowtorch or open fire.
The most original and unusual method of aging is the use of a special crackle varnish.
Wallpaper in the "Wallpaper Gallery" Master class on decorating bottles: decoupage with tights Decoupage of an old cabinet and table with your own hands How to make decoupage from napkins
It must be applied to the surface in even, thick layers, which, when dry, form rather unusual cracks.
After complete drying, the varnish is covered with gold or dark paint, which adds an unusual appearance to the product.
And the final layer should be a transparent varnish, which will not allow this effect to disappear.
How to decoupage furniture in Provence style with your own hands
Most often, small
things are decoupaged to create coziness and comfort in the kitchen.
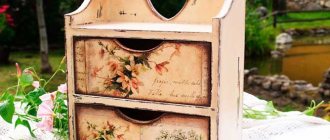
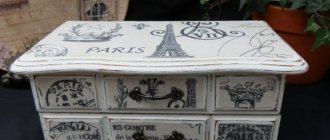
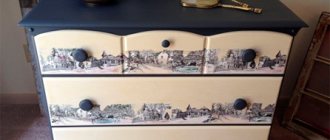
Thus, the most popular master class is on decorating a small kitchen chest of drawers
. It is perfect for storing spices and small secrets, and if you install it in the bedroom, you can store jewelry in it.
For this work, in addition to the above, you will need Provence decoupage napkins. And you can start remaking this small decorative item.
First you need to twist all the fittings on it. Unfold the napkin
and cut out a rectangle or square from it, suitable in size for the wall or front of the chest of drawers. To decorate the facade you will need to make small additions along the edges.
All furniture drawers must be carefully pushed in and the entire surface coated with glue.
Particular attention should be paid to those places where there will be folds or protrusions. Pasting the surface should begin from the bottom edge, pressing the material as tightly as possible and rolling all the raised areas of the furniture
The edges need to be folded over the sides of the product.
side
panels should be glued, aligning them along the front edge. Carefully level the surface and roll with a roller. And after that you need to paint the surface of the chest of drawers. Use a knife to cut through all the parts of the chest of drawers to ensure their mobility.
An additional decor in this case will be spray
.
To do this you will need a hard brush or toothbrush. You need to apply the desired shade of paint to it. If you then run your finger along the bristles in the direction “towards you”, you can get small drops that will fall on the surface in an interesting way. After this, you should cover the surface with varnish and screw on the fittings
.
Large furniture is decoupaged using the same principle. But it is worth remembering that for this you will not have to use the entire
napkin, but only some of the motifs from it. To do this, you should cut out the elements and stick them on the surface, carefully sand them and varnish them.
Decoupage of large objects
In order to decoupage old furniture, or rather, its entire surface, napkins will not be enough. In order to decorate a box, suitcase, refrigerator or door you will need a piece of fabric
or wallpaper.
The master class describes the sequence of work:
Sand and clean the surface thoroughly. If there are small or large stains on the surface, then it should be treated with white acrylic paint
It is very important to do this, because under the wallpaper or fabric all the stains will be very clearly visible, and this can ruin the whole effect. After this, the furniture must be covered with a thick layer of PVC glue. You also need to saturate the fabric or wallpaper with the same glue.
Let everything dry a little. Prepare a container and nozzle for spraying water. Gradually moistening the surface, you need to distribute the fabric or wallpaper over the surface. If you want to get an original design, then you can decorate the furniture in patchwork style, that is, decorate it with patches. Use a rubber roller to remove any bubbles and allow the surfaces to dry. After this, you can apply one or two layers of varnish and dry the furniture again.
If you have
imagination
, then decoupaging a vase, clock, kitchen or photo frame with your own hands will be quite easy. Depending on the preferences of the craftsman, you can partially decorate the door or drawer of the kitchen cabinet.
Or you can completely change the frame or bottle using ordinary napkins
. There are a lot of finishing options, they all depend on the taste of the decorator.
Do you want a watch?
in an old style - you should use a napkin with flowers and a little crackle varnish for this.
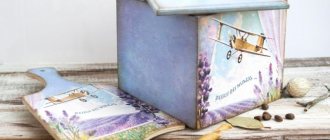
A jug or bread box decorated in a loft or Provence style will look just perfect in your kitchen. You just need to learn how to choose the right shades of paint and color combinations so that your room is not too pretentious and uncomfortable. And most importantly, the Provence style implies slightly muted
, seemingly faded colors and paints.
Grandma's old furniture with rough outlines, as if indicating that it was made by a folk craftsman, is perfect for him. If you transform it again and again, doing the work yourself, you can create a new
room and a new design each time.
Additional decor can be gilding
in Provence style design.
It is used on moldings, corners or small decorative elements. Craquelure
is also perfect for decorating furniture in this style . If applied correctly, you can get quite unusual surfaces. This coating will ideally combine with antique-style pictures and similarly aged fittings.
With the help of decoration you can give new life to old, damaged things
And also - to turn an ordinary faceless piece of furniture into an original one, attracting attention, creating a special mood. Make your own table decoupage
This simple technique will add warmth and uniqueness to the interior.
Decoupage is a technique for decorating any surface (wood, clay, glass, metal, etc.) with ready-made designs with further consolidation of the effect. There are many stylistic solutions. One of the most popular is Provence. This style is often used in the decoration of kitchen utensils, furniture, pots, clocks, etc. It is characterized by images of bunnies, hens, cockerels, and birds. Floral designs and various options for presenting flowers, especially lavender, are very popular. The predominance of light pastel colors makes such items gentle, homely and cozy.
Decoupage happens:
- Direct (classic). The design is pasted onto the surface to be decorated.
- Reverse. When decorating transparent objects, the front side of the image is glued to the back side of the product.
- Artistic or smoky. Combination with other techniques allows you to make transitions invisible.
- Volumetric. To create an image, a special substance (paste), pieces of textile, pebbles, eggshells, etc. are used.
- When decoupage and patchwork techniques are combined, another type arises - decopatch. Many pieces of paper create the effect of a quilt made of scraps.
Art for Beginners
After the preparatory stage, they proceed directly to the design of the furniture.
Using stencils
Painting with a stencil is the easiest way to transform the interior of a room. Having chosen the option you like from numerous examples, it is initially printed and then transferred to a thick sheet. The ornament or other image is carefully cut out. Simple and at the same time attractive patterns are presented below:
The surface of the furniture is initially painted with a background color; usually, calm shades are chosen for these purposes. After the paint has dried, the stencil is securely fixed to the furniture and the prepared cutouts are filled with brighter paint. The work is carried out with a sponge, so the surface is painted more evenly. It is better to gradually apply several layers to the furniture.
Depending on the chosen pattern, furniture painting can be done in one color or multi-color. In conclusion, it is recommended to additionally outline the outline of the painting to obtain a brighter image. If the stencil is small, you can use the pattern on several objects, the main thing is to observe moderation to avoid oversaturation of the interior with bright colors.
Decoupage technology
The essence of the decoupage technique is to attach a design made on paper or fabric to a dense base. These can be small vases and jars or larger furniture. The advantage of decoupage compared to painting with acrylic paints is that you don’t have to choose a wooden surface for decoration.
The choice of varnish is of great importance when preparing materials. Depending on the composition, the surface of the furniture can be:
- semi-matte;
- matte;
- with sparkles;
- semi-antique;
- semi-gloss;
- glossy.
To imitate painting, a special material with a pattern is purchased. There are the following options for furniture decor:
- Napkins. Due to the thin base, they are quite difficult to work with. It is better for beginners to practice on small, flat surfaces of furniture.
- Decoupage card printed on rice paper. Due to the denser base and elasticity, achieving the effect of painting on furniture will be a little easier.
- Decoupage cards on plain paper.
- Prints on photo paper. The advantage of the solution is the ability to order any image that is optimal for decorating furniture.
Attention! Regardless of the chosen pattern, the section of furniture intended for painting using the decoupage technique is painted with a white background. The reason for the requirement is simple - before application, the paper with the pattern is moistened; if the base is colored, the color of the painting will be noticeably distorted
On a white background, the color scheme will remain in its original form.
The drawing is fixed in different ways. Usually the surface is treated with glue, after drying, paper with a pattern is applied and carefully leveled, ensuring the complete absence of bubbles or wrinkles. When the paper dries, the drawing is coated with varnish, which will preserve the integrity of the painting.
Illustrative examples of painting done using the decoupage technique are presented in the photo:
Decoupage of an old dining table
A little effort, and instead of the old table you will get an attractive original table. Give new life to the furniture in your home - the results of the work will please the owners and guests.
Preparing for work
Prepare the necessary materials and tools:
- Old table. If there is none, you can purchase the simplest and most inexpensive option for registration.
- Acrylic paint of white (milky, beige, pink, blue) color. Choose a background that best suits your interior.
- Dark paint for a patina effect.
- Sandpaper of different grits.
- Ammonia or simple alcohol.
- Pictures depicting flowers or other flowers in Provence style. The best option is to use decoupage cards or pictures on rice paper.
- Decoupage varnish (the most inexpensive, water-based).
- Instant coffee, water for aging the surface.
- Sponge and brush.
- Paraffin candle (white).
- PVA glue.
- Putty (to fill holes and cracks).
- Putty knife.
- Rags.
Description of work
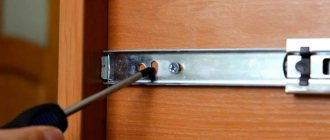
- Before you start decorating, you should check the quality of the table fastening. If there is a need to strengthen a structure that has become loose over time, remove the old screws. Then make connections again using screws and glue.
- Thoroughly clean the table surface from old varnish and dirt using sandpaper. Remove dust.
- Wipe the table with ammonia or regular alcohol. This will degrease and disinfect the surface of the old product.
- Fill the cracks and uneven areas of the table with putty. If there are large cavities or holes, fill them with product gradually in layers. Apply the next one after the previous one has dried.
- Sand the surface again, removing any excess putty. Wipe off the dust.
- Apply dark paint to the ends, corners of the table, and protruding areas of the legs; in this project we are using lilac. Leave the paint to dry.
- Fragmentarily rub the dark-colored areas with a candle.
- Cover the entire table with white or other light paint. Leave it to dry for at least 24 hours.
- Then wipe with sandpaper the areas where the surface was treated with paraffin. The white paint will come off, revealing the dark layer underneath. This way we will achieve an aging effect.
- Select the desired decorative images from the pictures prepared in advance. Try different options for their location on the table surface.
- In order for the floral decor to look natural on the table, you do not need to cut it out, but carefully, trying not to damage the design, tear it off with your hands. The edge should be uneven.
- Glue the floral decoration onto the table surface. Place the fragment in its place. Add a little water to the PVA glue. Wet the brush in the adhesive solution, apply it over the design, moving from the center to the periphery with small, neat strokes. Take your time so that there are no air pockets, untreated surfaces, folds or creases.
- After the drawing has dried, we begin aging the table using coffee. To do this, you need to dissolve the coffee powder in water, stir until completely dissolved.
- Using a cotton pad, apply the product to the entire surface of the table. If the toning is not completely uniform, that’s good. Don’t forget to process the legs and sides of the product. This treatment of the table top, the supporting part of the table, gives a natural look to the piece of furniture.
- As a finishing touch, the finished table should be coated with two layers of water-soluble varnish. Apply layers one at a time onto a dry base. Make sure that the entire tabletop is evenly coated with varnish.
How to decorate an old coffee table
This master class will help any beginner decorate an old coffee table using the decoupage technique.
Necessary materials:
- napkins, old newspapers or any image on paper;
- PVA glue;
- acrylic paint;
- primer;
- knife and scissors;
- brushes and stencils;
- varnish
The best one is the one with drawers and carved elements.
The first step is to polish the coffee table with sandpaper until it is completely smooth. Apply primer and wait until it dries. We prepare the paper with the image, remove the thick layer of the napkins, leaving only the top ball.
Sometimes it happens that the door does not fit into the existing interior of the room.
Removing irregularities and bubbles
We coat it with glue from the wrong side and, pressing, glue it to the surface. We remove irregularities and bubbles. Use white or black acrylic paint to paint the outlines of the image. We use the same paint to decorate the corners of the table using a stencil. After everything is dry, apply a layer of varnish.
Decoupage in the Provence style will help you get out of a difficult situation.
The first step is to polish the coffee table with sandpaper until it is completely smooth.
We conduct a master class on decoupage of a glass vase
A detailed master class and the video below will help novice decorators become familiar with the main stages of decorating ceramic products.
What should be done:
- We select the most convenient place for creativity and arrange the necessary tools in the most rational way.
- Carefully cut out the design you like from rice paper or a multi-layer napkin.
- Using a felt-tip pen, mark on the glass the places where a beautiful pattern will be applied. Marks are necessary to quickly return slipped paper to the selected place.
- Soak the napkin in a bowl of warm water.
- Before applying the image, you need to clean and treat the area with PVA glue.
- Paper is quickly applied to the adhesive base and carefully straightened from the center to the edges with a soft roller or cloth napkins. Care should be taken to ensure that no unsightly folds or air bubbles remain on the surface.
- Another layer of glue is applied on top with smooth movements of the brush.
- We paint the background with multi-colored or plain acrylic paints.
- The dried layer of glue is varnished, and then the finished product must be placed in the oven and heated to 150 degrees.
No putties are used to process glass, because the smooth surfaces of the bottles provide excellent adhesion to the applied design.
Decoupage of clocks in Provence style
- Carefully sand the wooden or plywood blank for the watch. If there are chips and defects in the workpiece itself, very good, we don’t level them. After all, old things do not have ideal surfaces.
- Instead of a primer, we will use acrylic paint of any dark color, but not black. It is preferable to use a dark gray, blackberry color; you can also make a lilac, or less often, a dark green base. The paint should be applied to the entire surface using a foam sponge using tamponing movements or a flat synthetic brush. Let's dry it.
- Generously rub the edges of the workpiece in places of future abrasions with a candle. At this stage, you can apply a one-step craquelure varnish, but not over the entire surface, but in fragments, almost without affecting the location of the future image. After applying the varnish, dry the workpiece according to the instructions for the varnish.
- We cover the surface of the watch with light beige paint and dry it again. So the craquelure cracks appeared. We are aging our workpiece. In places where the watch was rubbed with a candle, we go over the surface and especially along the edges with medium-grain sandpaper. Our task is to peel off the top layer of paint. If you were a little overzealous and damaged the lower dark layer in places, that’s also not a big deal. Provence fully tolerates such shabbyness. To further protect the craquelure, cover the surface with one layer of acrylic varnish.
- Paste the picture. If we work with a decoupage napkin, we separate the colorful layer and cut out or tear out the design. It is convenient to paste using the file method. To do this, place a napkin on the file with the image facing down and begin to pour water onto it very little and evenly. During the process of wetting, the napkin begins to swell and wrinkle; straighten it carefully with your fingertips. When the napkin is completely straightened, drain the excess water from the file. We attach the image to the workpiece and smooth it out. Directly through the file we roll or smooth the image, removing air bubbles. Carefully, starting from the corner, separate the file. Apply a thin layer of glue. Let's dry it.
If we paste a motif from decoupage card or rice paper
– grease the workpiece with glue, apply the image to the surface, smooth it with a rubber spatula or roller. Let's dry it.
Inspired by such a successful start, you can begin to transform larger things. But first, I would like to talk about one more way of aging furniture in the Provence style with your own hands.
Concepts for decorating in the Provençal version
Don’t delay, try now to take some object inherited from your ancestors - an armchair, a table, a chair or a chest of drawers, and use several available methods yourself. If desired, decorating Provence is not so difficult. To process a product and create artificial aging, you must first prepare it; remove all removable elements, drawers and shelves.
Don’t delay, try now to take some object inherited from your ancestors - an armchair, a table, a chair or a chest of drawers, and use several available methods yourself. If desired, decorating Provence is not so difficult. To process a product and create artificial aging, you must first prepare it; remove all removable elements, drawers and shelves.
Let's look at several available techniques and concepts for aging furniture at home:
- Using paraffin and coloring materials, for this we need to have the following materials and tools on hand (pastel shades of paint, sponge, fine-grained sandpaper, wax and a chair):
- Lay paper or film on the floor to avoid contamination.
- If there is paint or varnish on the item, remove it with fine-grit sandpaper.
- then the entire surface must be thoroughly rubbed with wax parallel to the growth of the wood fibers.
- then start painting using paint in an aerosol can, as it is more convenient for painting cracks and other hard-to-reach places, hold the can at a distance of about 50-60 cm from the chair and apply the paint in a thin layer for an even coating.
- to give the effect of aging, you need to use a sponge to gradually wipe off the paint and wax, but don’t be too zealous, because in the end you can erase too much and it won’t look very nice.
- If you wish, you can apply drawings typical of Provence painting onto the resulting surface.
- To consolidate the resulting effect, cover the entire surface of the piece of furniture with 2-3 layers of varnish, you can use craquelure varnish to create as many cracks as possible.
It will be much more convenient to work with paint in a spray can.
- Steel wool of black-gray color (steel wool), it is used for grouting and polishing furniture, you can buy it in construction stores:
- Let's take an old chair again, prepare it for decoration by removing all removable elements, then use fine-grained sandpaper to remove a layer of old varnish or paint and paint it with one or more similar shades of paint.
- parallel to the growth of the fibers, let’s go through “steel wool”, using it very intensively and confidently, as a result the entire surface will be covered with a layer of black soot, take a damp cloth and wipe the piece of furniture, achieve the desired effect of antiquity, i.e. give slightly noticeable worn and dilapidated marks Provence, then go over the entire surface with a dry cloth.
- We fix the resulting surface with 2-3 layers of varnish.
Decoupage in old French design with your own hands, for this you need to have the following materials and tools (fine-grained sandpaper, acrylic white or pastel paint, napkins with images of Provence, scissors, glue, sponge, acrylic varnish, powder to create a patina effect): prepare the surface (again Let’s take a chair as an example), after removing any remaining varnish or paint from it, apply acrylic paint in 2-3 layers. cut out the selected Provençal style of design, glue it to the selected place, and carefully wipe off the remaining glue with a sponge. When the image is dry, being careful, we sand around the drawing to ensure that the paint is rubbed off. Apply acrylic varnish and then powder to create a patina effect in some places (no need to cover the entire surface). We fix the resulting Provence effect with 2-3 layers of varnish.
Well, we have learned how to do the aging of interior items in Old French design with our own hands. We hope that everything we have written here will help you create elegant and unique furniture products in the Provençal style and make your home cozy and comfortable. However, to achieve uniformity in design, use various decorative items (figurines, vases, lamps, sconces) in a rustic or nautical style.
Instructions for Beginners
To decorate a couple of things in your home using rustic decoupage, you need to prepare the following materials: dishwashing detergent, primers, pictures, a special varnish for aging, acrylic yacht varnish, PVA glue, brushes, scissors, a sponge or a piece of foam rubber for staining, sandpaper. And then:
The surface of the item must be thoroughly cleaned of dirt with a detergent. If there is any glue, paint or varnish left on it, they are removed with sandpaper.
When the paint has dried, select a pattern of suitable size, coat it well with glue and carefully, slowly, apply it to the previously determined place, carefully straightening it. A layer of glue is again applied on top, removing the remaining bubbles, irregularities and roughness.
To complete the plot, apply paint of the desired color to a sponge or foam rubber and lightly press it along the edges of the picture.
You can further decorate the product with contours, textures, shiny varnishes, paints and others.
At the end, if there are roughnesses, they are removed with sandpaper.
Preparation
Next, the preparatory work begins, consisting of performing simple and understandable actions:
- Initially, various drawers and facades are removed, which are planned to be decorated;
- various fasteners are removed from them so as not to contaminate them with the means used;
- surfaces are cleaned of various contaminants and stains, and greasy stains are not allowed;
- if there is old varnish or paint, then these coatings must be cleaned off with sandpaper, but the material from which the furniture is made must not be damaged during the work;
- After completing the work, the bases are treated with degreasing compounds.
After such high-quality work, you can begin the direct process of decoupage. You can watch the video of the preparatory stages below.
Decoupage of kitchen furniture in Provence style
Despite the huge selection of products on the market, sometimes you want to have something original. Decorating your kitchen set in Provence style ,
You can create a corner of the “French village” in your kitchen. Floral motifs in delicate shades will look good on such furniture.
It happens that old furniture that has lost its original appearance is stored in an apartment for many years.
You can use not only paper images for decoration, but also various fabrics. This decoupage technique allows you to show your imagination. The only negative is that plastic furniture is unsuitable for decoration due to its glossy surfaces. The necessary materials are purchased. Wooden cabinets are sanded and covered with a layer of primer. Then they are painted several times with acrylic paint. Apply paper designs or fabric appliqués, pre-coating them with PVA glue. After the glue has dried, you can further decorate it with paint and apply patterns with stencils. The final stage will be coating the entire surface with varnish.
Before decorating the table, you need to degrease its lid with alcohol and then thoroughly sand it with sandpaper.
All it takes is a little imagination and diligence, and uninteresting furniture will turn into a real work of art. The room will be filled with comfort, acquire charm and unique style.
We sand the sides of the table with sandpaper and cover it with several layers of decoupage varnish.
With the help of decoration you can give new life to old, damaged things
And also - to turn an ordinary faceless piece of furniture into an original one, attracting attention, creating a special mood. Make your own table decoupage
This simple technique will add warmth and uniqueness to the interior.
Decoupage is a technique for decorating any surface (wood, clay, glass, metal, etc.) with ready-made designs with further consolidation of the effect. There are many stylistic solutions. One of the most popular is Provence. This style is often used in the decoration of kitchen utensils, furniture, pots, clocks, etc. It is characterized by images of bunnies, hens, cockerels, and birds. Floral designs and various options for presenting flowers, especially lavender, are very popular. The predominance of light pastel colors makes such items gentle, homely and cozy.
Decoupage happens:
- Direct (classic). The design is pasted onto the surface to be decorated.
- Reverse. When decorating transparent objects, the front side of the image is glued to the back side of the product.
- Artistic or smoky. Combination with other techniques allows you to make transitions invisible.
- Volumetric. To create an image, a special substance (paste), pieces of textile, pebbles, eggshells, etc. are used.
- When decoupage and patchwork techniques are combined, another type arises - decopatch. Many pieces of paper create the effect of a quilt made of scraps.
Grace and harmony as the basis of Provence
The freshness of the Cote d'Azur, spacious lavender fields and the refined aroma of Provencal herbs - this is what inspired French masters to create this style. “Provencal” trends in the interior were first introduced at the beginning of the 19th century. They united and continue to unite notes of romantic, calm, rustic styles. Hence the warm palette, light background, space, relaxed and natural solutions.
Floor.
Stones and noble woods were used as flooring. However, now modern tiles are an alternative. In an ordinary room, you can finish the floor with a brick or brown board. Instead of a board, it is important to use a laminate that imitates it.
Walls.
As for wall decoration, artificial stone, brickwork, and plastering are relevant. This style is not characterized by the presence of wallpaper. Most often, the walls are simply covered with plaster with a rough application.
Doors.
White interior doors are usually chosen. Doors with a soot effect look impressive: Provence is characterized by a patinated surface.
Window.
The ideal option is a window that covers the entire wall: from ceiling to floor. An alternative would be a double-glazed window frame. Imitation of wood-like windows is required. As for textiles, flowing weightless curtains, tulle in a light shade or with a floral print are suitable.
General solutions
. Prints and curved objects are presented in all their variety. By the way, you can decorate anything: not only ceilings, walls, windows and doors, but also furniture, flower pots and so on. Let's talk about the intricacies of the Provencal style in more detail.
Aging using dry brush method
As you can see, it’s quite easy to remake furniture with your own hands, creating a unique atmosphere in your home. See examples of successful remodels and get inspired!
Decoupage is a technique for decorating objects by applying a design to them. The most convenient and easiest way is to use a napkin with any suitable or favorite image as a picture. A napkin can be either the most ordinary one, taken out of a pack for everyday use, or it can be exclusive and very expensive.
Additional design will help make the product unique - applying an outline, paints, sparkles, etc. You can combine several different napkins on one product.
Considering the peculiarities of the work of each master, it is almost never possible to find two similarly designed objects.
Decorations – watches, napkins, flowers and lavender
You can add special warmth and homeliness to a Provencal interior with the help of wall clocks decorated with decoupage. To do this, you should choose napkins with the image of lavender, since it has long been the hallmark of this trend.
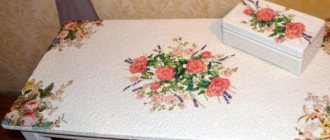
In addition, the Provencal interior can be complemented with various decors. Decorative plates, trays, flower pots and even spice jars decorated with decoupage will look harmonious in the kitchen. In the living room or bedroom, you should place on the table a box, a comb, a wall clock, vases and jugs decorated using decoupage techniques.