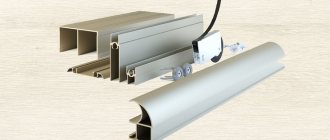
Many are convinced that drywall is a material intended only for covering walls, partitions and ceilings. It will be a surprise for them to learn that gypsum boards are used to make homemade cabinets of various designs. A cabinet made of plasterboard will cost much less than furniture made of chipboard or MDF. In this article we will talk about how to build a plasterboard cabinet with your own hands using metal profiles.
Cabinet drawing
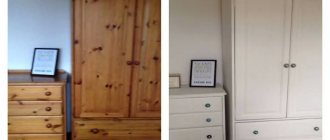
The creation of furniture begins with its drawing. A detailed diagram of the installation and arrangement of the wardrobe elements will help to avoid mistakes during its assembly. You need to determine the location of the future structure: in the hallway, bedroom, as well as in other rooms, you need to take into account the distance from the windows to the door, the height of the ceiling.
Form a body from profiles and cardboard. Design the future content and make a list of accessories for this. The sliding door system is created from traditional materials and will be independent of the frame design.
Having determined the dimensions of the built-in wardrobe, transfer them to paper. Draw the position of the shelves and partitions. Calculate the required amount of materials and prepare the tool.
Assembly and installation of wardrobe doors
Let's see how the process of installing sliding doors for a built-in wardrobe takes place. In this case, the interior of the furniture has already been assembled and installed; to use it, you only need to install the doors.
Step 1. The first step is to buy or rent all the tools. In this case, you will need a screwdriver, an aluminum saw (a miter saw will be used here), and a hammer drill equipped with a drill. Scissors and tape measures, drills and hexagons, etc. may come in handy.
Tools required for work
Step 2: The first step is to install the top rail of the coupe system on the ceiling. To do this, you first need to measure the width of the opening (for example, from wall to wall).
The width of the opening is measured
Step 3. Next, you need to measure with a tape measure and cut off the required piece of aluminum profile with a saw.
The required length of the profile is measured with a tape measure
Aluminum profile cutting
Prices for the popular range of miter saws
Miter saw
Step 4. Now you need to drill holes in the profile to mount it on the ceiling. There are three pairs in total, at the beginning of the profile, in the middle and at the end. But there may be more.
Holes are drilled in the profile
Holes are drilled in pairs
Step 5. Together with an assistant, you need to lift the profile and align it along the end of the cabinet, and then screw it using self-tapping screws. This will not be easy to do without the help of another person.
The profile is aligned along the end of the cabinet
Screwing the profile
Step 6. Now you can proceed to installing the bottom rail for the doors. Just like with the top rail, first you need to take measurements.
The width of the opening is determined from below
Step 7. Again, you need to mark the desired size of the rail on the metal profile, and then cut off the section with a saw.
Another piece of profile is cut off
Step 8. Next, in the place where the rails will be mounted, you need to lay the prepared section of the profile, without fixing it yet. At this stage, you need to insert compartment doors into it and make marks on the bottom rail in the places where the stoppers will be installed.
Laying the prepared profile
Places for installing stoppers are marked
Step 9. Then, after fitting, you need to install stoppers on the rail in the right places and then screw the bottom rail to the floor or bottom of the cabinet. The bottom rail can be fixed with double-sided tape. Then, before applying the sticker, you first need to degrease the surface, and only after that glue the tape itself.
Surface degreasing
Using double-sided tape
Fixing the bottom rail
Step 10. After this, you can install the doors in place. The wheels on the bottom of the doors should fit into the corresponding grooves.
Door installation
In this case, the wheels are already installed on the doors themselves. But how to fix them correctly if they were separate? There is nothing complicated here either.
Step 1. The cabinet must include special fittings. If the cabinet is made by hand, then such accessories can be purchased separately in the store. It consists of metal elements of different types - with and without a wheel. Those that do not have wheels are mounted at the top of the door at a short distance from its side edge, but flush with the top end. The fittings must be screwed on using self-tapping screws.
The fittings are screwed on
Self-tapping screws are used for this
Step 2. The second type of hardware, which has wheels, needs to be fixed at the bottom of the door so that the height is optimal. Two pieces of each type of element must be attached to each sash.
How to attach fittings with wheels
Step 3. Next, you just need to screw on the handles, and you can install the doors on the cabinet body.
All that remains is to screw the handles
Step 4. First, you need to insert the sash into the far upper rail, and then, carefully lifting the door, install the wheels on the lower rail. The remaining doors are installed in the same way, but on the nearest rail, etc.
Cabinet door being installed
Tools
To make a cabinet body from gypsum plasterboard, you will need the same tool as for normal work with drywall:
- metal ruler and tape measure;
- level and plumb;
- drill-driver;
- perforator;
- metal scissors;
- hammer;
- end plane;
- marker or pencil;
- construction knife;
- hacksaw for metal;
- jigsaw;
- brushes;
- spatulas.
As you can see from the list, the tools are standard, quite often found in every home.
In the bathroom
For the bathroom, small plasterboard cabinets are suitable, which can be built with your own hands quite quickly. Sometimes just shelves made of plasterboard are enough in the bathroom (in the toilet, by the way, you can also make shelves instead of a cabinet).
If the toilet is combined with a bathroom, you can experiment with the design. Build, for example, a closed cabinet and hang it above the sink. And hang shelves or niches made of plasterboard on the walls in the bathroom. The cabinet is convenient for storing items that should not be exposed to view, and on the open shelves in the bathroom you can place beautiful containers with care cosmetics, etc.
Materials
Based on the drawings, draw up a specification of materials necessary for installing the body and filling the wardrobe:
- drywall;
- metal profile;
- screws and dowels;
- damper tape;
- polymer mesh (serpyanka);
- putty (starting and finishing composition) and primer;
- water-based paint;
- vinyl wallpapers.
Depending on your taste preferences, you may need one thing: either wallpaper or paint.
DIY cabinet frame installation
First, materials are purchased. Wooden slats are mounted as standard - using self-tapping screws. If the choice fell on the profile, it’s easier to come to a hardware store, taking the drawings with you - the seller himself will calculate the amount of material.
When assembling the frame, show maximum care, since the strength, appearance, and durability of the future cabinet depend on this. Install each element, checking the level and looking at the drawing. Follow the sequence of steps:
Laying the profile adjacent to the surfaces in increments of 40 cm. Depending on the dimensions of the cabinet, the increment varies - the larger the structure, the more tightly the profile is attached. At this stage, be sure to level the supporting profile. To seal the structure and avoid squeaks, the contact points between the walls and the profile are taped with damper tape. Installation of vertical racks on the outside of the cabinet into the guide profile and their fastening. Installation of horizontal structural elements. Fastening starts from the ceiling. In places where shelves or special loads are expected, the frame is strengthened with additional transverse elements. Additional crossbars are also attached to the rear part of the structure; if the adjacent wall is not in the best condition, then you will have to sew up the plasterboard and the back wall of the cabinet. This stage includes the fitting/installation of drawers and shelves.
Wiring for internal lighting is mounted immediately on the frame, if you are going to do it.
2
Finding a suitable installation location, creating a sketch
It would seem that you just need to take an empty corner and arrange a closet there. But the stage is somewhat more complicated. You should think in advance about the location of the furniture, its approximate dimensions, taking into account the thickness of the walls, shelves, and their size.
As for the location, it can be either an old storage room or a wall in the room. The best option is to press the cabinet to the corner. The design may be compact, but it requires a little more space to accommodate all the things.
It is important to carefully choose the location, because due to the rigid fixation, it cannot be moved after installation. Step-by-step instructions include drawing up a drawing, which can be done either in a special program or on paper
The main thing is to remember the following points that need to be included in the diagram:
Step-by-step instructions include drawing up a drawing, which can be done either in a special program or on paper. The main thing is to remember the following points that need to be included in the diagram:
the height and width of the cabinet; the shape of the structure - linear or more complex; the shape of the shelves (their depth); the distance between the shelves (their thickness must be taken into account when calculating); the number of openings; the presence or absence of a hanger bar, the location of its installation; the presence of lighting.
It requires measuring the dimensions of the room and the product itself so that all parameters match.
Drywall
The choice of cladding material must be treated with extreme caution. The design of the shelves takes on the vertical load from the things placed on them, sometimes quite weighty ones. Therefore, it is better to take gypsum board with a thickness of at least 12.5 mm.
To cover a metal frame, it is enough to use sheets 8 mm thick. We advise you to purchase sheets of plasterboard of the same cross-section: this way you will not have any difficulties in covering vertical and horizontal metal surfaces. There will always be an opportunity to cut an additional piece from the entire stock of cardboard. Therefore, choose all cardboard according to the maximum end size - 12.5 mm.
If you decide to make a built-in, free-standing cabinet in the bathroom or kitchen, then use moisture-resistant plasterboard. This also applies to all damp rooms.
Expert opinion
Bashir Rabadanov
Technologist at the furniture company Woodband
Even on a glazed balcony or loggia, I recommend using plasterboard sheets to assemble the cabinet.
In any room, furniture located near a frequently opened window is also made of moisture-resistant material.
Speaking of dimensions, retail chains sell plasterboard sheets in the following sizes:
- length from 2 m to 4 m;
- width from 1.2 m to 3 m;
- thickness from 6.5 mm to 24 mm.
Based on the dimensions of the gypsum board you have chosen, we make a cutting drawing of all the cladding elements of the wardrobe box. It will help to avoid shortages or excess material. Allow an additional 5% of the total cardboard area for defects or accidental damage to parts during their manufacture.
Types of plasterboard sheets
Each room requires its own cabinets - a bedroom, kitchen or bathroom have their own “microclimate” characteristics, which must be taken into account when creating or purchasing furniture.
Table 1. Types of plasterboard sheets
| Type | Description |
| Ordinary | When making a cabinet for rooms with a stable microclimate (such rooms include bedrooms, living rooms or corridors), it is recommended to buy classic gray plasterboard sheets. They do not deform under the influence of the environment and will retain their proper appearance for a long time. |
| Moisture resistant | When installing a cabinet for rooms with high air humidity (namely, exceeding 70%), you should pay attention to moisture-resistant plasterboard sheets, which were mentioned in the chapter on advantages |
| Fire resistant | In rooms where the risk of fire of furniture is increased (in particular in the kitchen), experts recommend choosing fire-resistant plasterboard sheets for cabinets (they are marked with a special red marking during production) |
Metal profile
Galvanized steel profiles for drywall are available in several types. These are UD, CD, CW and UW rolled products intended for the formation of partitions, suspended ceilings and cladding of wall enclosures indoors. Some of them are needed for the installation of supporting elements, while other long lengths are used to make the connecting parts of the frame, ensuring the rigidity of the entire structure.
From the entire assortment, we will select the profiles that you will need to install a wardrobe made of gypsum plasterboard.
UW (MON and PNP)
Guide profiles limit the horizontal framing at the top and bottom of the box. UW slats are fixed to the floor and ceiling using dowels. If, when installed in a niche of a built-in structure, the height is less than the distance from the floor to the ceiling, the upper belt of the box is attached to the walls.
A similar method is used if it is necessary to fill the entire width of the wall with the structure. The profile is mounted vertically with shelves facing the inside of the room.
Steel slats are available in the following sizes:
- length – 3 m;
- shelf height – 40 mm;
- base width – 50, 65, 75 and 100 mm.
For the cabinet, we select long-length profiles with a wall width of 65 mm. If the furniture is small in size, then slats with a wall of 50 mm can be used as guide profiles.
CW (PS)
CW posts form vertical metal support members. Their ends fit into the UW rail guides. The rack profile transfers the entire load from the filled shelves to the base of the room. Dimensions of steel products:
- length – 3, 3.5, 4 and 6 m;
- shelf – 50 mm;
- wall – 50, 65 and 75 mm.
In our case, we use a profile with a wall of 65 mm. The edges of the sides are slightly curved, the wall has longitudinal grooves so that the length has increased rigidity and increased load-bearing capacity.
CD
We use UD strips as connecting elements of the frame and to create supports for shelves. The products are manufactured with a length of 3 m, a shelf height of 27 mm and a wall of 60 mm.
Pros and cons of shelving
The advantages of using this piece of furniture include:
- convenience of arrangement of objects;
- ease of maintaining order;
- affordable cost due to the use of a minimum of materials;
- the ability to create a beautiful interior using dishes and other original little things;
- absence of doors (saves space in small rooms);
- You can choose designs of any configuration.
Essentially, these are storage systems for jars for seasonings, bottles, cereals, dishes, towels and cleaning items.
Disadvantages of use include:
- the capacity of the shelves is less than that of closed cabinets;
- the shelves of the structures will be decorated only with presentable sets; old dishes will have to be hidden;
- no protection against dust;
- children and animals can easily reach all the things that are located on the open shelving.
Initially, shelving was conceived as furniture for unloading work surfaces.
Self-tapping screws and dowels
Using self-tapping screws for gypsum boards and fastening metal profile elements, you will need screws 10 and 30 mm long.
The steel parts of the supporting structure are connected to each other using screws using a screwdriver. Long fasteners are used to secure gypsum board sheets to metal. Use dowel nails to secure the supporting structure to surrounding concrete or brick fences. Drill the metal and the wall with a hammer drill, then hammer in a dowel consisting of a screw inserted into a PVC tip. Typically, fasteners with a length of 30–40 mm are used.
DIY profile cabinet
If you decide to choose a frame made of wooden beams, then when choosing it, pay attention to its condition and appearance. The tree must be completely dry and completely shrunk
Otherwise, the wooden frame will shrink, which will lead to its deformation. Accordingly, the plasterboard sheets will also be deformed and may even crack. When the plasterboard cabinet project has been fully developed, all errors and inaccuracies have been checked and corrected, you can begin assembling its frame.
After completely assembling the cabinet frame, you can begin covering it with plasterboard. Sheathing of the frame should be done from the outside and inside. However, if the cabinet is small, then it is quite possible to get by with cladding from the outside. It should be remembered that the larger the cabinet, the greater the load will be placed on its internal shelves and walls.
Therefore, it can be covered with 2 layers of gypsum board. It is necessary to prepare the surfaces to which the frame will be attached: clean, if necessary, tear off old wallpaper. You can install the frame on the old coating if it is strong, stable and has a good appearance.
The use of a special shock-absorbing tape, which is laid in all places where the base comes into contact with the wall, floor and ceiling, will help to avoid the transfer of vibrations from the walls and floor to the future cabinet. A win-win option would be to use two walls as the back walls of the cabinet. The front walls are constructed from sheets of plasterboard on a metal or wooden profile.
Putty and primer
There are putty compositions for starting and finishing gypsum board coatings. The building materials market offers dry mixtures and ready-made putty. The advantage of dry compounds is that you have the opportunity to always prepare the amount of putty required at this stage of work. The powder must be diluted with warm water and mixed thoroughly.
You will use the starting mixture to cover the drywall joints, seal the screw heads and secure the protective corners on the outer and inner sides of the frame cladding.
Once the starter coat is dry, apply primer to the entire cardboard using a brush. The mixture is sold in glass or plastic containers. The product will strengthen the paper base and the surface layer of gypsum.
Using a spatula, treat all surfaces of the gypsum board with the finishing compound. This coating is also applied with a spray gun, which forms a high-quality smooth surface of the cardboard.
Kitchen installation
So, our products are assembled, now it’s time to start installing the kitchen.
Wall row
It is now customary to hang a wall-mounted row of cabinets not on ordinary blind hinges, but on special furniture hinges with a hook, which cling to a metal profile strip screwed to the wall. The advantage of such hinges is that a cabinet already hung on the profile can be adjusted both in height and depth, which is very convenient for placing the facades of adjacent cabinets in the same plane.
We hang the cabinets of the top row and, using a screwdriver, adjust the hinges up and down, back and forth so that the facades of the adjacent cabinets are in the same plane, and the cabinets themselves hang level.
Bottom row
We tightly arrange the floor row cabinets, adjust them in height (by screwing/unscrewing the legs) and tighten them with intersection bolts.
We cover the cabinets with a tabletop and fix the tabletop with self-tapping screws from below through the drawers (transverse strips). You can also resort to using corners.
On the countertop we mark places for installing a sink and hob, drill a through hole so that a jigsaw blade can be inserted and cut out pieces of the countertop.
We cover the holes in the table top with a layer of silicone sealant, and also apply the sealant to the front side of the table top along the edge of the hole. We insert the sink and remove the squeezed out excess sealant with a rubber spatula. The same needs to be done for the hob, but you just need a heat-resistant sealant.
Bottom row assembled. The tabletop on the right row fits tightly to the window.
Well, here's what it looks like all together.
Installation of kitchen ceiling and bar counter
The next stage of work was the installation of the kitchen ceiling and bar counter. The kitchen is small, there is not a lot of space in it, so the choice was made in favor of a bar counter rather than a traditional table, the place for which was only at the entrance of the room, which, you see, is generally inconvenient.
Four pieces were cut out of chipboard (the same kind from which the cabinets were assembled) especially for the ceiling. Two parts were made with a curve, which should complete the ceiling. The parts were attached to the wall using thickened corners and self-tapping screws, but the bulk of the ceiling lay on the cabinets of the top row. Nothing complicated.
For the bar counter, a piece of the same Egger tabletop measuring 2000x400 mm was cut out, the edge of which was also made with a radius. It turned out that the rack and the ceiling element above it have identical dimensions.
We drill holes (14x170) in the tabletop and place them on hidden shelf holders, pre-fixed along the free wall.
Usually the recommended height for installing a bar counter is approximately 1100 mm from the floor, but mine turned out to be a little higher. The height of my counter was adjusted so that a microwave could fit into the free space between it and the floor row. It turned out something like this.
A little later, railing pipes with various hooks, jars for spices and trays will appear above and below the counter
Well, the whole stand/ceiling composition was completed by the 50th chrome-plated pipe with a holder for glasses and a shelf for fruit. Under the counter on the pipe I installed a holder with hooks for towels.
While the ordered bar stools were on their way, I slightly upgraded the wall above the counter by making the most expensive painting I could for it.
Well, this is what actually came out of it. Railing pipes with hooks are already in place, plus lamps were cut into the ceiling and another holder for glasses was added.
Step-by-step instructions for assembling the box and filling it yourself
| Step No. | Photo | Process description |
| 1 | We determine the location of the wardrobe. Furniture should not interfere with the passage of people and prevent the full opening of doors and windows. The corner closet is conveniently located opposite the entrance to the room. | |
| 2 | We mark the dimensions of the box on the floor, ceiling and walls. To do this, we use a pencil, marker, tape measure, metal ruler and level. | |
| 3 | According to the drawings and specifications, we cut the steel profile into the required sections using metal scissors, a hacksaw or a jigsaw. | |
| 4 | In accordance with the markings, we fix the UW guide profiles to the floor and ceiling with dowels. | |
| 5 | Having installed the racks, we fasten them with self-tapping screws to the top and bottom rails. Now you need to attach the vertical elements to the walls with dowels through perforated strips of hangers in increments of 40–50 cm. | |
| 6 | We install the transverse frame slats. They are inserted into racks and secured with self-tapping screws using a screwdriver. The crossbars are fixed in such a way that the openings between the shelves are at least 300 mm high. This is the optimal size recommended by furniture assembly specialists. You can maintain a different distance between the shelves. | |
| 7 | In the clothing compartment, you need to attach a rod to the metal crossbars of the box on which the tremels will be hung. | |
| 8 | To divide the contents of the closet into compartments for shelves and for outerwear, install a partition. Assemble it in the same way as the side walls of the box. | |
| 9 | You can also assemble the metal frame of the partition cabinet. Often a homemade wall is made open to delimit (zoning) a nursery, living room or room for another purpose. In this case, the structure can be used as an open bookcase. A plasterboard wall is often placed in the corridor to store everything that gets in the way in living quarters. | |
| 10 | If the box does not reach the ceiling, then you can make a straight arch, which fills the space between the ceilings. Make the arch from a metal frame covered with sheets of plasterboard. | |
| 11 | Mark the sheets of drywall using a tape measure and a metal ruler. Draw marking lines with a pencil or marker. | |
| 12 | Drywall cutting can be done in two ways. In the first version, cardboard is cut with a jigsaw. But this is not very convenient to do without a large workbench or table. You can cut the material directly on the floor. Place any flat length (beam or board) under the cut line. Applying a ruler, cut the markings shallowly with a construction knife (3–4 mm). Then, pressing with your hands on one side of the sheet, achieve an even break of the cardboard. If you have no experience in this matter, then it is better to practice on unnecessary scraps of material. | |
| 13 | Treat the ends of the facing elements with a plasterboard cross-cut plane. This work can be done with a sanding mesh secured with clamps to a special block. | |
| 14 | First, attach the shelves to the cabinet frame with self-tapping screws. After this, sheathe the vertical surfaces of the box. | |
| 15 | When installing shelves with a width of more than 50 cm, secure additional cross beams from the CD profile. Cut the ends of the crossbars with scissors, separating the shelves from the wall at a distance of 60 mm. Bend the ends of the shelves outward at a right angle. Then secure them with self-tapping screws on the side surface of the rack, and attach the end of the wall with a self-tapping screw to the base of the rack profile. | |
| 16 | To ensure that the thickening of the side surface of the rack does not interfere with the cladding, the contact area of the drywall must be sharpened with a plane or rasp. | |
| 17 | Apply primer to all surfaces using a brush. | |
| 18 | Use starting putty to cover the joints, cladding seams and cover the screw heads. Attach the screws so that their tops are recessed into the drywall. | |
| 19 | Cover all treated areas with sickle tape. Treat the ribbons with the starting mixture. | |
| 20 | Install the corner profile, covering it with a spatula and putty. | |
| 21 | After 24 hours, treat the drywall with a finishing compound. Clean up any imperfections with a mesh or fine sandpaper. | |
| 22 | Paint the entire box with a brush again with primer. | |
| 23 | At your request, the entire structure can be painted with a water-based composition or covered with vinyl wallpaper. | |
| 24 | Once the work is completed, proceed to install the sliding doors. To form the frame, use boards or timber with a width equal to the cross-section of the metal guide rails. | |
| 25 | Install the wooden frame almost close to the vertical posts of the box. It is necessary to maintain a gap of 1–2 mm. This must be done so that dynamic loads from the movement of door panels are not transferred to the drywall. Otherwise, the cladding material may crack and subsequently collapse. | |
| 26 | If the floor and ceiling have an ideal horizontal surface, then you can get by with installing only timber racks. Attach the guide strips of the sliding system with dowels directly to the horizontal railings of the room. | |
| 27 | The gap between the door frame and the coupe body must be filled with damper tape. | |
| 28 | It is advisable to attach swing doors to the bodies of small cabinets. If you nevertheless decide to install such doors on a plasterboard structure up to the ceiling, then you cannot do without installing a wooden frame. |
Choosing the design of a chest of drawers
Before starting installation, you need to decide on some important points. The first of these is the choice of location. This is an individual decision for each home owner. Once the location has been determined, you can make a drawing of the walls and come up with the location of the chest of drawers itself.
We mark the frame lines on the floor, ceiling and walls.
The drawing can be done on a regular piece of paper or use a ready-made one. However, the last option is more complex, because the finished work plan should ideally fit the parameters of your apartment.
Without resorting to the help of a professional, anyone, with some effort, can make a cabinet out of plasterboard with their own hands.
In order to create a plan, you also need to become familiar with the main types of such a design.
Drywall is a modern material that everyone can work with.
A gypsum plasterboard cabinet can be of different types:
- corner;
- linear;
- built-in;
- coupe.
One of the components of plasterboard (plasterboard sheet) is gypsum.
The corner design is ideal for a small room. It will save space. Linear cabinet with shelves - universal. It can be installed in any room of the house.
The strength of the material is ensured by the cardboard shell, which optimizes the technical characteristics of the board.
If the room has niches, then it makes more sense to make a large built-in closet with lighting. For example, it can be used as a dressing room. A chest of drawers with shelves will be an excellent solution if there is not enough space to store things. It can accommodate not only clothes, but also books, equipment or shoes. A coupe is the best solution for a small apartment.
This is an environmentally friendly material that does not contain harmful elements and has an acidity close to human skin.
You should also decide in advance on the features of the chest of drawers. It can have open and closed shelves. A cabinet made of plasterboard with closed shelves is the most practical, since you can store any accessories in it, but building such a frame will be more difficult.
The metal profile is easier to process.
We fasten cut-to-size gypsum boards using gypsum-metal or gypsum-wood screws, depending on the selected frame material.
The final result of a finished plasterboard cabinet may look different.
Cabinet-table made of gypsum plasterboard for TV
The principle of assembling a TV stand made of plasterboard with a frame made of steel profile remains the same. It should be noted that the cabinet needs to be made mobile. To do this, we assemble a floor frame from a guide profile. Install furniture legs in the corners. They can be monolithic or equipped with wheels.
Then assemble the entire metal frame. Attach a plasterboard table top to the top frame. It can be made semicircular or rectangular.
After puttying and painting, secure the doors. Hinged planes can be made from other materials (chipboard or MDF).
It is easy to give the cabinet an original design that will harmoniously fit into the interior of any room.
Making a kitchen rack
To make a plasterboard shelving unit on your own, you should prepare the same list of tools that was listed above. The only thing you need to supplement it with is scissors designed for working with metal.
Below we will consider in detail an example of a rack, which consists of shelves located on two racks along the entire height of the room with a simultaneous depth of 50 cm. A similar design can be equipped with doors, but this will be a more complex option.
First of all, markings for the racks are applied:
- in the corner located between the floor and the wall, a mark is placed where the first rack will be located;
- approximately 50 cm departs from this mark, that is, its outer edge;
- from the first marked point a line is drawn vertically from the ceiling to the floor;
- from the line thus obtained, you should retreat half a meter deep. This is the horizontal part of the future rack;
- 1.5 meters are retreated from the contour of the stand located on the right and all previous manipulations are repeated. As a result of this work, you can obtain the outline of the second rack.
After this, the profile is mounted according to the established marks and attached to the wall surface using a drill. Then the total height of the future racks is measured and an element is cut off, depending on this value - two elements of the load-bearing structural profile. This way the external racks will be obtained. They are inserted parallel to the wall surface into special grooves and connected. As a result, two rectangular frames will be obtained, which will then be sheathed with plasterboard.
In conclusion, all that remains is to cover the frame with plasterboard and you can do the final finishing. If you want to equip this structure with doors, you will need to install wooden blocks in certain places and install hinges on them.
As can be seen from all of the above, such a process and solution to the question of how to make a kitchen out of plasterboard does not fall into the category of complex ones. If you have simple tools at your disposal and have basic skills, and also follow the diagrams outlined above, you can quickly create high-quality furniture from plasterboard and equip your kitchen with it.
Features of installing gypsum plasterboard cabinets for kitchens and bathrooms
In these rooms, due to high humidity and temperature changes, unfavorable conditions are created even for furniture made from gypsum plasterboard. This. If you decide to install such furniture, then it is better to place it away from the stove, refrigerator, sink, shower or bathtub.
Simplicity and accessibility
The simplest and least expensive finishing method is painting surfaces. Even a person who is far from repair work can work with this material. Manufacturers offer special compositions intended for wall finishing. They are:
- latex;
- water-based;
- acrylic;
- silicone.
The walls are pre-leveled using finishing coatings. The key advantage of using paint is the ability to clean the surface from dirt. Another advantage is the wide selection of color palettes. If there are several protrusions, arches or niches, paint is an indispensable material, since it can be used to treat even the most inaccessible places.
Beautiful design of the hallway room
When working with paint, there are some important points to consider.
- After painting the walls, you need time to dry thoroughly.
- It is used if household members do not have allergies, since some compositions have a sharp, characteristic odor. During painting, you need to ventilate the room more often.
- It is necessary to know exactly the required amount of material. Its shortage requires an additional purchase, and new paint, even from the same manufacturer, may differ in shade.
- There is an additional category - decorative paint, imitating any material.
Hallway room interior
Hallway room design
Decorating the hallway of the room
Advantages of making furniture from plasterboard
It is not for nothing that plasterboard furniture is very popular among the population. This phenomenon is facilitated by the following positive qualities of the material in question:
- Easy installation of structural elements. You don’t need a lot of experience in handling tools; furniture manufacturing is available to anyone who wants to assemble a wardrobe from gypsum plasterboard.
- If we compare the cost of manufacturing a wardrobe from MDF and assembling furniture of similar dimensions from metal profiles and plasterboard, then savings can amount to up to 20% of the total costs.
- The ease of joining steel elements, cutting them, and cutting sheets of cardboard allows us to quickly produce a cabinet of the required dimensions and with the required contents.
After reading the article, you should have no doubt that drywall can be effectively used to make furniture. Despite the apparent fragility, gypsum plasterboard in combination with metal profiles can be used to make quite strong and reliable cabinets.
Internal filling
Filling the interior space of a wardrobe is an important point when developing a model of a future design; it is the most functional part of the sketch. Three visually different zones are traditionally installed inside the cabinet: lower, middle and upper. At the bottom there are traditionally racks for shoes or shoe racks, in the middle there are open shelves, rods, hangers for skirts and trousers, drawers, on top there is a rod for long clothes and open shelves for the least frequently used items and things.
The rod is found in all wardrobes and allows you to hang clothes on hangers, including long clothes. Choose two or more rods: the height of one of them should not exceed 80 cm (it is optimal to choose 60 cm): it will be used for everyday clothes, the other with a height of 100 cm will be used for hanging long and street clothes.
The pantograph is the same bar with the ability to lower the structure; they are installed as high as possible. The width of the rod varies up to 90 cm: if the rod is larger, it requires additional support.
- Open shelves are an integral part of any closet; the optimal depth of shelves is from 40 to 70 cm, width - up to 60 cm (it is better to make more shelves of small width), the height is determined based on the personal wishes of the consumer, optimally - 35-40 cm.
- Drawers protrude for storing underwear and hosiery; their dimensions correspond to the parameters of open shelves, because often these structures are located under them.
- Shoe compartments and shelves: Place them at the bottom to make efficient use of space. For ease of storage, you can choose designs with lasts for putting shoes on them or shoe racks: shallow drawers with vertical placement of wardrobe items.
Peculiarities
Drywall can be considered one of the best building materials. Rare repairs can be carried out without using its sheets. There are a large number of available options for its use - ceilings with one and several levels, slopes, smooth walls, partitions and screens. Among these and many other options for using drywall, the niche is not the least important.
The advantages of gypsum boards are quite obvious:
- lack of toxic properties;
- strictly standardized sizes;
- possibility of use in a variety of conditions;
- ease of decoration.
The plasterboard slab is always 120 cm wide and the length is either 250 or 300 cm. The material used for the walls is 1.25 mm thick.
Plasterboard niches are much better than the usual exquisite furniture, because they allow you to abandon bulky hanging shelves and whatnots, and original-shaped stands. Such designs are not very practical, are not suitable for every interior and often serve only as dust concentrators. With the help of recesses, it is easy to place the most important and pleasant things for people on the walls, give them a new meaning and radically change the atmosphere in the room. In addition, you can remodel the appearance of a room very quickly and at minimal cost.
Interior and exterior finishing
The last stage of work is the execution of external and internal finishing. First you need to seal the joints, for which sickle tape is used. The serpyanka is glued to the joint, and then covered with putty; it is also necessary to seal all the places where the sheets are attached, and the putty is applied in different directions.
You can use paint, wallpaper, or tiles to finish the cabinet. To do this, the entire surface must be puttied.
First, apply the first layer of putty, then apply a reinforcing mesh and level everything well.
After complete drying, the surface must be sanded, uneven surfaces removed and a finishing layer of putty applied. After it dries, you also need to sand everything down with fine sandpaper.
To ensure maximum quality work, it is recommended to use a primer between coats, and it should also dry well each time.
Now you can hang wallpaper or paint the cabinet. If you plan to glue the tiles, you can do it directly onto the drywall, or you can also putty the surface first and then install it.
Doors can be made hinged or sliding. Swinging doors are easier to make with your own hands, but with sliding structures it will be more difficult. Now you can purchase a ready-made set of sliding doors along with fastening elements and a door leaf.
You can use mirrors and other decorative elements for decoration; it all depends on your imagination and financial capabilities.
How to make a built-in wardrobe according to a plan
When the project for the future design has been drawn up, you can proceed to the assembly and installation of the cabinet.
Frame assembly
First, before starting assembly, you need to carefully inspect the load-bearing surfaces to which the frame guide profiles will be attached. They should not be dilapidated; if they are, they are restored.
After preparing the walls, you need to carefully check them using a building level. Even minor differences can lead to distortions, which will create problems when installing sliding door fittings;
The guide profiles are rigidly fixed to the wall using dowels and nails. The fastening pitch should be no more than 300 mm
Installation is carried out carefully, checking all guide profiles with the building level;
An important detail when installing a UD profile is the lining of a special damper tape under it. This is done to reduce vibration, otherwise when opening or locking the sliding doors the cabinet will be “booming”;
after installing the guide profiles along the walls and external ones (on the ceiling and floor), prepare the frame racks
Connections between CD and UD rails are made using small bugs;
It is important to install the crossbars after this. They are prepared to size from a CD profile, having previously cut the side shelves to the mounting depth;
depending on the condition, you will have to mount the frame under the lining of the back wall of the future cabinet. In this case, the frame is assembled as for finishing a wall, with additional fastening of the racks to the load-bearing wall with direct hangers;
if a cabinet of a non-standard shape is planned, then such a configuration is given to the frame using an arched profile that can be bent. And also by cutting the side shelves of the guides and rack profiles, they can be easily bent, thus replacing the arched element made of gypsum plasterboard. Stages of installing an arch-shaped cabinet
When the base is ready, you can immediately begin covering it with plasterboard.
Sheathing
Parts for sheathing are prepared by cutting sheets using a stationery knife. In this case, markings are made on the surface of the plasterboard in advance, along which cutting is carried out first on one side and then on the other. When the cardboard shell is cut through, the sheet breaks off easily; unevenness on the edge is cleaned up with the same knife or a wood plane. The blanks are fixed with self-tapping screws, screwing them into the surface of the cardboard by 1-1.5 millimeters, but without damaging it. The process of covering the frame of a built-in wardrobe with sheets of plasterboard
For sheathing you need a screwdriver, but it can be replaced with an electric drill, which has an adjustable speed. You also need bits for self-tapping screws. The distance between the attachment points is maintained within 250-300 mm. In this case, first one side of the workpiece is fastened, and then the other. When the cladding is completed, finishing begins.
Finishing
Regardless of what type of plasterboard decor will be carried out, it is necessary to carry out the initial finishing of the surfaces. It includes the following steps:
- Reinforcement and sealing of seams between individual sheets of plasterboard.
- Puttying the attachment points.
- Strengthening corners with perforated corners.
- Putty on all surfaces and rub it down.
Reinforcement of joints is done using fiberglass mesh in the form of sickle tape. It usually has a self-adhesive side that makes it easy to secure the strip to the joints. After which it is coated with putty using a narrow spatula. The process of sealing and reinforcing the seams of a built-in wardrobe. The places where the screws are screwed in are simply coated with a layer of gypsum plaster. When the joints and attachment points are dry, they are rubbed down with fine-grain sandpaper. The corners on the edge of the cabinet are “set” on the same gypsum putty, and leveled with a spatula. The dried mixture is also mashed. The final stage is to putty all surfaces with a thin layer. When the putty dries, it is rubbed down, removing small irregularities. Option for finishing a built-in plasterboard cabinet
A finished wardrobe made of plasterboard after such finishing can be easily decorated to match the overall design of the room by painting, wallpapering or tiling the plasterboard. The huge advantage of a built-in cabinet made of plasterboard is that its walls can even be decorated with textured or Venetian plaster. At the end, the fittings are installed: guides, sliding doors and clothes rails. You can build in such homemade cabinets almost anywhere: in the bedroom, bathroom, kitchen or in a plasterboard niche in the hall. Assembled in accordance with technology, it will perfectly perform its functions.
Choosing a niche for your interior
There are quite important nuances that influence the design of a niche in your living room. It is worth taking a closer look at them and those who chose the standard solution and decided to be original. In any case, listen to the advice of the masters.
How to choose a niche for your interior:
- Niche location. This parameter will influence both the choice of material and the properties of the material. If you place a niche near a window or door opening, in partitions, they may have different parameters.
- Number of recesses. If there are a lot of niches, they will look a little heavy in a small living room, and everything should look harmonious.
- Integrity of the design idea. If the installation of niches is intended to decorate the room, think about how to make them an accent in the interior. At the same time, the external arrangement should distract from the possible shortcomings of the room. These can be such successful “irritants” as decorative vases, flowers, figurines, photos, plates.
- Functional purpose. If any equipment is inserted into a niche, then the supports must be reinforced; even a TV can be very heavy for such a design. And be sure to think about where to hide the wires from the same TV.
Advantages and disadvantages
Plasterboard sheets are a durable material that is easy to use. It has strengths and weaknesses. The advantages include:
- does not rot or collapse over time when used correctly;
- it is easy to work with;
- weight, work can be carried out by one person;
- environmentally friendly and safe, can be used in children's rooms;
- When installed correctly, the material regulates the microclimate in the room;
- odorless, does not cause allergies;
- excellent thermal insulation and sound insulation properties;
- flexible sheets are used to make arches and figured walls;
- fire safety, vapor permeability;
- functionality, behind them are hidden various communications (cables, pipes);
- drywall lends itself to a variety of decorative finishing (wallpaper, putty, painting, artificial stone, etc.);
- affordability.
Despite the fact that the material has many positive characteristics, there are also disadvantages:
- fragility;
- cannot withstand heavy loads;
- does not like contact with water;
- not used for installation on timber floors without a frame.
Construction of the frame
The first is a guide profile; the distance between the slats should be approximately 40-50 centimeters, but if the furniture has a shape that does not allow this, you can change the distance at your discretion. The main thing is not to make this distance too large, otherwise the necessary structural strength will be lost.
Some tips:
- To avoid rattling and unnecessary sounds inside the case, use a damper tape attached to the case. It has a sticky side so this won't be a problem.
- If the wardrobe is large and accordingly you plan to store a lot of things in it, then install two profile guides in the frame, then it will be doubly reliable and you can hang swing doors.
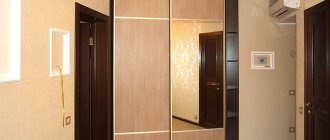
- If you want to make a corner wardrobe out of plasterboard, then in this case you can make a whole dressing room in which you can put a lot of clothes and even several people. By the way, for a corner cabinet you can also use the doors as a sliding wardrobe; to do this you just need to install them with a slight side slope.
If the product reaches the very ceiling, which happens in the vast majority of cases, it is also necessary to place profiles on it so that the cabinet is securely attached to all surfaces. Once the rail is installed, you can proceed to install the rack (CD) rail using the marks created in the previous step. The rack profile is located perpendicular to the guide. In those places where the shelves will be placed, they need to be additionally reinforced with a profile so that they accurately support the weight of the things that will be placed on them.
When you're done, check the frame - press down on it and rock it a couple of times, if it doesn't wobble, move on to the next step, and if it wobbles a little, you need to strengthen the frame even more. This can be done using profile pieces left over from previous work.
Manufacturing technology step by step
Knowing what parts the entire structure is assembled from, you can begin construction by preparing each component separately. First, each element is copied from a paper drawing and its dimensions are transferred to the material, measuring the required parameters with a pencil. Next they work with a saw. The opening for the sink in the countertop is cut out with an electric jigsaw. The boundaries of the opening on the material are drawn using a cardboard blank - a pattern, which is a flat model of a hole in an ordinary sink. Armed with a drill, a hole is drilled along the outlined border. The hole should clearly follow the copied outline of the bottom of the sink.
Cutting an overlay strip from a HA sheet to cover the top of the cabinet is the next stage of work. This strip is responsible for the external decorative appearance of the product. When compiling its dimensions, be sure to take into account the dimensions of the valves. There should not be a gap between the latter, but they should not overlap one another either. The thickness of the tabletop is made equal to the height of the sink. The main thing is that when the doors are opened, it is not exposed.
Assembly and covering of the base
Sequentially attaching each element to the frame begins when all parts are prepared. However, the wooden frame itself, made of bars, should be ready by this time.
Despite the fact that the plasterboard cabinet is made from moisture-resistant sheets (GKVL), processing of their end cuts in order to prevent moisture from penetrating inside is still necessary. Here the choice of means may vary. This is either a moisture-resistant adhesive composition, or special moisture-repellent primer compositions, and in addition to them - slats. The edges are cleaned with fine-grained sandpaper. And after that they prime or apply glue to them.
Then they proceed to attaching the end walls to the frame support, using glue or self-tapping screws. When using the latter, holes are first made. After applying the glue, the treated areas are pressed with clamps, allowing the adhesive to better adhere.
The stability and reliability of the structure is imparted by means of eight cut out corners. They are attached to the end walls and frame from the inside and behind the base.
The type of cabinet will influence the choice of how to install a countertop with a previously made hole for a mortise sink: either the countertop is installed, or the frame is adjusted to fit the washbasin.
Article on the topic: How to make a cutting table with your own hands
Then screw the doors and other accessories to the bedside table - hinges, drawers, shelves. Hinges with handles are immediately attached to the sash blanks. Upon completion of the preparation of the sashes, they are attached to the supporting structure of the product.
When cutting out a shelf, take into account that when installed it will cover the sewer pipes. It is installed by screwing it with self-tapping screws into pre-made holes in the end walls, or by placing it on a mounted profile.
The final procedure of the entire installation is the attachment of the bottom surface. If the cabinet model is supposed to be made with legs, the bottom is fixed at a distance of 10 cm from the floor.
Installation and cladding of the façade
The last step is to install and secure the sink inside or on the nightstand.
Depending on the type of cabinet, it can be hung from the wall or simply placed in the right place. On the installed product, all seams are treated with silicone sealant.
When the silicone dries, they begin to veneer the façade of the product. Any finish for drywall is suitable. Surfaces can be covered with wallpaper or self-adhesive PVC film, cork and even tiles. Everything is determined by the design of the room and the capabilities of the owners.
Basic painting can complete the finishing of the furniture. To do this, water-based or acrylic paint is applied to the facade using a roller or brush. The required shade is achieved by adding color to the paint. The paint is spread over the drywall in two layers.
Exterior finishing
The end surfaces of the cabinet can be covered with wallpaper that harmonizes (or, conversely, contrasts) with the walls in tone. For the bathroom and kitchen, it is advisable to stick a thick type of washable wallpaper on the cabinet. Duplex wallpaper has a reliable moisture-proof and light-protective coating. Usually they have a relief design or ornament applied on them. Double-layer vinyl wallpaper with imitation ceramic tiles, wood, and burlap are also perfect here. The vinyl type of wallpaper is ideal in the kitchen, as it is durable, easy to clean and does not fade in the sun.
Making such a piece of furniture for a kitchen or bathroom is quite easy. When a little time passes after making the cabinet, those who are carried away by such a process will think about what other furniture from plasterboard they can make with their own hands. The possibilities here are endless. So why not try making something more complex, such as a sofa or bed made of plasterboard.
How to restore
Over time or due to mechanical damage, the gypsum decor is destroyed. In this case, restoration of worn parts or their complete replacement will be required.
Renovation Tips
When carrying out restoration activities, the following recommendations are taken into account:
- Before starting reconstruction, you should study the scale and type of damage, and then choose the appropriate method of exposure or camouflage.
- If a small fragment is destroyed, replacement is not required. Existing damage is repaired directly on the element.
- If the stucco molding has changed color due to getting wet or dirty, the entire product is painted in a color that matches the interior. Water-based paint is suitable.
- Artistic painting will help hide minor scratches. Oil paints are used for this.
- In case of loss of a significant part, restoration work is carried out by checking the photograph, if available.
- If there is no photograph of the lost part, then a new one is made taking into account the general style of the room.
- During restoration, cracks and seams are opened and re-sealed with fresh mortar.
- Weakly fixed parts are removed, the surfaces are leveled and fixed again. In this case, double fastening is recommended - with glue and dowels.
- If paint comes off on an area of a figure, the entire element is painted over. Otherwise, the color of the freshly coated area will be different. To do this, the old layer is cleaned off the part, the surface is sanded, primed and a coating of the desired color is applied.
Decorating walls with stone - beautiful design in the interior
The choice of decorative stone is very large and varied and it will not be difficult for you to choose the right one. Decorating walls with such stone will not become difficult if you use our tips. It is best to apply the solution using a comb and trowel. The most important step is laying the first row, since virtually the entire wall will depend on it and a small mistake can become a big problem for all further laying. Before you start decorating the walls with decorative stone, you need to level the walls well.
This type of decoration is very massive, and it will be very difficult to work with it on uneven walls. To keep the level during installation, it is best to place beacons from strips of drywall or stretch fishing line/nylon thread. You can also use plastic crosses, but in this case your seam will be small.
Before you begin, we recommend sketching out a sketch of the future project, as well as choosing a stone for interior wall decoration. When creating a sketch, keep in mind that the stone can be laid end-to-end or along the seam. When calculating the sketch, the dimensions of the stone will help you, since almost all of their types have the same size. The leader among finishing materials is plasterboard. Due to the fact that it has a flat surface, it can be finished with a variety of materials: wallpaper on drywall, stucco, painting drywall, decorative plaster. But the most effective finishing is considered to be the installation of artificial stone on drywall.
But before you take on such finishing, you need to know a few nuances that will help make the structure durable and beautiful. Lining a plasterboard wall with artificial stone There are certain requirements that apply to the surface in order for the stone to stay on the wall for a long time. So, the surface should be: As a rule, marble and granite are used for finishing the floor. Granite has an average size of 305x305 millimeters. Marble has a lower structure density, so its thickness should be at least 20 millimeters.
Granite is considered a more practical material; it will delight any home owner. Marble is prone to wear faster and is more easily scratched. In order for a floor made of marble to always please everyone, it needs to be polished periodically.
Marble is polished every five years. Using stone in the interior to decorate walls and floors, you can create your own fortress or cozy home, it depends on the desired style and type of material for interior decoration. It can be natural or decorative stone, both of these types have their advantages, and designers have long appreciated the strengths of using stone in the interior. It can decorate any room, from the hallway to the bathroom, taking into account the style of the room. Stone in the interior of the hallway will help solve the problem of dealing with street dirt on shoes and high traffic.
Decorative stone in the interior of the hallway should be durable and retain its original appearance for a long time. Under heavy stone cladding, metal frame posts are installed more often (every 30 cm) to make the structure more rigid and durable. They are sheathed not with one, but with two layers of gypsum board.
Then they proceed according to the standard scheme. Only moisture-resistant plasterboard is used as a base for decorative stone. And even on its surface it is necessary to apply primer for absorbent bases or a universal one before starting facing work. Otherwise, moisture will leave the adhesive layer (especially thin ones) faster than necessary. It will not have time to gain the necessary strength, which can subsequently cause the elements to peel off.
The base ready for installation must be level, clean and dry. It is widely known that drywall is excellent for leveling walls, creating false walls and partitions, and it also allows you to create multi-level surfaces on the ceiling. However, you can combine wall decoration and the creation of composite structures and create a complex surface on the wall, for example, plasterboard niches for a TV or for various small items.
And the decorative finishing of a plasterboard niche in the wall will make the interior unusual and attractive. Assembling a plasterboard niche in a wall does not have any fundamental features; it is performed in the same way as finishing the entire wall - using the same set of materials and tools: