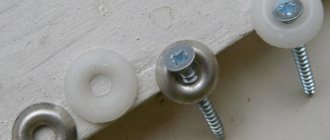
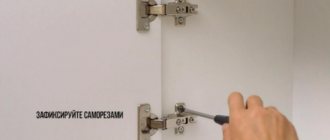
Attach the front part
Once the new piece is installed, drill holes for screws to attach the drawer face and handles. It's much easier to do this now while the drawers are still in place. To attach the new piece, drill a couple of small pilot holes on one side, then insert the screws. You just need to attach them, then it will be easier to attach the front panel.
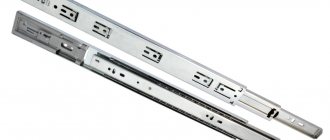
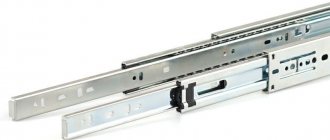
Roller or ball guides, which one to choose?
From the point of view of calculating drawers, the formulas for roller and ball guides are absolutely the same. You can change one on a chest of drawers, a cabinet or a closet at any time without any changes in the design of the furniture. The only caveat is that there will be holes left from the fasteners, which can be masked somehow, because:
- Roller guides are attached along the bottom edge of the box, with a grip on the bottom.
- Ball guides are usually mounted in the center of the side of the drawer.
If we talk about which of the above guides is better, then the answer lies in the budget allocated for the manufacture of cabinet furniture.
Roller guides are economical. They are used on production office furniture. As in principle, ordinary roller guides are installed on any drawers of economy-class cabinet furniture, including kitchen ones. Fittings of this type are quite practical and durable. If you don’t heavily load the box (and the bottom made of thin fiberboard won’t allow you to do this), then it will last for decades. The design of the roller guides is such that there is nothing to break there.
Full extension ball guides are in a higher class in terms of cost and performance characteristics. A drawer equipped with them extends completely, without blocking the back part with the top shelf (table top), which is very convenient for viewing everything stored in it. Also, ball guides boast a smooth, pleasant motion. There are options with a built-in closer (they can be identified by a spring built inside the mechanism with a plastic stop).
When choosing retractable mechanisms, you should not chase cheapness. A lot depends on the thickness of the metal and the accuracy of the calibration. Chinese analogues with thin metal fail very quickly - the guides themselves wrinkle and bend, rollers and ball bearings fly out even under non-critical loads. Therefore, be careful when purchasing and give preference to high-quality, popular items from well-known budget brands.
Drawer guides
When designing furniture, many people especially focus on drawer guides, and this is understandable because a lot depends on their operation, for example, durability, smoothness of movement, direction of closing the drawer, ease of removal, etc. However, now there are only two options on the market - telescopic and conventional roller guides. Each option has its own pros and cons, which I will try to tell you about today...
CONTENTS OF THE ARTICLE
I will proceed from the experience of many installations on various boxes. Moreover, there is something to think about, especially due to the current crisis in the country, because one option is more expensive than the other, although it has many advantages. Well, let's look at everything in order, I propose to touch on the oldest systems first.
Roller options
Yes, indeed, they appeared a very long time ago, back in the 90s, when imported fittings began to arrive on our market. At first they were from Western companies, but China quickly took over this baton; the quality, of course, dropped a little, but due to the mass production, the price of these products also fell. If you want, it was a kind of revolution in guide elements; probably everyone remembers the old Soviet boxes that ran (as a rule) on plastic guides, breaking from the slightest load or weight. It was terribly inconvenient, but the videos did their job, and quite well at that time. Mass production of furniture with them began very quickly, and the consumer could not get enough of them. They were placed anywhere, on computer pull-out tables, on drawers, etc.
Installation of roller elements
When the markings have been made, they move on to attaching the guides.
Work begins with the box. Apply the strip to the marked line so that the roller is located at the back wall. Attach it to the bottom using self-tapping screws. It is advisable to pre-drill the holes for them: if you tighten the fasteners right away, the chipboard or wood may split. Then screw the second pair of planks to the furniture body, aligning their position along the marking line.
When assembling furniture, you must ensure that both rollers simultaneously enter the track.
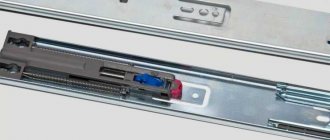
The drawer doesn't close all the way
Hello! In this short post, I want to solve the problem of many novice furniture makers. Sometimes I read interesting questions, one of which sounds something like this: “How to install a drawer with telescopic guides into a box?”
The fact is that when the drawer is inserted into the box, when closing it (the drawer), some resistance is observed. And this is natural. But the following may also happen: when closing the box, the front part of the movable plate (containing holes in which metal balls are located) may “bite”, that is, it will be slightly deformed (bent). In this case, how much this part bends, how many balls will fall out of it.
This problem is solved simply: the plate takes its original shape using pliers (of course, the dropped balls are put in their place), after which its front ends (those that were bent) are pressed against the guide itself as far as possible with the same pliers.
In order to correctly insert the box with telescopes, you need to observe the following points:
- Those parts of the guides that are attached to the box itself should be pulled out of it as much as possible.
- The moving plate with balls (which we talked about above should also be shifted forward as much as possible - from the box to the outside).
- When a drawer is inserted with its guide rails into the corresponding places of the guides, which are fixed on the box itself, you need to make sure that the drawer does not warp when it slides inside the box. It should go straight in.
- At a certain stage, slight resistance may appear. If the drawer slides smoothly, then you need to apply a little force, the latches on the guides will work, and everything will go like clockwork.
Here, in brief, are the main points of working with telescopic guides.
Biglis
I am also of the same opinion. especially after watching videos on YouTube - when telescopes are placed with an inclination of 5-7 degrees and it works as a closer - it moves in smoothly on its own. To close my drawers, I put in 7-10 kg of force to push them in or out. My wife can't cope at all..)
100% that the drawers are wider than necessary, or the cabinet is too narrow for the drawers, which is the same thing.
To overcome this, you need to arm yourself with a jigsaw and reduce them, or look for other guides, although now this is problematic.
Misalignment is a consequence of incorrect manufacturing or assembly of furniture.
If you assembled it using the finished holes, but it does not fit as expected, then you will have to find out what is causing this. The simplest thing, if these are guides (the most common mistake of additive operators in factories), is to check the position of the receiving skids (they must be screwed in the same way). If there is a difference, then re-drill the holes for the screws on one receiving slide to the distance that the drawer does not close.
Installing telescopic guides is not an easy task, but Gods don’t burn pots
July 28, 2020
Conventionally, the installation of telescopic guides for a furniture box (shelf) is divided into three stages. Clarification of overall dimensions and allowances, selection of suitable fittings, direct installation. After that, all that remains is to adjust the travel of the guides, and the installed mechanism will serve faithfully for many years.
Dimensions in the installation of telescopic guides are of particular importance
We discussed the features, types and types of guides for furniture drawers and shelves separately. We recommend reading them before you start upgrading your chest of drawers. But in any case, after making a decision, first of all we begin to work with the overall dimensions of the box and the niche in which it will be placed:
- The maximum depth, width and height of the niche will set restrictions on the size of the box;
- Take into account the load-carrying capacity of the guides and the maximum length;
- Consider the frequency of use, the possibility of minimal adjustment (depending on the weight of the stored items);
- Take into account installation tolerances and allowances necessary for comfortable use.
How does this look in practical application to the problem being solved?
- The length of the telescopic guides is standardized in increments of 50 mm, from 250 to 800 mm. For a drawer with a depth of 495 mm, you will have to choose 450 mm “telescopes”, sacrificing full extension.
- Technological clearances are needed to avoid jamming and ensure smooth running. 10 mm should be left between the rear walls.
- The thickness of the guides is 13 mm; such gaps must be left between the side walls of the drawer and the niche.
- The installation location is marked with an allowance of no more than 1 mm on each sidewall. The more accurately both guide rails are placed, the smoother and quieter the move will be. An error of 3 mm cannot be corrected by adjustment!
- The installation line for the guides is drawn exactly in the middle of the side of the drawer, marked from top to bottom, this is necessary for the correct distribution of loads;
- The distance from the bottom of the niche to the bottom of the box is not regulated; it depends on the design and size (shape) of the facade strip. In practice, there is usually a gap left, but you need to make sure that it exists.
If everything is clear with the dimensions, you can continue working.
Installation of telescopic guides begins with disassembling the “telescopes”
It is easy to disassemble - disconnect the fastener and remove the inner rail.
Lifehack. First, disassemble one structure, practice assembling it to gain skill. Otherwise, assembly after installation may cause difficulties.
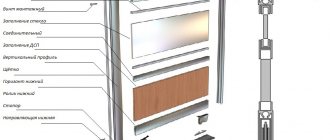
Remember that three elements are called:
- Mate (on the box);
- Middle rail. Ensures uniform load distribution;
- Main part. Fixed on the walls of the niche.
Next we need a pencil, an awl, a screwdriver or screwdriver and a building level.
We mark the side of the box with a horizontal line exactly in the middle of the height of the wall. We fasten the mating part with one screw (any extreme one). We place the box on the bottom, use a level to level the rail, and use an awl to tap the point for the second outermost screw in the center of the mounting hole.
We tighten all the screws (depending on the length, 3-5 pieces), while simultaneously controlling the accuracy of the horizontal level. We similarly attach the counter part to the other sidewall.
Lifehack. Fixation holes allow vertical correction of the counter and main parts. But the more accurately the screws are secured to the centers on the box, the easier it will be to adjust the main part inside the niche.
Before attaching the slats inside, we assemble the telescopes directly on the walls, check the smoothness of movement and, after trying them on in place, the correctness of the marked line inside the niche. If the line runs along the centers of the rail mounting holes, you can continue working. If not, we correct the marking to achieve the required accuracy.
DIY drawer frame repair and replacement
Summarizing all of the above, we can identify several repair methods to return the drawer to its former strength and smooth operation:
- Strengthening the structure itself . It is necessary to add rigidity by installing strips along the back wall. You can also level furniture that is standing unevenly so that its geometry becomes correct. After checking all the corners, you can repair the drawers and replace the fittings (if required).
- Strengthening the drawer frame and strengthening the bottom . If during operation it becomes clear that the fiberboard bottom is not able to withstand the load and is expected to fall out even after replacement, there is a reason to strengthen it. To do this, install a stiffener horizontally or vertically along the bottom - a partition. You can additionally attach the bottom to this part. This method will also help make a large box more rigid without warping.
- Replacement of drawer boxes. Sometimes wooden tenon boxes that have fallen apart are easier and cheaper to replace than to repair. For example, make them again from chipboard. You can read how to calculate the dimensions of the drawer parts for replacement here. It is also worth doing if it turns out that the dimensions of the drawers were initially calculated incorrectly, and therefore fall out of the guides. Or the fittings themselves are already outdated and are no longer available (such as some types of guides with an insert into the groove of the drawer).
For roller and telescopic guides, the optimal clearance for smooth extension is 13 mm on each side.
Dresser drawer repair
Today we will show you how to repair a drawer of this design yourself:
- Compensation beam.
- Bottom of the box.
- Side of the box.
- Side guide.
- Sliding guide.
Preparatory process
The very first thing you need to answer is these questions:
- What parts of the furniture structure need repair?
- How are drawer guides and sliding surfaces arranged?
After you answer the above questions, you will need to do the following:
- Check the strength and rigidity of retractable furniture and the reliability of fastening of the guides.
- Using a level or plumb line, determine whether the retractable mechanism is skewed. If you find it, then check the reason for its appearance. Sometimes this is due to incorrectly adjusted legs. Then you need to disassemble the furniture, eliminate the cause of the identified misalignment and reassemble the structure. The presence of misalignment significantly wears out the chests of drawers, which then become difficult to move in any direction.
Important! If your box is made of natural wood, then during the process of repairing it, clean the surface from fungus, seal holes and cracks, and at the very end, coat the furniture with a special protective agent.
Troubleshooting minor problems
More often than not, the problem with retractable furniture lies in its lower part. The bottom, made of plywood, shrinks over time, and gaps appear where all the small objects from the box end up. Experienced manufacturers, aware of this problem, install a bottom with a reserve, where excess material is hidden on the back wall of the box. It is thanks to this safety net that you can eliminate the gap by performing the following manipulations:
- We take out the nails that hold the bottom of our box.
- We push the bottom forward a little and insert it into the grooves of the front part. As you do these steps, be sure to check to see if there is a gap between the bottom and the back of the dresser.
- We hammer in nails.
Important! If the bottom of your drawer is made strictly to size, then cut out another piece of material or place a small wooden spacer.
Instructions for disassembling retractable furniture:
We determine the method of connecting the parts of the chest of drawers. If the “tenon and groove” method was used, then insert a small wedge into the connection point and lightly hit it with a hammer until all the elements are wet. After separating all the parts, remove the remaining adhesive by treating the surface with a wet brush. After checking the box for dryness, we assemble all its parts, simultaneously adjusting the two side guides.
Side wall repair instructions:
Most often, the side walls of drawers suffer from cracks and chips. So, if we find this chip, then we need to glue the fallen part with regular PVA glue, and then paint the surface with pumice. If you do not find a broken piece of material, then cut out a similar-shaped insert from wood and glue it to the empty space. Detach the cracked parts completely and then glue them together.
Important! You can use the second option: pull the cracked parts as far apart as possible, apply glue inside the damage and connect with clamps.
Repair instructions for guide elements
Using an example, we will look at the old classic options, time-tested - wooden guides, which are fixed on the sides on the inside of the box and have a bevel. Let's look at how to restore such guides:
- We remove the guide that requires repair. We turn it over and put it back in its original place.
- If the guide does not want to be inserted, then we go over its surface with a plane and attach the gasket.
- But if we couldn’t get through it with a plane, then we clean it and apply polymer resin (ED-5 or ED-6) to the guide, press it on top with our hand and place a thin wooden plate.
Detecting the Problem
The problem was very acute. The middle drawer stopped moving out altogether and became very skewed.
Outwardly, it all looked bad, and the point is not so much in appearance, but in the fact that every day I had to struggle with this chest of drawers, rattling the drawers, in order to get things out. After I once again pinched my finger, I decided: that’s enough! It's time to take matters into your own feminine hands.
I started by looking for the problem. I had to take out all the drawers and inspect the guides.
The reason for the misalignment was revealed almost immediately: these plastic rollers on the right side
This part simply crumbled under constant load. It's strange that this happened on one side.
Bottle holder for the kitchen - a wonderful idea
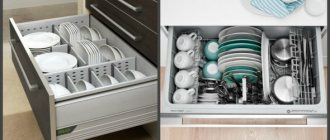
For the kitchen, the main thing is the functionality of the interior. Correctly and optimally organized kitchen space promotes quick cooking, a good mood, and, therefore, the prepared dishes become more healthy. Various storage methods help to properly organize your workspace in the kitchen: drawers, cabinets. Any housewife, when preparing a variety of dishes, uses sauces, oils, spices, which she stores in bottles and jars, stuffed in cabinets and the refrigerator. So you have to rush around the kitchen, wasting time and energy. Smart people have long come up with a wonderful device - a bottle holder for the kitchen . What kind of device is this and is it possible to make this miracle with your own hands? Let's figure it out.
Installation of new guides
My enthusiasm knew no bounds. I started screwing the bottom part right away. But then it suddenly became clear that for some reason the holes from the screws did not coincide with the new part, and screwing it into an untouched place, squirming around inside a cramped case, was not the most pleasant experience.
The screwdriver kept trying to slip out of my hands, and the screws kept falling off
And then I remembered that there was a screwdriver in the house. Yes, I know how to use it! First, I inserted a small drill bit into the screwdriver to make small indentations for the screws.
It was, of course, easier to screw onto the drawers than in the case
All that remained to be done was to tuck the finished boxes into place and enjoy their flawless work.
Perfect fit without distortion or gaps
It took me three and a half hours to do all the work, including going to the store. To be honest, I spent most of my time on my awkward attempts with a screwdriver. If I had immediately taken out a screwdriver, it would have been faster. So if you have such a tool at home, learn to use it and use it, it will definitely come in handy.
How to remove a kitchen drawer from the guides: step-by-step instructions
From time to time, certain cleaning and moving tasks may require you to manually remove drawers from a closet, dresser, or similar piece of furniture. In most cases, removing boxes is easy, but the process may vary slightly depending on the type of box you're working with. Most drawers with wood slides and drawers with a little force or tilting at a right angle will slide straight out. For drawers with locking mechanisms, such as stabilizer screws or anti-tip cables, you will need to remove the screws holding the drawer in place before you can finish removing it.
Pulling out drawers and freely rotating drawers.
Pull the drawer out all the way. Stand in front of a piece of furniture, grab the handle on the front and begin to pull out the drawer until it stops moving. If the drawer does not have a stopper, it should come out immediately. If you encounter "resistance" you will need to move the box a little to get it free.
- Most drawers have a locking mechanism to prevent them from accidentally falling out. On drawers, the stop is usually a small raised lip on the front of the inside track;
- Make sure there is enough space between you and the front of the drawer to allow it to slide out all the way.
Tilt the front of the drawer down.
Press down on the sides of the drawer to lift the back slightly. This will cause the wheels or lip on the rear edge to rise above the stopper at the front, allowing the drawer to be pulled all the way out.
- You may have to rock the box to free the wheels. However, be careful or you may damage it or the equipment attached to it.
Finish drawing out the drawer.
Once the wheels or back edge are through the stopper, all you have to do is slide the drawer off the track and out of the hole in the piece of furniture. Set the drawer aside on a flat, stable surface and repeat the process for any additional drawers you want to pop out.
- If you are still having trouble removing the drawer, chances are it may be equipped with another type of locking mechanism, such as levers or stabilizer screws.
Release drawers using levers.
Open the drawer and locate the guide arms along the outside walls.
You should see levers on each side of the drawer, directly in the center of the guide. These arms can be straight or slightly curved. Their task is to prevent the drawer from being pulled out until it opens.
Press both levers simultaneously.
The best way to do this is to use your thumbs or forefingers to release the levers while supporting the drawer underneath with your remaining fingers. This way, you won't drop the drawer if it unexpectedly slips off its slide.
- With your left hand, press the lever on the left side of the drawer, and with your right hand, press the lever on the right side of the drawer;
Pull out the drawer while keeping the levers pressed.
Continue to slide the box towards you, remembering to keep both levers in the off position. When it reaches the end of its guides, it should rise straight up. In the same way, remove all subsequent drawers from the product.
Dismantling drawers with stabilizing screws.
Pull out the drawer and locate the stabilizer screws at the ends of the slides.
You will find these screws at the bottom of each track. These are used to secure the two halves of the slide, the top of which serves as a latch to hold the drawer in place.
- If the drawer you are trying to remove has metal slides but no screws on the end, it may be metal sliding drawers with levers.
Please note: How to make blinds with your own hands: step-by-step instructions with photos.See if you can find a couple of "track" levers to press and then pull the box out.
Use a suitable screwdriver to remove the stabilizer screws.
Turn the screws to the left (counterclockwise) to loosen them, then remove them from the holes in the rail mount. Set both screws aside to avoid losing them.
Lift the latches to separate the 2 halves of the track.
Pull up both latches at the same time. When you do this, the top half of the track will move away from the bottom, allowing the drawer to open past the locking mechanism.
- The latches should have enough protrusion that you can easily grasp them with your thumb and forefinger.
Pull the drawer out all the way.
Without releasing the latch, move the drawer away from the guides. Keep it as straight as possible and move it along the guides to prevent it from sticking.
- If you are removing multiple drawers, check the tab on the inside of the right side of each drawer for a small number sticker. They indicate which box goes where, making it much easier to get them back into place;
- To reinstall a drawer with stabilizing screws, simply reverse the procedure: align the door with the track, lower the latch onto the bottom half of the track, then screw in and tighten the screws.
How to remove drawers with a rope to prevent them from tipping over.
Pull out the drawer and locate the cable on the back side.
Pull the drawer out until it stops moving and look at the back panel. There you should see a small metal cable securing the box to the body of the furniture. This cable is designed to prevent more than one drawer from opening at the same time.
- An anti-tip cable is a common safety feature for heavy items that may become unstable when opening multiple drawers.
- In the top and bottom drawers, the cables will be connected to special inserts attached to the back panel. In the middle drawers, they are threaded through eyelets drilled into the back panel.
Unscrew the screws holding the cable.
Depending on the design of the rollover protection device, there may be 1 or 2 screws. Turn the screws to the left (counterclockwise) until they are loose enough to be pulled out by hand.
Press and hold the “release tabs” if your box has them.
Inspect the back of the metal slides on either side of the drawer. If you find a pair of adjustable "tabs" there, press them down at the same time to release them and allow the drawer to slide freely.
- Firmly grasp the edges of the drawer while you watch the “release tabs.”
- Make sure both latches are fully seated. They may not lock into place on their own, meaning you will need to keep pressing on them until you pull the drawer out.
Slide the drawer off the slides.
Pull the drawer towards you until it releases from the furniture. You may have to lift or tilt the drawer up a little to clear it from the ends of the guides.
- Be sure to insert the extended metal slides back into the product before removing the next drawer.