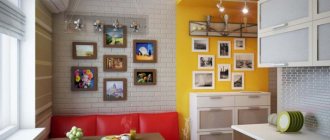
Papier mache
Among the many ways to make furniture out of paper, the papier-mâché method (using paper mass and glue for modeling) stands out.
Most often, this method is used to make masks or some kind of figures, but it is also quite suitable for doll furniture. Like weaving from paper tubes, the papier-mâché technique is very economical, but at the same time it is simpler.
Furniture made in this way must have a frame and dry well before it is coated with paint or varnish. By the way, if you add a little gypsum to the paper mixture, the product will become much stronger.
Each of the above methods for making paper furniture is unique in its own way. Some are complex, others are simpler to implement. But no matter which one is chosen, the main thing is to put your soul into your work. Then the result will definitely please you, and your favorite children's doll will have the best home in the world.
A small paper chair can be used as a decoration or toy in a homemade dollhouse. You can make this craft in 15–20 minutes.
To make it you only need a piece of paper or cardboard and a little patience.
Tips for choosing
When choosing a growing desk, you should pay attention to several criteria:
- Height. It is adjustable within certain limits, we wrote about this for each of the presented models.
- Materials. As a rule, tables are made of laminated chipboard and have a durable metal frame. Some manufacturers coat the frame with paint, thus making the tables original.
- Height adjustment. Each table model indicates the height within which the table moves.
- Dimensions. Make your choice based on the size of your room. The table does not always have to be large, the main thing is its comfort and functionality.
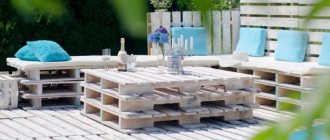
The advantages of making furniture with your own hands
Of course, in order to make any pieces of furniture yourself, even the simplest ones, you need to be able to work with carpentry tools. It is quite simple to acquire this skill - it is recommended to train on simple and miniature products (for example, a shelf for a hallway or a coffee table), and only then move on to larger ones. A desk is one of the simplest designs, because many people prefer to choose basic options without additional elements in the form of shelves, a cabinet or a footrest.
The main advantages of self-manufacturing structures include:
- cost savings;
- you can choose the best quality materials;
- creating your own unique design;
- the ability to take into account the features of the room layout.
If you already have experience in making furniture, you can create a more complex design
Another advantage in “protecting” self-made furniture is the opportunity to realize creative potential. In addition, such work can be done step by step, slowly and even enjoying, while following all the instructions and manufacturing technology.
How to make a table for a child yourself?
So, to make a simple children’s table, you need to make a drawing, select materials and tools, and you can begin the work process:
- We cut out the parts of the product according to the drawing.
- We sand the parts with sandpaper or a grinder. We determine the height of the product according to the height of the child.
- We assemble the frame. To do this, we make markings where the parts will be attached to each other.
- Screw the tabletop.
- To attach the legs, we make special holes and fix them.
- Next, the product is sanded and coated with varnish or paint.
- All elements of the children's table are assembled using a tongue-and-groove pattern.
Important: to make the legs, you should choose a beam measuring 40 by 40 cm or 50 by 50 cm. After assembling the children's table, you should carefully sand all the edges and ends
This way you will protect your kids and make the piece of furniture safe to use. When choosing paint or varnish, you should give preference to non-toxic materials
After assembling the children's table, you should carefully sand all the edges and ends. This way you will protect your kids and make the piece of furniture safe to use. When choosing paint or varnish, you should give preference to non-toxic materials.
The tabletop should be made of boards 2 cm thick.
Necessary materials
To make a transformable children's desk we will need three-layer wooden panels. The main parts of the structure will be cut out of them. The thickness of the panels is 30 millimeters and dimensions are 1700 x 900 millimeters.
- Adhesive primer. This material improves the adhesion of paint to the surface. Adhesive primer Tikkurila
- Paint with magnetic properties. Before use, the paint is diluted with water.
Magnetic paint Tikkurila - Paint for school boards. Used for decorative design of surfaces.
Blackboard paint
Contemporary Coffee Table: Round Top + Hairpin Legs
Here is an example of how to make a round coffee table with your own hands. If this is your first project, you'll learn a lot of interesting things along the way: how to cut a perfect circle, use a router correctly, and level a slab using simple tools.
- First, lay out the boards and cut them on a miter saw.
- If the boards are warped, use dowels to level the tabletop while gluing. To insert the dowels, simply set the drill bit depth, mark a line on the two boards, and drill the hole.
- Then glue the boards together.
- Level the glued board using a jointer and sander.
- Mark the circle and cut out using a router and jigsaw.
- Fill all cracks with wood filler and sand when dry.
- Then coat with a glossy water-based varnish.
Photo source: www.instructables.com/id/Modern-Round-Coffee-Table/
Round side table
Step by step tutorial on how to use a CNC machine to make a round end table. This round decorative table has a very simple design, but the visual effect is amazing! The process is very simple, although tedious, as there are many repetitive steps. You can download the design file for this side table on the website, link below the gallery. For this project I used a full sheet of 20mm maple plywood. First, you will need a circular saw to cut the plywood to approximately 60x60cm. The author used the largest model, so you may need to resize the panel to fit your machine if you have a smaller CNC. The author was able to pull eight panels from one sheet of plywood, which allowed him to cut 160 curved strips. This table is 60 cm in diameter, which is quite spacious! It's also worth mentioning that the author used the slicing settings in Easel. If you use the recommended settings, the cutting time is almost 3 hours per panel (multiply that by 8 panels and you'll be cutting these slats for ages)! The author tweaked the settings, although it took several attempts (and a few broken bits).
- Feeding speed: 152 cm/min
- Immersion speed: 38cm/min
- Depth per pass: 2 mm
With these settings, cutting time is reduced by more than half! Each panel took a little over an hour. The cuts won't be as smooth, but it's better to sand a little rather than waste a lot of extra time. You, of course, can cut these pieces on a scroll saw or jigsaw, but then it is unlikely that you will be able to make absolutely identical parts. And you can do other things while the machine is running. Just don't leave it unattended in case something goes wrong.
After all the strips are cut, it's time for assembly. There are 5 pieces per layer. When laying out the shapes, try to achieve equal spacing, 5cm is a good option. Then fold the bases together using wood glue and nails. For this table, the author of the project specially ordered a marble tabletop, an expensive pleasure. Of course, unless you have some extra marble lying around in your shed, you can use an X-carve to cut out a wooden tabletop. Or buy ready-made in the store. In short, you can make a tabletop from any material: wood, metal, plastic, whatever. So what do you think? Was this DIY round table worth the time and effort?
Photo source: jenwoodhouse.com/diy-stacked-side-table/
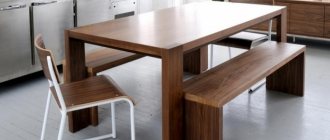
Desk for schoolchildren
We will not consider typical
desks that stood in all Russian apartments in the 90s of the last century. These tables are boring
in execution.
Let's consider unusual
table with A-shaped legs (trests) and a solid long
tabletop.
door
as a tabletop .
Stages of work
Step 1.
We outline and cut out the tabletop.
We process it with sandpaper or a grinding machine.
The sides can be edged with a special finishing edging,
which is sold at any hardware store.
Note:
with the edging, the width of the finished tabletop will be 72 cm!
Step 2.
Cut 8 boards with a length of at least
75 cm (if necessary, the edges will need to be trimmed with a jigsaw), sand them.
Step 3.
Tilt angle
The boards for the trestle should be such that the height of the legs
combined
with the thickness of the tabletop is
75 cm.
To do this, we cut out small
bars
that will be located between the upper parts of the supports.
The width between the lower parts should be 22 cm. Step 4.
In two boards 70 cm long, drill two 9 mm holes (for attaching the trestle). The holes must be equally spaced! We retreat about 3.5–4 cm from above, it all depends on the width of the board. Drill 9mm holes in the middle of the upper part of the legs.
We fasten the legs with furniture bolts and strengthen the structure with self-tapping screws. Please note:
The size of the bolts is 6 mm, and the diameter of the holes for them is 9 mm! This is necessary because the table legs are attached at an angle. Step 5.
At the bottom of the trestle
we fix
two bars
19 cm long.
The height of the bars is at least 3 cm from the floor.
We place two boards
on the bars as a shelf,
and secure them with self-tapping screws.
Step 6.
Having measured the distance between the sawhorses, we fasten
wooden blocks to prevent the tabletop from moving.
For better stability
table tops, it is recommended to use dowels.
To do this, drill holes in the supporting boards with a depth of 8 mm, and in
the tabletop -
22 mm.
The dowels should be dipped in glue
and driven into the board, then carefully place the tabletop on them.
For such a massive
table you need to make 2-3 dowels on each side.
Step 7
All wooden parts of the table should be treated
impregnation.
For a children's table, it is necessary to apply at least 3 layers
(so that it is impervious to moisture).
Each layer must completely
.
After the last layer has dried, the table is painted or varnished. You can add a little dye to the varnish
to give it the desired
shade. Please note:
the table can be decorated if desired. The best decorative technique for a children's table is: Just choose a cheerful picture or decorate the tabletop with images of your child's favorite characters.
Design Features
The design of the table is quite simple. First you need to glue a U-shaped frame to which two L-shaped legs are attached to hinges.
The tabletop itself is attached with hinges to the U-shaped frame, and when the table unfolds, it rests on the legs.
The author screwed stops and limiters for the legs to the inside of the tabletop along the edges. In the upper part of the legs it is necessary to make cutouts for the loops. The hinges themselves are screwed to wooden blocks, which are attached to a U-shaped frame.
At first glance, the design of the table seems unstable, but it is quite suitable for a first-grader. The advantage of this table is that it folds up - you do your homework and put it aside.
For a detailed review of a folding table-desk made of wood, watch the video on our website.
Rate this post
[Votes: 0 Average rating: 0]
How to make a desk with your own hands
If you're looking for a simple desk that's quick and easy to make, here's a great option. The author started designing at 4 pm, continued until 10 pm, and then worked another 4-5 hours on Monday. At this point the project was completely ready. So in total it took about 8-10 hours. In a sense, this is a one-day project. However, the finishing process could potentially take another 2-3 days, depending on the finish you use and the time you have. It is better to apply the top coat in the morning before going to work. Then in the evening you can sand, clean off any dust, and then apply another coat. So everything will be ready in three days.
Given that this is a quick project, only simple techniques were used: plywood countertop, hardwood trim, and a quick and easy pocket design.
You can read the instructions or watch the assembly video on the website, link below under the gallery. In general, this project was developed with the SketchUp program. Here are a few features of this desk. First, this design has a plywood top. But the author didn't want it to look like that. So the idea came to add some "fake" layout ends to the top of the table to give the look of a solid wood tabletop. Then the idea of another modification came up: to narrow the legs so that they did not look like just square bars
Note that the taper starts below the side bars. Additionally, a sort of arched cutout at the front adds a nice decorative touch.
The photo on the right shows diagrams with dimensions in inches; multiply these figures by 2.54 to get values in centimeters.
Photo source: www.instructables.com/id/Quick-Writing-Desk-in-the-Shaker-Style/
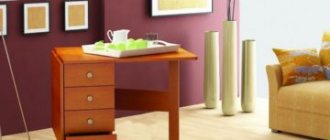
Desk with drawer under the tabletop
Here is a simple example of how to make a desk with drawers with your own hands. The finished table is 76 cm high, 74 cm wide and 41 cm deep. The base and drawer are made from 2×2 pine bars and 1×4 boards, and the top is made from walnut. You will need (4) 74cm high 2×2 legs, (2) 62cm long 1×4 back stretchers and (4) 32cm long side stretchers. Drill pocket holes at the ends of the crossbars to connect the legs. Next, assemble one side of the desk. First, attach the top stretcher flush to the inside of the leg.
Attach the lower side frame 7 cm up from the floor with a centimeter offset on the sides. Fasten with screws. Repeat this process for the other side and you will have two sides of the desk completed. Then join the sides together using the back bars. The bottom rails are installed flush with the back of the legs so that they can be attached to the wall if necessary. Next you need to make a box. Slides were used here, so the drawer should be 60 cm wide and 30 cm deep. The size of your drawer may vary depending on the type of slide. From a 1x4 board, cut (2) 56cm fronts and (2) 30cm sides. Cut 7cm wide or you can use a 1x3 board to make a shallower box. Cut a groove on the sides and front for the drawer underneath. The groove has a depth of 6 mm, and the width is selected in accordance with the plywood (usually 5 mm). This can be done in 2 passes on the countertop.
For the back, instead of making a 6mm recess, lift the blade and cut all the way through. You will get a ~6cm wide piece that will allow it to slide into the bottom panel at the back. Drill pocket holes on the outside of the front and back pieces. Assemble the drawer using screws lining the slots where the side and front meet. Attach the back of the box upside down so that the top edges of the box are even. Cut a 57x31cm sheet of plywood to fit the bottom of the box. Push the bottom in and secure at the back with two screws. Before moving on to installing the slides, fill and paint the base and front of the drawer. When installing, use spacers for support points. Install the retractable device according to the manufacturer's instructions. The last step in assembling the desk is the 74 x 40 cm table top. Attach the top using S-shaped fasteners, but pocket holes can also be used. Finish the top with a walnut urethane finish.
Photo source fixthisbuildthat.com/diy-writing-desk-plans/
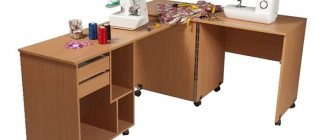
Choosing a future table
Adjustable desk with storage box and chair
The first question: design and construction features. There are several options:
- classic rectangular table (easy to make and assemble);
Rectangular table for studying with a baby - ergonomic (saving room space).
Simple and elegant ergonomic table for children
It is important to have drawers or a separate cabinet. They are convenient and necessary for storing writing instruments and educational materials.
One drawer can be equipped with a lock; the child will be happy to hide his little secrets there.
Children's desk-transformer with drawers Adjustable desk with a pull-out cabinet
You can make a schoolchild's corner yourself. The design is equipped with a bedside table, drawers, shelves, which do not have to be additionally hung on the wall, spoiling the coating by drilling holes.
DIY wooden corner for a child with a table
Not easy to make, but the most functional version of the “transformer” type table. This DIY desk will last for many years because it “grows” with the child: the height of the legs and the tilt of the table top are adjustable.
A universal model of a children's table with height and tilt adjustment options
Labor and cost
Cutting out the parts will take an hour. Subsequent assembly and fastening is another half hour.
Painting, together with drying of each layer, takes about four days.
- Adhesive primer 4 kg. - 300 rubles
- Paint with magnetic properties 0.5 l. — 1500 rubles
- Blackboard paint 1 l. — 1000 rubles
- Three sheets of plywood 1700 x 900 mm - 5800 rubles
The total cost of the table is 8,600 rubles.
With such a table, a child will pass through more than one class. The height of the chair and the lid can be adjusted, so this furniture will serve the owner for several years.
Main types of desks for schoolchildren
Currently, manufacturers produce several models, among which the most popular and in demand are:
Children's world: how to choose the right wallpaper for a girl's bedroomSoft flooring for children's rooms: description of types and selection criteriaWhat types of storage systems are there for a dressing room designerWhat is cork flooring
- classic rectangular minimalist option, represented by a tabletop fixed to a frame;
- option with storage areas, which has additional shelves, drawers and compartments that are designed to accommodate various accessories;
- transforming models, characterized by adjustable height and angle of inclination of the tabletop, as well as the size of the working surface area;
- corner-type models, represented not only by a working surface, but also by a special storage area.
All objects that surround a child in everyday life must be of the highest quality and exclusively environmentally friendly
Folding desks for studying
The folding version can be used as needed and is often installed in free space, near a window. The main advantage of using a folding desk is the ability to assemble and disassemble the structure without damaging all the notebooks, books and documents contained in it. Models with a folding tabletop are especially convenient.
Ergonomic corner tables for schoolchildren
Corner models are characterized by ergonomics and are ideal for installation in a small room. This option allows you to effectively use a relatively small free space, and the tabletop, increased due to the angular area, allows you to conveniently place both a monitor and a keyboard. The system unit, in this case, is installed in the corner, directly under the table.
Corner tables for schoolchildrenFolding study table
This model easily solves the problem of organizing a workplace for a schoolchild, which is especially important when there is a shortage of free space in the room. The dimensions of the worktop vary significantly, so they are selected individually. Wall-mounted shelves are most often used to store books and writing instruments.
Tables of this type can easily be built into the window sill, which significantly saves space.
Wall-mounted shelves are most often used to store books and writing instruments. Tables of this type can easily be built into the window sill, which significantly saves space.
School desk for computer
When organizing classes on a computer and developing correct posture in a student, you need to competently approach the issue of choosing a computer desk model, which should be equipped with comfortable shelves and the necessary niches. High-quality modern models have special shelves for the system unit, and are most often produced in an ergonomic and functional “L”-shape.
School desk for computer
Desk models for two students
Despite the variety of shapes, as well as differences in design and size, only a few of the most successful, convenient and very practical models are especially popular among domestic consumers, which also include desks designed to accommodate two students at once.
What is the desk for at home?
The main characteristic of a school desk is that the tabletop is tilted, adapting to the characteristics of the student’s body, which is individual, helping him to develop correctly without health problems in the future, such as, for example, stoop or scoliosis.
The tabletop is mounted on frames at an angle of up to 20°.
Ordinary tables do not have such functionality, so the child is most often in an uncomfortable position, which leads to deterioration of health - disruption of posture and the functioning of internal organs.
A school desk should be ergonomic.
A desk equipped with an additional storage system will also allow you to store educational supplies, freeing you from the need to purchase separate shelves or cabinets.
Desk refers to furniture used as functional orthopedic student furniture.
If the children's room is small and difficulties arise when arranging furniture, a transforming desk, the position of which can be adjusted, or a folding model will suit you.
DIY growing desk drawings
Category: Furniture 7,459
1
A growing desk with your own hands, drawings, diagrams and functional dimensions of the table that can ensure the normal and healthy development of the child during classes.
The requirements for children's tables are regulated by GOST 11015-93 “Student's tables”. Based on the specified GOST, they are produced in six numbers and have their own color marking depending on the average height of the student.
The model described in this article allows you to adjust the desk according to two functional sizes to suit the average student’s height from 105 to 180 (cm):
- along the height of the working plane from 460 to 760 (mm) (∆h = h1 – h = 300) with an interval of 50 (mm)
- by the angle of rotation of the working plane from 0 to 16° (∆φ = φ1 – φ = 16) (four positions 7, 10, 13.16°)
The presented model consists of three assembly units:
- Tabletop.
- Movable stands.
- Fixed stands.
1. TABLETOP
The size of the working plane is 500x700x20 (mm). The desk cover (1) is installed horizontally or fixed at an angle of 7, 10, 13 or 16°. Two plates are welded to a square pipe (2) 15x1.5 (mm): fastening the rotary axis (3); fixing the angle of rotation of the tabletop (4). The tube (2) is attached to the tabletop with four screws (6). The end plane is closed with a decorative plug (5). The tabletop has two recesses 220x20x5 (mm) for pencils, pens and other accessories. 2. MOVABLE STANDS The structure is welded from metal pipes: square (3) fifteenth; rectangular (6) size 35x15x2.5 (mm). To increase the rigidity of the structure, a plate (4) in the form of a right triangle with sides of 20 and 50 (mm) is welded to the corner joints. A wooden shelf (1) measuring 700 x 107 x 20 (mm) with a stop (2) is attached to the pipes. The end plane of the pipe is closed with a decorative plug (5).
3. FIXED STANDS
Welded from rectangular pipes (1) 40x2x2.5 (mm). By analogy with movable jays, a plate (3) is welded to the corner joints. The end is closed with a decorative plug (3). The figure shows desks with minimum and maximum size changes.
Fasteners:
- studs for parts with smooth holes (with two identical threaded ends) 6 x 30
- wing nuts M6
The presented model allows:
- adjust table height from 570 to 720 (mm), adjustment step is 50 (mm)
- adjust the table tilt angle from 0° to 90° (the maximum angle is set theoretically), the adjustment step is 5°
Recommended tilt settings:
— drawing from 0° to 5° — writing from 10° to 15° — reading from 20° to 30°
Components of a children's desk:
We will make it from planed boards. From the inside of the guide board, at the end we mill a groove measuring 10x10 (mm). The sharp edges of the parts are rounded. We fasten the parts of the legs together using:
We attach the top shelf and the footrest to the legs with wood screws or confirmations.
We will make it from planed boards. From the outer sides of the guide board, at the end we mill grooves along the edges measuring 10x10 (mm). We drill through holes with a diameter of 20 (mm) in the center.
We will make it from laminated wood or plywood. We will make the rotating mechanism from sheet metal 2 (mm) thick and attach it to the tabletop with wood screws. Alternatively, it can be made from wooden blocks.
1.
We insert the lifting mechanism into the grooves of the base.
2.
We secure the tabletop to the lifting mechanism using pins, washers and M8 nuts.
DIY children's desk assembled. Using the proposed concept for designing and constructing a structure, you can modify and supplement the model yourself with various shelves, pencil cases and glasses for stationery.
Source
Description of the work procedure
Attention! A handmade desk should turn out neat. Therefore, protruding excess glue must be wiped off immediately with a dry cloth.
First of all, connect the drawers and legs along the short sidewalls, after the glue has dried, add longitudinal drawers. Tighten the joints with clamps until dry. The base for the desk is ready.
- Cut a slab of furniture board (or chipboard) 936x550 cm for the table top and the top cover of the shelves. Select the slots to install the right compartment divider. Use a thin cylindrical router bit to cut the grooves. Also make the outer edges of the parts smooth.
- Using a special cutter, we select grooves 10 mm wide in the top cover of the shelves. They will help secure the partitions with the top cover. To make the groove even, while working, move the cutter along the block held by the clamp.
- Cut grooves for dowels in the edges of the side walls, partitions, and top cover. Use glue to connect all these parts.
- From plywood (10 mm thick) you need to cut out the components for the drawers. Assemble the boxes by gluing the joints, and additionally fasten them with finishing nails. Attach the facing panels to the front walls from the inside with 2 self-tapping screws.
- Our desk has figured side walls. Prepare a template from cardboard. Using an electric jigsaw, use it to cut out both panels, which will assemble the entire desk. Remove the chamfers from the edges and sand them.
- Cut out all intermediate partitions and shelf. Assemble the entire shelf structure and curly sides using glue. Tighten the structure with clamps and leave until completely dry.
- Secure the table with self-tapping screws to the base.
- As a final finish, coat the product with 1-2 layers of furniture acrylic varnish.
The first means of preventing scoliosis among children is a properly selected children's desk. She spends a lot of time at school and at home. In educational institutions, specialists monitor the quality of children's jobs; at home, this is the responsibility of parents.
Comfortable children's adjustable desk for home study
The ideal school desk is comfortable, safe, and environmentally friendly. But these indicators alone are not sufficient, because each child is individual.
Children's home "growing" desks
Making your own will help you get the perfect desk
The main advantage is not so much the cost savings on buying a ready-made item, but the importance of matching the furniture specifically to your child
DIY children's table and chair made from furniture board
Adjustable desk with storage box and chair
The first question: design and construction features. There are several options:
It is important to have drawers or a separate cabinet. They are convenient and necessary for storing writing instruments and educational materials.
One drawer can be equipped with a lock; the child will be happy to hide his little secrets there.
Children's desk-transformer with drawers
Adjustable desk with pull-out cabinet
You can make a schoolchild's corner yourself. The design is equipped with a bedside table, drawers, shelves, which do not have to be additionally hung on the wall, spoiling the coating by drilling holes.
DIY wooden corner for a child with a table
Not easy to make, but the most functional version of the “transformer” type table. This DIY desk will last for many years because it “grows” with the child: the height of the legs and the tilt of the table top are adjustable.
A universal model of a children's table with height and tilt adjustment options
Why children's tables are special
The importance of the correct layout of children's workplaces has long been known. The individual characteristics of the child’s body structure require an individual approach, which mass production often cannot do - you have to take the solution to the problem under personal control
You will find a lot of useful information in GOST 5994–93: it contains a table divided into 4 height groups of children, where the key dimensions and slope angles of surfaces are indicated. But, since the home desk will be used without replacement, starting from preschool age and at least through the 5th–6th grade, it simply must be able to be adjusted as the child grows
We also draw attention to the importance of rounding corners on all protruding parts with a radius of 10 mm or more
| Size name | Sizes depending on the child's height | |||
| 1000–1150 | 1150–1300 | 1300–1450 | 1450–1600 | |
| Working plane height h1, not less | 460 | 520 | 580 | 640 |
| Distance from the floor to the lower edge of the elements protruding under the lid of the desk at its edge (height of the legroom) h2, not less | 350 | 410 | 470 | 530 |
| Distance from the floor to elements protruding above the knees (height of space for legs bent at the knees) h3, not less | 350 | 350 | 400 | 400 |
| Distance from the floor to elements protruding above the foot of a seated person (height of space for outstretched legs) h4, not less | 250 | 250 | 300 | 300 |
| Working plane width t1, not less | 450 | 500 | 500 | 500 |
| Length of working plane b1, not less: | ||||
| single desk | 600 | 600 | 600 | 600 |
| double desk | 1200 | 1200 | 1200 | 1200 |
| Distance between the supporting elements of the desk (width of the legroom) b2, not less than: | ||||
| single desk | 420 | 420 | 420 | 420 |
| double desk | 1020 | 1020 | 1020 | 1020 |
| Distance from the edge of the desk on the side of the seated person to the elements protruding in front of his knees (depth of legroom) t2, not less | 300 | 300 | 300 | 350 |
| Distance from the edge of the desk on the side of the seated person to the elements protruding above his foot (depth of legroom when sitting with legs extended) t3, not less | 400 | 400 | 400 | 400 |
| Seat height h5 | 260 | 300 | 340 | 380 |
| Seat depth h4 | 240 | 260 | 280 | 300 |
| Seat width (one seat) b3, not less | 250 | 270 | 290 | 320 |
| Height of the back bend line w, no more | 160 | 170 | 190 | 200 |
| Height of the lower edge of the backrest above the seat h6 | 120 | 130 | 150 | 160 |
| Height of the upper edge of the backrest above the seat h7 | 250 | 280 | 310 | 330 |
| Backrest width (one seat) b4, not less | 250 | 250 | 250 | 280 |
| Bend radius of the front edge of the seat r1 | 20-50 | 20-50 | 20-50 | 20-50 |
| Radius of the backrest (one seat) in terms of r2, not less | 300 | 300 | 300 | 300 |
| Seat tilt angle g, degrees | 0-4 | 0-4 | 0-4 | 0-4 |
| Backrest tilt angle ß, degrees | 95-106 | 95-106 | 95-106 | 95-106 |
| Distance from the edge of the table on the seated side to the most protruding part of the back t5 | 220 | 240 | 260 | 280 |
| Distance from the edge of the table on the seated side to the front edge of the seat t6 | -40 | -40 | -40 | -40 |
Most manufacturers also make a very serious mistake - applying bright images and inscriptions to the surface, using compositions with excessively high color contrast.
The last point is the organization of study and work space. Since the child does not need visibility in front of him (usually in a nursery the desk is leaning against the wall), this space can and should be used to build an organizer. And, as you will see later, not every layout will be successful.
Excellent DIY home desk for a child (+ PHOTOS) | With your own hands
AN EXCELLENT TOOL FOR CRAFTERS AND HANDCRAFTS AND EVERYTHING FOR THE GARDEN, HOME AND Cottage LITERALLY FOR FREE + THERE ARE REVIEWS.
When my son grew up and became interested in drawing and modeling from plasticine, the question arose - the child does not have his own workplace. After shopping around furniture stores, I couldn’t find anything suitable. So I made a desk for the baby with my own hands.
For production I used chipboard panels from a disassembled Soviet-era cabinet. On plywood I drew sketches of the details of the chair (two stands (photo 1, p. 1), two side panels (2), seat (3) and back (4)) and desks - tabletop-pencil case (5), two side panels (6). the bottom crossbar (7) and two supports (8) I cut out all the parts with a jigsaw. I selected the sizes for the child, taking into account height and build.
I sanded the edges of each template with sandpaper, then laid them out on panels and traced them along the contour. I cut out parts from chipboard. Using a hand router, I gave the ends of the blanks a rounded shape in order to improve the tactile sensations when in contact with the furniture and to form a smooth curve of the edges.
Since the chipboard material is porous, after milling the ends were filled with putty and the irregularities were sanded. I decided to assemble the desk and chair using confirmations and bolts, so I drilled holes of the appropriate diameter on the parts in the right places.
I first assembled both products, making sure that everything was level and strong, and disassembled the furniture.
Every detail was painted with environmentally friendly water-based paints. After drying, I reassembled the kit. I attached the folding tabletop of the desk to a piano hinge (photo 2), and additionally provided for height adjustment of the table (photo 3)
The furniture turned out to be quite interesting, durable and does not take up much space. And most importantly, my son really liked it, now he, like his dad, has his own personal workplace.
DIY DESK FOR CHILDREN – VIDEO (OPTION)
Do-it-yourself ice walker made from plastic pipes Do-it-yourself walker for a child... Do-it-yourself fishing rod stand made from polypropylene pipes Do-it-yourself fishing rod stand for a boat... 404: not found We apologize to you... DIY chair made from cans Chair made from cans for the terrace Saw... Playpen on the train with your own hands (photo + diagram) Playpen on the train so that the child... Do-it-yourself pincushion chair - master class How to make a pincushion chair with your own... Do-it-yourself garden varnish - 3 recipes. A reminder to the gardener HOW TO PREPARE A GARDEN WITH YOUR OWN HANDS...
Thorough preparation is the key to quick and efficient assembly.
It can be done in just 4 steps.
- Prepare 4 sheets of the selected material (chipboard, natural wood, processed MDF) for the lid, 2 end walls, 1 inner. Look at the selected drawing for dimensions, or determine them yourself. According to the standards, a student up to 115 centimeters tall has a table height of 46 centimeters, and up to 130 centimeters – about 50 centimeters. You can cut and paint (only MDF/solid) material yourself if you have the necessary equipment and premises that allow for safe work. An easier option is to buy ready-made, processed slabs.
Sawing parts for tables and chairs
We round off the table parts for the safety of the child
Drilling holes on the side panels
Attach the edge to the ends of the workpieces
If the final testing showed that the height of the furniture was not 100% correct, the excess can be corrected with the help of a suitable chair.
DIY assembled tables and chairs for children
You should buy a chair with adjustable height and raise the seat to the desired level.
Children's chair, height adjustable
The elbows of a sitting child should be freely placed on the tabletop, the legs should reach the floor (another support), and the knees should be bent at an angle of 90-100 degrees.
Correct seating at a desk
Follow sanitary standards, and then you will keep the student’s posture healthy!
Assembly instructions
- The photo shows the dimensions.
Details of Guillaume's desk with dimensions We mark out the main details of future school furniture on the panels. You can cut them yourself, or you can turn to professionals. The thickness of all parts is the same - 30 millimeters. - We cut out the parts with a jigsaw.
We process the ends of the workpieces with sandpaper to get rid of sharp edges and burrs. - Now let's create a magnetic board. Apply masking tape along the edges of the proposed board.
- Prime the surface with an adhesive primer. The primer must be stirred before application. To apply the mixture evenly, a short-haired roller is best.
- Let's go over the dried primer with sandpaper for sanding.
- Using a damp cloth, remove accumulated dust and wait until the primer dries completely.
- After five hours we apply paint with magnetic properties. It also needs to be stirred before application. Apply it with a roller, stirring occasionally while working. Magnetic paint is applied in three layers, each drying time is 24 hours; applying a new layer before the previous one has completely dried is not recommended. Try to achieve maximum smoothness. To do this, use a short-nap roller and a paint spatula.
- After the third layer has completely dried, apply decorative paint for school boards. In modern stores you can find any color. Mix the paint and apply it to the surface with a short-nap roller. Wait six hours for the first coat to dry and apply the second. Lightly move the roller in one direction to even out the paint.
- Now we assemble the cut out parts of the home table together. Using self-tapping screws, we secure the table stand supports to the bottom panel (numbers 3, 4 and 5 in the diagram).
- We fix the stand and install the table cover holders (numbers 2, 7 and 8 in the diagram).
- We put the table cover on the stand.
- We assemble the chair by connecting the seat to the chair post (numbers 9 and 11 in the diagram).
- Next, we attach the stand with the seat to the bottom panel of the chair using a support (numbers 6 and 10 in the diagram).
Tools
- Screwdriver. Power tool for tightening screws. Mobile due to the absence of a wire and powerful enough to make holes of small diameter. Screwdriver
- Self-tapping screws 3.5 x 19 mm. Necessary for connecting desk parts together. Unlike furniture nails, they do not allow connections to become loose.
Wood screw - Putty knife. A tool for evenly distributing paint over a surface.
Paint spatula - Short pile roller. Allows you to quickly and evenly paint vertical and horizontal surfaces. Short nap roller
- 600 grit sandpaper. Used for final sanding of parts.
Sandpaper - Masking tape. Limits the area of the part to be painted, preventing paint from getting onto other elements. Masking tape
- Jigsaw. Tool for cutting parts from wooden panels. Allows you to adjust the cutting direction as you work. Electric jigsaw
Making doll furniture from color schemes
In the old days, paper cutting houses could be purchased at almost any bookstore. Follow the instructions and use scissors and glue to create a charming dollhouse or palace with furniture.
Knowing the basics of working with any graphic editors and the principles of constructing such diagrams, you can easily make similar blanks. If making a whole palace for a doll is not part of your plans, it wouldn’t be a bad idea to create a wardrobe, chair or bed and, after printing them, make vintage furniture for your favorite. Needless to say, only laser printing is suitable for this method, since inkjet printing, although more colorful, can float or simply fade over time when it comes into contact with water.
As for the choice of glue for this furniture, it is best to use double-sided tape or it is also acceptable to use a glue gun, but be very careful