- Common Problems
- Hull repair
- Failure of fittings for internal filling
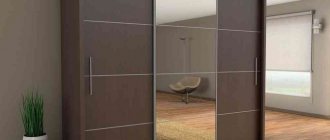
- How to update wardrobe doors
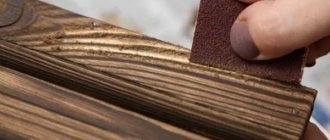
- Updating the appearance of the wardrobe
Restoring a wardrobe with your own hands will give you the opportunity to save on the purchase of this useful interior detail. An old or broken cabinet can be repaired and updated without much difficulty. The most common cause of breakdowns is considered to be door malfunctions, and restorations are the loss of the surface's appearance. Now we will look at several options on how to update an old wardrobe with your own hands and fix existing problems.
LiveInternetLiveInternet
– Quote book
: “...In 1985, after two operations, I was discharged from the Moscow Oncology Clinic and sent back.
Warm summer and spring days have only one drawback - nasty insects that...
We all age with time, but who said that in addition to age we should receive a bouquet of bo.
1 kg carrots 1 tsp salt 3 tbsp. l. granulated sugar 1 head of garlic 2 tsp coriander 1/2 cup.
The beneficial properties of patchouli oil have been known for a long time. In India it was used to flavor linen.
–Categories
- HEALTH (7216)
- DACHA (4907)
- BAKERY,DESSERTS,DAIRY (3203)
- SEWING (3203)
- MISCELLANEOUS (3116)
- KNITTING (2315)
- COSMETICS FOR EVERYTHING (1979)
- FOOD (1774)
- SUNSET (1698)
- MEAT (1584)
- SALADS (1014)
- CONSTRUCTION (913)
- DRINKS, TINCTURES (835)
- DIET (771)
- FISH (646)
- CHILDREN'S (613)
- magic (577)
- EMBROIDERY (494)
- COMP (368)
- Natuska KAKUSKA (294)
- herbs (267)
- exercise (190)
- MUSHROOMS (183)
- CINEMA (136)
- MULTICOOKER (130)
- photoshop (94)
- beads (62)
- DRAW (39)
- AIR GRILL (22)
- Dumpling (12)
- tatting (4)
- knitting needles (0)
- knitting needles (0)
-Music
–Search by diary
-Statistics
Sash design
The wardrobe door consists of profiles:
- lower;
The lower profile has deeper side walls - upper;
Upper profile for compartment door leaf - profile handles;
The handle can be on both sides - Intermediate.
These profiles are placed between parts of the door leaf, but you can do without them - if the door is solid and not composite.
This entire assembly has the appearance shown in the photograph. In this frame, the door material you choose is inserted into the grooves. It can be glass, mirror, chipboard and other materials.
Hanging structure without filling
Separating profiles are optional. They are necessary if you assemble doors from different materials or simply like them this way. The maximum thickness of the filler is 10 mm, the minimum thickness is 4 mm. Thinner ones - glass, plastic, mirror - are inserted through a gasket.
In order for the gate to move, upper and lower rollers are installed on it. The lower rollers bear the entire weight of the gate, and the upper ones stabilize the vertical position of the gate, preventing its deformation.
Rollers for cabinet doors
The rollers are attached to the side profiles with special fasteners.
Which wardrobe is suitable for a dressing room?
A new dressing room can be converted from an old wardrobe. Before you start disassembling old furniture, you need to decide on the size of the future dressing room.
It is necessary to decide where the clothing department will be located. You can free up space by combining several cabinets into one. We consider a neat wardrobe, sideboards, and bookshelves as additional materials for landscaping. All fasteners and accessories can be purchased in the store. Also suitable for furniture sets: gypsum board, chipboard, wood.
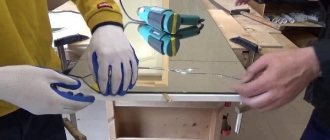
We're going to the sawmill to cut and drill boards to size
Having packed the boards and taking the drawings with you, you can go to the company. Here's our order.
As you can see, a significant amount goes towards delivery and drilling out the eccentrics. Those who have a car are great, those who don’t will have to fork out for delivery. However, you must always remember that if you are serious about assembling a wardrobe with your own hands using step-by-step photos, then you will actually save money, in comparison, as if you had bought such a new compartment in a store.
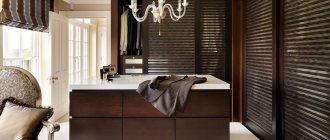
Transforming an old wardrobe into a dressing room
To transform an old furniture set into a new storage area, you will need tools and skillful hands.
- Initially, we remove all shelves, doors, rods, and clothes hangers. All that remains is the frame for the future dressing room.
- Next, we follow the previously prepared drawing and install partitions to create the interior space of the furniture set. Partitions can be made of gypsum board or chipboard.
- In each section, we mark with a marker the places for future shelves, hangers, and rods.
- An important stage is the installation of doors. Doors can be made sliding, mirrored, or done without them at all. It is best to hire a professional for installation.
- The final stage is filling the closet with things and accessories.
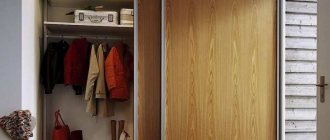
You can do without drastic changes; with a little ingenuity and available materials, you can change the appearance of an old wardrobe.
Tips on how to decorate your dressing room:
- Cover with self-adhesive film, fortunately in construction stores, you can choose any color and pattern that suits your interior. And the old closet will take on a new life.
- Wallpaper. This option allows your imagination to run wild. A huge selection of matte, glossy, embossed, photo wallpapers for every taste. Before gluing it is necessary to treat the surface.
- Cover with fabric. This option is ideal for a child's room. The fabric is attached using a construction stapler or glue.
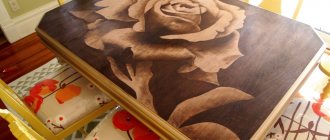
- The old “old fashioned” way is to paint it. You can simply paint it in several colors or use stencils and your own imagination to create a picture.
To make a dressing room with your own hands you need a little time and imagination. New life for old pieces of furniture will save space in the house and make a woman’s dream come true.
Fastening the shelves
The installation of the main internal elements is done even before installing the door to make sure that everything fits and matches everywhere. First, mark the interior of the cabinet directly along the walls and do not forget about the thickness of the material. Self-tapping screws, brackets and furniture corners are suitable for fastening.
For cross-shaped shelves and sectional blocks you will need special dowels and glue. Wide shelves from 80 cm must be additionally fixed in the middle so that they do not sag or sag. Vertical corner racks are good in corner cabinets - this is the most efficient use of space.
How to remodel a wardrobe in a compartment
How to make a full-fledged wardrobe from an ordinary wardrobe with hinged doors? This question is asked, no doubt, by many who still have a closet at home, perhaps from Soviet times. And in fact, the cabinet is good, strong, especially since they don’t make them like that anymore. It would seem that there is nothing complicated about it, order sliding doors, replace the hinged facades with them and use them. Actually, that’s the way it is, you just need to take into account some nuances, make some efforts and redo some things.
The first, and most important thing, is that installing sliding doors requires 80 mm of free space in the closet (Fig. 2).
You can get this space in two ways:
You just need to remove the facades, disassemble the cabinet, cut off all internal shelves and racks by 80 - 100 mm, assemble the cabinet, order and install sliding doors (Fig. 3). This option saves money, but eats up space inside the cabinet, as well as nerves and a lot of time for the home craftsman.
Figure 3 Figure 3 Figure 3 Figure 3
This method automatically turns the closet into a built-in one, but also makes it possible to increase its height by adding a mezzanine. It is necessary to remove the facades, add two racks and a roof, at least 80 mm deep than the cabinet itself (Fig. 4) and insert sliding doors.
Figure 4 Figure 4 Figure 4 Figure 4
To save money, you can add not full-fledged parts, but false panels (depending on the location of the cabinet (Fig. 5).
Figure 5 Figure 5 Figure 5 Figure 5
The second is the presence of drawers (drawers).
Drawers in the closet complicate the process of transformation from a closet to a sliding wardrobe. Due to the overlap of the doors getting into the drawers, the drawers may not slide out. And also in view of the fact that in old cabinets the facade is the load-bearing part of the drawer, when remodeling it will be necessary to modernize the drawers or make new ones.
Laws governing consumer rights
The regulations that govern the rules for returning goods, including furniture, include:
- Civil Code of the Russian Federation - it establishes general requirements for the content of sales contracts.
- Law of the Russian Federation No. 2300-1 “On the Protection of Consumer Rights” is the main legislative act that establishes the legal status of the seller and buyer, the basis of their relationship, as well as the procedure for returning a purchase.
- List of goods that cannot be returned or exchanged if they are in good condition. It was enshrined in Government Resolution No. 55.
In Art. 25 of Law No. 2300-1 “On the Protection of Consumer Rights” states that every buyer has the right to exchange and return goods of good quality, except those included in the list of goods that cannot be returned. Furniture sets and sets are included in this list. But this does not apply to other furniture products that are sold separately and individually.
To be able to terminate a purchase and sale transaction or exchange of products, the consumer must comply with the conditions established by law:
- Furniture products are not included in the set or set.
- The products are in salable condition, have not been used, and all production tags and tags have been retained.
- No more than 14 days have passed from the date of purchase, not counting the day of purchase.
- There is a receipt or other payment document for the purchase. This is not a mandatory requirement if the buyer can prove the purchase, for example with the assistance of witnesses.
- There is a warranty card (preferably, but not required).
High-quality furniture products are returned within two weeks. The countdown starts from the day following the purchase.
If any defects are found in it, you are given two weeks to return the furniture. During this time, the client has the right to make claims regarding quality.
Important!
If the furniture does not have a warranty, you can cancel the purchase within 2 years.
How to make a wardrobe from an old wardrobe
The question of whether and how to make a wardrobe out of an old wardrobe is a question many people are asking today. And this is quite understandable - there is still a good and strong wardrobe, which for some reason you don’t want to get rid of, and why not try to give this favorite piece of home furniture a more modern look. There is a short answer to the first part of the question - you can make a wardrobe out of a wardrobe! And how to convert a swing wardrobe into a compartment will be discussed below.
How to make a sliding wardrobe from a hinged wardrobe
It would seem that there’s nothing complicated about it, order doors equipped with rollers, replace the hinged facades with them and that’s it. Actually, that’s the way it is, you just need to take into account three main nuances and, with some effort, change something.
The first , and also the main thing, is that to install tracks and sliding doors you will need 80 mm of free space in the closet. You can get this space in two ways:
- Trim. You just need to remove the fronts, disassemble the cabinet, trim all internal shelves and racks by 80–100 mm, assemble the cabinet, order the selected system and install its parts and assembled sliding doors. This option saves money, but eats up space inside the cabinet, as well as nerves and a lot of time for the home craftsman.
- Build up. This method automatically turns the closet into a built-in one, but also makes it possible to increase its height by adding a mezzanine. You need to remove the facades, add two racks, a bottom and a roof, at least 80 mm deep than the cabinet itself, and, having installed the lower and upper tracks, insert the sliding doors themselves. To save money, you can add not full-fledged parts, but false panels (depending on the location of the cabinet).
The second is the presence of drawers. The presence of drawers complicates the process of converting a cabinet with hinged doors into a wardrobe. Due to the overlap of the sliding doors entering the working space of the drawers, the process of pulling out the latter is almost impossible. And also, in view of the fact that in old cabinets the facade is the load-bearing part of the drawer, when remodeling it will be necessary to modernize or make new drawers.
Well, the third thing is the width of the cabinet and the number of compartments. Old cabinets are mostly three-leaf with a width of 1500–1800 mm, and for this size two sliding doors are enough. Therefore, the overlap of the doors ends up in one of the cabinet compartments, which makes access to it more difficult. An equal number of doors and compartments eliminates this problem, but increases the cost of the entire project.
To summarize the above, it should be added that you can make a sliding wardrobe from an old wardrobe with your own hands by ordering the required parts (tracks) of the system and facades on casters in advance from the nearest furniture-making workshop. By the way, you can also get recommendations and advice on the process of remodeling your old cabinet.
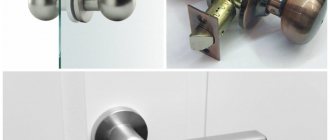
Installation of a swing facade on furniture hinges
Today there are the following types of door hinges:
- hinged;
- four-hinged (overhead, semi-overhead or inset);
- products for glass structures;
- corner;
- inverse.
How to mount a door leaf on hinges
Before installing hinges on the door and cabinet wall, you need to take into account the material the furniture is made of, and also determine how many door hinges will be needed. The number of products used depends on the size of the door and its weight. For example, with a facade height of about 1500-2000 cm, which weighs up to 13 kg, you will need 3 hinges.
Get ready for work
You should select the following tools with which you can hang swing doors in a closet with your own hands. Prepare:
- electric drill and drill corresponding to the diameter of the mounting screw;
- milling machine, nozzle of equal diameter;
- tape measure, pencil for marking;
- building level;
- We screwed it with a regular screwdriver that fits the size of the fasteners.
Procedure
- Mark the location on the door to install the hinges. The distance between the loops depends on the height of the fabric, and 8-15 cm should be measured from the edge.
- Place the hinge on the door and use a pencil to mark the location for the cup of the fixture.
- Drill out niches for the cup using a router with an attachment. Use the sharpest possible tool, drilling to a depth of 13mm.
- Insert the loop inside the finished recess, align the device horizontally. Mark the locations for preparing holes for fastenings.
- Drill holes for fasteners.
- Attach the hinge to the door surface.
- Place the door against the cabinet body with your own hands, align the position of the panel, and mark the cabinets where the strike plate should be installed.
- Drill through the cabinet at the marked points.
- Install the strike plate onto the screws.
- Connect both parts of the loops.
- Use a screwdriver to adjust the hinge to the correct position.