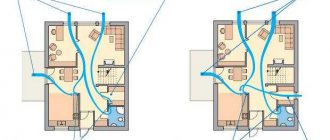
The hallway is an important part of any house and apartment. Here we take off our shoes and also take off our outerwear. Depending on the size of the room, in the hallway you can literally install one shelf, a small chest of drawers and hang several hooks. Or install a functional cabinet. And a good addition for it would be a suitable shoe shelf in the closet.
If the furniture was initially empty, you can expand its capabilities yourself. Therefore, a shoe shelf in a closet will be a good solution.
The only question is how to choose it correctly. There are many design options. But not every one is right for you. Let's figure it out.
Sliding shoe racks
Sliding shoe racks, not to be confused with retractable shoe baskets, are produced in two versions: in the form of a curved rod, which is attached to the body of the wardrobe using fasteners, and in the form of plastic sidewalls with two metal tubes.
Sliding shoe rack figured
| Rice. 12-14. Sliding shoe rack |
As you can see from the photo, shoe shelves are called sliding because they can be moved to the desired width within a certain range. Shelves for shoes can be attached both to the back wall made of chipboard and to the side walls of the wardrobe.
If you have a lot of shoes, you can even make a whole column of curly shoe shelves, as shown in the example of our experimental two-door wardrobe from ready-made solutions for wardrobes.
Rice. 15. Two-door wardrobe with a column of figured shelves for shoesAnd again a bonus for patient readers of the site. I offer an option for making a retractable column with shaped shoe racks for a sliding wardrobe.
Expert opinion
Smirnova Ekaterina Anatolevna
7 years of experience in interior design, professional architect
As you can see from the photo, we make a rectangular base from chipboard, and attach two ball guides to its bottom. We also attach five ball guides to the vertical part of the column.
The depth of such a column should not exceed 500 mm if the depth of your wardrobe along the outer side wall is 600 mm. You can read more about making your own wardrobe here.
At the bottom of the column we add two small radii made of chipboard to give rigidity and attach five figured shoe racks to the vertical screen. To extend this entire structure, we attach a furniture handle to the vertical wall of the column.
We again insert this unusual pull-out design with shoe racks into our experimental two-door wardrobe. I think that a wardrobe with such a shoe rack design will be a real exclusive and your pride, unless you only have two pairs of shoes :). Good luck making shoe racks.
Types of shoe shelves for closets: how to choose, install and make it yourself?
Shoes should be stored near the exit to the street. You don’t have to carry a removed pair of shoes across the entire hallway or corridor to put it on a shelf in a wardrobe or cabinet.
If your closet is in the hallway next to the outside door, it will be the most convenient place for shoes. The problem of the lack of a storage system for boots, shoes, and sandals in a closet can be solved by manufacturing and installing shelves for shoes.
Let's look at the options available in stores and tell you three ways to make your own at home.
Retractable mirror
If the room design concept does not include a mirror on the outside, there is the option of equipping a small retractable mirror in the closet itself. It can be attached to one of the side walls of the shoe rack, or pulled out along with the shelf, there are many options, keep in mind that the price of such mechanisms is not always affordable.
Imagine, you fold back a shoe shelf (or pull out a drawer), and along with it a small mirror smoothly appears, at foot level, slightly tilted, so that you can see your shoes in the smallest detail, how do you like it?
Varieties
Standard materials are MDF, chipboard and metal profile. There are 3 types as standard:
But the first ones are conditionally divided into 4 more options.
Retractable systems
These are shoe shelves that can extend beyond the perimeter of the cabinet opening. Provides access to the entire shoe storage volume. Let's consider these types:
- mesh boxes;
- flat gratings;
- shoe column.
Mesh boxes
The height of the sides of the shelves in the mesh boxes prevents the outer shoes from falling. The lattice structure promotes ventilation of the interior space from all sides.
The mesh is made of wire reinforcement covered with vinyl. The plastic shell of the grille protects the surface of the shoe from accidental scratches. The shelves themselves pull out like drawers in cabinets and cabinets. The lower side corners of the mesh boxes are connected to the walls of the wardrobe with telescopic guides.
Pallets
They are made in the form of ordinary furniture boxes. The only difference is that the sides of the pallets are low (40 - 70 mm). There are special mechanisms thanks to which shelves on telescopic runners extend at an angle.
Since the pallets are made of solid material, there is no ventilation of the shoes from the bottom and sides. Therefore, bags of absorbent are placed at the bottom of the shelves. Metal rods are inserted into the sides to keep the shoes suspended. In this position, the soles do not contact the bottom of the box.
Flat gratings
They are made from the same material as in the previous example. The difference is that the planes have small sides only in front. They are placed on brackets that are attached to the vertical wall of the retractable system. The wall rests on a horizontal plane that extends from the cabinet opening along telescopic guides.
For maximum capacity, they are installed at an angle. The front edge prevents the shoes from sliding down.
Shoe column
The shelves can hold many pairs of shoes. There are two known options for columns: those that extend from the front and from the side. The choice of model depends on the size of the opening.
When the passage is narrow, it is better to mount the column on the side wall of the cabinet on retractable telescopic guides. If the transverse size of the opening is wide, then the front wall of the shelf is placed on a horizontal plane, to the bottom of which four roller legs are attached.
Handles are installed on both sides of the vertical panel, behind which the draw-out column is pulled out.
Note! The material for column support railings is MDF or laminated chipboard sheets. The shelves themselves are made of nickel-plated or chrome-plated metal profiles. They are mounted in a horizontal or inclined position.
Folding
As such a system, they take a ready-made shoe rack and insert it into the cabinet opening. Folding shelves are petal-type rotating mechanisms with built-in shoe racks. A closet can contain 2 or more pieces.
The peculiarity is that the lower shelf of the rotating section is also the front of the cabinet. Up to 4 shelves can be installed in the folding one.
Stationary
The structure consists of horizontal planes at different levels. This is the simplest solution for shelves in a closet. The disadvantages of such a storage system include the open position of shoes in the internal space of the wardrobe, the limited number of stored pairs and the inconvenience of their use.
The advantage of stationary shelves is their simplicity and low cost. Such storage systems can be mobile if they are a free-standing structure. Then the shoe rack can be removed from the closet and moved to another part of the hallway.
Dimensions
Expert opinion
Smirnova Ekaterina Anatolevna
7 years of experience in interior design, professional architect
The width and depth of the cabinet opening imposes restrictions on the dimensions of the shoe rack. When calculating, do not forget about the size of the boots. The vertical distance between the shelves should provide freedom of access to each pair of shoes.
It is necessary to include the dimensions of the shelves in the calculation, taking into account the maximum number of pairs of the largest size.
I recommend sticking to the following parameters:
- width – from 600 mm;
- height (distance between shelves) – 150 mm;
- height for boots – 400 mm;
- depth – 350 mm.
Styles and selection
To make storage for all pairs of shoes look organic, you need to choose it to match the entire room . So, for a Provence interior it is ideal if the shelf is made of natural materials, preferably wood. Such furniture can be decorated with carvings. Those variations that have several floors for shoes, and on top of them there are boxes for various accessories, look good. Shelves with seating – banquettes – also look good in this design. But too luxurious shelves or banquettes are more suitable for the Art Deco style or for the same Rococo or Empire style.
It is important that the shelf matches the style of the room
For hallways and corridors in the high-tech or minimalist style, you can use simple shelves, without carvings, and quite bright. You can take a regular wooden or metal structure and paint it. Glass shelves also look great, but caring for them is difficult - prints of soles will constantly remain on the glass.
How to make shoe racks with your own hands
If you have the skills to use the tool, our step-by-step guide will not seem difficult. The procedure for manufacturing and assembling shelves for a sliding wardrobe is described in the form of 3 instructions. Use the method you like best.
Option I: pull-out basket
- Install a partition in the cabinet at a distance from the side equal to the width of the basket with guide rails.
- Make markings for attaching the telescopic guides.
- Use a drill to drill holes for the screws.
- Install the guides.
- Having pulled out the moving parts of the slats, attach the upper side corners of the mesh baskets to them.
- If you don't need to place baskets across the entire height of the cabinet opening, install a limiter cover that will protect shoes from dust and create a division of space. On the one hand, secure the stove to the upper end of the partition, and on the other, secure the lid to the side wall of the cabinet.
- Use screws for fastening.
- Place shoes in baskets and push them deep into the closet.
Note! Fasteners for baskets on telescopic bars are sold in the hardware department of a construction supermarket.
Option II: pull-out shelves
- Using a jigsaw or circular saw, cut a panel from an MDF sheet to the depth of the opening. The size should be such that the front end of the slab does not interfere with the movement of the sliding wardrobe doors.
- Secure the shelves to the vertical panel with confirmations or self-tapping screws.
- As an alternative, you can hang brackets with rods.
- Connect the structure to the side wall through telescopic slats.
- Instead of a handle, use a jigsaw to cut a vertical slot.
- Put your boots and shoes in their places, push the shoe rack into the closet.
If the width of the shelves is much narrower than the opening, then you will have to install an additional vertical partition inside the cabinet.
Option III: folding sections
If the width and depth of the cabinet allows you to install a shoe rack with folding shelves, then do so. If this is not possible, build built-in storage. To do this, use the sides and partitions of the cabinet. For detailed instructions, read the article “Do-it-yourself shoe cabinet.”
What materials are they made from?
Shoe racks in the hallway are made from the following materials:
- Closed shoe chests or cabinets are most often made from laminated chipboard or MDF. The second option is better, as it is not afraid of high humidity. But shoe racks made of MDF are much more expensive. But you will use them for a long time.
Shoe rack made of chipboard or MDF - the most common type - The open type is assembled from: metal pipes and wire (stainless, powder-coated, nickel-plated), shelves can be wire, plastic, laminated chipboard and MDF.
- plastic;
- from laminated chipboard and MDF.
All these varieties may have different shelves. The usual solid ones - plastic, chipboard, MDF - are not very convenient. Dust and dirt accumulate on them, they impede the movement of air, which is why the shoes dry worse. The best option is made from metal wire or several pipes/pins on which the shoes are placed.
It is convenient if the distance between the shelves and/or their number can be changed. For the summer you can put more shelves, for the winter you can remove a couple of shelves - longer distances are needed for shoes and boots.
Pull-out shelves are a great idea...the main thing is to implement it
The shelves can also be not only stationary, but also retractable, which is also very convenient. Especially if the shoe rack for the hallway has great depth. We need to get to the last row of shoes - we pulled out the shelf. And there is no need to bend over or look while standing in an awkward position.