The manufacturer makes changes to the technical characteristics of its product over time to improve the quality of the parts.
For example, seemingly insignificant changes affected the design of the Pax wardrobe doors: the thickness of the vertical frames in the doors was changed, the side plug is now installed on the door, previously it was attached to the cabinet frame, the door assembly process has been improved - rubber bands no longer need to be inserted - they are glued in advance in frames.
Additional options include door closers and interior lighting using photo elements. Attention was also paid to filling the cabinet, including auxiliary elements. In our opinion, the instructions for assembling the Pax wardrobe, developed by Ikea, best show the step-by-step sequence of connecting parts and all the nuances of assembly; only the inattentiveness of the assembler and external factors can lead to errors.
When installing a wardrobe on their own, the buyer sometimes encounters certain problems.
The Pax wardrobe doors touch each other and do not move well along the guide.
1. The doors are mixed up. On older cabinet models, the vertical frames of the front door are wider than on the inside. The frames of the door closest to the cabinet frame are marked “A” . It is necessary to rearrange the roller system on the doors.
2. Do not tighten the screws when tightening frames or installing rollers. If the screw cannot be fixed - it is torn off or does not “go” along the thread - it is unscrewed using pliers, we “drive” the thread with a tap, and tighten the screw.
3. The roller has come off the guide, the door stop is not closed. We install the roller and bottom bracket into the guide and fix the limiter.
4. A foreign object has fallen between the doors.
5. Changes in cabinet geometry: uneven floors, uneven screeding of cabinet frame sections, fastening to the wall, which caused the cabinet to bend. Level the structure and eliminate all unevenness in the cabinet frame.
The closet door knocks when opening.
1. The wheel in the roller system is deformed. If the wheel is chipped, replace the roller bracket.
Which is better: heated floors or radiators?
Warm floorBatteries
2. Visually inspect the roller wheel and remove any adhering particles of debris.
3. Sand in the top guide. We remove dust and other objects from the guide groove.
4. The guides are not tightly connected to each other. We remove the gap.
It is impossible to hang an assembled door.
Move the limiter on the inner door to a horizontal position, then hang the door - then move it to a vertical position - the door is locked.
Updated interior door roller! To open the lock - press on the appendage and pull it down. Secure the pax wardrobe door - pull it up until it clicks.
On the outer door the limiter is towards you, after hanging it - away from you.
Updated roller for the outer door of the Pax wardrobe! To open the lock - lift the element and pull it towards you. Lock the lock away from you until it clicks.
The Pax closet door rattles.
1. The density of the internal elements of the door is lost. Older models were equipped with rubber bands and foam stickers; perhaps over time the rubber bands lost their rigidity or popped out. There are often cases when the client himself removes the seal from the door frame during assembly, citing the reason that it was difficult to insert, which is absolutely not necessary to do, since the door will subsequently rattle when opened. More details - how to remove the door from the Pax wardrobe.
2. The screws are not tightly secured when assembling the doors and installing the roller brackets.
Drawers hit the doors when rolling out
1. Adjust the doors.
2. Move the bumper on the upper guide to the desired position.
3. Install the cabinet frame level, aligning the doors.
The back wall is falling out.
According to the assembly diagram of Ikea furniture, the Pax cabinet is attached to the wall of the room - this is what the Ikea manufacturer provided. This is not only for safety reasons, but also for the smooth movement of doors and the tight fit of the back wall of the cabinet to the wall of the apartment. If for some reason you refuse to drill, replace the nails with self-tapping screws.
There are not enough screws to assemble the doors.
Read the instructions carefully; not all holes are screwed into all the holes when connecting door frames. After installing the device for smooth closing of doors, the screws in the roller mechanism fastening are replaced and three extra screws remain.
Gas mounting gun HILTI GX 120
Sano published an article in Tools and Equipment, March 11, 2012, article
But a tool is a tool, and knowledge of safety precautions and rules on how to work with it has never stopped anyone.
By the way, it would be useful to note that bringing a tool to the workplace like this, showing it in action, even in the hands of a representative, or even trying out the signature move of the Hilti company yourself, it’s very convenient to try everything yourself before purchasing and then decide whether the tool is suitable or what you need. something else.
Installing IKEA furniture in a prepared niche
After inspecting the niche, the craftsmen discovered that it was built end-to-end, according to the dimensions of the furniture. It is not right! During repairs, you should set the parameters with a small margin, that is, a little wider than the planned furniture. As a result, the cabinets did not fit, both on the sides and in height. The customer decided to expand the niche from nutria. They tried to carry out the expansion carefully so as not to damage the painted walls; the photo shows the result of the work. It was easier with the legs; they, along with the plinth and metal grille, were simply cut off. Fortunately, expansion was required for a small distance of 5 mm. As a result, the cabinets moved into the right place with a grinding and creaking sound. All that remains is to adjust them! But adjustment, unfortunately, is not possible, so during construction the edges must be drawn out perfectly! Any unevenness, even a few millimeters, immediately catches the eye.
First steps. Slab countertops
Sano published a blog entry in Furniture made from slabs, solids, and various differences, October 7, 2022, blog entry
The first attempts to make something from the brought slabs. Although there may be some attempts, the material costs money and the right to make mistakes is as much as there is money in your pocket. Train at your own expense, as they say.
Therefore, each board is carefully inspected and tried on; the proverb about measure seven times is in action.
The work itself is not tricky, creative, there are several boards and they need to be selected so that they look beautiful and there is no overspending. All sizing and trimming is done with the minimum possible removal of material, simply sawed off a little here, cut a little there with a chisel.
Very profitable style with black mirror IKEA Chic
Well, that's a completely different matter!
This is what you get when you combine a table and a small chest of drawers with chairs from IKEA
Another visual transformation of an ordinary linen chest of drawers
The furniture is too stylish to be from IKEA, but nevertheless it is...
IKEA Malm chest of drawers with 2 drawers turned into a comfortable dog house for a small pet
Marshall speaker in retro style, and matches furniture from Ikea (the latter, of course, modified by the owner)
“Create the style of a Skogsta bench with paint and rope,” writes the owner of this beauty
Plywood shelf. Furniture made of plywood and veneer
Sano published a blog entry in Furniture made from slabs, solids, and various differences, March 29, blog entry
If in the first case (the niche already exists) we operate with the dimensions, which are a given, and based on them we make a decision about WHAT can be done there, then for the second case we clearly need to know the dimensions of the niche in order to draw a plan and give clear instructions for builders. If you clearly understand that the cabinet will be made TO ORDER , according to an individual project in a good carpentry workshop, then the width of the niche can really be made absolutely any, since an individual project is individual. And today’s technologies allow us to operate with any size: 1 meter, 1 meter and 34.5 cm. I made 1.5 cm. On top 2. I think 1 cm is possible, if you are confident in the builders that they will respect the geometry.
The first cabinet was first assembled and then pushed into a niche. The second large one was assembled in a niche, but it was left without a back wall. The single door was pushed into a niche after assembly. No matter how well the walls/corners are aligned, there will still be errors in the geometry. That's why built-in wardrobes were invented.
But I really like Pax, so I was looking for a compromise. So, the PAX wardrobe reminds me of children's LEGO. First, I designed all the shelves, drawers, baskets, and hangers in a computer planner and came with this plan to the store employee.
A huge plus of PACKS is the variety of fillings; at any time I can buy an additional item, or even re-hang all the shelves. STRIEBERG lighting, an irreplaceable thing! Insanely convenient, economical, has 3 modes: always on, off and automatic.
Transform IKEA 365+ glass containers into tableware in true Scandinavian style
Transform IKEA Frosta stools into a large, creative cat climbing tree
Project “Bed in a Fairy Tale Princess Castle” from IKEA Kura
I made this from IKEA products (except paint and black light). This is a shelf of tiny Nintendo toy characters for my friend.
IKEA hack
Hack for pet owners. I took a Dukting doll bed and turned it into a bunk bed for cats
How it was and how it became! Although the owner says that polishing was not easy
How to make a cozy cat house from a shelving unit
The upper shelves store pet food and other small items like toys and cat litter.
My IKEA Lack table turns... into a table with a flower bed
IKEA Kallax Art Deco Console from a different angle, in a different color and with additional art decor elements
Combination based on the IKEA Kallax Window Seat set
For our narrow aisle, we combined two IKEA Hemnes shoe cabinets and replaced the original countertop with a stained wood countertop
“My first IKEA hack, made from the legendary Bekvam spice racks and a couple of magnets :-)”
Fritids, two in one: hidden box / bench for cats
I used a CNC cutter to cut out designs on the doors of my IKEA Kallax
Converting IKEA Filing Drawers
Beautiful room of bookcases from IKEA Hack – France
Add black marble carbon (contact copy paper) and gold paint to the Vittsjö coffee table
IKEA hack
Used Karlby countertops as a counter in the laundry room. Voxtorp cabinets over the top of an unusual table
IKEA Kallax Mid Century Modern Sideboard
“Repurposed my Malm bed in country style.”
IKEA Mid Century Modern Chest Hack
DIY for IKEA Moppe Cabinet
Turned Vittsjo laptop desk into a home bar
Large counter consisting of several tables
Two Hejne shelves from IKEA turned into a walking place for a cat
Home bar made from two Fjallbo cabinets
It's hard to believe that this gorgeous cabinet started life as an IKEA cabinet called Ivara!
“Plastic table Docksta Glow-Up. The marble table I wanted to buy from the World Market was $550, so I turned this $180 table from IKEA into the table of my dreams using spray paint, epoxy resin and a blow torch."
Addition (drilling) of holes for corner cabinet
I did all the addition myself, fortunately I know how and there are good conductors. This is probably the last closet I’ll make in the apartment, there’s really not enough space.
Here are some of the tools and accessories used:
Clamps are our everything! I would especially recommend that anyone who makes furniture (chipboard or solid wood, it doesn’t matter) purchase KREG Face Clamps. They do not leave marks even on soft wood, let alone chipboard, but at the same time they have a very high degree of compression. The only things missing from the photo are jigs and screwdrivers. Yes, it's better to have two or more.
The green one is an old 12V hammer drill. Sometimes I use it to torment my neighbors when I’m too lazy to take out a suitcase with a network punch and don’t need to make a lot of holes. It has a 1/4'' hex chuck. In fact, it’s not a very convenient tool, but it was once given to me as a gift and I use it from time to time. I would like something more powerful - 18 volts
In almost all my posts with furniture, in the absence of a filler router, I use this jig for dowels. I ordered a 5mm insert in the center from a turner: on the second try it was the right size XD
For a novice furniture maker, this conductor is probably the best you can find.
Craig's tongs are, of course, gorgeous, but they are not always convenient to work with, and they are the only ones I have. But when drilling the face, it is better to clamp it on both sides so that the jig does not move during drilling.
For serial holes there is a special stopper with a pin that is inserted into a previously drilled hole. And so that the conductor does not move, I rest it against a shelf attached with clamps.
If you do everything carefully and don’t rush, the connections will turn out perfect.
I already said that standing assembly imposes some restrictions: I cannot fasten the bolts from below, and it is problematic from above. Therefore, where it is not possible to use tie screws, I use eccentrics.
If for screws, the need for dowels is a matter of debate: whether they are needed or not, then for eccentrics they are strictly necessary, because before tightening the parts must be centered!
And now about my first mistake in design. To save money, IKEA baskets on roller guides were chosen. They cost 700 rubles per set.
Ikea focuses its fittings on its own products: neither the website nor the fittings themselves indicate filler dimensions. But since we are making a corner cabinet with our own hands, then we will count everything ourselves!
There were overall dimensions on the website, where the width was indicated as 500mm. I was completely sure that this was the width inside the cabinet... But no! This is what cabinet width these baskets are suitable for, i.e. external dimensions! It’s also worth clarifying that the pax cabinet is made of 18mm chipboard, which I already googled after receiving the baskets (chipboards were already in production and it was too late to change the sizes). My niche was larger than it should be...
But, more is not less... Let's add panels. It was not possible for me to find 18mm laminated chipboard, but in chain stores and in markets they sell furniture panels: just 18mm.
Right in the store they cut the shield to size for me, which made my life easier.
After adding additives to the guides, the sheets were milled along the edges and painted white with interior enamel.
With the help of a jig for hinges/shelf supports, I made an additive for the guides. Holes in the jig with a pitch of 32 (it is with this pitch that the factory additive is now made on most of the fittings: from hinges to handles).
Product characteristics
The IKEA Pax wardrobe has a height of 236.4 cm, respectively, the ceiling must be at a height of at least 245 cm. At the same time, for assembly in a horizontal position, a ceiling height of 244 cm is sufficient, and in a vertical position - 242 cm, but without taking into account errors such as unevenness the floor and the ceiling itself.
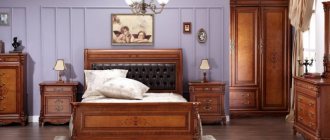
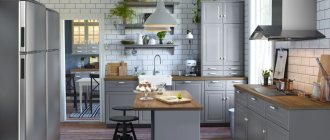
Wardrobe Pax IKEA
The depth is 66 cm, which is relatively small, thanks to which the cabinet can be placed in a relatively narrow corridor. The width reaches one and a half meters.
The doors of the Pax cabinet are Auli, which allows you to place other furniture opposite it without maintaining a distance equal to the width of the door.
Cabinet options
Pax, corner and coupe, requires special mounting to the wall. Fastening materials are selected independently, taking into account the wall material. The instructions for the Pax cabinet from IKEA provide for this point.