My home is my castle. Yes, that's what they often say. But you and I are not living in the Middle Ages, our fortress should not be an ordinary house, but a cozy nest, where everything is beautiful and comfortable. In this article, we will look together at various DIY handicrafts for the home without much expense.
Also interesting: What can you sew from scraps of fabric with your own hands? 7 coolest ideas.
Crafts for the kitchen
The kitchen is the soul of the apartment and simply cannot do without beautiful decor. Cozy napkins on the table, bright potholders, elegant covers for stools and chairs will look great here. Similar fabric crafts for the home can be created from old T-shirts, dresses, and even small pieces of fabric using the patchwork technique.
Cozy coasters for hot dishes can be made from old wine bottle caps. To do this, they can simply be glued together or secured to a small piece of plywood. You can make a charming tray in the same way.
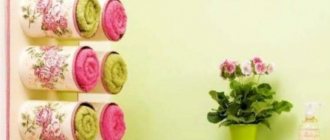
A cute cutlery stand can be made from tin cans for drinks or canned food. To do this, they are simply painted in the same or different colors and fastened together with strong glue.
A knife stand can be made from an unnecessary jug or glass jar. To do this, they are filled with wooden kebab skewers or various cereals, creating an unusual pattern.
Cute containers for spices are made from glass baby food jars. To do this, they are cleared of stickers, corresponding pictures or inscriptions are drawn on the sides, and the resulting beauty is covered with colorless varnish. Or you can go further and purchase special napkins for decoupage, giving ordinary containers an antique look.
Painting based on foam plastic
An interesting decoration is obtained if sufficiently dense foam acts as the base. This material is distinguished by its plasticity and elasticity, for which it is valued in home crafts. For a painting that will elegantly fit into a child's room, you will need the following materials and tools:
- fabric scraps, the color of which corresponds to the picture selected for production;
- foam sheet of the required size;
- copy paper;
- PVA glue;
- soft simple pencil;
- scissors with small blades;
- a flat spatula used for patchwork, or other sharp object needed to press out the contours of the design;
- seam ripper.
Algorithm of actions:
- On the foam plastic, straight lines are marked from all edges at a distance of 15-25 mm from the edges. The resulting rectangle is pressed with a spatula.
- Copy the picture onto polystyrene foam. The contours of all the details of the pattern are pressed using a spatula.
- A larger piece of fabric matching the tone is applied to one of the fragments, pre-lubricated with glue.
- Using a steamer, carefully press the material into the pre-pressed contour.
- Tuck all ends inward. The result should be an element with a smooth surface without distortion of the pattern.
- Fill out the entire drawing one by one. For the finished work, a fabric frame is made, also tucking the ends of the textile into the pressed outline.
Very cute and soft paintings made of fabric and foam plastic will appeal to the whole family
Crafts for the bedroom
Everything in the bedroom should ensure quality rest, so soft, cozy things are placed here.
You can put a fluffy rug made of pompoms on the floor. To make it you will need a construction mesh and a lot of pom-poms made from leftover wool. The rug can be plain or multi-colored, and experienced craftswomen even create small pictures and patterns from soft lumps.
If there is no wool, then a soft rug can be made from pieces of fabric (any old things can be used for this). To do this, the perimeter of each patch is stitched with thread, padding polyester or cotton wool is inserted into the middle, the fabric is pulled together to form soft knots, which are then sewn together or attached to the base.
Completely unusual and very romantic candlesticks can be made from small glass jars or old glasses. To do this, they are coated with glue, creating the outline of the pattern, and covered with salt, carefully blowing off the excess after the glue has completely dried.
The smallest particles of salt will sparkle exquisitely in the light of a burning candle, creating a mood of romance and magic.
Cozy flower pots can be made from an old pot, a large plastic bottle, or a mayonnaise bucket, if you wrap them with woolen threads. First, the surface must be generously coated with glue.
The decoration of the new house for flowers will be coins, shells, artificial flowers, ribbons or bows. By the way, in the same pots you can create a home kitchen garden of herbs, which will be convenient for flavoring ready-made food.
Natural material in interior decoration
Unique interior details can be made from elegant plant forms. When walking in a park or forest, you should pay attention to intricately curved snags or interesting branches. After cleaning, sanding and varnishing, they can become the highlight of the most elegant interior style.
Such parts are placed in different planes, giving a certain functionality if desired. For example, in a country mansion, an original support for lighting fixtures will add charm and presentability.
Dry branches are often used for home crafts
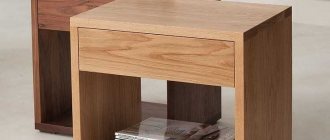
Miniature table for books
Wall key holder with original design
Even scraps of driftwood with light, unobtrusive tinting will serve as an exclusive material for creating interesting wall compositions. With a successful selection of colors, such an element will be in harmony with the overall space.
An interesting addition to the fireplace area can be created from small pieces of branches, which are fixed in a certain order on the accent wall.
Designer watches that will never go out of style
A lantern made from branches will perfectly complement the garden plot
Crafts for the living room
DIY home crafts can beautifully decorate the heart of your home. A fireplace made from old boxes would look great here.
To do this, you need to take a large box or glue several small ones together, decorate them with suitable wallpaper or ceiling tiles, cut through the “firebox” and put real firewood, tree branches or their imitations from paper tubes inside. Fire can be drawn on paper or created from scraps of scarlet fabric, securing the structure to a soft wire.
Such crafts for home decoration are decorated with cardboard photo frames, balloon topiary, and green plants.
A floating cup will be an unusual craft. To make it, take a tea pair and an ordinary aluminum fork, artificial flowers, and satin ribbons. The cup is glued to the tip of the fork upside down, the teeth are bent horizontally and fixed with glue to the saucer.
The resulting structure is decorated with decor so that it seems that the cup is hanging in the air, pouring flowers, ribbons, and bows onto the saucer.
A cozy coffee table can be made from old fruit boxes. To do this, they are placed on their sides and connected to each other. The middle of the table can be filled with pebbles, and the resulting compartments will provide space for placing handicrafts, books, and decorative elements.
Cardboard box
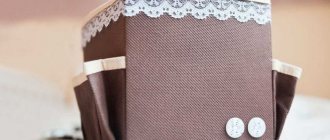
Everyone has a small box of chocolate bars, tea or other items at home. From such a thing you can make a box with your own hands for jewelry, threads and needles, small office supplies... One of the simple and quick options is to cover a cardboard box with a rope. You just need to prepare the materials:
- a cardboard box about 20 by 15 cm, so that its lid opens upward;
- tourniquet;
- glue gun and rods for it;
- for decoration you can take: coffee beans, decorative stones, seashells, multi-colored buttons...
Heat the glue gun well, tightly glue the base and lid of the box with a rope in 2-3 layers. Do not apply a lot of glue so that threads do not appear, and also fit the rows of the rope tightly so that there are no gaps.
When the entire box is well wrapped with a tourniquet, let it stand for a while. Then decorate with decorative elements of your own choosing.
You can also glue felt or corrugated paper inside the box, or you can leave it as is.
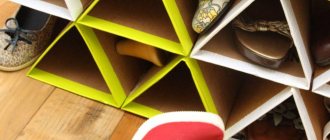
Crafts for the hallway
Comfort in the hallway will be created by baskets woven from wicker or paper tubes, and key holders made from wine corks or wood cuts.
A pebble rug will decorate the floor. To do this, you need to take a regular rubber carpet and carefully glue smooth stones to it, trying to cover the entire space.
An ottoman made from plastic bottles will help make the process of changing shoes more convenient. The bottles are secured with tape, plywood and a suitable piece of foam are placed on top and everything is covered with fabric. For ease of movement, wheels are attached to the bottom of the craft.
A non-standard frame for a mirror will be newspaper tubes (they can be the same length or have different sizes, creating an original pattern), tree cuts, toilet paper rolls cut into circles.
How to create an architectural decoration with your own hands
The facade of the house will acquire a completely unrecognizable exterior if you use stucco foam. A huge variety of finishing coatings makes it possible to choose an imitation to your liking. It can be marble, wood, stone and other natural materials. Installation of such decor is absolutely simple, so it is often done independently.
Operating rules and important standards that must be followed:
- The installation base must have a perfectly flat, clean and dry surface.
- If necessary, the plane is carefully leveled.
- Voids in old plaster must be removed.
- The selected material is fixed with an adhesive mixture, trying to create a tight fit of the foam element to the structure. Excess glue must be removed with a spatula before it hardens. All joints (decor plus base) are carefully glued with a special compound for seams.
- Additional fastening with dowels is possible. In this case, the caps are recessed by three to four (no more) millimeters.
There are various installation techniques that will allow you to create interesting optical masonry effects.
Picturesque decor is an integral part of the interior of the room. A room without appropriate decoration will feel like an empty and unfinished space. And you don’t have to spend a lot of money buying such items. They can be created with your own hands.
Bathroom crafts
For the bathroom, you can make a soft rug from old terry towels or bathrobes. To do this, they are cut into strips, the strips are woven together like a braid, and the strips are given the desired shape.
Jewelry hanger
All representatives of the fair sex love jewelry; Almost every woman has jewelry that needs to be stored somewhere. An original storage for jewelry will be a hanger made like a painting.
In order to make a hanger for storing jewelry, you will need:
- baguette frame;
- plywood;
- stain (paint can be used as a replacement);
- hooks and drawer handles;
- nails;
- screwdriver and drills;
- cutting tool.
Cut the plywood according to the dimensions of the frame and coat it with stain, then dry it and apply it to the frame. Mark the places where the hooks will be attached and screw them. All that remains is to hang the decorations on the hanger.
Now you have a place to store women's treasures - jewelry.
Holiday crafts
Before any holiday, the question arises: “How to make a craft for the home?”
Crafts for the New Home include Christmas wreaths made of cardboard, tinsel, soft branches, decorated with New Year's balls and candies, New Year's socks for sweets from Santa Claus made of fabric, and paper garlands.
Do-it-yourself crafts for the home for the New Year are created from everything that is at hand: cardboard and tinsel are suitable for making a Christmas tree, fairy-tale characters can be created from old socks, snowflakes can be made from napkins, paper, foil, caramel, dough, chocolate.
On March 8, the house will be decorated with vases made of plastic bottles and flowers made of wool, paper, fabric, and plastic. Or you can present your mother or grandmother with a sweet bouquet of sweets.
Valentine's Day will give you decorations in the form of various hearts made of paper, fabric, and three-dimensional letters made of cardboard.
To celebrate Easter, chickens are made from pompoms, baskets for treats, stands for Easter cakes and eggs.
Lamp made from CDs
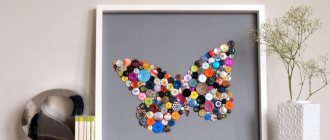
From unnecessary disks you can create various crafts for the home: a lamp, a candlestick, a small wallet, New Year's decorations for the Christmas tree, bookmarks, a chandelier, a mirror ball...
A lamp made from old disks looks original and does not require much time or materials to create:
- 12 discs;
- protractor and ruler;
- pencil;
- wire and pliers;
- awl;
- Christmas tree garland.
Using a protractor and a ruler, mark the locations for the holes with a pencil along the edges of the disks so that they form a regular pentagon. Use a hot awl to make holes. By fastening the disks with wire, assemble a pentagon, before the last fastening, place a garland inside, but do not forget to leave the plug outside to turn it on.
Children's crafts
Photos of crafts for the home surprise with their diversity. And most of this splendor consists of crafts for children.
For them and together with them they make toys from pompoms, soft rugs, houses made of cardboard, cars and ships from boxes, dream catchers from hoops, hairpins from homemade flowers, organizers for pencils, calendars and many more interesting or useful items.
Ice staining
Using this technology you can dye pillowcases, bedspreads, tablecloths and any other home textiles. Each drawing will be unique, because it is impossible to repeat natural stains on purpose. You will need a cloth, a metal grid and a container to place it over, gloves and ice.
Wet the cloth and stretch it along the grate placed on the sink or over the basin. Crumple the canvas to make the designs even more interesting and irregular. Randomly place ice cubes on top and sprinkle everything with regular washing powder mixed with dye. Wait until the ice melts, dip the fabric in cold water several times to set the color, dry, and voila - you're done!
Photo: dekormyhome.ru Photo: dekormyhome.ru
Photos of crafts for home
Patchwork technique
Bright and colorful patchwork technique is suitable for making decorative pillows, bedspreads, blankets, rugs, carpets, coasters and panels. It fits best into eclectic and ethnic styles, boho or Provence.
Select different pieces of fabric and cut them into equal-sized squares. You can decorate them on top with other geometric elements or hearts. Connect triangles, rhombuses or trapezoids - the shapes are completely up to you.
Make a layout in advance to check how your patchwork-style canvas will look. This is especially important if you need clear dimensions: for example, for a decorative pillowcase. Gradually sew the elements together into a single fabric and do not forget to trim the edges. If you want to make a product stronger for a carpet or bedspread, place it on a solid base made of denser fabric.
Photo: dekormyhome.ru Photo: pinterest.com.au Photo: podelunchik.ru Photo: titan-spec.ru
Braided decorative pillowcase
Felt braids look warm, cozy and reminiscent of winter sweaters. Decorative pillowcases in Scandinavian interiors look especially elegant in this format. But you can use the same principle to sheathe any other products.
For the pillowcase, cut out two main parts and many long strips, the total width of which is equal to the width of the base. Take the length of the strip with a reserve, because it is from them that you will weave “braids”. Sew the strips from above to the top of the workpiece and begin to cross them together.
If you like a looser braid, stitch only the edges to the base. If a denser option seems more practical to you, secure each new turn with a stitch. Hide the edges of the braid into the inner seam when you sew together the halves of the pillowcase, or simply tuck it in for flat parts.
Photo: youtube.com Photo: iiam.ru Photo: posudaizkamnya.ru Photo: kopitsvet.rf Photo: burdastyle.ru
Decorative lampshade for floor lamp
To make a classic lampshade, you will need a cardboard template and a piece of fabric of sufficient width. The frame can be cylindrical or cone-shaped - at your discretion and to suit your interior. Cut the fabric with a small margin of 1-2 cm in order to carefully tuck and finish the edges.
If you have a lampshade with a pattern, carefully apply the fabric to the workpiece so that all the patterns match and look where they should. Place the fabric right side to the template, secure with pins and mark places for seam allowances. Carefully remove the pins and fold these allowances inward, and immediately fix them again so that the line is even.
Sew a fabric lampshade, trim the edges and iron the workpiece well. Apply glue to the surface and wait a little until it is saturated, and only then pull it onto the frame. Make sure to cover the seam with the most carefully processed side at the joint.
If you're attaching a lampshade to a wire frame, you don't necessarily need glue. Just pull it on and tie it with thin cotton ribbons. In any other case, first completely dry the product, and only then put it on the lamp.
Photo: copytsvet.rf
Photo: mastersamodelok.ru
Photo: dm-st.ru
Did you like the post? Subscribe to our channel in Yandex.Zen, it really helps us in our development!