Corner for a child
Sometimes there are a lot of unnecessary fragments of the tabletop left, and then it is possible to build an unusual corner for the baby for toys, books, accessories and children's hiding places.
If there are a lot of scraps, you can make a desk and computer desk, stool, cabinet, small chest of drawers, sink in the same color scheme.
Ideas for creativity and implementation are varied and suitable for a master of any level. All you have to do is choose what you liked the most and get to work. Good luck!
- Author: Ksenia Gavritski
Rate this article:
- 5
- 4
- 3
- 2
- 1
(18 votes, average: 3.5 out of 5)
Share with your friends!
FIGURE MILLING
The seat of the stool can be left rigid, in which case the ends should be trimmed with a flexible PVC mortise profile. Or you can make it soft, then you will need an additional piece of foam rubber measuring 32x32 cm and a thickness of one to one and a half centimeters, as well as a piece of suitable fabric approximately 40x40 cm.
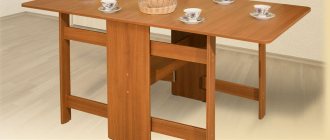
A compact table for the living room is assembled from the following parts:
- table top – 1 piece
- planks - 4 pcs.
- shelf - 1 piece
- bottom - 4 pieces
- wheels or legs - 4 pcs.
Additionally you will need:
- plastic corners - 4 pcs
- self-tapping screws 3.5x16 mm - 16 pcs.
- confirmations – 8 pcs.
- edge for cutting laminated chipboard and self-adhesive to hide the fasteners
Disposal of chipboard
The issue of recycling wood-based materials remains unresolved. The composition of chipboard contains 10-15% of harmful substances. Popular disposal methods include landfilling and incineration. In this case, formaldehyde vapor may enter the environment.
The choice of waste disposal method depends on the type and volume of production. In Russia, chipboard processing and combustion for energy production are not common. Processing technologies are still under development.
Installing the necessary equipment requires significant financial expenses. However, recycling waste helps to avoid the release of toxins into the atmosphere, helps preserve the environment and reduces the cost of producing building materials.
Burning
Chipboards can be disposed of by burning them in special boiler systems. This method allows you to convert waste into energy. When chipboard and MDF are burned in special boilers, the release of toxic substances into the atmosphere is minimal.
The waste is first crushed. During combustion, 250-300 g/kWh is produced. The disadvantage is the high cost of the equipment and the inability to provide the boiler installation with the required amount of fuel. This disposal method has not become widespread in Russia.
Recycling into secondary materials
Using a crushing plant (shredder), the slabs are crushed into chips. Additional filters can reduce dust emissions and reduce production hazards.
The shavings are pressed or used in building mixtures. Materials obtained from recycled chipboard:
- Arbolit. Concrete, which is produced from wood chips, cement, water and chemical additives.
- Technological shavings. Used in the pulp industry, used for the production of particle boards, feed yeast, hydrolytic alcohol.
- Sawdustbegon. Used for thermal insulation of premises.
- Thermal plates Also basted for thermal insulation.
- Gypsum sawdust concrete.
- Termiz, Velox, xylolite, Durizol.
When processing chipboard into recycled materials, it is necessary to follow the technological process. Working with wood-based materials involves increased risk due to the release of toxins. The resulting materials must be tested for toxicity.
Return to production process
At large enterprises, it is appropriate to return wood chip waste to the production process. Transporting lump waste to landfills for disposal is unprofitable. Reusing materials reduces production costs.
Adviсe
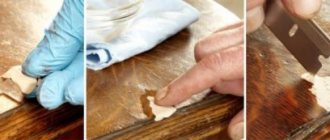
Don't rush and don't be upset if the result is a little disappointing the first time. To do everything beautifully and quickly you will have to learn. Of course, this is not a matter of one day, but when you already have enough experience, you will be able to make any interior elements from almost any materials. The most important thing is to just take your time and carefully consider your every action. And of course, you shouldn’t forget about safety rules, since carpentry work is always associated with some risk. But don’t be afraid, if you are attentive and careful, accidents can be avoided. Start with simple ones and gradually move on to more complex tasks. Then you can become a real craftsman for whom decorating your interior will not be a problem.
Manufacturing process
Chipboard cutting is carried out independently or by turning to professionals who have the necessary equipment. In addition to chipboard, when making furniture you will need fiberboard (fibreboard), natural wood lumber, fittings, and fasteners.
It is quite possible for anyone to carry out a simple update, a master class of which is offered by experienced specialists. The result will be a beautiful, completely new product, and the family budget will not suffer. The most important design details that need to be given the most attention and time are:
- Facades - the front part of the furniture and its doors - are made of a more attractive material. DIY furniture made from chipboard should look attractive. The facade is a separate part of the furniture; it is usually made to order. There are many different types of furniture fronts, they vary in the material used and design;
- The bottom and side walls of the drawers - these furniture elements, like some other parts, are easiest to make from fiberboard. Some craftsmen prefer to fasten fiberboard with a furniture stapler, but this is wrong. After some time, the staples will become loose, and then the entire structure may become warped. It is best to fasten fiberboard with self-tapping screws or nails; it is good to install self-tapping screws with special washers;
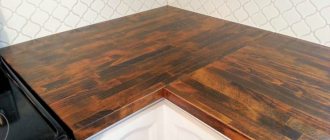
- A tabletop is a horizontal surface where you can write and read. Most tables made at home (photos below) are made from the same chipboard. The weakest area of the countertops is the cutting of the surface. They are most often protected with a melamine edge, for this reason they begin to break in the first year. To prevent this nuisance, the edges are covered with aluminum profiles. The tabletops are fastened from below using small self-tapping screws so as not to damage the front surface.
Choosing the right fasteners and fittings is no less important than quality materials. Furniture fasteners are products necessary for connecting individual parts. Basically, all elements are connected at right angles.
- Dowels - their installation schemes imply the use of pre-prepared holes. They are used for preliminary fastening and increasing the strength of the connection;
- Furniture corners are a common, but already outdated type of fastening. They don’t look very nice, they become loose after a while;
- Euroscrew – screws for connecting parts of furniture.
The holes are made directly on site, using a special drill capable of drilling a groove of the required diameter. The question of how to make furniture with your own hands requires control of the perpendicularity of the drilling direction, so as not to spoil the furniture element. When connecting elements, you need to take into account the subtleties:
- Furniture screws are screwed in using a hex key. Heads designed for a Phillips screwdriver cannot be completely screwed in;
- The main disadvantage of this mount is that fully screwed heads remain visible. To hide them, the holes are covered with plastic plugs of a suitable color;
- Eccentric ties are a convenient, modern fastening method. It allows you to make a hole on the inside of a piece of furniture.
To make holes of the required size, use a Forstner drill. It is not rational to buy it only for assembling hidden elements, but they are convenient for installing doors. Even a novice craftsman should have no problems with how to repaint furniture at home, and step-by-step recommendations will help you assemble new products.
Boxes
Facades
Tabletop
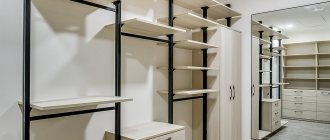
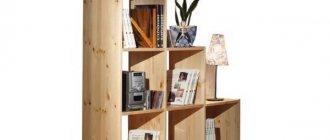
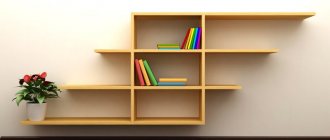
Bookshelf
Every person who loves books is faced with the need to store a library. The easiest way is to purchase a ready-made cabinet, but you can save a lot of money and make or restore furniture from chipboard yourself. The easiest way is to make a classic version of a cabinet with open shelves that can easily fit in any room. The ideal depth for this furniture is 400 mm, overall dimensions are 2000x800x400. (height width depth). Most books will easily fit on such shelves.
You need to start work by drawing up a drawing, separately depicting all the details. Then transfer the parts to chipboard. Next come cutting and other stages:
- Assembly must be done on a flat surface so as not to distort the structure;
- We connect the top of the cabinet and the side walls. You need to use a special square to ensure that the corners are even;
- All elements are connected using fasteners;
- Having installed the top of the cabinet, fasten the bottom, checking the correct connection with a square;
- Don’t rush to attach the back wall; it’s more convenient to install the shelves first. It is better to secure them with confirmation in several places. This will add reliability and increase the service life of the shelves;
- At the end, the back wall is attached;
- Finally, the supports are installed.
Preparing the elements
Connecting the back and sides
Installing skids
Fastening the shelves
Making additional supports
Ready product
TV table
Although TV devices that can easily be mounted on the wall are now common, there are many devices that require special stands. After all, you need to find a place not only for the TV, you may want to install a home theater, a remote control, or find a shelf for a collection of discs. By making a comfortable TV stand yourself, you will not only save money, but will also be able to take into account all your desires - style, how to paint chipboard furniture with your own hands.
The most convenient dimensions for the product are 600x400x1850 mm (height - depth - width). The bedside table is placed directly on the floor, it can withstand serious loads. Making furniture of this size will allow you to easily place even a large TV, and next to it - the rest of the necessary equipment.
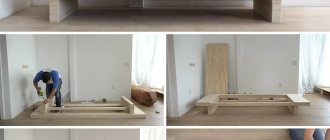
- First, the frame of the TV stand is assembled;
- Place marks for attaching the middle shelf, make holes and install it in place;
- From elements 0.12x0.45 mm, assemble frames for drawers. Then attach the plywood bottom to them, with glue or nails;
- Install hardware for moving drawers;
- Attach handles to the drawers;
- Prepare a place for installing the doors by milling and secure them;
- At the end of assembly, secure the top panel.
Preparing the details
Screw the bars on the sides
We fix the front part
Fixing shelves for drawers
We make a box, secure the elements with self-tapping screws
Assembly
Computer desk
The computer, after the refrigerator and TV, is the most popular item in the house. For this reason, the table at which we work must be suitable. A computer desk is a piece of furniture with different accessories and parts that can be adjusted if necessary. In addition, a self-made version will cost much less than in a store.
When making a table, you can simplify the work and limit its design to straight lines. Additional shelves, holes for wiring, and space for the system unit can be made as you wish.
There are a huge number of designs of such tables; there are special tables used for a netbook or laptop. In small apartments, transforming tables are convenient. The narrow object does not require much space, and if necessary, it turns into a normal computer desk, with all the necessary elements.
For independent execution, it is better to choose a simple model, rectangular in shape. After completing the drawing and cutting out all the parts using a circular saw or jigsaw, you can begin assembly:
- Holes are prepared in the central and side walls for attaching the lower shelf. After this, secure it with confirmations;
- The top shelf is also attached;
- After this, the back wall is installed. It is flush with the tops of the central and side walls;
- Now you need to screw the guide elements for the retractable console under the keyboard;
- The tabletop is attached to the side walls with dowels. You cannot make through holes in the tabletop;
- If you plan to make shelves on top of the tabletop, they are also attached to dowels.
Cutting out the details
Stages 1-5
Stage 6-7