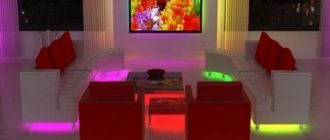
LED lighting for curtains is often used by craftsmen to add originality to the interior of a room. Also, this method of decoration can often be seen in shopping and sports halls, and administrative buildings. This backlight serves as an additional light source, while LEDs consume a minimal amount of electricity.
Another advantage of the LED strip is that it can be installed in the cornice without the help of a specialist. The most difficult part of the job is installing and connecting the power supply for the LEDs.
Types of backlight
There are several types of lighting that can be installed indoors.
Table. Types of lighting for the ceiling.
| View | Description |
| Contour diffuse | Gives a gentle, beautiful diffused light. The ceiling is, as it were, illuminated from below along the perimeter, contour. In this case, the LED strip is located on a special shelf (at the lower level in a prepared recess), and the light from it falls on the ceiling surface. A continuous luminous strip is formed. |
| Directed | In this case, the LEDs will be installed on a slope, which is located between two ceiling levels, shining as if along the ceiling surface. |
| Spot | This is a ceiling covering with a “starry sky” effect. LED light bulbs are installed in the finishing material. One of the most difficult types of organizing ceiling lighting, since it will require a lot of time. |
| Curly | LEDs are installed in small lampshades that will be mounted into the finished ceiling. Several light bulbs are installed, one, for example, shines down, several others create “rays” on the surface of the ceiling. |
Duralight backlight
The backlight is also divided into:
- target;
- general purpose;
- designer.
Installation of contour and directional lighting
The first type is the installation of lighting to delimit certain zones in the room. Simply put, in this case, lighting is used to zone the room. For example, in the kitchen the work area may be more illuminated - additional light would not hurt.
Corridor lighting
General purpose lighting is ordinary lighting. True, most often it is implemented not with LEDs, but with the help of spotlights. Although there is an option when an LED strip can turn into a full-fledged lamp - this is a luminous ceiling.
A luminous ceiling can be installed in any room. For production, an LED strip and a stretched translucent fabric are required. The tape is attached to the rough ceiling and hidden under the tension material. As a result, when we turn on the light, we will get a completely luminous ceiling above our heads.
Glowing stretch ceiling
Typically, a luminous stretch ceiling is combined with plasterboard edging. A small cornice is made from this material around the perimeter of the room, and a backlight with canvas is placed between its sides.
And finally, a designer version of the ceiling lighting. Such lighting will not provide a large amount of light, but it will make the room cozy and complete. Such lighting includes illumination around the perimeter of the room and the creation of luminous patterns on the ceiling.
The patterns are created according to the same principle as the luminous ceiling. Only the LED strip is placed in the shape of the desired pattern, and not across the entire draft ceiling. When you press the switch, the light will penetrate through the translucent stretch fabric and create the same figure on the ceiling surface that is made of LEDs.
Light painting effect
By the way, the ceiling lighting does not have to be white. It can be either single-color decorative or multi-colored RGB, that is, shimmer with red, green, blue and other shades. Colored lighting, if it matches the color of the bulbs with the style of the interior and the general appearance of the room, will look very good around the perimeter of the room both with the main light on and in the dark.
Options for lighting curtains with diodes
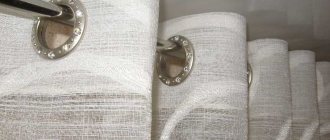
The LED window curtain garland has 2 types of glow: end and side. It is compact, thanks to this property it can be installed even in very narrow window openings. In addition, the tape is practically invisible when turned off.
Ideally, residents should not observe the glow provided by the operation of LEDs, but rather diffused (reflected) light that is pleasant to the eye.
Scattered (reflected) light
It is advisable to hide the cornice for such curtains in the ceiling niche or cover it on top with a polyurethane cornice so that the light source is hidden.
Related article: Making a porch at the dacha with your own hands
Decorative lighting of curtains with diodes is performed in 2 options:
- Below the curtains.
- On top of the curtains.
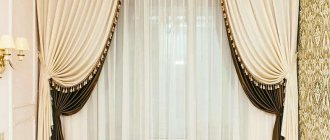
The most common way of illumination is from the top of the curtains, pointing down onto the fabric. To do this, a box is mounted near the edge of the curtain; a diode strip is placed in it, which supplies light tangentially.
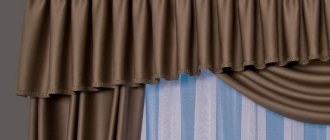
Sometimes, to get a bright accent of light, it is enough to illuminate not the entire curtain, but only the lambrequin, which in the light of the diodes acquires a unique aura.
In some cases, LED curtain lighting is not hidden in a box, but is used to illuminate blinds. To do this, choose a tape with the most dense arrangement of diodes to create an interesting point-light decor.
Hypodynamic interior lighting is provided by full-color RGB diodes, which are controlled using a remote control and can change the shades of light. After pressing the control button, the tape takes on the selected static color, which can completely change the visualization of the curtains. If blue curtains are illuminated with yellow diodes, you will get diffused greenish illumination for the curtains, and if blue diodes are directed at red textiles, the curtain illumination will be purple.
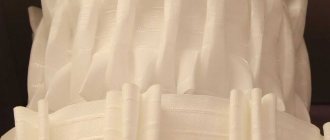
Low-power diodes turn transparent fabrics into light and weightless ones. The lower the density of the diodes, the more airy the organza tulle, muslin or thin curtain will look.
For thick and heavy curtains, more powerful and closely spaced diodes are often used, because such textiles transmit little light and therefore require stronger lighting.
INSTALLATION AND CONNECTION OF TRANSFORMER FOR LED STRIP
The first step is to securely mount the transformer to the ceiling. We apply our constant voltage source to the intended installation location so that the wires laid in advance can easily reach the connection terminals. Then we mark the locations for the mounting holes.
Since most often in modern apartments the ceilings are made of concrete, we drill holes in the marked places with a hammer drill.
And then, using dowel nails, we securely fix the transformer on the ceiling surface.
Now all that remains is to correctly connect the wires to the transformer. Do not forget to de-energize the installation site by turning off the circuit breakers of this branch in the metering and distribution board. Only after making sure that there is complete absence of voltage can you begin to connect.
We proceed directly to connecting the wires.
The supply wire is connected to the terminals marked L and N, while the white wire is the phase wire to terminal L, and the blue wire is the neutral wire to terminal N. For more information about what the L and N markings mean on electrical equipment, read the article “Designation L and N in electrics."
We connect the wire going to the LED strip to the terminals marked V+ and V-. If, when connecting, you do not use a special cable, color-coded for direct current, where the wire connected to the minus is most often marked, but use ordinary wires for alternating current, be sure to remember the polarity of the connection, so that you can then connect the other end of this cable to LED strip.
Where to start?
LED garland curtains are often designed and installed by designers or builders. But if you wish, you can make the illumination with an LED strip yourself.
Required tools and materials:
- strip with LEDs (measure the desired size);
LED strip
- transformer;
- Super glue;
- perforator;
- dowel-nails;
- screwdriver.
First, a plasterboard box is mounted along the top of the window opening, along the edge of which a polyurethane cornice is attached.
Related article: Bath paint: interior decoration
First, be sure to carry out the electrical wiring of the standard type for 12-Watt lamps and install a switch with 1 key.
Making your own lighting
How to make curtain lighting yourself? To complete the work you need:
- choose LED strip;
- select additional equipment necessary for the operation of the tape;
- install LED strip and other electrical equipment.
How to choose a tape for organizing curtain lighting
When choosing an LED strip you need to consider:
- LED color. Manufacturers produce:
- plain white LED strips (photo below). The main advantage is the possibility of achieving not only a decorative effect, but also organizing additional lighting of the window opening;
- plain colored ribbons. Available in red, yellow, blue, green, purple and so on. When choosing a specific color, you need to build on the existing decoration of the room. The ribbon should complement the design of the room, and not stand out as a separate bright spot;
LED strips with diodes of the same color
multicolor ribbons. The main advantage is the ability to independently select a color mode in accordance with your mood, work performed, and so on.
Multi-colored ribbons can be used to additionally decorate a suspended ceiling with a niche for curtains, which will allow you to achieve maximum effectiveness;
LED strip with multi-colored LEDs
- lighting brightness. Parameter depends:
on the size of the installed LEDs. Illumination of cornices for curtains and suspended ceilings is usually done with diodes of size 3.5X2.8 mm, which allows you to achieve a brightness of 5 lumens;
The most popular sizes of LED strips
on the number of diodes per 1 m of tape;
Variety of strips depending on the number of LEDs
- level of protection of electrical equipment from moisture. To illuminate curtains in a room or kitchen, a strip with a minimum level of protection (IP20 marking) is sufficient.
All parameters that are significant when choosing an LED strip are indicated in the labeling.
Standard LED strip marking
Selecting additional equipment
For the LED strip to work correctly you will need:
power supply, which is selected depending on the power of the electrical equipment and operating voltage. To independently determine the power of the equipment, you can use the following formula:
Power supply power = Power of 1 m LED strip * Strip length * 1.25 (minimum stock level)
Tape connection equipment
controller. If you set up the curtain lighting yourself using a multi-color tape, then to control the operating modes, additional equipment is required - a controller, which can have manual or remote control.
When choosing a device, factors such as the control method and the number of available operating modes are taken into account.
Remote Controller
Installation diagram
LED strip installation diagram:
- preparation (assembly) of the lamp. The LED strip is cut in accordance with the specified parameters, connected to each other by soldering (the safest method) or connecting clips, the power supply and controller are connected (if necessary);
Equipment connection sequence
- LED strip mount. If installation is carried out in an aluminum profile or plasterboard box, then the tape can be attached to an adhesive base. If the tape is fixed directly to the cornice, wall or ceiling, then it is more advisable to use special fasteners;
Installation of LED strip on mounting clips
- fixing the power supply and controller.
You can watch the video for more information about the process of organizing the lighting.
After complete installation of all lighting elements, a test run and performance check is carried out. If necessary, appropriate adjustments are made.
Option to suit your taste
There are indeed quite a few ways to “illuminate” curtains and make an original night light. Among the most popular:
- Garlands,
- LED curtains,
- lighting built into the cornice,
- curtains, which themselves are LED “waves” (they are also called “waterfall”).
Often the method of illuminating curtains is used in administrative centers, sports or shopping areas.
But first things first.
Bathroom mirror
Lighting in the bathroom means the presence of lamps on the ceiling and walls.
To illuminate the mirror, modern LED sconces are used, installed directly above the mirror or on the sides of it.
There are also factory mirrors that initially come with built-in lighting, but they cost a lot of money.
In the meantime, you can easily modernize this decorative element with your own hands at minimal cost.
The main problem here is how to avoid bright light so that it does not hit your eyes.
You will need a good dissipative plug. This is if you glue the tape around the edges on the outside.
Many people use the backlight option, when the tape is placed “behind” a mirror protruding several centimeters from the wall.
The easiest one to implement is the option with rectangular mirrors. All you need is a profile, a diffuser and corners.
With round shapes, background lighting is used. Fitting the ribbon beautifully into the circle is quite problematic.
Here it is more rational to buy factory options.
Features of tape fastening
The traditional method of attaching ice strips to illuminate curtains uses a factory-made adhesive base on the side opposite the diodes. However, in practice, the durability of this method of fixation leaves much to be desired - the tape falls off quite quickly. The reason may be either a manufacturing defect or unscrupulous adherence to the instructions of the installer himself.
In such a situation, high-quality super glue may be the solution. Before installing the strip, the gel must be applied in dots at a distance of 5 cm to the base to which the tape will be attached. Then, with the self-adhesive side, place the ice lamp itself on such a surface. Curtains or blinds with lighting installed in this way will last as long as the diode elements themselves work.
LED strip installation technology
Stage 1. Installation of skirting boards
I will now tell you how to make LED lighting with your own hands. Work must begin with preparing the base - installing a ceiling or furniture plinth.
Example of open gluing
If installation is carried out on the bottom surface of the kitchen unit, then the instructions suggest two options:
- Open installation - the tape is simply glued to the pre-greased bottom of a hanging kitchen cabinet.
Fastening the profile for mounting the tape on the headset
- Installation in the baseboard - a special profile is glued or screwed onto the cabinet from the bottom side. After this, an LED strip is glued inside the profile, which is covered with a transparent insert.
Do-it-yourself ceiling lighting is somewhat more difficult to install:
| Illustration | Sequencing |
| Preparing the baseboard. The ceiling fillet for installing lighting is cut to fit the size of the room. To trim internal and external corners, a miter box is used - a special device that allows you to accurately fit the parts and not confuse the direction of the cut. | |
| Preparing the walls. Markings are applied to the walls under the ceiling for installation of ceiling plinths. We control the horizontality of the markings using a level. | |
| Primer of walls. We treat the place where the plinth is glued with a penetrating primer. As an alternative to primer, you can use baseboard glue diluted with water in a ratio of 2:1-3:1. | |
| Applying glue. Apply a thin layer of glue to the underside of the plinth. | |
| Gluing fillets. We apply the plinth to the wall and press it while leveling it. Carefully remove excess glue protruding from the bottom of the base with a plastic spatula. | |
| Putty joints. The joints between the fillet fragments in the corners and on flat areas are sealed with white acrylic sealant. We use spatulas to fill cracks. |
LED lighting can also be installed in a special plasterboard box. But in this case, a shelf for laying the tape must be included in the ceiling design in advance, at the stage of its installation.
Installation diagram for a plasterboard shelf
A stretch ceiling made of light vinyl film can be decorated in an even more original way. To do this, the LED strip is glued directly to the wall behind the stretched canvas, at a distance of approximately 40-50 mm from the top edge of the mounting molding. When the backlight is turned on, the light flux is blurred, thereby achieving a decorative effect.
This is what the contour light decor looks like behind a matte white canvas
Stage 2. Assembling and connecting the electrical part
Now - briefly about how to make LED backlighting yourself.
Simple connection option
Complex circuit with amplifiers and multiple power supplies
The first thing to remember is that LED strips are connected in parallel, in fragments no longer than 5 m. Accordingly, when installing a long circuit, we will have to select wires of the appropriate length.
We assemble the system like this:
| Illustration | Sequencing |
| Tape cutting. Using sharp scissors, cut the LED strip into fragments of the required length. The cutting lines must follow the marks on the product, otherwise there is a risk of damaging the LEDs or conductive paths. | |
| Soldering wires. We clean the ends of the wire (two-core for a single-color tape, four-core for a three-color tape) and the edges of the conductive paths on the tape. Solder the wire to the LED strip, focusing on the markings. When soldering, we use a temperature of no more than 240-250 degrees. To avoid damage to the base, soldering time should not exceed 10 seconds. | |
| Connection to the power supply. We also clean the other end of the wire (the edges of the cores can be crimped or end switches can be put on them). Observing the markings and focusing on the color of the wires, we connect the wire to the terminals of the power supply, tightening the fastening screws with a screwdriver. | |
| Functionality check. We turn on the system to the network, checking whether all the LEDs are lit. We also control the degree of heating in the soldering areas. | |
| Installing the tape. Using a self-adhesive base, we mount the tape into the ceiling fillet or furniture plinth. You can also simply stick the product to the bottom of the kitchen cabinet. |
Examples of ready-made solutions
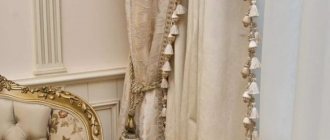
In addition to the top and bottom lighting of curtains, LED strips are often used to illuminate the side parts of a window opening. In this case, install the box (with the tape placed inside) along the perimeter of the window. This lighting method will look especially bright and unique with curtains decorated with embroidery or beads.
Using LED lighting to illuminate curtains and window openings is an excellent way to create a unique design and visually enlarge residential and administrative premises. In recent years, the cost of such products has decreased significantly, making them accessible to almost all segments of the population.
LED RGB Strip
You will get truly magical curtain lighting when choosing such an RGB strip. RGB strip is an LED strip that can change its shades using a remote control.
Curtain lighting
Where can I buy LED strip for curtain lighting?
You need to buy tape depending on the width of your cornice. Knowing the width of your cornice, you can purchase tape of the same width
What should you pay attention to? It is advisable to purchase the tape in a complete set for connection. What's included in the kit?
- LED Strip Light
- The controller (since the tape is about 12 volts, it adapts the tape to your voltage of 220 V) and has the size of a rather large box, or a rectifier, which is much smaller than the controller (found mainly in tapes with one color tone). When choosing a tape with a controller, keep in mind that it needs to be placed so that it is not visible.
- Control panel (for illuminating curtains with RGB tape)
Curtain lighting
LED strip for illuminating curtains can be purchased in radio parts stores, and is also successfully sold at a much lower cost on the AliExpress website. Here you can find ready-made kits for different lengths with a good description of the characteristics.
Look carefully at customer reviews, because you risk paying money and not receiving the product. If there are good reviews in large quantities, you can safely order, especially since the site management protects the buyer from unscrupulous sellers; if you do not receive the goods, your money will be returned to you.
Well, the most basic question is, where is it better to stick the LED strip for curtain lighting?
All modern LED strips have an adhesive base. Everything is very easy, remove the protective layer, glue the tape in the right place.
Designer's advice:
Use additional transparent glue to strengthen your LED strip to avoid misunderstandings. The adhesive application is most often not of very high quality; over time, the tape may fall off, and this is an additional time expense. This is especially true for those tapes that have frequent application of diodes, as well as for tapes with silicone coating (moisture resistant), they already have a heavier weight.
In order to preserve the mystery and romance of your curtains, the LED backlight needs to be hidden, and therefore, there are only two options in which the LED strip will be appropriate:
Niche for curtain lighting
Make the niche a little wider than usual, two to three centimeters, so that the tape does not touch the fabric. We glue the tape in front of the curtains, on the end of the suspended ceiling.
You can read about curtains in a niche here:
Cornice with a strip for lighting curtains
A cornice with a strip is also a great option for installing an LED strip.
You can read how to install the cornice correctly here.
Glue the tape to the inside of the plank. Alexander Dikovinny's video shows the step-by-step process:
So, to summarize, we can say that lighting curtains and installing an LED strip for it is not as difficult a process as it seems. Decide on the tape, by the way, it has a different number of diodes per meter, install curtain lighting, change your environment with the speed of a click on your remote control.
Perhaps you also know ways to illuminate curtains? Share them in reviews, leave comments.
Advantages
By using this modern high-tech decor, users receive the following benefits:
- Illuminating the curtains creates an interesting effect of soft sunlight penetrating.
- An LED curtain visually changes the dimensions of the room and the geometry of the interior space of the room.
- The diodes favorably emphasize the window composition of curtains with tulle, while looking attractive from the inside and outside of the room (it creates a second light from the curtains).
LED lamps are much more economical than conventional incandescent lamps, are fireproof and almost do not heat up during operation.
The electricity consumption of such light sources is minimal, and their operation is durable and stable.
Curtain rod lighting operates on low voltage and does not damage the fabric, as it produces little heat.
Installation technology
In order for the LED lighting to be on the curtain, when laying electrical wiring in the room, it is necessary to place a special plasterboard box above the window in which the cables will be placed. This box will contain a tape and a transformer from which the backlight will operate.
Then you need to move on to installing the transformer. It is mounted on the ceiling or wall. It is usually attached with dowels and in such a place that the wires can be easily connected to the DC source.
Before you begin connecting cables, turn off the power supply. After this, connect the power cable to N and L (in this case, the white phase wire is connected to the L element, and the blue neutral wire is connected to N). The LED strip is connected to the device through the V+ and V- elements. The connection diagram is shown below:
Important! After the installation and connection of all wires to the power supply has been completed, you must begin connecting the transformer and strip. The LED strip is secured with a wire located in the niche
The backlight is attached using soldering. We talked in detail about how to connect an LED strip with your own hands in a separate article.
In order for the curtain to be illuminated from the inside and fit well into the interior, it is necessary to take into account some points:
- The curtain should look good with the lighting, and the LED strip should not be visible to the person looking at the curtain. Only the backlight should be visible, as in the photo below:
- The light should not be obscured by curtains or any other elements.
- In relation to the canvas, the LED illumination should have a tangential direction.
- In accordance with fire safety regulations, the power source should not be located close to surfaces that are susceptible to high temperatures. This means that the distance to the curtain must be significant. The photo shows an LED strip that is placed along the entire length of the wall:
As for installing the LED strip, there is an adhesive base on the back of the strip, thanks to which you can attach it to any flat surface. The optimal solution would be an aluminum profile. It is small and the curtain will cover it. Its standard length is 2 m.
Before gluing, you need to make sure that the LED strip is insulated from aluminum. This is necessary to avoid short circuit. Then you need to attach the tapes to two aluminum profiles and solder a connecting pair of wires between them. After the lighting strip has been installed in the profile, it must be tested. The lighting can be turned on together with the general light or it can be done with a separate switch.
Another option for installing lighting is on a cornice. In this case, the curtain will hide the brightness of the light and look more original. A photo example of this type of tape arrangement is shown below:
In addition, the curtain can be illuminated using the spot method. As a rule, this method is used to emphasize lambrequins
When installing LEDs on a rigid structure, attention is focused on the outline. But to implement it you need to be extremely precise and careful.
We also recommend watching a video that shows how to make curtain lighting with your own hands:
Ready-made options with photos
The result obtained directly depends on the idea. The above describes the standard installation option, which can be varied at your discretion. Below (pictured) are bold solutions, but at the same time difficult to implement. Therefore, if you do not have confidence in your own abilities, it is better to entrust the work to professionals.
Wall corner
For some reason, everyone places the LED strip strictly in the upper part of the ceiling, placing this decorative element parallel to the wall.
However, the tape can be installed directly and in the corner between two walls.
To do this you will need a special profile.
It is not necessary to make continuous lighting from the ceiling to the floor; standard two-meter sections that will illuminate the upper part of the room are sufficient.
Here you can mount both a regular strip on multi-colored SMD LEDs and a smart addressable one.
This solution looks truly unexpected and will not only bring a new play of light and shadow to your old apartment, but will also add an extra source of lighting where it was previously missing.
For example, you can refuse a sconce if you forgot to lay the wiring under it in advance. At the same time, the wall itself remains absolutely free for other decorative elements - paintings, TV, functional shelves, etc.
Once again about the main thing
In order for the lighting decoration to really please you not only with beautiful effects, but also with ease of use and safety of operation, be sure to think through all the details before going to the store and starting installation.
Try to create smooth lighting, and no curtains or curtains should interfere with the light.
Kitchen lighting
The main location for lighting in the kitchen is the work area of the table. When preparing food, we often lack top and side lighting. LEDs in the right zone solve this problem. An excellent design move is the internal lighting of glazed cabinets. The bottom of the kitchen set can also be decorated with LEDs.
Conventional cabinets for storing dishes, cutlery and food literally need additional lighting installed. Especially if there are a lot of appliances in the kitchen, and finding them is significantly complicated by the lack of light.
A fashionable favorite of recent seasons is the illumination of a transparent tabletop. It can be either contour or solid. And it looks beautiful, giving the kitchen interior a unique twist.
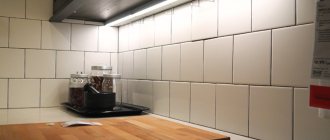
The LED console with a pattern is considered another new product. They replace tiles on the wall, creating unimaginable effects and overflows in the room.
New Year's LED curtain for the window
A New Year's curtain is an excellent solution for a nursery. The curtain shimmers with different lights, creating a cheerful atmosphere. Stores sell curtains of different colors and combinations: red, yellow, green, white, purple and others.
Assembly and connection of the electrical part
When designing and assembling, keep in mind that the LED boards are connected in parallel; the length of the fragments does not exceed one reel (5 m). Five-meter ice strips are not connected in series - they are connected to the driver in parallel. For a powerful unit with a large size, leave more space.
- To cut the LED strip into fragments, use sharp scissors or a knife with a backing. Guide the cutting lines along the marks between the modules so as not to damage the conductive paths.
- Strip the ends of the wire and the edges of paths carrying current. Solder the wire according to the markings on the tape. Soldering temperature – 240-250 °C. For SMD tape, use a two-core copper wire, for RGB tape, use a four-core wire. To avoid damaging the base, do not solder for more than 10 seconds.
- Strip the free end of the wire, connect it to the adapter terminals, guided by the color of the marking, tighten the fastening screws.
- Check the functionality of the circuit by connecting the system to the network. Check if all the fragments are glowing, check the heating at the soldering site.
- When installing the tape, use a self-adhesive base to secure the system.
No tags for this post.
Garland for curtains
It goes well with fabric curtains, but also looks good on its own. Light either part of the window or the entire window opening. Garlands can be hung with any number of threads, direct the light in the desired direction, and even fold the design.
LED lighting for stairs, diagram of how to make it yourself
There are plenty of solutions for successful lighting - from a conventional lamp to an intelligent system. To understand what you need, get acquainted with the options for staircase lighting with LED strip.
What you will need
To arrange this beauty on the steps, stock up on:
- LED light sources;
- power drivers for LEDs;
- profile for laying the power supply cable;
- fasteners, electric drill or powerful screwdriver;
- measuring tape, scissors, stationery knife;
Progress
First, mark the installation. Then find the location for attaching the profiles for the wiring and lighting control unit. Learn how to design LEDs.
Glue the product with double-sided tape to the steps along the top edge. The sealed LED strip performs well, even withstanding floor washing.
Check with the backlight control method before wiring installation work.
Many people welcome the “smart home” in complex project solutions.
Get acquainted with one of the backlight connection diagrams, consisting of:
- power supply;
- intelligent control unit with sensor;
- light emitting elements.
Use as a sensor:
- acoustic relay;
- motion sensor;
- ultrasonic range finder.
About the power part of the circuit
Select a power supply taking into account the total power of the lighting fixtures.
Acoustic relay control
The point: the system reacts to loud sounds, say, clap. This device is assembled even without a microcontroller.
Controls: very simple. Clap once and you turn on the backlight, and then turn it off again.
Useful video
Installation recommendations
To create high-quality lighting that will not spoil the overall interior of the room, follow the following rules:
- Lighting is selected in accordance with the curtains used. You create a colorful effect rather than highlighting the ribbon. Therefore, the person who looks at the curtain should not see the tape. Ideally, it should be hidden inside the box.
- Do not block the path of light flow with other structural elements.
- It is advisable to direct the light along a tangent line relative to the curtain.
- Install the lighting device as far as possible from flammable objects and surfaces.
- Try to create smooth lighting, and no curtains or curtains should interfere with the light.
- Avoid installing overly bright LEDs or buying cheap Chinese products (both strips and power supplies).
- Make sure the insulation is intact to prevent a short circuit.
PSU power calculation
Before purchasing a tape, you need to calculate its power and, in accordance with the result obtained, select a power supply. As an example, we will consider a flexible SMD 5060 board, the length of which is three meters. The total power is 14.4 W, and there are about 60 LED diodes per meter. The power for one linear meter can be obtained from the sales consultant.
The total consumption of a 3 m board will be 14.4 * 3 = 43.2 W. But the power supply should be taken with a power reserve, so about 20% should be added to the obtained value. As a result, after rounding we get a derivative equal to 52 W. You can buy a power supply of a different power, but not lower than the received value.
The table below shows the dependence of the wire cross-section on the power of the lighting strip:
| Power, W | Current, A | Cable diameter, mm | Cable cross-section, sq. mm |
| 12 | 1 | 0,75 | 0,44 |
| 24 | 2 | 1,0 | 0,79 |
| 48 | 4 | 1,5 | 1,77 |
| 72 | 6 | 2,0 | 3,17 |
| 100 | 9 | 2,5 | 4,91 |
Fastening the tape
We said above that the tape is most often hidden inside a special niche. After the transformer and electrical wiring are installed, the flexible curtain board should be installed. We described recommendations for its mounting above at the beginning of the “Installation Recommendations” section.
Modern trend in curtain decoration
Interior designers often use several sources of artificial light to zone rooms. Light streaming from different parts of the room can create a different mood and sense of space depending on what functions a particular zone performs.
So, in small living rooms, in addition to central lighting, floor lamps, sconces are used, or walls, curtains, and ceilings are illuminated. For example, a floor lamp and an easy chair are installed in the recreation area for cozy reading books or listening to music.
At the same time, the curtains can be illuminated, and if you turn on all the lighting sources at the same time, you will get bright illumination for family and friendly gatherings. In the evening, illuminated curtains not only perform a decorative function, but also serve as an additional source of light; for example, in children's rooms they can be used as a night light.
Technologies do not stand still, and at the moment there are LED strips that are available to almost everyone. And the use of LED strip makes it possible to mount the product anywhere on a hard surface. Let's take a closer look at the use of LED strip for illuminating curtains.
Methods for installing lighting on the ceiling
The most common place to install LED strips is suspended ceilings (especially plasterboard). This product can be installed on the ceiling in the following ways:
- creating hidden lighting by installing LED in a box;
- placement of the light source on a special profile;
- installation of the product on the ceiling plinth.
The most common way to create hidden lighting is using a box. In this case, you need to create a box with a hidden cornice from drywall.
Hidden LED lighting in a plasterboard box
This is a rather complicated implementation method, as it involves creating a box around the entire perimeter of the backlight. In addition to the box, the LED strip can be installed on a profile, which today can differ both in the material from which it was made and in type. The most popular is the aluminum profile. It is best to choose when installing in the kitchen.
Profiles for LED strip
But a plastic profile can also be used here. This profile is suitable for the bedroom and living room. Modern models, which have increased resistance to temperature changes and moisture, are perfect for installation in the kitchen. Profiles for LED strip come in three types:
- corner. Used to create ceiling lighting around the perimeter of rooms. With such a profile, you can create an unusual illumination of the ceiling surface, even if there are various figures on it;
- mortise More relevant for furniture lighting. They are often used in the kitchen to illuminate the work surface;
- built-in When installed, it looks three-dimensional, which allows you to play with it in the interior of the premises in a variety of ways.
Another rather original way to attach an LED strip to the ceiling is to install a ceiling plinth. The main advantage of this installation method is the simplicity of the work, on which you will spend a minimum of effort and time. Here you just need to install the plinth at a distance of 8-10 cm from the ceiling.
Ceiling plinth for LED strip
Once the installation method (box, profile or plinth) has been selected and implemented, you can begin installing the light source itself.