Sometimes the assortment in stores is striking in its monotony. Many apartment owners know that choosing furniture for the hallway is very difficult. If the room is small, then the cabinets simply do not fit into it or fill all the free space.
But owners of spacious hallways also find themselves in a difficult situation - the presented models do not always meet the owners’ needs and often look ridiculous in a large room. The answer is a DIY hallway.
If you cannot choose a suitable cabinet, then do not be upset and think about creating the ideal furniture for the hallway with your own hands. This approach will help you save money and also get a model that suits you in all respects.
Will a novice “home master” be able to cope with such a task? Yes, the desire and availability of all the necessary tools and materials will lead you to a positive result. Of course, inexperienced craftsmen are better off sticking to the simplest models.
But those who have made furniture more than once can create a real work of art.
To make it easier for you to understand complex work, we have prepared special instructions, drawings and diagrams.
Material selection
The materials differ in appearance and technical parameters.
What to consider when choosing
- Moisture resistance - parts should not lose their properties when in contact with a wet raincoat or umbrella. Special requirements are placed on feet that come into contact with puddles from outdoor shoes, because in winter, when snow gets into the raised sole, it is not always possible to remove it by tapping the shoe on the floor. Shelves on which things are constantly placed quickly get dirty and have to be wiped frequently with a wet cloth. It is desirable that their outer layer is completely impervious to water - otherwise it will begin to warp and the inner base will collapse.
- Abrasion resistance. Doors and shelves are constantly used. They place bags with metal fasteners and decorations, and heavy bags of groceries. A sharp buckle may cause scratches on the surface. To prevent this from happening, the coating must be highly resistant to mechanical damage.
- Durability - often not only clothes are stored on shelves, but also metal tools, or spare parts from a car are left, so they should not bend. If marks remain on the outer covering when pressed lightly, it is best used for clothing or items that do not create stress.
- Resistance to aggressive environments - shoe sprays, cleaning products and other household chemicals are often stored in the hallway. When they get on the surface, they should not corrode the outer coating or leave permanent stains on it. Shelves and walls should be made of materials that can withstand cleaning using chemicals.
Material options
- Natural solid wood - blanks do not have good performance characteristics. Their advantage is their appearance, but it is perfectly imitated by veneer. Natural pine or beech is used only when it is a matter of principle. The array is characterized by low resistance to temperature and humidity deformations. Large parts bend and shrink even under normal conditions. This is due to the fact that the moisture content in their fibers changes, evaporating in hot, dry weather, or absorbing from the atmosphere saturated with steam. The fibers are susceptible to rotting. They must be dried for several days, and then impregnated with antiseptics and covered with a layer of varnish that protects them from damp air and direct contact with water.
Unlike factory products, natural ones have many defects. The quality is affected by the presence of knots and resin stains. To assemble a hallway with your own hands from wood, it is better to use ready-made panels that have undergone the necessary processing.
- Chipboard - boards made of glue and sawdust. They do not have defects characteristic of an array. The products do not change their shape with changes in temperature and humidity and do not differ in strength from natural ones. They are inferior in durability and hardness to oak and wenge, but such varieties are rarely used. Products covered with veneer or melamine paper are of good quality. They are not afraid of dampness and are resistant to chemically active substances. The blanks do not require additional processing.
- LDSP – chipboards with a laminated coating. They are distinguished by higher performance characteristics. They are often used to decorate walls, floors and ceilings in wet areas. Laminate is a paper-polymer film. It provides a high level of protection against moisture and abrasion.
- MDF - panels made of finely dried sawdust and a binder. They are laid in layers and formed by hot pressing. The products are stronger than their analogues. They are more resistant to stress and dampness, but they are much more difficult to process. Cutting the workpiece will require much more effort and time. The blanks are covered with melamine paper and veneer.
- Fibreboard (hardboard) - thin sheets for back walls that do not experience mechanical stress. It is easy to cut and adjust to the desired size. It tolerates wet cleaning well, and if it gets wet it does not lose its properties. Appearance does not matter when creating an interior design. The back walls are usually hidden from view.
Floor repair
To repair the floor, the old covering is removed and unevenness is corrected with a thin layer of screed. Then a soundproofing or other underlying layer is laid, depending on the type of flooring.
Quite often, large-sized ceramic tiles or porcelain stoneware are used in the hallway. The solid material is resistant to mechanical stress and has various textures similar to natural stone and wood.
Another popular material is laminate, usually at least 32 washability class. These materials can be combined: the entrance area near the door is covered with porcelain stoneware, and the rest of the hallway is covered with laminate
A common covering option in the hallway is semi-commercial linoleum. It is also resistant to heavy loads and comes in a variety of colors and textures.
Chipboard finishing options
- Laminating is a varnished paper coating glued to a chipboard base. It quickly becomes unusable in rooms with high humidity. Does not tolerate mechanical loads well.
- Melamine paper (artificial veneer) - it is placed under a layer of transparent melamine resin, through which the design on the outside is clearly visible. The resin tolerates moisture and chemically active substances well. It is highly resistant to abrasion and is perfect for creating furniture.
- Lamination is the application of a film of melamine resins, which increases wear resistance several times. There are two classes of coatings. Class CPL - smooth surface, class HPL - imitation of natural stone or wood fibers.
- Postforming – finishing with multilayer plastic. Often used for walls and countertops with rounded corners. Essentially it is lamination in several layers.
- Veneering is gluing a thin sheet cut from solid wood onto the surface of a panel. The products do not differ in appearance from their natural analogues, while they are devoid of their main disadvantages. They are not susceptible to mold and retain their shape in any environment.
Advantages and disadvantages
Nowadays, almost anyone can independently design a hallway. You can purchase a ready-made set of materials in stores, which you just need to assemble yourself at home. It is also possible to order the production of the necessary parts according to individual sizes and preferences. And if you have the opportunity and the necessary tools, then it is possible to make all the components yourself.
In any case, if you take on making furniture with your own hands, there are both pros and cons.
The advantages include:
- original design;
- compliance of furniture with the required dimensions with minimal error;
- the cost of homemade furniture is several times less than ready-made furniture;
- an exciting pastime.
The disadvantages of such design solutions are the following nuances:
- in the end, the product may not be as perfect as one bought in a store;
- making furniture will take a lot of time and effort;
- During the work, a lot of dirt and dust will appear, so the best option for the rest of the household is to be in a separate room at this time.
Design
It is advisable to design the hallway in the same style as the rest of the rooms. At the same time, the design can be diversified with artifacts that express the individuality of family members.
Posters or paintings placed in frames on a free wall will tell about your passion for art. An original banquette with ethnic motifs and exotic little things will communicate your love of travel.
Types of hallways
Based on the appearance of the “entrance” room, all your guests and even just casual visitors will form an impression of the home as a whole. Carefully think through the concept, the main idea of the entire room. And then only start working when you are sure that the idea is practical, and its implementation will lead to the optimal result.
A hallway made with your own hands is, in any case, more unique than something made to order.
But having freed yourself from the “tutelage” of designers and engineers of the furniture industry, you will have to independently understand all the nuances. The main types of these rooms are corner, open, compartment and hinged; depending on the specific type, the requirements for furniture differ.
In a corner room, absolutely everything is subordinated to the idea of maximizing the use of space, or rather, an empty corner. Open shelves can be placed on the sides of the wardrobe; in other places, cabinets and hangers of a classic look can be placed. You can additionally save corridor space if the cabinet doors are mirrored.
The open type of hallway contains the bare minimum of furniture - there will obviously be no upholstered furniture, and sometimes there won’t even be a closet to be found.
If there is one, it is relatively small; hooks and hangers are used for hanging clothes, visible to everyone. The opposite is a room in a compartment format, in which wardrobes of the same type are invariably placed. It easily accommodates the personal belongings of everyone who lives in the apartment; sometimes you don’t even have to look for a place for clothes for different seasons.
Hallway configuration
An elongated narrow corridor needs to be visually expanded. A sliding wardrobe with mirrored doors installed along a long wall will add air and light.
Painting the ends of the room in darker colors than the side walls will help visually shorten the length. Horizontal stripes will expand the space.
A small hallway will require a thoughtful, compact solution to save every centimeter. Mezzanines, narrow wall hangers, and folding shelves would be appropriate here. A corner cabinet will help save space.
A large hallway allows you to create additional storage areas for sports equipment: bicycles, skis, skateboards, and for household items: vacuum cleaner, ironing board.
DIY wardrobe
A home craftsman can independently make the main element of the hallway - a wardrobe. First, you should draw a sketch and plan where outerwear will hang, shoes will stand, and where hats will be placed.
The dimensions of all elements are determined in the drawing. To work you will need:
- furniture panels;
- plywood;
- furniture fittings;
- screwdriver;
- self-tapping screws.
- Blanks from furniture panels are cut out according to given dimensions: side strips, base and shelves. A sheet of plywood is used as the back wall. The top cover must be overlapped. The entire structure is assembled using self-tapping screws, and wood glue is used for reliability.
- Mark the location of the clothes rail. It should be located 4-5 cm below the top shelf. Now you need to screw the holders and insert the bar itself.
- The doors are cut out of panels and each is hung on three hinges. Finally, the handles are attached and all surfaces are tinted with varnish.
DIY cabinet in the hallway
A cabinet is made in a similar way, which can be adapted as a shoe rack or used to store various small items. The side parts are connected to the base and back wall using wood glue and self-tapping screws.
For drawers, ready-made guides are attached to the side strips. The boxes are assembled and inserted inside the cabinet, and then the top cover is attached.
The top of the cabinet can be designed as a seat. To do this, glue a piece of furniture foam rubber onto the top cover. On top it should be wrapped with padding polyester, and on top with beautiful furniture fabric. The fabric is attached to the lid from the bottom side with a furniture stapler. As an option, the seat can be made folding by attaching hinges to the lid and to the back wall.
The composition will be complemented by a mirror in a wooden frame, a stand for umbrellas and bags.
Styles
If the renovation in the hallway has already been completed and the interior style is clearly defined, you can easily select the appropriate modular furniture.
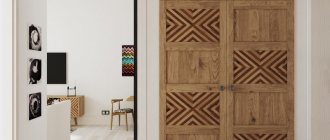
Baroque
The color of the furniture can be white with gilded outlines. It is allowed to use natural wood without painting. All modules are decorated with stucco, there are cornices and columns.
Baroque style in the hallway.
Classicism
Regular module shapes, symmetrical details, pastel colors or a play on contrast. The modules contain a lot of glass or mirrors, and there is a stained glass design.
Classicism style in the hallway with modular furniture.
Art Deco
Bright colors on a white background, fine carvings on the facades of the modules, textile inserts, various landscapes and patterns are possible.
Art Deco in the hallway.
Minimalism
Rich colors, calm textures, strict shapes.
Strict minimalism in the hallway.
High tech
A surface that imitates plastic or glass, a lot of chrome parts, shiny facades.
Innovative high-tech style in the hallway.
Provence
Pastel colors, wood-like textures, fabric inserts, aged surfaces.
Provence style with corner modular furniture.
Thanks to the mobility of the modules, you can create completely different compositions. After studying the options on the Internet, you can create a unique hallway with a simple arrangement of blocks.
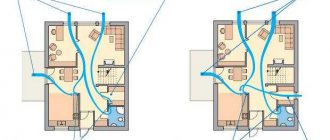
DIY corner hallway: instructions, diagrams and drawings
The problem that arises when creating a corner hallway is that careful calculations are required; the slightest mistake can cost a whole sheet of material. First you need to take measurements and check the walls. If the surface of the walls is curved, then you cannot do without a common frame.
Otherwise, the walls themselves can serve as a base to which you can screw shelves. The second option is more economical and simpler, but we will consider a separate cabinet, since perfectly smooth walls are very rare.
Choose the appropriate drawing based on the size of the room, the length of the walls and the proximity of the doorways. Consider the interior of the cabinet. According to the selected dimensions, make six main body elements:
- lower and upper bars,
- back walls (2 pcs),
- side walls (you can do without them, but the functionality of the cabinet will decrease).
Once you have the frame assembled, you can begin installing interior shelves, baskets and drawers, as well as hooks and rods.
The corner hallway can be equipped with doors on rollers, turning the structure into a corner wardrobe. But budget swing doors will also look good.
How to inexpensively make a design project of a product according to your dimensions using someone else’s hands
There are different options for how to make a corner cabinet with your own hands according to a finished project. The necessary drawings can be ordered through specialized services where professional designers and constructors work.
Search for a designer on Avito
The Avito advertisement portal constantly publishes advertisements from various designers and furniture designers. You can contact a suitable specialist and directly discuss all the terms of cooperation.
Negotiations with local designers
If there is a design studio in your city, or you know specialists in this industry, try to consult with them and find out about the prices for drawing up design projects. At the negotiation stage, all nuances and details should be discussed in order to avoid mistakes when drawing up drawings of sliding wardrobes.
Placing an order on the remote service FL.ru
It is also possible to order a cabinet design service through the freelance service FL.ru. In this case, you yourself will be able to indicate the desired price, terms of cooperation and technical specifications. The portal employs thousands of specialists in the field of furniture design, who will easily prepare a project in a short time and at an affordable price.
DIY wardrobe: instructions, diagrams and drawings
Making a wardrobe is much easier than it might seem. But first you need to decide on the exact meaning of this term. “Sliding wardrobe” involves a special design of doors that move on runners along the cabinet body. It can be either built-in or free-standing.
If you wish, you can make the cabinet body from plasterboard and thus hide it in the false wall. But we will look at the classic design of a sliding wardrobe with side walls.
This model with dimensions 2020x625x2320 consists of several main parts.
- The side racks should be 2288x625 mm high (these calculations take into account the thickness of the sheets of the upper and lower strips - 32mm).
- Also large parts are the lower and upper strips: 2020×625 mm.
- The middle vertical posts are inextricably linked to the clothes rail. As a rule, it is mounted at a height of 1900 mm, so the standard size for them is height 1900 mm, width 525 mm. The remaining 100 mm is a margin for the normal functioning of sliding doors.
The filling of the cabinet can be anything. It all depends on your desires and preferences, but remember that there should be room inside to accommodate mounting systems.
It is best to order all parts from a carpentry workshop. Even an experienced craftsman will not always be able to cut out elements of the desired shape at home.
After this, you can begin assembling the cabinet. For installation, we recommend using not only screws and dowels, but also furniture corners. The rails are installed inside the cabinet in a specially designated area (those 100mm that we left when preparing the parts). After this, you can put the door back in place and use the cabinet.
Instructions for making an open set with a column
Tools for work
- Tape measure and pencil.
- Jigsaw and hacksaw.
- Screwdriver and screwdrivers.
- Sandpaper or grinder with a sanding disc.
- Carpenter's knife.
Necessary materials
We will make the body from laminated chipboard - this solution is used quite often. We will cut out the back wall from hardboard.
We will use ordinary furniture screws as fasteners. Professional carpenters cut grooves at the ends of the connecting parts and place them on glue.
The connection is stronger and more accurate. This requires skill.
The work can be done, but it will take a lot of time.
Accessories:
- Corners.
- Loops.
- Pen.
- Door closer.
- Bar for hangers.
- Adjustable legs.
- Drawer runners.
- Holder for basket or bottom drawer.
Before you make a hallway with your own hands, you should collect everything you need for the work. Searching during assembly is very inconvenient.
Contents
Sometimes the assortment in stores is striking in its monotony. Many apartment owners know that choosing furniture for the hallway is very difficult.
If the room is small, then the cabinets simply do not fit into it or fill all the free space. But owners of spacious hallways also find themselves in a difficult situation - the presented models do not always meet the owners’ needs and often look ridiculous in a large room.
If you cannot choose a suitable cabinet, then do not be upset and think about creating the ideal furniture for the hallway with your own hands. This approach will help you save money and also get a model that suits you in all respects.
Will a novice “home master” be able to cope with such a task? Yes, the desire and availability of all the necessary tools and materials will lead you to a positive result. Of course, inexperienced craftsmen are better off sticking to the simplest models.
But those who have made furniture more than once can create a real work of art.
To make it easier for you to understand complex work, we have prepared special instructions, drawings and diagrams.
Technology for making a wall hanger for the hallway with your own hands
For work you will need wooden boards of the same length. The structure will consist of several blocks.
To make a hallway hanger with your own hands, you need to follow these steps:
- Place the boards on the surface so that there is free space between them.
- A rail is attached to the upper part at the same level where the clothes hooks will be fixed.
- At the bottom of the boards, they are connected using a batten.
- A shelf for hats is made and attached to the hanger above the hooks using self-tapping screws. The length of this element must correspond to the width of the hanger.
- Hooks for clothes are installed symmetrically in the upper part.
- The finished hanger is fixed to the wall.
Helpful advice! To prevent hats from falling, ribs should be installed on the sides of the shelf.
Tags
Hallway Hallway with your own to make the hallway your own Standard hallway with your own Corner hallway with your own for the hallway to make the hallway with your own With your own hands with your own hands. with your own hands. with your own hands with your own hands with your own hands with your own hands for With your own hands with your own hands. With your own hands it amazes with its monotony. all the free space. the hallway with your own hands. the hallway with your own hands. all your parameters; a garden with your own hands; a dacha with your own hands; lighthouses with your own hands;
assembly
Cabinet with one door
To begin with, take a canvas measuring 1700x400x18. The side part is cut out of it according to the markings. Then they make the bottom and the front part, which will be attached under the bottom.
The further sequence of actions is as follows:
- Cut out holes for dowels. Mark the places for cutting.
- To make the door, the material from which the frame is made is used. Cut out recesses for the hinges.
- The dowels and holes are lubricated with glue. Wooden fasteners are inserted into the recesses and the frame is glued together. When all the parts are assembled, they must be strengthened with self-tapping screws. Then the door is installed.
- For drawers, you need to make runners and attach them inside where the bottom of the drawer is located.
- Moving on to creating the drawer itself:
- Cut out the sides and back wall from the boards.
- Screw them to the bottom with self-tapping screws.
- Cut out the lid and attach it to the body with edges.
Wooden double-leaf cabinet
The manufacture of a double-leaf bedside table and a single-leaf one are similar. They make a frame, mark it and cut it out. Cut out a plank from plywood for the shelf. Dimensions are the same as a bedside table with one door.
One compartment occupies a fourth of the structure in width and the entire space in height. The second compartment is divided into 2 parts by a horizontal shelf and occupies all the remaining free space.
Pencil case
The production of a pencil case is simple:
- To assemble the frame, you need to lubricate the dowels and holes with furniture glue. Then they are put in place and the structure is strengthened with self-tapping screws.
- Two doors are cut out from a piece of canvas, and holes are made in each for hinges.
- Fastenings for the shelves are made at the same level from the inside.
- The shelves are cut out and installed, and the doors are attached.
Ceiling repair
The ceiling is made of suspended plasterboard. You can hide electrical wiring behind it. Drywall allows you to beautifully play up the differences in protruding structures on the ceiling and highlight individual functional areas.
- Pool finishing: description of all types and features of modern finishing
- How an independent examination of construction work is carried out: an overview of all stages
Fasteners for the construction of frame houses: features of the right choice
A stretch ceiling will look beautiful in a large hallway. A glossy monochromatic surface visually increases the height of the room. A suitable pattern on the canvas will help complete the stylistic design of the interior.
The hallways of small apartments have a small height. The surface of a low ceiling is leveled with putty, cleaned and painted with water-based paint or finished with ceiling tiles.