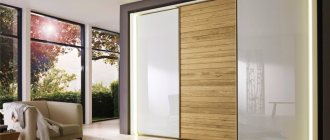
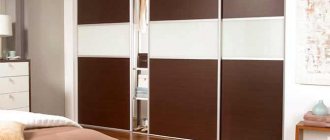
“PREMIAL aluminum profile” is a complex of aluminum profiles and components for the manufacture of sliding wardrobe doors. The profile as part of the system is structurally utilitarian and is used in serial and custom-made furniture. We are pleased to present you aluminum profile systems for sliding doors from the PREMIAL company - vertical profile C, C-classic and C-classic brush - vertical profile L and L brush - vertical profile H - vertical profile P - and of course, a completely new unique Elephant profile
C-premium aluminum profile decors
Vertical profile 1.2 mm thick.
| Scheme | Graphite Soft Touch | Latte Soft Touch | Vanilla Soft Touch | |
| Premium gloss chrome | Premium matte chrome | Gold gloss Premium | Premium matte gold | Champagne gloss Premium |
| Champagne matte Premium | Silver polish Premium | Smoked oak Premium | Bronze gloss Premium | Apple tree Premium |
Aluminum profile decors C-classic
Vertical profile 1.1 mm thick
| Scheme | Matte chrome Classic | Matte gold Classic | Champagne gloss Classic | Champagne matte Classic |
| Wenge gloss Classic | Bronze gloss Classic | Bronze matte Classic |
Aluminum profile decors L
Vertical profile 1.2 mm thick.
| Scheme | Chrome gloss | Matte chrome | Silver polish | Gold gloss |
| Matte gold | Champagne gloss | Champagne matte | Bronze gloss | Wenge gloss |
Wardrobe door: aluminum base Versailles system
Today we will talk to you about the assembly of composite sliding doors assembled on the basis of the Versailles aluminum support system. Composite, that is, including several dissimilar parts (in our case, these are two parts of film MDF with a frosted glass insert). The profile of the handles in our example will be asymmetrical (or “open”).
First, let's make some calculations. The dimensions of compartment doors are always calculated from the dimensions of the opening in which they will be installed. Manufacturer's file is attached. But it is better to analyze the calculations using a specific example.
For example, let's take an opening of 2385x1395 mm (HxW).
We count the dimensions of one door. For two they will be:
Door width = (opening width+26-2*schlegel brush height)/2 (1395+26-2*6)/2 = 704.5 (rounded to 705) Height = handle profile height = opening height - 4 cm 2385-40 = 2345
Let's move on to calculating horizontal dimensions:
- Length of horizons = opening width - 50 mm 705-50 = 655 mm
- MDF filling width = opening width - 37 mm 705-50 = 668 mm
- Glass filling width = opening width - 40 mm 705-40 = 665 mm
It remains to calculate the height of the horizontal parts. We use a connecting profile without a screw, which is exactly what is shown in the calculation table (download at the end of the article).
We have three sections.
- The bottom will be 85 cm, the glass will be 8 cm and the top will be 1415 mm.
- It turns out that the lower part (MDF) 850-49 = 801 mm
- middle part (glass) 80-7= 73 mm
- Top part (MDF) 1415—14mm = 1401mm
By the way, the length of the upper and lower tracks will be equal to the width of the opening, that is, 1395 mm.
So, we made the calculations, bought what we needed (namely, profile handles, upper and lower tracks, upper and lower horizons, a divider without a screw, wheels for two doors (asymmetrical), a brush-schlegel, a silicone seal, a pair spring stops)
Using a miter saw, we cut the handle profile according to the calculated dimensions.
The marking is greatly facilitated by such a simple conductor. Using it, we mark 8 mm from the bottom and top. And also another 4.2 cm from the bottom.
Hitting the dowel with a hammer, we make marking holes.
We drill these holes through all layers with a 0.5 cm drill.
And then with a 0.9 cm drill to the thickness of the top plate.
It should look something like this.
Cut horizontal profiles to size. Having cut off the first profile, we put a stop on it and cut the rest along it.
We cut tracks. The result should be a cut like this.
We insert spring stoppers into the grooves of the lower track.
In principle, you can proceed to the assembly process itself. MDF is usually supplied packaged like this.
The glass looks like this.
It is more convenient to assemble in a horizontal way. It’s better, of course, on a special assembly table, but it’s also possible - on stools. Horizons are printed on the upper and lower parts.
Dividers are packed on the opposite side.
Now we are ready to install the glass. To do this we need a silicone seal and scissors.
Cutting out triangles, we bend the seal around the perimeter of the glass.
The result should look like this.
We insert the glass between the prepared profiles and stuff them onto it.
Another larger shot. The edge of the silicone should be flush with the edge of the VLA.
Now let's move on to the most important thing - installing profile handles. This is the main fastening element. They are aligned to the bottom edge. The groove in the handle is placed opposite the edge of the filling.
With gentle blows of the mallet, we fill the profile-handle onto the filling elements.
First one, then the second.
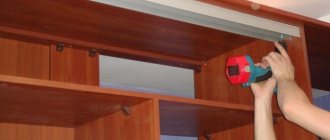
That's it, the door is ready for final fixation and installation of rollers (lower and upper).
Fixation is carried out using self-tapping screws with cylindrical hexagon heads. They are screwed into the holes (top and second from bottom).
Without tightening the self-tapping screw by about 3 mm, we insert the antennae of the upper roller under it.
We put the roller in place and tighten the screw completely.
From below we do the same thing, only without the roller
We place the door on its edge and tap the profile handles through the plank again so that they finally fall into place.
All that remains is to install the lower rollers. To do this, we insert the roller housings into the void of the lower horizon so that the element with the nut faces outward, and the roller itself looks inward.
Using an imbus wrench as a guide, we “catch” the nut with the bolt, and then tighten it, but not all the way, by about 5-6 mm. (then they will adjust the position of the door).
All doors are assembled. It can be put in place. The inner one is installed first. To do this, the upper edge of the facade is inserted into the corresponding track and raised until it stops. Meanwhile, the bottom edge of the façade is placed above the bottom track.
If the rollers are in the way, they must be “recessed” into the body of the door and, having installed the latter above the corresponding track, released so that the protrusions of the rollers fall into the slot of the track.
After this, we adjust the position (tilt of the facade) by rotating the screws securing the lower rollers. When the screw is tightened, the corresponding edge of the door rises and it tilts in the opposite direction.
The last step is gluing the Schlegel brush (unfortunately, I did not photograph this stage).
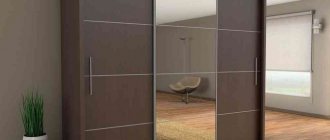
And finally, you can admire the result of the work in the photo.
Calculation of elements of a sliding wardrobe system from the profile system “Versailles”, “Versailles-Light”, “Versailles-Elite” (898.5 KiB, 385 hits)
Brushed decors of aluminum profiles C-classic and L
Brush is a profile that is beautiful and pleasant to the touch. Brushed aluminum profile decors are exclusive Premial® colours. This is a collection of stylish decors that can decorate a fashionable wardrobe without a vulgar touch of “glamour”. Brushes will suit both discreet classic and modern interiors. In addition, brushing is not just an option for aesthetically finishing a profile, it is also a finishing touch for imparting anti-corrosion properties to the profile for sliding wardrobes. The technology is unique. Scratch-brushing with steel cylindrical brushes with threads made of steel and silicon carbide removes oxides, dirt, and seals from the aluminum surface, applying a beautiful decorative pattern in the form of strokes along the length of the profile. All excess layering, soft or defective initial coating is “combed out” without any residue. The processing technology involves partial removal of the top layer of metal, but the depth of anodization and integration of color dye is much greater. And brushed aluminum, for all its external beauty, is also reliably protected from corrosion. The aluminum brush profile has high quality and aesthetic characteristics.
| Gold Brush C-classic | Granite Brush C-classic | Silver Brush C-classic | Champagne Brush C-classic |
| Gold Brush L | Granite Brush L | Silver Brush L | Champagne Brush L |
Components for calculating compartment doors
Overlapping location
This is the place where two doors seem to be “layered” on top of each other. One of them rides along one path, and the second - along a parallel one. For example, if there are two compartment doors, then there will be one overlap area. And if there are four doors, then there can be 2 or 3 places of overlap. But there are times when it is necessary for two doors to be “joint to joint” on the same path.
Schlegel
This word means a long narrow ribbon with pile. It is glued to the door profile, which will be in contact with the wall of the cabinet. This is done so that the metal profile does not hit it. The Schlegel is also glued to the back wall of the profile, which covers the adjacent door, so that dust does not get into the cabinet in this place.
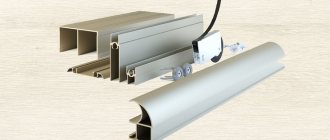
Profile
This is a metal door frame. The vertical profile is called a handle profile or simply a handle. It can be steel or aluminum, symmetrical or asymmetrical.
Lower and upper - connects two vertical profiles of the compartment door, and there are rollers inside it.
Sealant
Used if the cabinet doors are glass.
Stopper
This part is needed to prevent the door from opening on its own.
Aluminum profile decors H
Vertical profile 1.2 mm thick.
| Scheme | Matte chrome | Matte gold | Champagne gloss | Champagne matte |
| Smoky oak | Wenge dark | Bronze gloss |
Aluminum profile decors U
Vertical profile 1.2 mm thick.
| Scheme | Matte chrome | Matte gold | Smoky oak | Wenge gloss |
| Wenge dark |
Instructions for calculating and assembling ITALUM system doors. (For series: LAGUNA, KORAL, CLASSIC-A)
Transcript
1 Instructions for calculating and assembling doors of the ITALUM system. (For series: LAGUNA, KORAL, CLASSIC-A) 1. Introduction This training course is designed for self-study in the calculation of doors to a sliding wardrobe with asymmetric series of ITALUM profiles. After studying the recommendations, you can easily calculate the dimensions of the doors for your wardrobe based on measurement data. This training course can be used both for independent work and as a reference for the work of your managers. 2. ITALUM sliding system The ITALUM sliding system is a high-quality aluminum profile with anodized or film coating. The system is used both for the production of sliding wardrobes and as interior doors. Thanks to the presence of dividing horizontal profiles, it is possible to produce combined doors. Upper and lower rollers ensure smooth and silent running. 3. Assembly diagram Components: 1. top double guide 2. top single guide 3. bottom double guide 4. bottom single guide 5. bottom mortise guide 6. Vertical profile 7. Top horizontal profile 8. Separating profile 9. Bottom horizontal profile 10 Filling chipboard 10mm 11. Filling Glass (mirror) 4mm 12. Upper roller 13. lower roller 14. Lower roller stopper 15. Profile fastening screw 16. Lower roller setting screw 17. Seal for 4mm 18. Brush seal. All details on +7 (495) Page 1
2 Assembly diagram All details on +7 (495) Page 2
3 4. Calculation of door sizes. Vertical section of the door Horizontal section of the door 4.1. Calculation of the door height of the door opening 40 mm All details on +7 (495) Page 3
4 4.2. Calculation of door width for double guide ASSEMBLY DIAGRAM. System for the production of sliding wardrobes ITALUM In the door = (In the opening+21mm) / 2 In the door = (In the opening+28mm) / 2 In the door = (In the opening+33mm) / 2 CLASSIC-A LAGUNA KORAL In the door = (In opening+105mm) / 5 In the door = (In the opening+133mm) / 5 In the door = (In the opening+153mm) / 5 In the door = (In the opening+49mm) / 3 In the door = (In the opening+63mm) / 3 In the door = (In the opening+73mm) / 3 CLASSIC-A LAGUNA KORAL In the door = (In the opening+42mm) / 4 In the door = (In the opening+56mm) / 4 In the door = (In the opening+66mm) / 4 All formulas are given taking into account the use of Schlegel Calculation of filling sizes for door design options Door design option upper middle lower Width B Door without dividing profiles Door with one dividing profile Door with two or more dividing profiles Chipboard door 59 mm — — Door glass 61 mm — — Chipboard — top 16 mm top 16 mm Glass — top 18 mm top 18 mm Chipboard — — middle 9 mm Glass — — middle 11 mm Chipboard — bottom 51 mm bottom 51 mm Glass — bottom 53 mm bottom 53 mm Chipboard In the door 39 mm In the door 39 mm In the door 39 mm Glass In the door 41 mm In the door 41 mm In the door 41 mm All details on +7 (495) Page 4
5 4.4. Calculation of the dimensions of door profiles Length L of the horizontal profile (upper, lower and dividing) Length L of the vertical profile In the door 54 mm In the door 5. Assembly and installation 5.1. Assembly and installation of sliding wardrobe doors Before starting assembly, you need to prepare an assembly table. The table surface must be covered with soft material to avoid damage to the coating of the elements. To carry out assembly work, you must have the tools and devices intended for this. Preparation for assembly: Using the markings on the packaging and the diagram on page 2, we determine the elements of the doors to be assembled; in accordance with the assembly drawing (page 2), profiles, components and filling are laid out on the table; To fasten the rollers and profiles to each other, holes are drilled in the vertical profile according to the drawing below: 5.2. Assembly Using self-tapping screws, the vertical profiles are attached to the lower horizontal profile; Filling, for mirrors, plastic seal, transition profiles, horizontal profile are inserted; The upper and lower rollers, plugs, and brush seal are installed (see sketches). All details on +7 (495) Page 5
6 Upper assembly lower assembly 5.3. Installation The upper guide is attached with screws to the cabinet ceiling or the top of the opening. Mounting pitch mm; The doors are inserted (see sketch), the vertical position of the doors is determined by the level and adjusted by moving the lower guide. The lower guide is attached with screws to the bottom of the cabinet or the bottom of the opening. Mounting pitch mm; All details on +7 (495) Page 6
7 Installing a door in the opening Stage 1 Stage 2 Stage 3 Please note: All of the above calculations are for informational purposes only for standard products and can be used at your discretion. The manufacturer has the right to make adjustments and additions to the calculations without notice. All details on +7 (495) Page 7
Elefant aluminum profile decors
Elephant aluminum system - minimalism in the design of sliding doors.
Are you tired of excess and pretentiousness? Is it time for brevity and restraint in your life? Are you looking for optimally balanced combinations of horizontals and verticals, planning a clearly structured architectural space? If this is the case, then especially for you we offer a new aluminum profile system for sliding doors with thin visible elements “Elephant aluminum system” for an unobtrusive frame of mirror sliding doors. Profile in the decor "Mat chrome", "Black gloss" and "White gloss". The profile frame is practically invisible on mirror surfaces. Thin and graceful lines go well with glass and light filling surfaces. The boundaries between the image on the doors and the interior background are blurred. The profile color is pure, without stretch marks, transitions or mixtures. The new system includes a vertical profile, upper and lower horizons, an intersectional profile with a screed. Technical characteristics: — width of the visible part of the vertical profile — 13 mm; — width of the visible part of horizontal profiles — 10 mm; — a semicircular lower guide with a height of 8 mm will complement the system; Choice of filling for every taste: glass and mirrors 4 mm, MDF 8 mm, chipboard 10 mm, HPL plastics on MDF 10 mm and other popular materials; Vertical profile 1.2 mm thick.
| Semicircular pattern | White gloss-EM semicircular | Gloss black-EM semicircular | Matte chrome-EM semicircular |
| Scheme | White gloss-E | Gloss black-E | Matte chrome-E |
Price list for sliding aluminum system Price list for Elefant system Price list for Premial fittings
Online calculation
Calculating sliding doors online will take no more than 5 minutes. And upon completion, you can print or save all the data. The link provides a convenient service for calculating sliding doors online for any system. First you need to select a manufacturer by clicking on the desired logo, for example, Aristo, Aluma-Decor, Braun, Absolut, City Line, etc. There are about 40 manufacturers on the site.
Next, the appearance of the doors is selected (the number of sections, horizontal divisions or inserts). And then all the data is sequentially indicated: the width and height of the opening where the doors will be installed, the profile of the vertical handle (symmetrical or asymmetrical), the type of intersection profile and the filling for the doors - in which part there will be wood and in which part there will be a mirror. After entering all the data, the site will provide the necessary information to order doors.
You can print the calculation data and drawing directly from the site. Or save by clicking on “print” and in the place where the printer is indicated, select Adobe PDF and click “print”. Next, a window will pop up where you need to specify the save folder.
Website kupetable.ru
HOW TO PLACE AN ORDER
To order doors for a wardrobe, you must indicate: - the net size of the opening - the number of doors - the series of the PREMIAL system - the desired content. Use our online form. It can be filled out and sent for cost calculation directly from the site. You can order the production of doors for sliding wardrobes and calculate the cost of the product at the company’s office or by sending a request by e-mail. Visit our office, look at samples of products and materials, and get a free consultation with a manager. We are located within walking distance from the Shosse Entuziastov metro station. Driving directions. You can order measurements and installation of doors from us.
Wardrobe door leaf width calculator
A sliding wardrobe is an extremely convenient and practical piece of furniture. Taking up almost no useful space in the room, it has considerable capacity, and its external design is quite capable of decorating any room interior. The demand for such products is consistently high, and many owners are attempting to build a wardrobe on their own.
Wardrobe door leaf width calculator
It must be said that there is every reason for this - there are special sets of profiles on sale that allow, if you have certain skills and special care in your work, to make such a cabinet yourself. The work will be successful if all measurements and necessary calculations are carefully taken. One of the key parameters is the width of the sliding wardrobe doors. It depends on several initial values - all this is taken into account by the calculator we offer for calculating the width of the wardrobe door leaf.
Prices for sliding wardrobes
inexpensive wardrobe
The corresponding explanations for the calculation are in the text section below the calculator.
Wardrobe door leaf width calculator
Go to calculations
How to make the calculation correctly?
The calculator is designed for the manufacture of wardrobe doors from the most common aluminum profiles of the ARISTO brand - they are the ones most often used in work, and they are widely available on sale.
ARISTO brand aluminum profile system for sliding wardrobes
- To determine the width of the sashes, first of all you need to carefully measure the width of the opening ( Lп ), which will serve as the location of the wardrobe. The value must be entered into the calculator in millimeters (1 m = 1000 mm).
- Naturally, the width of the valves ( Lc is the same for all) directly depends on their number. The calculator provides the ability to calculate from two (minimum) to five (maximum) leaves. The diagram clearly shows their relative placement and the direction of movement along the guide rail profiles.
Diagram of the relative arrangement of sliding wardrobe door leaves depending on their number. Shown are the dimensions of the opening (Lп) and the width of the sash (Lс)
- One of two profiles – type “C” and type “H” can be used as vertical pillars for sliding wardrobe doors. They differ somewhat in size and installation technology, which is reflected in the size of the sash. In the calculator you must indicate the selected profile.
- Finally, the sash can be equipped with a schlegel glued to its vertical end, or without it. Schlegel is a narrow lining made of plastic and soft pile, which provides the desired degree of compaction when closing doors, and also softens the impact of the doors on the side walls of the cabinet. The calculator should indicate the presence or absence of Schlegel.
The calculated result will be shown in millimeters.
Having the calculated value, it is easy to determine the length of the horizontal jumpers for the frame structure of the door leaf. It will be:
- for profile “C”: Lc - 52 mm;
- for profile “H”: Lc - 70 mm.
The height of the vertical posts of the door frame ( Hd ) is always equal to the height of the opening minus 40 mm ( Hd - 40 mm ), regardless of the type of profile used.
After calculating the main parameters of the tree, you can proceed to calculating the sizes of the fragments filling it - there are special calculators for this.
How to assemble a wardrobe yourself?
You will have to purchase the necessary components, prepare the necessary tools and carefully study the operating technology. Detailed illustrated instructions are given in a special article on the portal dedicated to the manufacture of doors for sliding wardrobes .