Door distortions, their loose fit, difficulties with opening/closing - there are quite a lot of problems typical not only for new furniture after its assembly is completed, but also for old ones. First of all, this applies to elements of kitchen units, the awnings of which are affected by changes in humidity, temperature, and their high values. As a rule, most defects that appear can be eliminated by adjusting the hinges on cabinet doors. And the services of a specialist, if you understand the meaning of all operations, are definitely not needed.
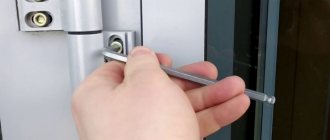
All a home craftsman needs is a cross-head screwdriver, since the awnings are fastened with self-tapping screws. And, of course, an understanding of what needs to be done.
What you need to adjust furniture hinges
Of course, the appearance and location of doors in a kitchen or closet depends entirely on the qualifications of the installer. If no gross mistakes were made when installing the hinges on the door and the inner wall, it is quite possible to adjust the hinges of the kitchen cabinet doors with your own hands without outside help.
Buttonhole adjustment stitch pattern
To correctly adjust the position of the awnings, you will need only three tools:
- Construction level with bubble chamber;
- Wooden school ruler;
- Phillips screwdriver.
A caliper can come in handy if you suddenly need to straighten four rings on a cabinet at the same time. Sometimes it can be helpful to purchase a flashlight or portable lamp when it comes to placing shades on a piece of furniture in an awkward or dimly lit area on a furniture wall. The process takes 5-10 minutes, depending on the experience and condition of the furniture facade.
You can cut a loop only using a template
They are probably made with extreme positioning accuracy on the cabinet door, so you shouldn't even try to adjust the position of the cabinet doors by refracting the "cups".
How to attach adjustable attachments?
To attach kitchen cabinet hangers, you will need the following tools:
- Drill or hammer drill (depending on the wall material).
- Screwdriver or Phillips screwdriver.
- Hacksaw for metal.
- Level.
- Roulette.
Before proceeding with installation, the following preparatory work should be carried out:
- Make sure the walls are strong if they are finished with plasterboard - secure a wooden beam under the front surface (if possible).
- Form a right angle under the corner cabinet and level the walls. Install the wiring.
- Install a socket for the hood.
Installation of canopies can be done in two ways:
- If the material of the back wall of the cabinet is fiberboard, then small holes will need to be cut in the upper corners for the passage of the mounting tabs. After this, the suspension is pressed against the top shelf and fixed with self-tapping screws to the side.
- If the wall material is laminated chipboard, a cutout will need to be made directly under the canopy.
Why else might the door not close?
Modern furniture has functional hinges.
What can cause tilting of the swinging sashes:
- This disease most often occurs with the kitchen door under the sink. This is facilitated, first of all, by frequent opening and closing, possibly with a bang. Secondly, moisture causes the door material to swell, deform and weaken the hinges. It is necessary to re-adjust the hinges according to the method described above; in a critical situation, the sash will need to be replaced.
- Young children can have a ride on the cabinet door, from which it slides down naturally. Supervise children and explain that such games cause costly property damage.
- The tight fit of furniture frames, such as kitchen cabinets, to the wall leads to friction between adjacent doors, which ends in bending of the hinges. In this case, adjustment may not help. To prevent this from happening, when hanging cabinets, you must leave a small gap between adjacent sides of the cabinets.
- Sash tilts may occur due to uneven surfaces on which the furniture is installed. The disadvantage is eliminated by leveling using pads of different thicknesses under the base.
Take a few minutes to adjust the buttonholes.
By spending a few minutes adjusting furniture hinges and combating door deformation, you will get an impeccable appearance of the facade, satisfaction from a job well done, and will extend the service life of the awnings for a long time.
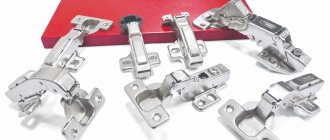
There are many interesting hinge shapes on the market today.
How to care for fittings
In order for the furniture to last a long time and not cause discomfort during use, you need to regularly care for the hinges.
4 simple rules will help with this:
- The first adjustment of the hinges is carried out immediately after installing the door on the cabinet.
- The interval between the following adjustments depends on the correctness and intensity of use of the cabinet door. If you use the cabinet daily, you need to adjust it 4-6 times, and if you use it irregularly, 2-3 times a year.
- The cabinet facade is regularly inspected for distortions, sagging and door deviations. If deviations appear, adjustments must be made.
- In order for the hinges to last longer, not make sounds, and open doors easily and smoothly, they need to be lubricated. For this purpose, motor and diesel oils and lubricants are used: “Ciatim”, “WD-40”. The hinges are lubricated 1-2 times a year.
In order for the hinges to last longer, not make sounds, and open the doors easily and smoothly, they need to be lubricated.
After frequent adjustments, the screw holes break and do not hold the door well.
To fix the problem, the screws are completely unscrewed and wooden choppers are inserted into the holes. Afterwards, the sash is reinstalled on its hinges.
Improper installation of the door over time leads to deformation of the entire furniture structure. It is better to spend 15-20 minutes of time 1-2 times a year on setup than to repair or buy a new cabinet.
How to adjust hinges on cabinet doors: technique
Often new furniture loses its attractive appearance due to the fact that their geometry is disrupted by inclined doors. But old wardrobes with heavy doors, where even the grooves for fastening the screws are worn out...
One conclusion suggests itself: it needs repairs and adjustments. You can do it yourself. So I’m telling you how to adjust the hinges of the cabinet doors, restore the normal operation of the cabinet, its original appearance.
Check out this simple technique and give us your opinion.
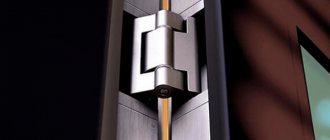
"Butterflies"
These loops are called “butterflies” because of their resemblance to insect wings. This is the easiest type of hinge to install, and therefore the most popular. Butterfly hinges are inexpensive, quick to install, and fit doors made of almost any material. However, the service life and quality are much lower than other types of hinges. Butterfly hinges can only withstand small loads and cannot be used when installing doors over 20 kg.
To adjust them you need:
- Remove all covers hiding the screws;
- Loosen the screws with a screwdriver;
- Align the door in the required position;
- Tighten the screws.
Adjusting hinges on cabinet doors
Furniture in our homes is not just a part of the interior that pleases the eye with its beauty or unusual design. In most cases, it is also an object that serves a specific functional purpose, for example, for storing clothes, dishes or other small things important for our daily life. Properly selected furniture is the key to a comfortable home arrangement.
To prevent personal belongings from spoiling the interior of the room and creating clutter, they are usually stored in a closet. This convenient and practical piece of furniture is found in almost every home today, so the problem of adjusting cabinet door hinges is undoubtedly familiar to many.
Tools for work
The set of tools that will be useful when adjusting door hinges includes basic tools:
- Tape measure or ruler (for accurate measurements);
- Pencil or chalk (for marks);
- Screwdriver (you can use a screwdriver, but then don’t forget the screws);
- Hex key;
- Building level;
- In some cases you may need: drill, hammer, chisel.
It is better to use construction gloves for safety and hand hygiene reasons.
Vertical adjustment
So you can line up if they are on different levels. This is clearly visible when the canvases are tightly closed.
Installation instructions are as follows:
- find 2 screws that secure the hinge to the box in special grooves;
- unscrew them a little and place the doors on the same level;
- then tighten the bolts tightly in the previous position.
Attention! It is better to carry out these manipulations with an assistant, otherwise there is a possibility that the position of the sash will shift when twisted. One holds, the other twists.
Adjustment in planes
Vertical adjustment
Vertical adjustment of furniture hinges is the initial step for adjusting furniture fittings. This installation is necessary if the door hangs crookedly - it protrudes beyond the overall contour of the cabinet or if there are two doors, one is located above the other.
Vertical adjustment of the facade is carried out in 4 successive stages:
- Open the cabinet door and look for the hinges. If they have caps, remove them.
- On both hinges, tighten the bolts closest to the edge of the side wall. They are responsible for the vertical position of the furniture facade. Both bolts should initially be set to the same value in order to know where to adjust next.
- Close the entrance door and observe its position in space in relation to the overall dimensions of the cabinet. If the upper corner is inclined to the right, then it is necessary to tighten the adjusting bolt on the upper hinge more tightly, and unscrew it on the lower one.
- Repeat steps 2-3 until the optimal position of the façade is achieved.
Adjusting the vertical clearance
At this point, the vertical adjustment of the hinges on the cabinet doors is completed, you can move on to the next stage - adjusting the furniture facade in height.
Adjusting the door height
Two screws located on two oblong “ears” are responsible for adjusting the height of the doors; the ring itself is pulled through them.
Height adjustable with two screws
The setup is carried out in 3 stages:
- Loosen the adjustment screws on all installed hinges.
- Raise or lower (if necessary) the façade and then secure it.
- We screw in the screws at low speed almost all the way, without disturbing the threads.
After adjusting the facade in height, you can begin adjusting the doors on the floor.
Front height adjustment
Before adjusting the height of the cabinet hinges, it is advisable to choose self-tapping screws with a small thread pitch - they provide more precise adjustment of the position of the facade.
Adjusting hinges according to plane
Adjustable furniture hinges allow you to change the position of the facade in the plane - this is useful if the pressure of the door on the furniture body is small or, when pressed, the door seems to bounce in the direction opposite to the pressure.
In this case, simply turn the second adjusting bolt located on the hinge. First tighten the bolts towards you (2-3 mm is enough), then check the distance between the facade or doors and make additional adjustments if necessary.
Adjustment of doors at one level
Don't be afraid to tighten the bolt that adjusts the front end in plane. It is on it that most of the weight of the structure is supported, and it is fixed itself. Use a Phillips screwdriver to tighten, being careful not to damage the threads.
Installation process
First of all, you should install awnings on your kitchen cabinet. This process is not complicated. If the rear wall of the module is made of fiberboard, then it is necessary to cut two small holes in it for the mounting tabs. After this, press the canopy against the top panel of the cabinet and secure it with two self-tapping screws to the side wall.
If the back panel is made of laminated chipboard, then you will have to make a cutout directly under the canopy and fix it flush with the laminate. But this option is quite rare.
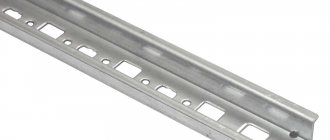
To mount a metal rail for hanging cabinets on the wall, you must perform the following calculations:
- Add up the height of the lower cabinets, the distance between the wall and floor modules, and the height of the upper cabinets. For example: 920+600+600 (pedestals, apron, top module).
- From the resulting result, 45 mm should be subtracted for the shrinkage of the canopy. The result will be a size that should be marked on the wall.
- Next, you need to mark a horizontal line along the level and attach a metal strip. It has holes for fastenings every 15-20 mm, but you don’t need to drill all of them, just fasten the screws in the corners of the mounted modules.
To make adjusting the cabinets easier, before installation, you should slightly loosen the fastening tab and allow it to move freely up and down. After this, you can begin hanging the cabinets, and then adjust them on the wall so that all modules hang evenly. The hanging elements can be fastened together with intersectional ties for strength and convenience.
Installing a kitchen yourself is not as difficult a process as it might seem. First of all, it is important to decide on the fastening, and if preference is given to canopies and planks, then installation can actually be carried out alone, without outside help. Before installation, it is necessary to complete all repair work and finish the walls in the kitchen, as well as prepare the necessary tools. It would be a good idea to familiarize yourself with the installation process in advance by watching video tutorials on the Internet.
Adjusting standard sash canopies
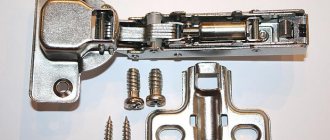
There are two types of door hinges most often used: regular and door closers. Externally, both options are almost identical, the second has a more massive design. The setup technology is common to all types. There are four main conditions for this operation to be carried out successfully and in a short time.
Before starting work, you need to make sure that the cabinet stands exactly on three spatial planes. This can be determined using a building level.
The impossibility of an optimal position in three spatial planes will require increasing the gaps on the facade doors. Their dimensions, with the correct arrangement of furniture, are within 3-4 mm.
The adjustment begins with adjusting the vertical gaps according to the height of the door. Then the sashes are leveled in height.
Another important point is the correct addition of the facade under the siding cup. Otherwise, the correct adjustment process is practically impossible, and the additive defect will need to be eliminated.
It is necessary to adjust furniture hinges simultaneously in several planes:
- vertical adjustment;
- door height alignment;
- floor adjustment.
Vertical adjustment is made when the sash is tilted or one door is lower than the other. The process consists of four stages:
- Removing caps from awnings.
- Installation of bolts at the same level, further from the edge of the side wall and responsible for vertical adjustment.
- Cover the door and determine its position relative to the entire cabinet structure. If the upper corner of the door has shifted to the right side, you need to screw the adjusting screw into the upper canopy and unscrew it into the lower one.
- The previous operation is performed until the door reaches the desired position.
Now you can start adjusting the door height. To perform this, you will need to purchase adjusting screws with fine threads - 16e PZ, which will securely hold the mount. Self-tapping screws are thick and cannot be used with large threads. In this case, you will need to work with the bolts that secure the hinge to the side wall through the oblong holes. The process is divided into three operations:
- Loosen the screws on the awnings by turning them slightly.
- Move the sash in the desired direction (up or down) along the opening and secure.
- Smoothly tighten the screws almost all the way, but so that the threads are not lost.
Adjusting the hinges in one plane is necessary if the door does not press well against the body or moves back a little when closing. In this case it is necessary:
- Tighten the screws closest to the edge of the side wall towards you, no more than 2-3 mm.
- Checking the correct position of the door: there is a gap between the leaf or facade.
- If necessary, repeat the process until the defect is eliminated.
It is advisable to make adjustments using a Phillips screwdriver, since the bolts also serve as fastenings and therefore must be tightly tightened.
Adjustment of furniture canopies with closers
Adjustment of furniture hinges using a door closer is carried out as standard. However, there is a difference: another adjustment screw is added, which allows you to turn off the closer or increase the force of attraction.
In some mechanisms, the stop is achieved by an additional bolt, in others - by a switch located in the hinge cup. This depends on the manufacturer and design of the canopy, therefore, how to adjust the setting of a certain type of hinge with a closer, you need to find out from the manufacturer’s instructions.
Common faults
The sliding wardrobe system includes one or more doors. They move along the guides using rollers that are attached at the bottom or top.
To ensure that the doors do not hit and close completely when opening and closing, the design provides for the use of a stopper and a closer.
The main reason why vertical, height adjustment or correction of other problems may be required is long-term operation. Don’t forget about initially incorrect installation or the use of low-quality fittings.
Most often, owners of wardrobes encounter the following problems:
- over time the door sags;
- the stoppers are worn out or displaced, and therefore the door does not lock;
- the gap between the doors has increased and the doors are skewed;
- the door simply dangles and flies off the guides;
- the canvas does not move well along the guides, it moves slowly;
- Uncharacteristic extraneous sounds appeared during the opening and closing process;
- the connection has become loose, etc.
You can clearly see that there are quite a lot of problems and malfunctions. The costs for a specialist in such a situation will be impressive. Therefore, sometimes it makes sense to learn how to fix problems with your own hands.
Yes, you may need to purchase a special wrench that is used to adjust and install the stops on the coupe. But believe me, if the door falls off, they will charge a lot of money for repairs. In addition, the scheme for independently restoring the functionality of a sliding wardrobe is quite simple. You can master it by reading this material and watching various videos. On them you will see how cabinets with bottom and top rollers are repaired, and much more.
What distortions occur at the doors?
A three-dimensional coordinate system allows you to represent the deviation of the door from its normal position in space in relation to the original surface of the furniture.
It is convenient to take the front plane formed by the furniture box, from the walls, bottom and lid, as a basic reading. It is generally accepted that a door may deviate from its ideal state when:
- simply turned in the frontal plane to one side;
- it moved up or down;
- tilts backward relative to the horizon or vertical axis.
In fact, all three deviations are created in a complex way. It's just that one of them is more pronounced.
All these movements must be assessed by visual inspection before adjustment begins. The condition should be analyzed in the two extreme positions of the door:
- Locked down;
- Open.
You should always take into account that the door is attached not to one, but to two or three hinges.
it is necessary to change the position of the sash by alternately adjusting the screws on the upper and lower hinges. If the door is fixed with three curtains, then the middle part is simply loosened for the duration of the adjustment, then fixed in the new position.
What is important to consider when setting up loops
There are 4 conditional laws for adjusting loops, which are important to consider when working:
- Before work, check the levelness of the cabinet on one floor, it must be level.
- First of all, align the door vertically.
- In some cases, it may not be possible to obtain optimal results when adjusting the height. The reason is that the door width is too wide. Therefore, tighten the screw that adjusts the gap width. It should not be more than 5 mm.
- When working with modular furniture stacked on top of each other, work begins with wall cabinets. This will allow for proper weight distribution and more precise tuning.
To avoid rapid unscrewing of the screws, anaerobic clamps are placed under their heads.
If anaerobic fixative is not available, nail polish can be applied.
To avoid quick unscrewing of the screws, anaerobic clamps are placed under their heads.
How to Adjust Hinges on Kitchen Cabinet Doors
Anything new bought for your home always brings joy. And so, we brought in new kitchen furniture, finished assembling its structure, the front door slammed behind the installer and... a little annoyance: the cabinet doors are lowered and do not want to close hermetically. Can this be considered a cause for disappointment or a complaint against a furniture company that sold a poor quality product? At all. How can I adjust kitchen door hinges? This requires desire, a good screwdriver and time.
Adjusting the height of kitchen cabinet door hinges
There may be several options for adjusting kitchen cabinet door hinges. First, it is necessary to visually determine the situation where the problem occurs: the door does not close, one of its corners goes down or goes beyond one of the edges of the cabinet? If the answer to any of these suggestions is yes, you need to look for the cause in the height adjustment.
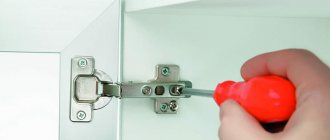
If the cabinet door stop is inside the cabinet, pay attention to its design. It becomes clear what kind of screwdriver you need - a regular or a Phillips head. Typically, a Phillips screwdriver is required to adjust the hinges of an outdoor stand.
With the cabinet doors open, insert a screwdriver into the adjustment screw in the part closest to the cabinet body. The screw must be loosened so that the door can move freely, then the screw must be tightened so that the original position of the door matches the design of the entire structure. If the piece of furniture is large and the door is heavy, you can support the lower part with your foot and adjust the fastening.
In any case, it is necessary to create conditions for a uniform gap between the kitchen cabinet doors so that the corners coincide with each other. There may be two screws in the mounting structure. You must weaken the one that occupies the second position from the door. This way you can adjust the door back and forth, install it properly and secure it with a screwdriver.
With the cabinet doors open, insert a screwdriver into the adjustment screw in the part closest to the cabinet body
It may not work the first time; such experiments require little experience and knowledge. If during alignment the desired effect is not achieved, loosen the screws again and, opening and closing the kitchen cabinet doors, move them to the desired position, then secure them. The final fastening of the screws must be strong.
Handle the screwdriver with extreme care. If the tensioner is too tight, the screwdriver may slip off the thread and cause injury. It is recommended to hold it correctly, evenly distributing the load on the screwdriver.
Reasons for sagging hinges on kitchen cabinets
It only takes a few minutes to correct the misalignment, and the result of the work is always pleasant - you want the new kitchen cabinets to look perfect, and the sloping cabinet doors do not spoil the appearance of the updated interior. But it’s not only new furniture that can cause such a nuisance. Pay attention to your kitchen cabinets that last for several years. Do the doors not close tightly, drop down, or are tilted in places? Let's start looking for the reason.
One of them most often lies in the unevenness of the floor on which the kitchen furniture is located. Who among us has not at least once placed a well-rolled piece of newspaper under the wall of a cabinet, thereby “straightening” the desired corner? This practice leads to skewed furniture in the kitchen. First of all, you should eliminate such “supports”, then carry out the procedure with self-tapping screws and a screwdriver.
If renovations have begun in your apartment, you should immediately think about leveling the floors. Firstly, it is aesthetically pleasing, and secondly, it is effective. After all, even small unevenness in the floor will cause damage to the furniture installed in the place where they are located. A flat floor is a guarantee of durable furniture that will last for many years.
After rearrangement, the cabinet door hinges may become skewed.
Warping of the cabinet door can also occur after rearranging. Large-scale changes when the kitchen wants to be transformed can affect the condition of the cabinets. Suddenly the doors begin to bend and do not close properly. Again, visual inspection shows uneven space between the hinges. Doors must be adjusted in height, paying attention to how they fit to the base of the entire furniture structure.
But sometimes it happens that it is necessary to completely replace the fastening mechanism. This can happen if screws and bolts have slipped out undetected and there is nothing to replace them with. In a furniture store you can pick up any accessories, including a suitable device for attaching a kitchen cabinet door.
If such work is considered complex and time-consuming, you can seek help from specialists at a furniture showroom that has a furniture assembly service. For a fee, a technician will come to your home and professionally replace the part. You can also use bidding ads.