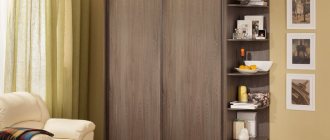
Ikea wardrobe systems are one of the most popular in the world, as they allow you to optimally and aesthetically arrange many things. But their main advantage is that the manufacturer gives you the opportunity to arrange the blocks at your discretion, creating the ideal storage space for yourself.
If you have a large amount of clothes and shoes, the question of organizing your wardrobe immediately arises, because even a large closet may not be enough to organize all your things. Therefore, you have to take up space with additional shelves, chests of drawers and other pieces of furniture.
For the convenience of storing all things, the manufacturer Ikea has developed special ergonomic wardrobe systems. Each of them has certain advantages, and today we will talk about their features.
Ikea wardrobe systems
Features of wardrobe systems from Ikea
The company's furniture is suitable for storing both large and small items. Such designs have been popular among buyers for many years due to their functionality and favorable cost.
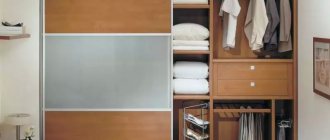
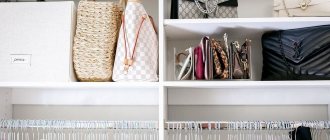
Many people prefer wardrobes from this manufacturer because of their versatility, because you can choose the best option for a room of any size and design. In addition, the design of these systems allows the use of additional elements in the form of baskets, rails, drawers, various shelves, and compartments.
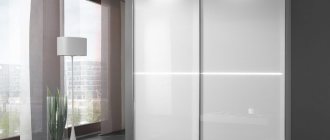
You can fit a lot of things in an Ikea wardrobe
Another advantage of such systems is the ability to install them in almost any corner or free space of the room. All this, combined with impeccable quality, makes any Ikea product very popular among buyers.
Ikea systems include many storage elements
Stacked doors
The price of a stacked door system depends on the material from which the selected panels are made.
Panels for sliding door frames are sold as a set of 4 pieces, in four sizes: 50 and 59x75 cm, 50 and 59x100 cm each. Various materials are used for manufacturing:
- Fibreboard covered with film:
- Mehamn - white color. Cost - 1100 rubles. 236×75 cm and 1700 rub. 236×100 cm.
- Volda - double-sided. Colors: black-brown and bleached oak. Price: 1100 and 1700 rubles.
- Hoksund. Dark green - 5000 and 6000 rubles. Light gray - 5000 rub. 236×75 cm. Dark blue — 6000 rub. 236×100 cm.
- Veneered fiberboard - Ilseng model. Price 4000 and 5000 rubles. Options:
- black-brown;
- brown stain and ash veneer;
- oak veneer;
- oak veneer, bleached.
- Tempered glass coated with different colored glass enamel:
- Sekken: 1500 - 2000 rub. Frosted glass.
- Uggdal: 6500 - 7600 rub. Color: grey.
- Fairwick: 7600 - 8700 rub. White.
- Auli Model:
- Mirror glass: 1900–2500 rub. (4 size options);
- Glass with gray and brown protective film: 2700 and 3500 rubles.
Overview of wardrobe systems
"Pax"
Recently, cabinets from the Pax wardrobe system have become in great demand - such pieces of furniture are designed for storing clothes of any type. The system has several components that can be placed in any order you wish. So, for its customers, the manufacturer Ikea produces cabinets with the following parameters:
- 50x20.1x35 centimeters;
- 100x236x38 centimeters.
In total, it is possible to create designs of eight sizes. Separately, it is worth noting the doors of such cabinets. They come in hinged and sliding compartment type. The design features of the Pax wardrobe allow you to clearly see all the contents of the cabinets.
Pax assembly options
Important point! If you have limited space, it is recommended to choose a wardrobe. After all, there is free space in front of the door that can be used for other purposes, while there should be no obstacles in front of the swing doors.
In total, the catalog contains thirty possible color options for furniture, so such products will fit perfectly into almost any interior.
You can choose modules of different colors
Inside this wardrobe system there are various compartments, baskets, and other auxiliary elements in order to conveniently place both outerwear and any small accessories.
Variety of cabinets in the Pax wardrobe system
"Algot"
The Algot wardrobe system has design features that allow it to be used even with limited space.
It is worth highlighting its other advantages:
- high quality materials - all internal metal elements can withstand loads of up to 60 kilograms (depending on dimensions);
- the components can be easily combined with each other, in addition, they can be disassembled and rearranged to any location;
- All structural elements are quite easy to care for - just wipe them with a damp cloth, which is why such cabinets are often chosen for hallways and children's rooms;
- the entire structure is lightweight, and the cabinets can be assembled even by one person;
- if necessary, you can at any time purchase various auxiliary elements (bars, baskets) and expand the working area of the room;
- Algot wardrobe elements are installed not only on the floor, but also on the wall;
- The kit includes detailed instructions that describe various assembly options.
Elements of the Algot system
It is worth noting that this is not a complete list of the positive aspects of a wardrobe system of this type. After all, these functional items are suitable for furnishing various types of premises, including a dressing room and bedroom.
In some cases, in order to save free space, they prefer to occupy only the walls with wardrobe system modules, leaving the floor free. In order to implement such an idea you will need:
- metal tires of different sizes (install them in a vertical position using self-tapping screws);
- holders for shelves that are fixed to the slats;
- shelves of various sizes, which can be metal or chipboard. You should choose one option or another based on what things you plan to store in this closet.
Schematic representation of the wardrobe system
Among the elements that are installed on the floor, it is worth highlighting the following:
- frames with multiple crossbars for fixing baskets;
- frames with a rod for storing clothes on hangers;
- fabric bags - they are used as a basket for storing dirty clothes;
- mounts with wheels that can be fixed to the bottom of the frame to move the module if necessary.
An example of placing a wardrobe only on the wall.
This system also includes other, no less popular items that can be purchased separately:
- baskets made of mesh and wire (ready-made options are available with mounting on a bar);
- trouser hangers;
- sliding pipes, which are used to organize additional storage space for things on hangers (can be extended up to 60 centimeters);
- modules for storing shoes.
The Algot storage system is designed in such a way that each person can create their own unique project using modules.
Video – Review of the Algot wardrobe system
"Stallman"
This is another ergonomic wardrobe system from Ikea, which allows you to better organize the space of a large and small room. When assembled, the length of the entire structure can be from 210 to 330 centimeters.
The basis of the wardrobe is a stand that can be installed to the wall or to the ceiling. It consists of two pipes, one of which can be moved apart to a certain distance.
The following items can be attached to this rack:
- hanger rods;
- inclined shelves for shoes that can be adjusted;
- shelves for standard clothes;
- module with mirror door.
Using special fittings, you can fix these shelves at any desired height.
In addition, a wardrobe system of this type requires the presence of chests of drawers. They are narrow drawers that quickly slide out on guides. At the same time, stoppers are provided to prevent the boxes from crashing into the rear wall of the structure.
Some people may think that such a wardrobe is only suitable for large rooms, but this is not at all true. If necessary, you can place these modules in the corner, and light-colored furniture does not look bulky, and at the same time makes it possible to store any things in plain sight.
Option for placing the “Stallman” wardrobe in the corner
If you have the opportunity to allocate a room for a wardrobe system, then in addition to standard racks, you can install shelves for clothes and shoes, top drawers and much more.
It is worth noting that all modules of the Stolmen wardrobe have a universal snow-white color, so such wardrobes can be used in any type of interior.
"Ophus"
The Ophus module system is perfect for rooms of any size, including very small ones. Thanks to the presence of such cabinets, you can better arrange the interior of a bedroom, dressing room, hallway, hall, or use the space under the stairs.
The design is multifunctional
Any free area can be used from a functional point of view thanks to this ergonomic system. So, when assembled, the wardrobe can have a width from 60 to 340 centimeters, but if necessary, you can always purchase several additional modules.
The cabinets of this system have comfortable legs that can be adjusted. This feature is best suited for uneven floors. The system comes with wall fasteners, but screws and dowels will have to be purchased separately.
Wardrobe system "Ophus": installation option under the stairs
Such a model can be transformed in a few minutes. For example, a closet quickly turns into a convenient cabinet.
Video - Review of storage combinations: Ophus wardrobe system
Types of Pax cabinets
Ikea has thought of everything to ensure that its cabinets look comfortable in an apartment of any size and layout. The parameters can be like this:
- Height - 201 or 236 cm;
- Width - from 50 to 300 cm;
- Frame depth - 35 or 58 cm.
In addition, you can choose between straight, corner and modular wardrobe modifications.
Direct
This version of the Pax cabinet will never lose its relevance, because interior classics are appropriate always and everywhere. There are several accommodation options:
- From wall to wall;
- From the wall to the door or window leaf;
- In the center of the wall.
The design of the cabinet is simple and versatile, making the cabinet ideal for a classic-style interior.
Corner
Corner wardrobes are an ideal solution for non-standard room layouts. This practical storage system will significantly save space in a small room or hallway. A corner cabinet makes the most of the available space without compromising the aesthetics of the room.
Corner Pax in white
Corner cabinet Pax dark tone
Modular
This “Pax” wall is distinguished by the ability to modernize your wardrobe using individual wardrobe elements. By combining different shapes, styles and colors, you can create spectacular designs. Modular closets are very convenient when moving. Those who like experimenting also prefer them: rearranging individual sections from place to place is interesting and easy.
Modular wardrobe Pax
Materials and colors
Ikea uses the highest quality materials to produce Pax wardrobes. In the production of cabinet frames the following are used:
- Laminated chipboard and fiberboard;
- Tempered glass parts.
- Internal components for wardrobes are made from:
- Anti-corrosion steel;
- chipboard;
- Fiberboard;
- High quality ABS plastics.
Pax wardrobe from Ikea
As for the color scheme, the white Pax wardrobe in the interior still remains the most popular. In addition to visually expanding the space, it perfectly complements the interior made in any style. The company also offers other color solutions for wardrobes:
- Brown is a solid and elegant classic;
- Bleached oak - brings a touch of homely warmth and comfort to the room;
- Black - classic, strict style;
- Silver – for glamorous interiors;
- Light blue and dark blue are bright accents in the apartment;
- Beige – soft cozy pastel.
The brand also offers two-color options, which we will show in the photo. The dressing room can be made in a strict black and brown shade or a contrasting combination of black and white. Mirrored or transparent glass doors visually lighten the design and create the illusion of additional space. Manufacturers also produce glossy, matte and translucent cabinets.
Mobile wardrobe systems
Ikea specialists have developed wardrobes for various occasions. So, if you rent an apartment or are planning a quick move, it is better to opt for mobile models. These include the convenient “Brame” and “IKEA PS” modules.
These products have an unusual, attractive design, but the main advantage is ease of assembly and transportation. Thus, the textile wardrobe “Brame” has the following dimensions: 80x55x180 centimeters (width, height, depth). The shelves can withstand loads of up to 40 kilograms without any problems.
Mobile wardrobe system "Brame"
Using such a convenient mobile system, you can place all your things anywhere.
Warnings and helpful tips
Be extremely careful during assembly! When using the most popular #2 screwdriver in use, you can cause serious damage to the fine threads located on the screw heads.
The best screwdriver option for assembly is screwdriver No. 4. It's more effective than the screwdrivers that often come with IKEA kitchen sets. In addition, this screwdriver is very convenient to use. If a serious obstacle occurs during assembly, check whether you have followed all the above steps correctly. It is quite possible that, despite all your efforts, you made a mistake when performing some stage and it needs to be corrected.
If during assembly you have any problems or something is unclear to you, you can contact the IKEA service center. There they will tell you how to solve your problem.
If you are patient, careful and follow the included instructions exactly, you will be able to assemble your IKEA kitchen furniture in the shortest possible time. We wish you good luck!
Using the Scheduler
Since there are a large number of different options for organizing wardrobe systems from Ikea, specialists created a special planner. Using this program, you can create your own layout project and arrange the modules according to your personal wishes.
Using such software is not difficult. You just have to do the following:
- Go to the company website and open the scheduler.
- Choose a design and indicate the dimensions of your room and the dimensions of the modules.
- Supplement your wardrobe with auxiliary elements.
Any version of the system can then be printed and used when arranging a room.
A planner makes it much easier to arrange a room
How to choose an Ikea bed
Since the Ikea extendable bed is now at the peak of popularity, more and more companies are appearing that are engaged in counterfeiting it.
More often, manufacturers create only a visible resemblance to the original, without caring at all about the functionality of the design.
Therefore, when choosing Ikea for a children's room, you should pay attention to the following aspects.
- It is advisable to purchase a design with a slatted base. Under no circumstances should you purchase a piece of furniture that has plywood instead of slats.
In the latter case, the mattress will not be sufficiently ventilated.
It quickly begins to move apart and fall apart under increased mechanical loads.
After a short time, the sliding part begins to jam and the mechanism breaks.
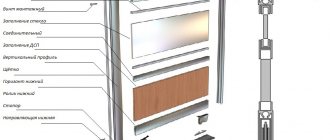
Assembling a wardrobe system: step-by-step instructions
Today we will look at a detailed version of assembling the Pax wardrobe. In addition to cabinet parts, this kit includes additional elements for installation.
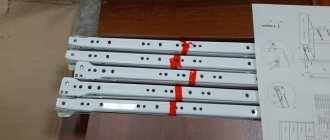
Step one: you need to open the packaging and conveniently place all the elements on the floor. The width of the finished frames will be 100 centimeters and 70 centimeters. In the assembly process itself, we will not need anything other than one screwdriver and a hammer and a hammer drill.
In this case, we will place two parts of the modules side by side - here you can see the presence of all the necessary holes for fasteners
Step two: First you need to install the wall brackets on both sides.
Installed corners for the wall
Step three : next, according to the instructions, we need to secure the holders for the upper crossbars. In total, these screws are screwed in three places. The same steps should be repeated in the second half.
Screw in the crossbar screws
Step four: Next, you need to hammer wooden pins into the upper and lower crossbars on all sides. Here we need a hammer.
Hammering the pins
Step five: Now you need to attach threaded washers to the bottom of the wardrobe (as shown in the image). They are needed in order to then screw the legs with stops into them.
Screw in the washers
Leg
From the inside of the wardrobe, you can adjust the optimal height of the legs using a Phillips screwdriver.
This is what the assembled leg with a plastic stop looks like
Step six: at the bottom of the cabinet we tighten the metal pins on which we will have to put the crossbar. They should not be secured from the extreme part, but by retreating some distance in order to place other perpendicular crossbars.
It is necessary to insert the lower crossbar into the metal pins
The sides with the cutouts should be aligned. The longitudinal part will be fixed to the wall
Step seven: when we put the bottom shelf on the metal pins, here you will notice a hole for a special nut that needs to be tightened. Using the same principle, it is necessary to secure the second shelf. It is also pre-attached to metal fasteners.
The nuts will need to be tightened using a screwdriver in three places
Step eight: when the top shelf is secured, it will be necessary to install stiffening ribs at the bottom.
They are a type of planks into which wooden pins are also installed - they should be securely fixed to the bottom.
Stiffening rib
At this stage, most of our cabinet is ready, you just need to secure the part on top.
In order to connect the remaining parts into the grooves, it is better to involve another person to help. After all, this is quite a responsible process.
This is what the finished cabinet base will look like
Step Nine: Now we need to attach the back wall to the cabinet. It is attached with nails.
It should be placed in this groove and then nailed evenly
This is what the fixed wall will look like
Now you need to put the cabinet straight.
Using the same principle, we assemble another meter-long cabinet with a height of 70 centimeters
Step ten: the next step is to connect all these cabinets into a single system using prepared holes.
You will need to attach the cabinets to each other using the fasteners that come with the kit.
To do this, you will need to first align them exactly to the level, and only then secure all the screws and nuts. It is advisable to double-check the correct location of the cabinets several times.
Then, through the holes in the furniture corners, each module of the system must be secured to the wall. You should also make holes in the wall itself using a hammer drill into which dowels will be inserted. As a result, two dowels were used for each such cabinet.
Fastening furniture corners
Step Eleven: Before installing the cabinet doors, you will need to secure the runners at the top and bottom. These doors will move on them.
This is what the top bar looks like: Bottom bar
This is done quite simply. So, first, using two self-tapping screws, screw the top bar according to the instructions, install plugs so that it does not move back and forth. Then we screw the plastic holders on top.
Plastic holder
The lower bar is even easier to install. It will have to be secured with 8 screws.
Step twelve: the next step is to assemble the doors.
First you need to screw the corner and crossbar
After the main crossbar is installed, we need to secure the middle crossbars with screws.
The crossbars will connect the mirror and the wooden panel
Step Thirteen: Once these plates are installed, we will move on to the step of joining the mirror to the wood panel. This is the most difficult process of all stages of structural assembly. The canvases must be alternated with each other.
On top we install a wooden panel in special grooves. In this case, all seats must be sealed with a rubber seal.
Rubber compressor
Then a jumper is installed and only then can glass be installed up to the next jumper.
Step fourteen: all that remains is to put on the other side of the fastener, and our door will be ready.
Door assembled
Once assembly is complete, you can tighten all the screws again for greater reliability. Otherwise, they may unwind during operation.
It should be remembered that the door marked “A” is installed on the right side. The only difference is that it is a little thinner because it slides behind the other. Therefore, during assembly this feature will also have to be taken into account.
The door marked “A” is installed on the right side.
Then you have to hang the wheels on the door and install it in the wardrobe system. The mechanism should open and close smoothly.
What difficulties can you encounter during the assembly process?
Let's consider the main problems that arise when assembling a wardrobe - structures that are available in various wardrobe systems from Ikea and not only.
Table 1. Problems when assembling the cabinet
| Problem | Causes |
| Doors are difficult to move along the guide | 1. The doors may have been mixed up. Therefore, you need to remove them and check the markings. 2. When installing the rollers, the screws were not tightened properly. 3. The roller has moved from the guide. It is necessary to check its position and correct it. 4. An object has fallen between the doors. |
| The closet door is knocking | 1. The roller has chipped. It may need to be replaced. 2. The guide is clogged with dust. You'll have to take it apart and clean it. |
| Drawers hit doors when opening | 1. First of all, you need to install the base of the cabinet level. 2. Then you should adjust the position of the doors. |
| The back wall is falling off | In most wardrobe systems from Ikea, the back wall must be fixed to the wall - this will make the structure more durable. In addition, this will ensure smooth door movement. If you are not going to fix it to the wall, then instead of nails when assembling the cabinet, it is better to use self-tapping screws. |
Wardrobe Ikea
Opinions on review sites
In addition to quality, it is worth evaluating other properties and characteristics of this furniture. What do other buyers say about this?
My blog has also previously published reviews of PAX