TV stands, like most types of furniture, are delivered from store warehouses in disassembled form. This delivery method simplifies transportation and protects products from damage. You can assemble a TV stand from the received set of parts and accessories yourself or with the help of professional assemblers.
Qualified craftsmen assemble furniture faster and almost with their eyes closed, but if you have free time, you can do the same work with your own hands. The main thing is to strictly follow the manufacturer’s instructions, follow the technological stages of assembly, and be careful and careful.
Assembling a drawer using dowels and minifixes
This article describes a method for assembling a drawer from ready-made factory parts, with marked holes for dowels, minifixes and confirmations.
From this material you will learn how to assemble a drawer yourself and you can easily do it yourself. People began to furnish their homes with furniture since the construction of the first house. Gradually, benches, tables, and beds appeared, which over time were transformed into comfortable sofas, wardrobes and beds.
There was a time when a simple wooden chair amazed with its sophistication and beauty. Then the era of unification came and all pieces of furniture began to fulfill only their functional purpose.
But man’s irresistible desire to live in comfort and coziness forced him to look for new forms and embody original ideas. The real solution was the production of cabinet furniture, which harmoniously combined attractiveness and simplicity, individuality and accessibility.
Now it is not difficult to find the necessary product; all that is required is skill in assembling it and the ability to understand furniture parts.
For some reason, many questions arise in this matter, particularly when assembling drawers, for example for a closet or chest of drawers, especially if the fasteners are minifixes. Shall we figure it out?
Tools and materials required for assembly
Before you begin assembling furniture, in order to avoid surprises, you should check the complete set of purchased materials and fasteners contained in the box. The name and quantity are indicated in the attached instructions. Typically, the kit contains the following parts.
- Wood plywood slabs, cut to required sizes. Walls, lid, base of the product, as well as front, side and back parts of drawers. The bottom of the drawers and the back wall of the bedside table are often made of thinner material.
- Legs or wheels for the base.
- Elements for fastening parts together: wooden dowels, special screws for wood, self-tapping screws and small nails.
- Accessories (handles and guide rails).
Tool you will need
To assemble a cabinet, take care of these tools.
- Phillips screwdriver for screws. If the manufacturer suggested using a special Euroscrew for fastening, then the kit should include a hex key.
- Hammer.
- Screwdriver.
Build from wood or scrap materials?
You can make a bedside table with your own hands from different materials:
Natural wood.
It is important to choose the right wood here. It is divided into: hard, soft and durable. The most difficult thing to work with is oak, as it is difficult to process. Furniture made from it turns out noble and aristocratic. But birch and pine are easy and pleasant to work with . Lumber is distinguished by its favorable price and impeccable texture.Such furniture will serve not only you, but also your grandchildren.
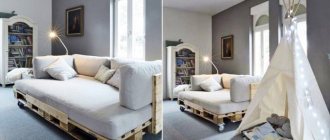
- Pallets. They are distinguished by ease of use, long service life, naturalness, and the ability to withstand heavy loads. Keep in mind that the pallets will need to be pre-prepared for use.
- Brusa. This lumber is easy to process, strong, reliable and durable. From it you can assemble an original and exclusive design that will delight owners with ease of use and high technical characteristics.
- Boards Wooden cabinets are a classic example of the use of natural materials in furniture making. The boards are resistant to deformation, cracking and stress. When choosing them, attention is paid to the degree of drying, the presence of defects and flaws.
- Chipboard. This lumber is distinguished by the presence of a melamine film on the surface, which makes it resistant to high moisture and chips and scratches. In stores you can purchase laminated chipboard of any texture, texture and color scheme. The material is easy and pleasant to work with. Since it is cut and sawed with both hand and power tools. Furniture made from chipboard is distinguished by its aesthetics, resistance to negative factors, safety and favorable cost .
- Furniture board. It is made on the basis of shavings and is distinguished by its naturalness, durability and attractiveness. Furniture made from furniture panels does not differ in technical characteristics from furniture made from solid wood.
Each individual option has its own manufacturing characteristics. In addition, designers offer original and interesting options for making cabinets from scrap materials. Namely, you can make a bedside table from:
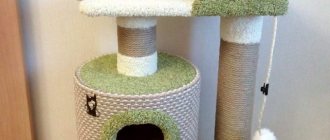
- An old stool. Thanks to a creative approach, an old stool can be turned into a full-fledged cabinet with drawers for storing personal items. For these purposes, choose a chair without soft upholstery.
You will need to buy fittings for the drawer.The box itself is made according to the dimensions of the chair. A pre-assembled box is attached under the seat; additional shelves can be attached below from laminated chipboard.
- Old boxes.
Here you will need wooden fruit boxes. They will need to be placed on legs or wheels to create an original cabinet. You can make an additional shelf inside the box. The box can be placed both vertically and horizontally. If you use two drawers at once, you can build a taller cabinet. - Chest. This item was important in every hut or hut in ancient times. Nowadays they are quite rare in interiors. If you have a chest from your great-grandmother lying around in the attic or barn, you can use it to make an exclusive bedside table. Thanks to the spaciousness of the chest, it contains a large number of personal items, which makes it practical and functional.
- Books This interesting project is suitable for installation in a bedroom or living room. Stacks of unnecessary books are tied with leather straps or thick ribbons. Between the books there are square or rectangular modules made of wood, plywood or chipboard. Thick cardboard boxes are also suitable as modules.
- Barrels. This bedroom design will be very unusual. The barrel itself is a completely finished cabinet. The main thing is that it must be clean and free of unpleasant odors . You will need to cut out a door in the middle of the barrel, put it on hinges and make an additional shelf inside. There is also an interesting option: make two barrels from one barrel at once, sawing it in half and placing it upside down.
- Suitcase. There is an old suitcase in almost every home.
This interesting approach to using a suitcase as a nightstand will not only decorate a vintage or classic interior, but will also allow you to properly place bedding.To make a cabinet you will need two suitcases that are stacked on top of each other. You can also build a cabinet from one suitcase, first placing it on an old stool or attaching legs to it.
- Stool and mirror. A stool and an unnecessary mirror are suitable as a bedside table. At the bottom of the product you can also make a drawer and shelves. The mirror will serve as a table top.
- Stepladders. This is the simplest option in which nothing additional is required. If you have a small wooden stepladder, you will have an exclusive finished bedside table. If desired, it can be painted or varnished in several layers . Personal belongings will fit on the steps of the stairs. You can put a book on them, a cup of coffee, or a phone.
Advice : if you don’t want to specifically buy lumber for making a piece of furniture, just find an old stool, which is found in every home, or a pallet, a barrel, or even a stepladder.
Cabinet structure
Any cabinet belongs to the category of cabinet furniture, in which the interior space is functional. Its body can accommodate several drawers. But, given that we are talking about a piece of furniture that cannot be higher than a table, there are usually no more than three such drawers that would be convenient to use. The cabinet can be attached, but in our case, preference was given to the more convenient option on casters.
Cabinet body dimensions
- You can see the most optimal dimensions of the product in the photo above. Well, the height of the drawers should be determined by dividing the height of the cabinet by three.
- Do not forget to take into account the necessary gaps between them, which are optimally 3 mm. That is, if you have three drawers, then you need to take into account four gaps: one at the top and bottom, and two between the drawers.
Hand drawn sketch
In any case, work must begin with a drawing on which all dimensions will be calculated and indicated. It will help not only to better navigate the work, but also to accurately calculate the amount of consumables and accessories.
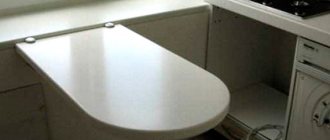
Leather covered bedside table
An easy-to-make but interesting-looking bedside table can be made from chipboard and eco-leather. The design is quite simple. The cabinet will have only two drawers.
Step 1. The first thing you need to do is make a simple drawing of the future bedside table and put all the dimensional parameters on it.
Simple design drawing
Step 2. Next you need to assemble a frame from pieces of chipboard. They need to be sawed (remnants from a large sheet will do) and connected to each other using self-tapping screws.
Frame made from chipboard pieces
Step 3. Then you need to make the drawers themselves from the remnants of the chipboard, in this case in the amount of two pieces. Also, as in the previous case, it is important to correctly install and adjust the drawer guides.
Drawers installed Photo of the work result
Step 4. Since the bedside tables will be covered with eco-leather, they must first be covered on the outside with thin foam rubber, which can be secured to the bedside table using a construction stapler.
The cabinets are covered with foam rubber
Step 5. Afterwards, the frame needs to be covered with facing material. You need to pull it tightly enough so that the eco-leather sits tight. Step by step, you need to fix the material also with a construction stapler, but in such a way that the staples are not visible to the eye.
Covering with face material Staples should not be visible
Step 6. Using the same principle, you need to cover the front sides of the drawers.
The front side is also covered
Step 7. These are the bedside tables you should get.
Finished nightstand This is what nightstands look like next to the bed
Video - Making a cabinet from plywood
Materials and tools
You can make a cabinet with your own hands both from scrap materials and from standard structural ones: wood, its derivatives, tempered glass, metal. Most of the ready-made drawings that are freely available suggest the use of chipboard or MDF with a thickness of 16 mm or more in the manufacture of the main parts of the body. Fibreboard with a thickness of 4–6 mm is suitable for sawing out the back walls or bottoms of drawers.
The quality requirements for furniture fittings when making a cabinet with your own hands are high. Handles, hinges or guides are purchased in full from trusted manufacturers. Help to make your locker comfortable and beautiful:
- gilded or antique-style handles;
- high-quality guides, purchased if there are drawers or drawers in the plan (a budget alternative is L-shaped wooden planks);
- wheels turning in different directions;
- elevator door opening mechanisms, magnetic latches.
Tools are selected based on the type of body material. A standard wooden bedside table is made using a jigsaw, drill, grinder, screwdriver, furniture jig. To fasten individual elements, glue (carpentry or PVA), screws or dowels are used. Self-adhesive edgings or films used when working with panel wood materials are fixed using an iron or a hair dryer.
Option No3. Bedside table made of pallets
To minimize costs when making a bedside table, you can take pallets from building materials. They (pallets) can be not only wooden, but also metal and plastic.
Pallets have many standard sizes, but often only 2 are used:
- 120x80 cm (European);
- 120x100 (North American).
Stage No1. Preparing everything you need
For work you will need the following consumables:
- pallets (in our example – large double ones);
- pieces of plywood (can be replaced with other sheet material);
- nails;
- glue;
- screws;
- glossy varnish (for wood), water-soluble.
Pallets are used to make the cabinet.
As for the tools, you will need:
- pencil, square and tape measure;
- mount;
- screwdriver;
- hammer;
- clamps;
- Circular Saw;
- holdfast;
- Sander;
- electric jigsaw;
- ballerina (or hole saw);
- screwdriver;
- electric drill.
On a note! If we talk about glue, then it is better to give preference to PVA - it dries quickly, provides a strong connection, and can be easily removed when squeezed out.
Stage No2. Removing the pallet
Of course, new lumber can be used instead of old pallets, but the cost of the bedside table will increase greatly because of this. Therefore, we begin this instruction by disassembling the pallet.
To work you will need a hammer and a pry bar. To minimize damage to the wood, it is recommended to first loosen the boards using a chisel. By the way, an electric reciprocating saw is perfect for dismantling - its metal blade should be inserted along the joint of the boards to cut the nails connecting them. After this, the nails can be easily removed, while the wood will remain virtually undamaged.
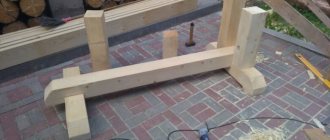
Stage No3. Blanks for creating a frame
It will consist of 10 planks (4 for the back wall, 3 for the side walls), which will be connected by a pair of rectangular frames.
Drawing of a wooden bedside table
Using a circular saw, 10 boards are cut, each 520 mm long (the length can be any). Planks for the rear wall and those of suitable quality for the side walls are selected. Each set of planks is chipped together to measure the overall width. The resulting figure will be needed when creating rectangular frames.
Measure the width of the folded boards
Each frame is made of 4 bars. When cutting bars, it is very important to observe all dimensions exactly.
Frame drawing
Note! It is advisable to use a hand tool for cutting workpieces rather than an electric one - this way the results will be more accurate. You will be surprised, but a hacksaw is ideal for this. If we consider power tools, then preference should be given to a band jigsaw, but, alas, not every home craftsman has one.
Stage No4. Rectangular frames
When all the blanks are made, rectangular frames are assembled. In the finished cabinet, the latter will not be visible, and therefore you don’t have to worry too much about the aesthetics of their connection. The width of each workpiece is 7 cm. If there are no screws of the required length, holes are made with a 12 cm drill to 1⁄2 the width of the block.
Finished frame for a bedside table frame made of wood
You need to make sure that the dimensions of both frames are identical . When tightening the screws, it is recommended to clamp the lower and upper parts together so that they exactly match in size.
Stage No5. Planks for countertops
Upon completion of the previous stage, blanks for the table top of the structure are cut. Pieces of the required length are cut with a circular saw with a slight allowance.
Preparing boards for countertops
Stage No6. Workpiece grinding
Before assembling the frame, the boards are thoroughly cleaned with a grinding machine. Of course, you can try to do this manually, but using a grinder is both better and easier. The movements should be circular - this will create a beautiful texture.
Sanding boards
Note! If you want, you can get an unusual effect - to do this, the external surfaces should be thoroughly cleaned (almost to a mirror shine), and then treated with coarse coarse sandpaper to deliberately create defects and irregularities.
Stage No7. Frame
For the final assembly of the structure body, only nails are used. Additionally, you can use glue, but this is not necessary - the frame will already be quite strong.
It is important that the wood is dry during work, otherwise it will dry out once it is in the house, and its attractiveness will noticeably decrease. Yes, this can later be attributed to the rustic style, but it is still advisable to dry the wood first.
First of all, the top cover is assembled on a rectangular frame. The ends of the boards that extend beyond the structure are brought to the required dimensions using a grinding machine.
The tabletop of the future design is being assembled
Next, the back and side walls are nailed. Let’s make a reservation right away that this is quite difficult to do - the lower frame must be well fixed, otherwise the rectangularity will be disrupted when hammering in nails. After this, the front surface is assembled.
Installation of bedside tables
Important! Instead of nails, it is still better to use screws - this way the parts will be properly fixed without the risk of shifting from being hit with a hammer.
Stage No8. Plywood inserts
To make the drawer slide easier and more freely, a couple of pieces of plywood are glued from the inside to the bottom frame (see diagram below).
Gluing plywood inserts
Stage No9. Drawer
In our case, it will be assembled from a piece of plywood (recommended thickness - 4 mm) and five pieces of wood.
Making a box
- The required piece of plywood is marked and cut using a saw.
- After measuring the height in the workpiece from which the front wall will be made, a groove of 8 mm depth is cut out. The plywood will be inserted into this groove.
- The remaining walls are cut off.
- The walls of the box are placed on top of the plywood and connected with nails (additionally, glue can be used).
The finished drawer of the bedside table
Due to the fact that it is the drawer that will be subject to the greatest loads, its walls can be additionally connected with iron corners - this way its rectangularity and strength will be preserved.
Stage No.10. Shelf
When the box is ready (its front wall will be finalized a little later), you can begin strengthening the shelf. A pair of slats are attached to the side walls using screws, after which all that remains is to make sure that the box moves freely inside the structure. If yes, then you can safely nail the shelf to the slats. By the way, to mark its position, you can first place the box inside to draw a couple of lines a few millimeters higher than the side walls.
Making a shelf
Stage No11. Sweetheart neckline
First, we note that the cutout on the front wall can have any shape - it all depends on your personal preferences. According to our design, it will be shaped like a heart, although you can simply make a simple pattern with a few small holes (these can be drilled with a drill).
- So, first a piece of board of the required size is cut.
- Next, a heart is drawn on the board; it must have the correct shape. If a hole saw is used for cutting, for example, 3.2 cm, then it can serve as a template.
- A pair of holes is drilled using a hole saw.
- All the pieces that remain are finally cut out using a jigsaw.
- After this, the front wall of the drawer remains to be completely assembled, which will require the same nails and glue.
Cutting a hole in the shape of a heart
On a note! Cutouts and other shapes will look great - these could be, for example, images of card suits. However, for this, the bedside table must have the appropriate number of drawers.
Stage No.12. Finishing touches
Once assembly is complete, the cabinet can be coated with clear varnish to protect the wood and reveal the details of its texture. Moreover, the varnish can be slightly tinted with pigment (white or black) - this way you will get a slight gray haze.
So what you need to do:
- clean the tree;
- sand it with sandpaper No. 150;
- clean again;
- coat with a layer of varnish, then wait at least 4 hours;
- lightly sand with No. 200 sandpaper;
- clean again;
- apply a second coat of varnish.
Note! The finished bedside table will look great if you treat the surfaces with stain before applying varnish. By the way, instead of stain, you can use a solution of potassium permanganate or iodine, diluted tea, etc.
Homemade wooden bedside table in the interior Homemade wooden bedside table in the interior
Video – Bedside table in Provence style
What functional role does a chest of drawers play in the interior?
A chest of drawers is a multifunctional piece of furniture that remains relevant for many years.
There are various options both in the homes of grandmothers and among modern youth. Modernized models fit perfectly into any design. Modern and durable materials are used for their production. Thanks to this, it was possible to achieve a long service life. At the same time, the necessary level of comfort is organized, because the drawers can fit a large number of things.
Experts recommend choosing wood models. The material is highly durable, so it will last a long time without visible damage. However, if the family budget is limited, then it is permissible to purchase a chest of drawers made of plastic. It will fit perfectly into the decor of a bedroom or kitchen.
The size of a standard chest of drawers is small. That is why it can be successfully placed even in a room with a small square footage.
The chest of drawers has a large capacity in each drawer. It is a must buy for a large family.
The chest of drawers has a large capacity in each drawer
The furniture will not take up much space, but will delight you with its functionality. If you arrange things carefully, they will maintain a neat appearance for a long period of time.
Manufacturers offer models with open and closed shelves. Manufacturers also complement the furniture with stylish and original accessories.
Depending on the chosen decor, the style of the chest of drawers is determined. It can become a stylish addition to any interior. You can place vases or other decorative elements on top. Family photos look stylish. With them, any apartment becomes much more comfortable.
Depending on the chosen decor, the style of the chest of drawers is determined
Project detailing and specification
Perhaps this is the most important stage in making a chest of drawers with your own hands; here you need to be especially careful, because... We will make a list of parts and determine their sizes, which we will then send for cutting.
We enter the necessary parts into the specifications, indicating their length, width and thickness. We also enter the name of the material, where and on which side the edge should be glued, and indicate the milling of the ends (only in MDF).
We take the resulting list of parts to a company that is engaged in cutting chipboard and manufacturing MDF facades, and we agree on this order. The made parts will remind you of a Lego set, which can be assembled quite easily with the help of fasteners and accessories.
Also pay attention to the indentations under the baseboards when installing the chest of drawers. There are several options here
You can take legs that are taller than the baseboards, or you can simply run the tabletop back 50 mm, as, for example, this was done with this model
There are several options here. You can take legs that are taller than the baseboards, or you can simply run the tabletop back 50 mm, as, for example, was done with this model.
Here we will calculate the necessary material, fittings and fasteners to assemble the chest of drawers and at the same time calculate how much it will cost us.
The specification can be made in a regular Excel file. For example, you can download mine:
Download link:
How to assemble a chest of drawers yourself
When assembling cabinet furniture, it is recommended to use recommendations from professionals in this matter. Thanks to this, it will be possible to keep the furniture stylish and of high quality for many years:
- Furniture must be assembled from small parts. It is gradually possible to increase their size or connect them together.
- Assembling the chest of drawers on a flat surface will prevent distortion.
- Parts may suffer from any mechanical damage. That is why you should first cover the work area with a soft cloth. Cardboard can also be used as a protective element.
- When tightening the bolts, do not use too much force. Otherwise, dents or other damage may occur on the chipboard or MDF.
Assembling the chest of drawers on a flat surface will prevent distortion
Required materials and tools
You can assemble individual parts of cabinet furniture if you first stock up on the following tools:
- Roulette
- Phillips screwdriver
- Drill or automatic screwdriver
- Hammer
Today, to assemble some furniture samples you will also need to use special Euroscrews. Only they are suitable for connecting parts together reliably.
As a rule, manufacturers initially include Euroscrews in their tools. The product has a convenient structure and will last for a long time.
As a rule, manufacturers initially include euroscrews in the composition of the tools
Scheme and drawing
The guides can be installed inside the housing only after the side surfaces have been aligned. However, the preliminary marking is done with a pencil. It is recommended to use a tape measure to measure.
Self-tapping screws should be used to secure the guides. They will fit securely into the surface when using a screwdriver.
The drawers will only slide in smoothly if the guides are positioned correctly. Otherwise, during operation they may cling to each other. At the last stage of assembly, the horizontal cover is secured. To do this, you will need to organize reliable connections with the corps.
Drawers will only slide in smoothly if the guides are positioned correctly.
Frame
Before starting manipulations, it is recommended to check the presence of all parts. Without them, it is impossible to assemble furniture quickly and efficiently.
The chest of drawers will include:
- Bottom
- Lateral and horizontal parts
- Some models must also have a plinth strip
- Rear wall
Some mobile models also include wheels. In stationary chests of drawers they are replaced with legs. They will need to be secured first. Only after this is it possible to proceed to further actions.
The last stage of assembly is fixing the back wall. For ease of further use, it is made of isorgalite or chipboard. Reliable fixation is achieved by using self-tapping screws or furniture nails.
After completing these manipulations, the assembly process can be considered complete. Example of frame assembly diagram
Drawers
The model quite often includes drawers. They will need to be collected separately. The boxes consist of the following spare parts:
- Side wall
- Bottom
- Front end
Before starting the upcoming manipulations, specialists are recommended to arrange the parts of each box into piles. This will reduce the likelihood of confusion to a minimum.
When assembling each drawer, it is recommended to use the diagram that is applied to the body. It is recommended to use confirmats to connect the side walls to each other. It is also possible to take another type of fastener that will fit directly to the selected model.
It is recommended to use self-tapping screws to secure the bottom.
The walls of the drawers are assembled with screws or cones class=”aligncenter” width=”1024″ height=”587″[/img]The bottom is secured with nails or self-tapping screws. When assembled correctly, the boxes should slide easily along the guides
The handle is secured with bolts
At the last stage of assembly, the facades and handles are secured. To do this, it is allowed to use self-tapping screws of short length.
This indicator will require attention. Otherwise, careless movements may damage the front part.
Manufacturers, as a rule, leave ready-made holes for handles. That is why there is no need to use a drill to form them.
A chest of drawers is a stylish and fashionable addition to the interior. The furniture has a simple structure, so you can assemble it yourself
However, you will first need to pay attention to studying the process instructions
Assembling drawers
How to assemble a chest of drawers? Retractable mechanisms are a more complex stage in the assembly of any cabinet furniture. We are sure that you can do it too.
First, sort all the elements of the drawer into different cells (stacks). This will streamline your workflow. Next, assemble each box according to the same principle as the main body: fasten the side walls and fix the bottom of the product.
The next step is how to install drawer guides in the chest of drawers? The mechanism for fastening the runners in almost every model of chest of drawers is the same. As a rule, you should step back about 2 mm and screw the runners along the guides. There are three types of guides:
- lower ones , which are attached to the bottom of the chest of drawers. This is the most cost-effective and easiest-to-install mechanism
- central , mounted in the sides of the drawers. These are ball runners that can be fixed at any height of the drawer, but it is better to stick to the central location
- top fasteners: guide rails are located along the top edge
Your task is to screw the guide rails at the same level. In this case, the boxes will move well and last as long as possible.
The last stage of assembling the drawer is the installation of decorative handles. Usually the front facades have ready-made openings. If not, you will have to drill them yourself.
You learned how to mount the frame, assemble the dresser slides, and install the drawers. By this moment, you should have the finished product that you chose in the store in front of you. We are confident that the assembly was successful!
Calculating the body of the box is a simple procedure. The part on which the guide will be attached (the depth of the drawer) is usually taken to be equal to the length of the guides themselves. They, in turn, are produced in multiples of 50 millimeters: 250, 300 and so on, up to 600 millimeters.
The part that will be located along the width of the box is calculated as follows. Opening width, minus 26 millimeters (technological gap on the guides), minus 32 (with a standard chipboard thickness of 16 millimeters). For example, if the opening in which the drawers will be located is 500 millimeters, therefore, the part is 500-26-32 = 442 millimeters.
What functional role does a chest of drawers play in the interior?
A chest of drawers is a multifunctional piece of furniture that remains relevant for many years.
There are various options both in the homes of grandmothers and among modern youth. Modernized models fit perfectly into any design. Modern and durable materials are used for their production. Thanks to this, it was possible to achieve a long service life. At the same time, the necessary level of comfort is organized, because the drawers can fit a large number of things.
Experts recommend choosing wood models. The material is highly durable, so it will last a long time without visible damage. However, if the family budget is limited, then it is permissible to purchase a chest of drawers made of plastic. It will fit perfectly into the decor of a bedroom or kitchen.
The size of a standard chest of drawers is small. That is why it can be successfully placed even in a room with a small square footage.
The chest of drawers has a large capacity in each drawer. It is a must buy for a large family.
The chest of drawers has a large capacity in each drawer
The furniture will not take up much space, but will delight you with its functionality. If you arrange things carefully, they will maintain a neat appearance for a long period of time.
Manufacturers offer models with open and closed shelves. Manufacturers also complement the furniture with stylish and original accessories.
Depending on the chosen decor, the style of the chest of drawers is determined. It can become a stylish addition to any interior. You can place vases or other decorative elements on top. Family photos look stylish. With them, any apartment becomes much more comfortable.
Depending on the chosen decor, the style of the chest of drawers is determined
Preparatory work
The first thing you need to do is clean your nightstand. To do this, take warm water and add a small amount of detergent that contains chlorine.
I bring the most delicious tomatoes from the market: when choosing them, I always look at 3 things
“He’s matured, he’s outgrown his mother”: Valeria shared a new photo with her youngest son
What the stars promise for the week from July 5 to July 11: horoscope for all zodiac signs
Thoroughly wash all surfaces inside and outside the bedside table to disinfect them and remove dirt and unpleasant odors. Then take warm water again and add a couple of drops of vinegar to it. Now you need to let the bedside table dry completely. To do this, leave it for several days in a well-ventilated area or outside, if weather conditions permit.
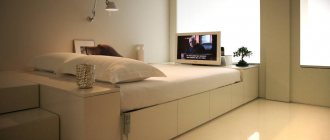
Bedside table
It is easy to store books that are in the process of reading right now in the nightstand. You can put a glass of water and your phone on the nightstand. Hide your favorite hand cream or eye drops. There are a lot of important little things when you wake up or go to bed, and they all need to be stored somewhere.
A bedside table is quite difficult to ignore and get by without it in everyday life, so it is a real indispensable assistant for any housewife. You can buy a bedside table or make it yourself.
Assembling the headset box
Any kitchen set must have cabinets, cabinets, drawers and sections, the basis of which is a box of four boards. Such boxes can be floor-mounted, wall-mounted, or supported only by the surfaces of other furniture elements. When assembling boxes, it is recommended to adhere to the following instructions:
- The sides of the box are attached to the bottom and top with confirmations.
For these special “screws”, holes of appropriate size are pre-drilled in the surfaces to be fastened. Ordinary nails and screws are not suitable for high-quality and durable screeding of wooden surfaces. The use of furniture screws is allowed as fastening only in small boxes that are not designed to bear a large load from the kitchen utensils placed in them. - If, during factory assembly, there are no holes and marks for installing shelf holders and receiving guides, then the installation locations for the fittings can be determined using a level. All structurally connected pairs of holders or guides must lie in a strict horizontal plane.
- When calculating the method of installing the box, it is necessary to take into account that the confirmats must fasten the boards in a horizontal position. If, after the final installation of the box, the confirmats find themselves in a vertical position, then the force of gravity can make such fastening very unreliable.
- A thin sheet of chipboard or plywood is usually chosen as the back wall of a small box. Such a sheet is fastened to the back of the box using numerous small nails or sheathed with a construction stapler. It is irrational to use thick back walls in small boxes, with the exception of some types of decorative sections of the set.
It is also important to know that the diagonals of the assembled box must be equal. This will indicate their original proportionality and correct positioning in relation to each other
If the diagonals are not equal, it means that the geometry of the box was violated during installation, or during the initial fitting of the walls, discrepancies in the size of the boards were missed.
The diagonals of the box must be equal.
Design
As for decorating a bedside table made from old pallets, you can decorate it with a cut out heart on the drawer. For this:
- Cut a piece of board to the required size.
- We draw the ornament with a pencil. It is better to use a hole saw to cut out the heart . Drill two holes with a saw. The rest of the drawing is completed with a jigsaw.
- Now we install the front of the drawer using nails and glue.
That's the whole simple process of making a bedside table with your own hands from construction pallets. In order to safely use a piece of furniture, you will need it first:
- Sand with sandpaper.
- Cover with a layer of varnish and wait for it to dry completely.
- Sand the surface again and apply a second coat of varnish.
- Some people use wenge or walnut stain before varnishing their pallets.
The assembled cabinet can be used as bedside furniture, in the living room and even in the hallway. It will fill the interior with some mystery and exclusivity.
Tip : instead of a bedside table, you can use a TV stand. And if you are interested in the loft style, then you can also make a bed, sofa, table and even an armchair from pallets.
Tools for assembling a chest of drawers
There should be no problems with choosing a chest of drawers, but the same cannot be said about assembling it. In order to do this kind of work, you need to use some advice from professionals. First, you should prepare the tools that will be useful when assembling the chest of drawers. So, for this you need:
- Screwdriver - you will need it to tighten bolts and screws. Of course, this job can be done with a simple screwdriver. But this will take a lot of effort and time.
- Hammer - this will be used to hammer in the nails that secure the back wall of the chest of drawers.
- Awl - used to make holes into which self-tapping screws will be screwed in the future.
Having these tools and instructions at hand, you can carry out high-quality furniture assembly, without any defects or outside help. It is worth noting here that you will have to pay separately for the services of an assembly specialist. So, how to assemble a chest of drawers?
In this article, we have provided a small selection of drawings with exact dimensions, according to which it is quite possible to assemble a chest of drawers for storing things.
Tools
Materials you will need:
- wooden double pallets;
- nails;
- screws;
- glue;
- plywood;
- varnish
Tools you will need:
- mount;
- hammer;
- Sander;
- saw;
- drill;
- screwdriver;
- electric jigsaw;
- clamps;
- pencil and ruler;
- screwdriver.
Design features
Modern design solutions can significantly expand the scope of application of this product. This happens through the use of new technologies and modern materials.
It is necessary that the diagram for assembling the cabinet with your own hands is correctly selected. They may look like this:
- rectangular parallelepiped in traditional design;
- hexagonal prism;
- cylindrical shape.
The possibilities for choosing different designs are unlimited. Cabinets can consist of several compartments and have different design features of their functionality and decorative design.
Designing the top panel
A wooden panel is placed on top of the cabinet. Experts recommend the use of various design solutions. For this purpose, a small canopy is used in the front or rear of the special structure. To decorate the top part, you need to reproduce the following manipulations:
- The top is attached with 4 cm screws;
- 2 dowels are cut at a 45-degree angle;
- The back bar is cut out and the size can be adjusted to determine how much it will protrude from each side.
- Special dowels are glued using wood glue;
- After the special substance has dried, the slot holes are filled with sealant.
Peculiarities
The features of this piece of furniture include:
- Reliability. Products made from natural solid wood last for many years and do not require special care. They do not lose their technical characteristics, functionality and original color.
- Comfort. The presence of numerous drawers allows people to intelligently organize personal items so that they are always at hand.
- Wide range of models, sizes and configurations. Depending on the needs, people can make a chest of drawers of any height, width and length. For owners of small-sized housing, it is worth choosing compact and ergonomic models. And owners of spacious mansions can build a spacious and large chest of drawers with a huge number of drawers.
- Eco-friendly and natural. Wooden items do not emit toxins and do not harm consumers. They emit a pleasant woody aroma and fit harmoniously into various stylistic trends.
Types of wooden bedside tables
In everyday life, wooden furniture is called not only furniture made from natural material, but also from its analogues. Externally, these products are sometimes difficult to distinguish from each other, but in composition they are different. Solid wood cabinets are more expensive, and this depends both on the type of wood and on the size, shape, type of finish and other features of the product.
Solid wood cabinets - factory-made and homemade
Materials for production
The first criterion by which bedside tables are chosen is the material from which they are made. Wood of different species differs not only in color and pattern, but also in hardness, which determines the appearance and service life of the finished product.
Table. The choice of lumber depends on the hardness of the wood species.
| Wood species by density | Characteristic |
| Hard varieties include larch, birch, maple, exotic merbau and others. Furniture made from such wood is distinguished not only by its strength and durability, but also by its decent weight. To work with such breeds you need special tools and a lot of experience, without which it is better not to start making even the simplest furniture. |
| Medium hard | Oak, cherry, beech and some other types of wood have a slightly lower density, but are also quite hard, and products made from them are considered elite. This is also due to the beautiful texture and color of the wood. For example, cherry darkens over time, while oak stands out with its contrasting pattern and unusual shades. |
| Soft | Soft varieties - pine, spruce, walnut, aspen, etc. They are the most convenient to use for working in artisanal conditions, since they are easy to process and are inexpensive. Despite the fact that soft wood is easily scratched and does not have high resistance to mechanical damage, it is quite suitable for creating furniture that does not experience high loads. In addition, there are many coatings to protect wood from any external influences. |
Wood-like materials from which the bulk of modern furniture is made are plywood, chipboard and MDF. They can be painted, laminated or covered with natural or artificial veneer.
Most often, MDF, fiberboard and chipboard are used to make furniture.
Note. Depending on the type of coating, products made from them can cost even more than similar furniture made from pine or birch without external finishing.
Design features
The shape of bedside tables is usually square or rectangular in horizontal section. But, if the style of the interior requires it, they can have a different configuration - from round or trapezoidal (corner) to curly.
The cabinets have a variety of shapes
Depending on the presence of facades, they can be open or closed:
- open cabinets do not have facades and consist only of sides, back panel, bottom and lid. Equipped with shelves, the contents of which remain visible; Open bedside table
- Closed structures have doors, most often hinged. They can also be equipped with drawers. The extension mechanism is different: it can be on simple runners, ball or roller guides. Closed nightstand
For reference. If maintaining absolute silence in the bedroom is important, then it is better to abandon drawers on a roller mechanism, since it makes a dull sound when moving.
As for the sizes, they are not limited in any way. But for ease of use, the bedside table should have a depth of 30-40 cm, and the height should not be greater than the height of the bed. Although it depends on the purpose of this piece of furniture. For example, if it is used as a bedside table for family members with limited mobility, it is more convenient to make it higher.
Standard sizes of bedside tables
Style solutions
Convenience and functionality are very important. But even an object as small in size as a bedside table must also fit harmoniously into the bedroom interior and match the uniform style and color design of the room. If it is purchased separately, and not included with the headset, or is made with your own hands, you can give the following recommendations for selection:
- modern styles, such as minimalism or hi-tech, involve the use of simple forms and laconic finishes. These are rectangular cabinets, plain, with a minimum amount of fittings and a lack of decor; Bedside table in minimalist style
- cabinets in the Art Nouveau style - wooden or veneered, with curved legs and convex facades;
Furniture in the Art Nouveau style is distinguished by convex shapes and the presence of elegant decor. - The main thing in country style is simplicity and an unpretentious village atmosphere. It goes well with simple cabinets made of natural wood without a coating that hides the wood texture. You can use painting or decoupage as a decorative finish;
Country style nightstand - classic models are distinguished by rounded corners, the presence of panels, carved and gilded elements, massive handles, and three-dimensional shapes.
Elegant classic
Covering and decor
Since both natural wood and materials consisting of recycled wood are very sensitive to moisture, temperature changes and other harmful factors, they need protection from them. As a protective coating for wooden cabinets, compositions with additional decorative properties are used. Such compositions include:
- various paints that create a colored film on the surface that does not allow moisture to pass through; Paint is the most affordable option among protective and decorative means for wood
- varnishes, forming a hard and durable coating after drying, protecting against most external influences, including mechanical damage. But they have a serious drawback - they deprive the tree of the ability to breathe and release the natural smell of wood into the air;
Wood varnishes come in different shades - stains and impregnations that do not have this drawback; moreover, such means protect the material from rotting, penetrating deep into its structure without forming a surface film; The stain provides good protection and enhances the beauty of the texture.
- oil and wax are the most natural and environmentally friendly protective coatings. They do not clog the pores of the wood, do not hide them, and even more strongly reveal the pattern of the material, make the surface pleasant to the touch and protect it from moisture and dirt. But they are quite expensive and require regular updating; Wax and oil are environmentally friendly wood care products.
- azure – a universal remedy that protects the tree from all harmful factors.
Azure is another popular means for protecting wooden surfaces.
In addition to protective and decorative coatings, other methods of decorating such furniture are used. Handmade work is highly valued - solid carving, applied carved wooden decor, as well as inlay, burning, and decoupage. In industrial production, other techniques are used:
- embossing – a method of heat treatment of wood in order to create a three-dimensional pattern on it. If you compare the end result, it is the modern equivalent of hand carving;
Example of embossing on wooden furniture - veneering. Veneer covers not only chipboard and MDF, but also furniture made from solid soft and inexpensive wood to give it a more solid and respectable look;
Varieties of veneer - Silk-screen printing, airbrushing, digital printing - these methods allow you to create any designs on the surface. In the first case, stencils are used for this, in the second - special sprayers, in the third - printers. Examples of silk-screen printing and digital printing on wood
Also, bedside tables can be finished with fabric, natural or artificial leather, and other materials. These methods allow you not only to decorate and make new products original, but also to restore old ones or give an elegant look to products assembled with your own hands from waste material.
DIY cabinet decor
Assembly drawings and diagrams
Before you start making furniture, you need to decide for what purposes it will be used. Bedside products have a huge number of variations. You can draw drawings of a bedside table for the bedroom yourself, or find them on the Internet on specialized resources. General principles of schemes for all designs:
- the drawing should show a detailed drawing of the bedside table;
- front and side views;
- not only the central elements, but also small objects were analyzed;
- the dimensions of the product and all its parts are clearly indicated;
- the number of compartments for shelves is determined.
You can make the drawing yourself or find it on Internet resources.
Along with the diagram, it is imperative to focus on the size of the room itself where the furniture will be located. The product is small, but it should fit into the overall style of the room. Also, the nightstand should not be “squeezed” between the bed and the wall (unless this is a necessary design according to the plan). The diagram should be detailed and take into account the size of the room.
Option No2. Unique pine bedside table
Today it is not easy to find a truly original, but at the same time simple bedside table. And if you have previously dealt with wood, then we suggest making such a unique design with your own hands.
The end result should be a bedside table like this
Table. Instructions for making a bedside table from pine.
| Steps, photo | Description of actions |
| Step 1 | To begin, prepare all the necessary tools shown in the image. |
| Step 2 | The material will be natural wood (pine), which can be purchased at a hardware store. |
| Step 3 | Work begins from the inside of the future structure. |
| Step 4 | The boards are connected to each other as shown in the image. |
| Step 5 | They are installed vertically. |
| Step 6 | After this, the lower and upper parts of the bedside table are nailed. |
| Step 7 | The result should look something like this. |
| Step 8 | Here are the materials you will need to make the box. |
| Step 9 | First, the bottom of the box is created. |
| Step 10 | Photo of the work done. |
| Step 11 | After this, the guides are nailed. |
| Step 12 | The second guide is nailed on the opposite side of the box. |
| Step 13 | The finished box will look something like this. |
| Step 14 | All that remains is to insert the finished box into place. That's it, the simple wooden cabinet is ready! |
| Step 15 | At the end, you can paint it (preferably with white paint) or cover it with stain. |
Dimensions and drawing
The dimensions of the structure are selected taking into account the purpose of the cabinet. Standard bedside models have a width of up to 50–55 cm, a height from 35 to 50 cm and a depth of 35–90 cm. Products under washbasins or sinks must securely hold bowls and be safe. With the right approach, drawings are made after measuring the free space. All elements are detailed indicating the exact dimensions of length and width. Example for clarity:
- rear panel - 1 piece, L × W, mm;
- side walls - 2 pieces, L × W, mm;
- doors - 2 pieces, L × W, mm;
- shelves, drawers (if available).
The type of fittings, connecting elements and places of their fastening are indicated in the drawing in advance, in all joining areas. Dimensions are indicated with high accuracy. If you have skills in working in special programs, the sketch of the cabinet is duplicated on paper and in electronic form.
Beginners should select ready-made universal drawings and evaluate their performance using furniture design programs or cardboard templates. The correct paper blanks can be used at the stage of marking and cutting parts. In the absence of any experience, it is worth making the cabinet as simple as possible. An open model without a door is considered an ideal option for beginners.
For shoesUnder the sink
Bedside
MEASUREMENT, MANUFACTURE AND PREPARATION OF PARTS FOR A FUTURE TV STAND:
As a result, from a cappuccino chipboard sheet 2750x1830x16mm (5.033 sq. m), it turned out:
- one piece measuring 2220x470x16mm (for the top piece of the cabinet lid measuring 2200x450x16mm);
- one piece measuring 2200x430x16mm (bottom of the cabinet);
- one piece measuring 712x430x16mm (middle connecting shelf of the cabinet);
- 2 parts measuring 500x450x16mm (bedside table lids);
- 4 parts measuring 434x430x16mm (walls and partitions of the cabinet);
- 4 parts measuring 434x430x16mm (bedside table walls);
- 4 parts measuring 712x60x16mm (upper connecting strips for hinged cabinets)
As a result, from a Santorini pine laminated chipboard sheet 2750x1830x16mm (5.033 sq. m), it turned out:
- one piece measuring 2220x470x16mm (for the bottom piece of the cabinet lid measuring 2200x450x16mm);
- 2 parts measuring 710x410x16mm (shelves of hinged cabinets);
- 2 parts measuring 500x430x16mm (bottom of the bedside table);
- 2 parts measuring 468x430x16mm (connecting shelves of the bedside table);
- 2 parts measuring 468x60x16mm (upper connecting strips of the bedside table);
- 2 parts measuring 704x410x16mm (fronts of drawer cabinets);
- 2 parts measuring 460x296x16mm (bedside table fronts);
- 4 parts measuring 426x349x16mm (fronts of hinged cabinets);
- 4 parts measuring 668x100x16mm (boxes of cabinet drawers);
- 4 parts measuring 390x100x16mm (boxes of cabinet drawers)
To add creativity to the furniture, all visible parts of the TV stand, bedside tables, as well as their facades were rolled with PVC edge 2/19mm Cappuccino DC 343 Dollken, a high-class specialist, a master of his craft, Yusuf!
Placement nuances
The versatility of the cabinet is its main advantage. Such designs are successfully used both in small apartments and in spacious rooms. There are no strict requirements for placement, because the location of the product can always be changed. But if daily rearrangement in apartments and offices does not cause inconvenience, then school furniture should be in certain places. The same applies to hospitals and other institutions that are visited by a large number of people.
As for the children's room, it is better to place the bedside table near the bed or desk. Usually books, notebooks, and various office supplies are stored inside, which should always be at hand. In the bathroom, it is worth placing a roll-out cabinet under the sink, especially if the dimensions of the room are small. If desired, the product can be installed in any free corner or near a bathtub or shower stall.
The best place in the bedroom is considered to be the space near the closet or bed. Here the cabinet is often used as a table, where, if necessary, a book is placed, a cup is placed
If the design is purchased for the living room, it makes sense to pay attention to decorative elements. Contrasting shades, carvings, unusual handles and other details can diversify the interior of a room, becoming its highlight
Installing Items and Shutting Down
The assembled parts of the box must be installed. Next, the stability of the structure on a flat surface is checked. The parts should fit tightly, without gaps or distortions, and the drawers should be removed smoothly. If necessary, tighten bolts and eccentrics. The final touch is to properly attach the caps. The self-build process is complete.
After installing the main elements of a luxury chest of drawers, guides are installed on the inner surface of the sides of the case and on the drawers. If they are installed correctly, they will be able to ensure smooth movement of the elements and they will not cling to each other.
Common mistakes
Each private furniture maker has his own secrets on how to quickly and accurately assemble furniture. Some professionals use a table to assemble furniture, while other craftsmen can mount a large tall cabinet on the floor and install the finished structure, measuring the diagonal of the room and the product.
To become a professional assembler, the future master must be able to draw up a project, calculate the consumption of materials, perform detailing and cutting of chipboard, MDF boards, use equipment, tools and have some design skills. Then the finished product will be distinguished by its impeccable quality, durability, and long service life. Frequent mistakes that novice craftsmen make when assembling furniture:
start work without first checking the availability of the mounting kit, basic structural elements, and without studying the manufacturer’s instructions; Universal prefabricated furniture begins to be assembled by connecting large parts - you need to decompose all the elements into units (drawers, cabinets, tables), and try to assemble a small structure; they don’t pay attention to the specifications in the instructions - in vain, at first glance the parts are similar, but there are left and right elements, fronts of upper and lower cabinets, and other assembly nuances; ignore the need to assemble the product on a hard, clean surface
For work you need a sufficient amount of free space; you can use a device for assembling furniture; panels made of MDF material can be damaged by using an electric tool (drill, screwdriver) - use screwdrivers until you acquire the necessary assembly skills; do not change the diagonal of cabinets (compartments, bedside tables, chests of drawers) before installing the back wall made of fiberboard - this leads to distortion of the part and the entire structure; do not take into account the assembly order specified by the manufacturer in the instructions. The result is low quality assembly, dismantling and re-installation of the product; they do not check the holes for fixing the fasteners, do not measure the distance between them to ensure compliance with the drawing - as a result, they have to cover the defects with plugs.
There are craftsmen from whom you can hear that they violate assembly technology in order to quickly complete the work - for example, “I hang the top of the kitchen unit before installing the lower cabinets.” Technically, this is not true - the assembly of a complex kitchen structure begins with the installation of the lower corner cabinet (often a sink), then install the remaining floor units, connect them together with self-tapping screws or intersection ties, cut in the sink, install the countertop, and only then proceed to install the upper tier of the kitchen headset There are many such subtleties in the process, and to do the job accurately, watch the video on assembling furniture.
When the master has assembled a furniture structure using simple equipment, fasteners, tools and accessories, he must make adjustments, check that there are no visible technological gaps, and that the doors are diagonal. Distributing and assembling furniture is not an easy task, but after acquiring the appropriate skills, everyone will be able to gain valuable experience in assembling furniture units of various designs. To make furniture assembly easier, the video below will help you understand the process.
This activity can be used as a business option in several steps - ordering factory furniture, delivery to the consumer in your car, installation at the installation site. Presenting photos of assembled furniture will expand your customer base if the furniture assembler is interested.
How to make a bedside table with your own hands
Even making such a simple item requires a project. In our case, this may simply be a drawing of the future structure with dimensions. After which it must be “disassembled” into parts and the exact dimensions of each part determined.
The more detailed the drawing, the easier it is to calculate the amount of materials for the bedside table
Sometimes they do the opposite: they adjust the dimensions of the cabinet to fit existing materials. For example, it could be an old chest of drawers, a bookcase that you decided to disassemble. Or just separate pieces of plywood or cutting boards. In any case, something will have to be cut and adjusted, so a drawing is necessary. It will also allow you to calculate the required amount of fasteners and accessories. We bring to your attention examples of making bedside tables at home from different materials.
Simple wooden cabinet
To make this extremely simple design, you will need several scraps of boards and small bars. Although they can also be cut from the same scraps - they are needed only for connecting vertical and horizontal parts.
Step 1. Prepare 6 bars with a length equal to the width of the side walls or slightly shorter. The number of planks depends on their width and the planned depth of the cabinet. In our case, we will need two of them for each side wall and two for the bottom and lid.
Prepare lumber and necessary tools
Step 2. We assemble the sidewalls by connecting the planks end-to-end and fastening them with bars along the top and bottom edges.
The planks are fastened with bars
Step 3. We nail one more block 10-12 cm below the top ligament and parallel to it. It will serve as a guide and support for the drawer.
Stuff a block to support the cabinet drawer
Step 4. We nail the bottom of the future cabinet and the lid. By the way, it can be made a little larger, leaving small overhangs in front and on the sides.
Stuff the lid and bottom of the cabinet
To make the frame more durable and stable, if desired, you can nail the back wall with small nails, cutting it out of plywood or fiberboard.
Step 5. Now we make a box, for which we first connect its side walls to the bottom. It can be either plywood or wood; in the first case, the box will be lighter.
Assembling a box from planks and bars
Step 6. Attach the back of the drawer and the front. The total length of the product should be equal to the width of the side walls (depth of the cabinet).
All elements are fastened with nails
Step 7. We nail planks to the side walls, the width of which should be a couple of millimeters less than the distance between the two upper bars holding the sides of the cabinet together.
There should be guides on the sides of the drawer
All that remains is to paint the product or cover it with another decorative composition, and insert a box that will be held by the internal strapping bars and move between them.
The finished product needs to be painted or stained
As you can see, everything is very simple - you don’t even need accessories. Instead of a drawer handle, you can cut a round or shaped hole in its front panel.
Rules for caring for wooden furniture
Plywood bedside table
The previous example is not difficult to manufacture, but does not claim to be highly rated. This cabinet will look good in a rustic or ethnic style. If you want to do something more modern and neat, study the following master class. But keep in mind that you won’t be able to do this with just a hammer and a hacksaw – you will need a more accurate and efficient tool. Of course, a machine with a circular saw can be replaced with a jigsaw, but it is very difficult for them to make perfectly even cuts.
The basic materials you will need are a sheet of plywood 10-12 mm thick, lumber for the base of the cabinet, self-tapping screws and wood glue for fastening and joining parts, as well as hinges for the facades.
To make a cabinet you will need plywood and furniture hinges.
Step 1. Prepare a drawing of the product and determine the quantity and dimensions of each part. When calculating dimensions, do not forget to take into account the thickness of the plywood.
First you need to draw a sketch of the bedside table
Step 2. Using a woodworking machine, we cut the plywood and boards according to the drawing.
Mark and cut plywood
Step 3. We assemble the supporting part from two planks, fastened with transverse bars. You can fasten them to each other with self-tapping screws, screwed in diagonally, after making secret diagonal holes in the bars. But this is not necessary: it is quite possible to use metal corners by placing them inside the structure. They won't be visible anyway.
Assemble the supporting part
Step 4. Attach the support to the bottom of the cabinet. Why do we first glue them together and then additionally connect them with self-tapping screws. To prevent the material from cracking, we first drill holes for all the fasteners, using a drill with a diameter slightly smaller than the diameter of the screws.
The elements are connected with self-tapping screws, the holes for which are drilled at an angle
Step 5. Assemble the main part of the cabinet, installing the side walls. We also screw them in with self-tapping screws from the bottom side, additionally applying wood glue to the ends.
Before the glue dries, the fastened workpieces are clamped with clamps
Step 6. We insert the back wall between the sidewalls and twist them together.
Connect the walls of the cabinet together
We fix the shelf inside the cabinet by screwing it into the ends through the outer surface of the sides. Here it is important to accurately determine the level of the shelf so as not to miss the fasteners.
Insert a shelf inside the structure
Step 7. We do not screw the lid, but place it on glue so that there is no fastener on the visible surface of the cabinet. While the glue is setting, place a weight on the lid and tighten the sides to avoid the slightest shift.
The lid is fixed with glue, after which a weight is placed on top and the body is clamped with clamps
Step 8. Meanwhile, cut thin slats from the board to cover the perimeter of the cabinet and hide the unsightly cut of plywood. We carefully adjust them, sand them and glue them to the ends of the side walls, bottom and lid.
Cut the slats and cover the ends of the bedside table with them
Then we hang the door on small overhead hinges, and the cabinet is ready. All that remains is to putty all the defects and paint the product in the desired color.
The final stage of assembly is installing hinges on the door
Chipboard cabinet with leather trim
We will not dwell in detail on the manufacture of the frame. It is assembled from two layers of chipboard, all walls are screwed together with self-tapping screws. Moreover, you don’t have to worry about the appearance of the material and the location of the fastening points - they will not be visible. Then we make the frames of the drawers and install them in the cabinet, securing them on roller guides. They can be purchased at any large hardware store.
A simple cabinet with two drawers, made of chipboard
Now let’s take a closer look at the process of finishing the finished cabinet.
Step 1. Upholster the side walls and lid with thin foam rubber. It is cut to size, taking into account the bend at the ends and fastened with a furniture stapler.
For upholstery, not only foam rubber is suitable, but also a lining made of foam polyethylene
Step 2. The finishing material is fixed on top of the foam rubber in the same way - artificial leather or thick fabric.
The top of the body is covered with finishing material
Step 3. The fronts for the drawers are upholstered with foam rubber and leather separately, and then screwed to the front wall of the frame from the inside.
Drawer fronts are upholstered separately
Advice. Don't forget to drill holes in the fronts for attaching handles before you start decorating them.
Step 4. The last stage is to nail the back wall made of fiberboard and install the handles on the drawers. You can attach legs or furniture wheels to the bottom.
For the upholstery of the body and drawer fronts, it is advisable to select materials in contrasting colors - this will make the cabinet look more impressive
As you can see, it is quite possible to design and assemble a bedside table yourself, not only saving a lot of money, but also ultimately getting an exclusive piece of furniture that fits perfectly into your interior and meets your requirements.
How to assemble a chest of drawers
Before moving on to a precise sequential instruction circuit, it is necessary to consider general principles.
First assemble the base body of the item, and then the remaining parts.
It is better to start assembling any furniture, especially large-sized ones, from the largest parts, continuing downwards.
In our case, first the main body, then the fastening of the drawers and other small aspects. Work exclusively on a flat surface to avoid problems with the relationship of the body parts to each other. Cover the floor with a protective material to protect both the furniture and the work surface from scratches. Some materials may be fragile, which is why you need to perform all actions carefully - slowly tighten the bolts, do not drop components, etc. You need to tighten the bolts tightly, but not too much. The bolts need to be tightened tightly, but not too much.
The bolts need to be tightened tightly, but not too much.
Features of choosing a bedside table depending on style
Yes, each interior style has its own type of bedside table. And it is not surprising, because we are talking not only about a useful thing, but also about an element of the interior that can emphasize the stylistic direction of the room or, alternatively, negate all efforts. How to organically fit a bedside table into the interior? Let's get acquainted with the most popular styles and find out which designs are suitable for each specific case.
Interesting and comfortable bedside tables and tables that will elevate the interior
East style . In this case, the ideal option is a bedside table with small legs made of rattan. Frequent weaving, natural colors, and a traditional rectangular silhouette will look great.
Bedside table in colonial style
Classic style . Here preference should be given to furniture made of natural wood. You can, for example, use a large and squat cabinet with curly handles as decorative elements. As for color, dark tones will look good in a classic style. A bedside table that meets all these requirements will emphasize the aristocracy and fundamentality of the classics.
Palazzo . The main thing in the Italian style is attention to detail (aged or varnished shelves, forged iron elements, etc.).
Italian bedside table
Scandinavian . The best option for him would be a white cabinet made of natural wood and without unnecessary decorative elements. The design should be as simple as possible. A good option is a bedside table made of unpainted beech. Give preference to massive legs and narrow simple shapes.
Interior in Scandinavian style - rational, but very attractive
Provence . Wooden cabinets are suitable for this style, preferably with graceful outlines and narrow curly legs.
Bedside tables in Provence style
Minimalism, hi-tech . Obviously, designs with metal frames are more suitable for these styles. Glass doors would be a great addition. It is important that a minimum of unnecessary parts be used.
Sophistication and rigor of high-tech style
Installation of guides
The next stage of work will be the installation of guides. There are two types of retractable mechanisms: roller and ball (telescopic). Each of them has its own characteristics. But these designs are similar in one thing - they are separated before installation. One part fixed on the drawer ensures smooth sliding. The second part is mounted on the inner wall of the frame sidewall. Usually, the places for attaching the guides are already marked on the cabinet. If not, you will have to choose yourself. For this you will need a tape measure and a pencil. On both sides, equal intervals are marked on the walls of the housing. The guides are fixed at such marks with a screwdriver, which screws in the screws.