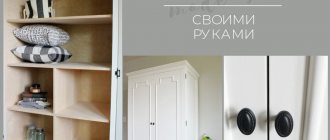
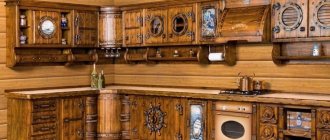
Wooden furniture is especially popular. This is due to its strength, durability and attractive appearance. A wooden cabinet can last for several decades, remaining just as beautiful and reliable.
There is no need to buy it in a store, limiting yourself to the assortment presented. Anyone can make a wooden cabinet on their own. You just need to decide on its appearance and prepare all the necessary tools.
Peculiarities
Wooden cabinets fit perfectly into any interior. This allows them to be used both in city apartments and in the country. It is enough to correctly calculate the dimensions and determine a suitable design that will be an ideal complement to the appearance of the room.
Wooden cabinets have many advantages:
- environmental friendliness - only natural material is used that is not subject to chemical treatment;
- heat and water resistance - when heated or wet, the cabinet will not lose its properties and will not be damaged;
- variability - you can create your own unique closet with maximum convenience and ideal design;
- decorations – wooden furniture can be decorated with carvings, paintings or various inserts;
- placement methods - the cabinet can be built in to save space or placed in a classic way;
- possibility of disassembly - wood allows you to disassemble the furniture many times if necessary;
- elimination of damage - if scratches or chips appear, it is enough to sand the damaged area and treat it with paint, mastic or putty.
Creating a wooden cabinet yourself is not difficult and does not require large financial costs. In some cases, the process of preparing parts and assembling evokes such pleasant emotions that it turns this work into a hobby.
Important! In order for the cabinet to have all the properties inherent in wood, you should purchase materials from trusted stores where they were stored properly.
How to care for your closet
Wooden cabinets coated with varnish or paint easily accumulate dust. Requires dry daily cleaning or the use of a dampened and well-wrung out piece of flannel. After collecting dust, the surface must be polished with a dry cloth until all traces of moisture are removed.
Do not use aerosols, cleaning agents or household detergents. You can use special wax polishes. It is required not to leave traces of moisture on surfaces and carefully follow the manufacturer's recommendations. Usually it is enough to carry out such cleaning once a quarter.
It is necessary to systematically clean a wooden cabinet from dust and dirt. To remove stubborn dirt on polished furniture, it is recommended to use lemon oil. It restores shine and returns vibrancy to color. You can use olive oil (1 cup) and table vinegar (1/4 cup). Soak a soft cloth in the solution and rub into the varnished surface until the shine is restored.
A cabinet made of natural wood is a beautiful and indispensable piece of furniture in numerous design styles. A wooden cabinet made with your own hands will save a lot of money. The main thing is that it will be original, unique and one of a kind.
Types of structures
You can make a cabinet from laminated chipboard yourself, and it will satisfy the needs of all family members, and will also fit well into the interior. You need to decide what exactly it will be, not only in color or internal compartments, but also in three important criteria.
Case shape
Not only the appearance of the cabinet, but also the complexity of all future work will depend on the chosen body shape. This point should be given special attention, and the final decision should be made before purchasing materials.
Possible body shapes:
- linear - a classic version with a simple rectangular shape. They have the usual cells, shelves and rods, suitable for storing any clothes with accessories;
- radius - characterized by rounded facades. It is almost impossible to make a radius cabinet from boards at home, since the manufacturing technology is complex;
- five-walled - suitable for hallways or small rooms. The external side is often complemented by open consoles or special modules;
- corner - help to effectively use the space in the corners of rooms. Often decorated with glass or mirror, great for the bedroom;
- trapezoidal - visually correct rooms of non-standard shape. They have separate shelves on the sides, and the facades are often decorated.
Self-production gives you freedom in choosing the shape. If desired, you can create non-standard options, the likes of which cannot be found in any store.
Size
You need to determine the optimal dimensions based on the free space in the room and the type of cabinet. A wardrobe should have a depth of no more than 60 cm, a wardrobe - about 45 cm, a bookcase - from 35 to 55 cm. For large cabinets with a width of about 2.5 m, you need to install doors from 70 cm, and the recommended base height for them is 10 cm.
Other options:
- internal shelves - from 40 × 10 to 100 × 15 cm;
- height of sections – up to 30 cm;
- pipe for hangers – 80–100 cm;
- drawers – up to 80 × 30 cm.
The exact parameters are determined individually. It is not recommended to deviate from the norm, as this may negatively affect the reliability of the structure.
Doors
The door that causes the most doubt when choosing cabinet features is the door. The most common is the swing option. The doors have a classic look and are attached to special hinges. They open outwards using a separate handle. Swing elements are ideal for modern or classic interiors. Cabinets can be single- or multi-door.
Sliding doors are no less popular. They differ in that they open to the side. For this purpose, upper and lower guides with a special roller are used. Doors can be found in wardrobes, which are very often installed in bedrooms or hallways. Sliding elements can have a coplanar system. Its difference is that the doors first smoothly move a little forward, and only then to the side.
At the second stage we make the frame.
Wooden blocks of 20*40 mm are mounted around the perimeter of the future cabinet.
When installing, it is worth considering the material of the walls. If the walls are concrete, then it is better to use a 6*60mm dowel-nail, having previously drilled a hole with a hammer drill; if the walls are plasterboard, the bars are attached to 40mm wood screws.
Next, wooden blocks of 50*50mm are mounted strictly according to the level. They, in fact, are the main frame; the cabinet doors will be attached to them. They must be smooth and planed.
A very important point is that the bars should be installed 1-2 centimeters larger than the width of the doors, depending on the number of doors. And 2-3 centimeters from the height of the door. In our case, these bars were attached to 55mm wood screws.
It is also worth making an additional frame for attaching the lining and shelves, from a 20*40mm bar. The number and distance between shelves is decided individually.
In our case, a shelf was made along the entire length of the cabinet in the upper part. Two shelves on the right side of the closet and a wardrobe rail (photo No. 2).
Before sewing up the cabinet with clapboard and installing the shelves, you need to check that the frame is manufactured correctly. To do this, you need to try the door into the opening and make sure that there is space on all sides so that the door opens and closes without problems.
Cabinet frame
Placement method
Depending on the method of placement, cabinets can be cabinet or built-in. Both options have their own characteristics. At the same time, it is not always possible to use the second option, since it requires a special niche.
Cabinet cabinets consist of several modules. They are placed in any suitable place, and if necessary, the cabinets can be moved or disassembled. They can be given any shape or size.
Built-in wooden cabinets are placed in special niches or closets, where it is not possible to place classic furniture, effectively using the space. When creating them, you have to focus on the dimensions of the place where installation is planned. An important advantage of the cabinet is the ability to do without one or more walls, as well as a floor or ceiling. It is enough to install the most necessary elements into the walls and install the doors.
Coating
To make natural wood look more impressive, you can use varnish. First, carefully polish the surface with a special machine. If there are unevenness, cracks or other problem areas, we putty in the same shade as the wood itself. Leave to dry.
After the putty has completely hardened, we sand the furniture again. Then, using a soft brush or sponge, spread the first layer of varnish. Apply the product again after the first layer has dried. As soon as the last layer has dried, sand the product again.
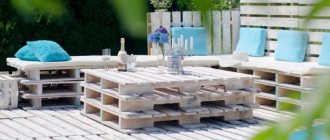
For antique lovers, you can artificially add age to the material. This method is used for furniture on a terrace or veranda in retro and country style.
By choosing the right fabrics for curtains and other small details, you can create an unusual style in the room.
Selection of base material
Many types of wood are suitable for creating a cabinet. Among them there are both hard and soft. Each type of wood has its own characteristics, so you need to select them taking into account personal wishes and operating conditions.
Base material options:
- birch - the material has a beautiful light shade, is easy to process, its cost is quite low, but its use at the base of a cabinet can cause problems in the future, since high humidity quickly destroys its structure;
- beech is one of the strongest materials, it can withstand a lot of weight, which is why it is excellent for storing any things, but it is difficult to process and has insufficient moisture protection;
- pine – solid pine cabinets have a beautiful texture with a light golden tint, are lightweight and durable, but their surface gets scratched very quickly and breaks from impacts;
- oak – the use of oak wood in the cabinet makes it especially strong and durable, while the material tolerates high humidity well and is not the target of harmful insects, but you will have to spend a lot of money to buy it;
- alder - the material has sufficient strength, is quite moisture resistant, it can be painted in any shade, but it is difficult to purchase panels, since most companies do not work with alder.
Spruce, poplar, fir, aspen, walnut, maple or elm wood is perfect. As an alternative, you can consider materials made from ash, cherry, rowan or chestnut.
Photo gallery of ready-made options
Below are solid pine cabinets in various shapes, finishes, and styles.
A cabinet made of natural pine will be a great addition to many interior styles, and a homemade design will also save money, which you can spend on decorating your home.
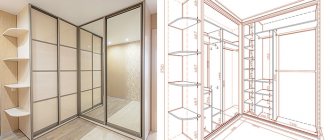
Create a drawing
It will not be possible to make a cabinet from chipboard with your own hands without preliminary preparation. Drawing up a diagram with a drawing is the most important stage in creating furniture. They help avoid sudden difficulties during the production, assembly or installation stages.
When creating a layout, it is important to consider not only the height and width of the cabinet itself, but also its location. It is necessary to take into account the presence of baseboards, window sills, pipes, sockets and other small elements. The cabinet itself is depicted in diagrams and drawings from three sides: front, top, side. In the first case, on paper you need to note its width and height, the parameters of the base and all sections, as well as the distance of the shelves from each other. We must not forget about the thickness of its walls and fastening points for doors. On the top and side drawings, you should note the depth of the cabinet with all internal elements, as well as the rounding of the shelves with their dimensions.
Important! When creating a drawing, you should take into account the size of the internal drawers so that the cabinet front does not interfere with their rolling out.
Assembly
It is better to assemble the cabinet at its intended location. In this case, it will be possible to prevent deformation of the walls and floor of the room when moving finished furniture. Initially, sheets of cardboard are laid on the intended floor, on which the structure of the product will be sequentially assembled.
Step-by-step instructions for assembling the cabinet, carried out in stages:
- the first side sheet is located on the floor;
- fasteners are fixed vertically to connect the bottom and top sides of the cabinet;
- the top and bottom of the furniture are installed and fixed on the sides;
- the second side sheet of the cabinet is placed on top and secured;
- the strength of fastening elements is checked;
- the cabinet is turned over with the front side on the floor;
- the back of the furniture is laid and secured;
- The cabinet rises and is installed tightly against the wall in the designated area.
Next, using a level, you need to create a level position for the cabinet, then fasten the doors, as well as install the filling.
So, having learned how to make a cabinet with your own hands, many beginners will not make serious mistakes when designing the structure. A step-by-step manufacturing guide will help you correctly complete the furniture parts. And if the given assembly sequence is followed, wooden cabinets will be able to stand for decades without deformation.
Tools and equipment
After creating detailed drawings and diagrams, care should be taken to prepare the material with all the necessary tools. To create the base of the cabinet, you can use solid boards, chipboard or plywood. The choice depends on the location and features of the planned operation. Solid boards are considered the most durable, but they are quite expensive, and the joints can spoil the appearance of the cabinet. Therefore, chipboard is most often used. For the back wall, thin plywood is used. The amount of material can be calculated according to the created scheme.
Tools and other materials you will need:
- screwdriver;
- drill;
- jigsaw;
- hammer;
- sandpaper;
- melamine film;
- roulette;
- level.
You can’t do without a ruler with a pencil, self-tapping screws, nails, shelf supports, hinges, hinge cups, front fittings, and varnish.
If you want to paint the cabinet, you will also need to prepare the paint. But it is recommended to apply it after assembly, since it can be damaged during the process of fastening the parts.
Door installation.
Even at the measurement stage, it is necessary to take into account an important nuance. You need to have a rough idea of the size of the as yet non-existent frame. This will allow you to determine the correct size of the doors so that they are neither wide nor narrow, and also to match the height, this is necessary so that everything looks beautiful and aesthetically pleasing.
Louvered doors can be purchased ready-made at a hardware store or ordered according to your size.
But you need to keep in mind that there are size limits: the height is a multiple of 20 cm, and the width is a multiple of 10 cm.
Next, we make holes in the doors for the hinges using a Forstner drill.
All that remains is to screw the doors to the frame with self-tapping screws. (Photo No. 3).
Wardrobe with installed doors
Manufacturing of parts
Having prepared all the tools and materials, you can begin making parts for the cabinet. It is necessary to transfer from the drawing to chipboard sheets and plywood all the required elements in the required quantity. After drawing them, all that remains is to cut them out using a jigsaw. During the work, you need to take into account the thickness of the saw, as it can reduce the dimensions of the parts, which will become critical during assembly.
When all the elements are cut out, they will need to be processed. Melamine film will do. It needs to be placed on the cut areas and then ironed. After setting with the surface, it remains to trim off the excess particles around the edges.
The final stage is edging.
It can be made from professional slats, in our case 30mm. We simply nail it onto the finishing nails, leaving a gap of 3-4mm to the door, and we also use them to frame the joints of the lining and other places where decoration is required.
Amount of material used:
- Wood block
- 50*50 mm 3 meters – 3 pcs;
- 50*50 mm 2 meters – 2 pcs;
- 20*40 mm 2 meters – 9 pcs;
- Profiled lath 30mm, length 2.2 m – 7 pcs;
- External corner 35mm, length 2.5m - 3 pcs;
- Eurolining “Calm” 90mm, length 3m - 15 pcs;
- Wardrobe rod 25mm - 1m, 2 flanges;
Finishing of wooden elements
Finishing the cabinet will be required if the furniture panels were purchased unpainted.
Then you can choose light furniture enamels for Scandinavian or country style (not recommended for painting wood with a weak texture) or tinting from Akzo Nobel and semi-matte varnishes.
Tinting must be applied in two stages, after diluting the concentrate and making test colors. Usually the proportions used are 1:10 or 1:20 , where ten and twenty parts of water, respectively.
You can also find tinting varnishes on sale, however, they are not water-soluble, and you need to work with them more carefully to avoid drips.
If the boards were purchased painted, but not to size, but of standard dimensions, then the ends after cutting must be treated with stain before the assembly stage.
Advice . If you are considering making cabinets from other materials, we recommend considering furniture board, chipboard, drywall, cardboard and plywood.