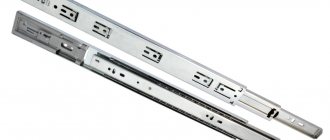
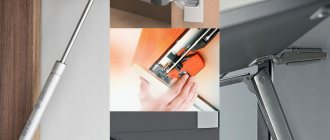
Telescopic guides for drawers are modern fittings that allow you to effortlessly open even massive structures. Despite the fact that in almost any piece of furniture you can find drawers that can be pulled out due to the installation of special fittings, telescopic (or as they are also called ball) guides have gained great popularity only in recent years.
Today we will take a detailed look at their features and types, talk about how such fittings work, what advantages and disadvantages they have. We will also tell you step-by-step about the installation of telescopic drawer systems and simple repair of the guides, which you can do yourself.
Telescopic guides for drawers
Features of telescopic systems
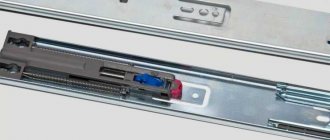
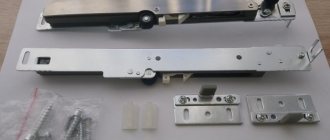
Ball guides have a fairly simple design; their mechanism consists of main and auxiliary parts - these are metal runners and balls, as well as stopper elements and other limiters, which can be metal or plastic.
Telescopic guides are technologically advanced, durable fittings
This system greatly simplifies the operation process.
In order to understand the mechanism of their operation, we will consider the simplest version of two-section non-demountable telescopes. In this case, there are two rails that differ in size and are U-shaped, so that one part can fit into the other.
The mechanism is driven by moving metal tracks
There are small balls in the upper or lower part (between the parts), and the stopper is represented by the protruding edge of the rail. So in a certain area its movement stops.
The system received this name due to the fact that one track is placed inside another and extends like a telescope.
What types of ball guides are there?
Depending on the purpose, telescopic guides are distinguished by shape and other functions. Basically, they are divided according to the following characteristics:
- collapsible and non-dismountable mechanisms;
- two-section or multi-section (number of steps);
- multi-level or single-level.
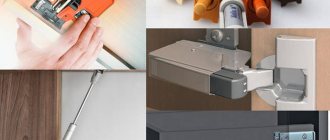
The fittings have various mounting options
Telescopes can be installed both on the sidewalls and in grooves.
The difference between non-separable mechanisms is that they are quite low in cost compared to analogues. This difference is due to some difficulties in the production of collapsible rails and a specific method of fixing the balls, because the structure must be designed in such a way that the guide can be disassembled without losing small elements.
Easy movement of boxes made of any materials is ensured by special balls
Of course, the cost is also influenced by the number of stages of the mechanism. This is also due to the peculiarities of the production of more complex parts.
Guides for this type of drawer come in a variety of colors, including black, steel, and zinc yellow. Balls are made of steel and nylon. It is worth noting that plastic balls are the quietest.
In most cases, drawers in cabinets with sliding doors are installed on telescopic guides
Electric oven Midea MO68100GB
Electric oven Midea MO68100GB Kitchen appliances Built-in ovens
0,00₽
Start shopping
Three-level telescopic guides
They make it possible to simultaneously pull out sheets on three platforms. However, many users find it inappropriate to extend all three elements when the pan is only at one level.
Combined telescopic guides
Combines the properties of partial and three-level. In this option, only one sheet, located at the desired level, is fully extended, the rest are at a shorter distance.
Thanks to the variety of types, users can purchase kitchen appliances with retractable telescopic guides, guided by their ideas about convenience.
Advantages and disadvantages of ball guides
Any mechanism has certain advantages and disadvantages. Such features should be taken into account before choosing one or another fitting for installation.
Table 1. Pros and cons of installing ball guides
| Advantages | Flaws |
|
|
Telescope mechanism suitable for massive iron boxes
The role of ball guides in furniture production
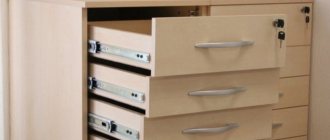
Despite the fact that ball guides are used in various industries, such fittings are most popular in furniture manufacturing.
Most often they are installed in various wardrobe systems, chests of drawers, cabinets. This means that they can be found in any type of furniture that is designed for comfort and space saving. It is worth noting that the presence of such a system greatly simplifies the use of sliding cabinets.
A bed with drawers mounted on telescopic fittings
Installation of telescopic guides
We will consider the option of mounting telescopes using the example of the lower part of a kitchen table with drawers.
Calculations
At the very beginning, we need to determine the length and types of guides that will be used during further installation.
The basis will be a table of standard dimensions: length 520 millimeters and height 720 millimeters
The first type is a two-row incomplete extension design, and in our case such a mechanism will not work. The second type is the four row full extension slides which are perfect for this desk.
Next, you will need to determine the length of the sidewall, in this case it is equal to 520 millimeters, the type of back wall of the invoice. Even if the design assumes the presence of an inset wall, a 500 mm guide will still fit. Therefore, in any case, it will be optimal to choose exactly this length, but the method of fixing the back wall must be taken into account.
All calculations must be carried out starting from the facades
In this case, we will have 3 facades of 140 millimeters each and 1 facade of 292 millimeters. Calculating the length of the facades is quite simple. You just need to know the height of the case, which in this case is 720 millimeters.
This can be calculated using the following example, in the end we got 712 millimeters, which we divided into four facades
It should be borne in mind that each manufacturer has its own standard range of parts and most often the changes relate specifically to the height of the facades.
In order to correctly place the markings on the sides of the structure, it is necessary to consider the location of the drawers
Now you need to figure out how to calculate these dimensions. In this case, it is necessary to take into account the value of the lower indentation, which is 17 millimeters. So, the distance from the floor to the first box will be 25 millimeters, now you should add the height of half of this box, in this case it is 50 millimeters. The result was 75 millimeters.
The next size can be obtained taking into account the height of the lower facade. Here you should add 2 millimeters for the gap and another half from the other box. This is based on the fact that the boxes are 100 millimeters high and are located in the central part of the narrow facades, which are 140 millimeters high. Thus, 140 should be divided by 2 - it turns out 70 millimeters, which we add.
The next two calculations can be obtained by adding the previous ones
This means that 142 millimeters will need to be added to the dimensions that we have already received. Most often, the guides are installed before assembling the case itself, so you can simply subtract 16 millimeters from previous calculations or determine the values along the entire chain.
Next we will look at how to calculate the width of the drawers. In this case, our table length is 600 millimeters. Since in most cases laminated chipboard or MDF measuring 16 millimeters is used in furniture production, we will need to subtract 32 millimeters from the total width of the structure.
Determining the width of the drawers
In addition, from the resulting value of 568 millimeters, you will need to subtract another 26 millimeters for gaps.
Video - Installation of telescopic guides: calculations
Installation
Upon completion of all preliminary calculations, you can now move on to the practical part - installing telescopic guides.
The next two calculations can be obtained by adding the previous ones
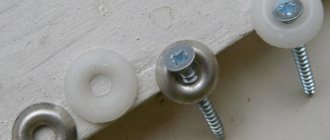
Example of fixation on fiberboard
It is important to note one more digression - if you use guides on rollers, then the fiberboard bottom can be fixed to furniture nails. In the case of ball guides, it is recommended to use self-tapping screws as fasteners; in this case, you can also make an inset bottom.
Step-by-step instruction
Step one: the first thing we need to do is detach the inner part and attach it to the axle that divides our box into two parts. The guide has many holes for adjustment. In this case, we will start with longitudinal adjustment.
Attach the guide to the marking
Step two: you need to make a longitudinal adjustment so that the edge of the guide on the front is flush with the front edge of the side panel. After which you can already adjust the height.
Adjusting the location of the guide
Step three: after the work has been done, you need to begin installing the main part of the guide to the side of the table. Essentially, the mounting principle is the same, but in most cases there is no way to adjust the height. That is why when purchasing guides it is necessary to take this principle into account, because mechanisms with additional adjustment have a higher cost. Budget options were used here.
Installation of the main guide
Step four: the last step is to secure the drawers in place and check their functionality. You can insert all four drawers at once or one at a time.
Putting the boxes in place
Step five: the last step is to secure the facades. This should be done using double-sided adhesive tape and self-tapping screws (as shown in the image).
We install facades
There should be a gap of two millimeters between the facades. In order to make it, you should take a PVC edge tape of this diameter or any other object of the same width.
Repair of roller guides
Despite the fact that telescopic guides are considered the most durable compared to other options, in some cases failures occur. Of course, under such circumstances, you can replace the fittings, but it is still worth trying to repair it.
In this case, we will look at repairs using the example of full extension ball guides. The breakdown is that the plastic retainer has become unusable. It allows you to hold the box, thereby preventing it from jumping out of the rail.
Plastic retainer
Thin plastic can break during use, as happened in our case.
Of course, such a breakdown does not have any effect on the operation of the guide itself, but the box will not be fixed properly. Therefore, if you push it all the way, it will simply fly out. This, in turn, is unsafe because massive boxes can fall on your feet. That is why, if there is no stopper, they should not be pulled out.
Video - How to remove a drawer with ball guides
Telescopic guide repair instructions
Step one: you need to take a wire with a diameter of 2 millimeters. In this case, strong stainless steel wire is used, but you can use another one. At the same time, it should spring a little. In total, we will need to cut 9 centimeters from it (maybe a little longer or shorter) - this is the standard length of the clamp in any type of guide. The mechanism used here is 50 centimeters long, but it can be shorter.
Wire with a diameter of 2 millimeters
Step two: stepping back 1 centimeter, you need to make a bend at the end of the wire. Next, use a tape measure to measure another 2 centimeters from this bend and make another one.
The result should be something like this, which will now need to be bent in the opposite direction
Step three: now you should step back from the edge about 5 millimeters and bend it in the other direction. First, we get a small bevel, which will not be enough for a stopper, so we take another pliers. Next, we use two pliers to make the maximum bend.
Now we have a more durable clamp
Step four: you need to step back another 3 centimeters from this bend, and make another bend in the wire. The main thing is that all bends should be exclusively in the same plane, otherwise you will end up with a crooked latch that will not work properly.
Let's make a bend like this
Now, using pliers, you need to make such an eye at the end
Now you need to hammer in the latch using the same tool
At this stage our fixative is ready. Compared to a plastic product, it will last for many years, and besides, it is quite easy to make it at home. If desired, you can prepare a wire of 10 centimeters - a long clamp will work more smoothly.
How to Install Hidden Guides
Hidden ball guides are installed according to the following scheme:
- The clamps for the system slats are attached to the bottom of the box. The fasteners can be fastened in the following way - using self-tapping screws, according to a special scheme that was developed by the furniture fittings manufacturer.
- Then the ball guide strips are inserted into the clamps.
- For fittings whose size does not exceed 4-4.5 centimeters, auxiliary clamps are not needed. During the installation of large-sized guides, the bar can, if necessary, be additionally secured using self-tapping screws.
- Holes must be drilled near each fastener. Their size should be equal to the size of the hooks for fixing the guide.
- On the body, fixation points for the rail bases are marked and the components are further secured using self-tapping screws.
- The rail parts are combined with each other.
Roller guides: what are their features?
In order to understand why many furniture makers choose telescopic guides, it is necessary to familiarize yourself with the structure of roller fittings.
Such mechanisms became available to a wide mass of buyers back in the 90s, when the first imported accessories began to be sold. In most cases, the products were manufactured in China, so they were not always of ideal quality, but there were exceptions.
Just a couple of decades ago, such mechanisms were considered very popular. They were used for furniture of any type, including cabinets, chests of drawers, and computer desks.
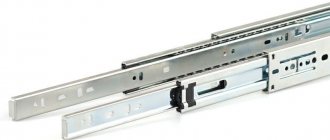
They are in the form of two planks, one of which is fixed to the wall of the structure, and the other to the box itself. The connection between them is represented by plastic rollers, thanks to which movement occurs.
Roller mechanism
The following positive aspects of installing roller guides can be noted:
- they are also distinguished by good strength;
- it is not difficult to repair such a structure yourself;
- they can be installed without the help of a professional technician;
- Guides of this type are characterized by a low price.
Roller guides are still included in budget furniture today
. In addition, the following negative aspects of installing such accessories are noted:
- it is impossible to pull out the drawers to the very end, because there must be some space left to connect the two parts of the guides;
- If installed incorrectly, there is a high probability of rapid breakdown of the mechanism;
- such fittings will not be able to support a box that is too massive, because the plastic rollers will simply break due to such pressure;
- plastic rollers wear out after a while - this leads to the fact that the drawers begin to constantly jam;
- less aesthetic appearance compared to telescopes.
Roller guides
Other tips
In order not to confuse ball and roller guides, you just need to look at them carefully.
In most cases, roller manufacturers paint them white or light gray. The action of their work is aimed at moving the wheel in the runner, which in turn is made of plastic.
In practice, they are not very convenient, parts often deteriorate, and noise appears during use.
What other retractable mechanisms are there?
There are other drawer systems:
- Metaboxes. This is the name of the retractable mechanism, which is based on roller guides. The system assumes only partial extension to three-quarters of the entire length. Such a box should carry a load of no more than 20 kilograms.
- Tandems. The mechanism is an open type guide. The system provides partial extension and smooth operation. The advantage is that the box will be easy to dismantle without specialized tools.
- Tandemboxes. These are the most expensive guides. The kit contains components for installing fittings to the facade and rear wall. Such a system sometimes involves automatic opening of the drawer - all you need to do is press the front.
Drawer on Tandembox guides
Let's sum it up
You should choose one or another type of retractable fittings based on the design features of the furniture and your personal preferences. At the same time, if you want to get a durable mechanism, then you should not save money on its purchase, because low-quality guides quickly jam and stop functioning. The best option today is a telescopic system, and the installation of such fittings can be done without the help of a specialist - you just need to have all the necessary tools and fasteners on hand.
Accessories for moving furniture elements
In past times, it took a lot of effort to open and close a drawer. At the same time, it could warp or completely jump off the wooden guides - slats. Modern systems make it easy, smooth and silent to open and close any pull-out piece of furniture, be it a heavy chest of drawers or a small desk drawer. Telescopic guides come in several types: roller, ball, bottom mounted, with clamps, closers, as well as the Metabox and Tandembox systems. The scope of application of the latter is where high operating loads are planned - kitchen cabinets, workbenches, technological equipment.