Furniture in the kitchen is not only a functional element, but also an important component of the entire interior. If you do it yourself, this will help you significantly save on the services of a designer, manufacturer and installer, and will also allow you to show your creativity.
You can make a cabinet for a kitchen sink with your own hands from scrap materials, choosing any shape of the product and its filling capacity. It is easy to install kitchen appliances or a drinking water tank inside it, and you can also use it as additional storage space for kitchen utensils. It is important to take all these nuances into account when choosing a design and drawing up a sketch. Read on to learn about the step-by-step production of a kitchen sink cabinet.
Choosing a sink - type, shape, material
The choice of size and shape of the kitchen sink directly depends on the area of the kitchen. All sinks are divided into 3 types:
- round;
- square;
- modified previous options (oval, rectangular, with beveled corners, etc.).
The most popular are round products. There are the following types of sinks:
- With one bowl, which can be round or square. The first one is more spacious and suitable for small kitchens, therefore it is more common.
- With several bowls. Installed if there is free space in the kitchen. The tap is placed between the bowls or at an angle to them.
- With two bowls of different sizes. The smaller part of the sink is used for washing fruits, vegetables or defrosting food.
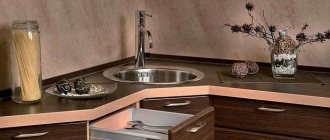
- Corner with several bowls.
- With additional work surface. The space is primarily used for drying clean dishes. Some sinks have holes for draining water. Sinks have one or more bowls.
There are different volumes of bowls on the market, but you should not choose too small. When the tap is running, splashes will fly out of the sink. Shells are made from the following materials:
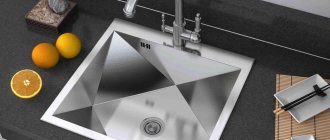
- stainless steel;
- ceramics;
- artificial stone, which is divided into 2 types:
- acrylic;
- agglomerate.
- wood or stone.
The most common material is stainless steel. Nickel and chromium, which are included in the composition, contribute to a long service life without loss of appearance. Sinks can have a glossy or matte surface, ornament or texture. You can make a cabinet under any kitchen sink with your own hands. Making the item yourself is especially suitable in the case of non-standard shapes or sizes of the sink.
If the choice of product shape is determined by the taste of the owners, then the number of bowls is always dictated by the size of the kitchen. You should consider not only the area of the room, but also the overall design.
Additional open shelves
It's a good idea to store items and products that are often needed on them: everything is in sight, easy to find and use. True, you will have to place everything on them in cute packages and jars so that the filled shelves look beautiful and make the kitchen cozier.
But you can find a lot of places for open shelves and shelves even in the smallest kitchen. Plus, a variety of models and variations are possible that can be adapted to your needs.
You can place dishes and spices on the shelf, and hang rolling pins, ladles, skimmers, knives and other useful kitchen utensils from below.
The shelf may be small, as in the photo below. But an additional tier is created, on which it will be possible to place a dozen of the necessary jars. Compact, roomy and organized.
Additional open shelves fit perfectly on the side surfaces of kitchen furniture. Towels, napkins, a set of products, a whisk with a rolling pin will fit perfectly there, and horizontal surfaces will be unloaded.
Sometimes it seems that it is difficult to find a suitable place for additional shelves. But it is not always the case. Take a look at the following photo: this is how you can organize as many as 7 shelves at once in a small space. Quite functional and aesthetically pleasing.
Sometimes it's good to use the area around the window. The result will be not only smart, but also cozy storage.
Here's how you can play up the space around the doorway. Dishes, vases, and books were not only conveniently placed in the kitchen, but also transformed the interior.
Deciding on the shape and size
First you need to decide whether there will be a corner cabinet for a kitchen sink or a straight one. The size of the product depends on the volume of the bowls and their number. A straight set is considered a classic; it is always equipped with additional functional devices. These can be shelves or hanging structures on the door.
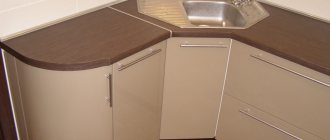
Corner cabinets come in the following shapes:
- straight;
- trapezoidal.
The first is a single-door design in which one half is closed. Since in this case it is inconvenient to get things from the back, shelves are built into such cabinets. For example, it could be a carousel shelf. The optimal width of this structure is 60 cm.
A trapezoidal cabinet is installed if the sink has several bowls or a non-standard shape. The dimensions of the cabinet allow you to place simple shelves or a washing machine inside.
The standard depth of the product is 60 cm, height is 85 cm, and the width of a single-leaf object is at least 60 cm. The width of a double-leaf cabinet is 80-90 cm, the distance between the product and the wall is from 5 to 10 cm. The tabletop should protrude by 3-5 cm .
Before starting work, you should make a drawing of the sink cabinet. The project must contain all dimensions, positions of shelves, hanging structures, etc.
Design
Let's return specifically to my kitchen. As I already wrote above, the choice of the concept of my set was influenced by a washing machine, the main feature of which is the vertical loading of laundry. That is, unlike most washing machines, my “working” plane is the top plane, and all the rest can be hidden from the eyes of an outside observer. This is how the idea of a corner kitchen was born, where the sides of the corner are cabinets and the top is the machine. This arrangement is the most rational and provides maximum functionality.
In the photo above you can already see a new window installed without a window sill and in a reduced opening. The old opening, in my opinion, was too large for such a room, and I refused the window sill because I planned to fit a tabletop in its place. At the same time, electrical wiring was done and socket blocks for household appliances were installed. Later, tiles were laid on the floor and walls, and wallpaper was hung. I approached the final design of the headset with the following picture.
I started drawing the kitchen in AutoCAD because I wasn’t trained in any PRO100, and I didn’t set myself such an initial goal. Although I will not hide that if you master this specialized program, then in the future it will, based on your finished dimensions of the cabinets, itself carry out their detailing and even suggest the optimal fastening element. My AutoCAD drawing turned out to be much simpler, but at the same time quite visual.
Editor's note: for design, you could also use the online designer on our website. No special knowledge is required to use - just take it and draw.
Let's go over the main points regarding the cabinets I got:
- I decided to place the floor row on decorative aluminum legs, with the ability to adjust them in height. In my opinion, aesthetically it looks better than a solid base, and besides, there remains (albeit limited) access under the cabinets (for a mop or rag, for visual inspection for leaks from the water supply or sewerage system). The presence of decorative legs must be taken into account when further detailing the cabinets (see detailing).
- The facades of cabinets 1 and 5.6 (in fact, this is one cabinet, like 2.3, I just thought in its original form that it would be two cabinets, and already left the numbering as is, so as not to change) will open upward using gas elevators.
The facade of the drying cabinet (2.3) will open upward using the Aventos HF system.
- The doors of cabinets 4 (above the washing machine) and 8 (under the sink) will be hinged on regular door hinges with a closer.
- An oven will be built into cabinet 9, so it will be hollow, with only a small drawer underneath for storing baking sheets and a grill grate.
- Cabinets 10.1-10.3 are three identical cabinets with drawers that will be secured with intersection bolts. Why drawers and not just shelves? The fact is that the contents of the retractable drawer are easy to glance at. To get to things located in the depths, you don’t have to carry out archaeological excavations. Shelves often turn into a “cemetery” of dishes and supplies, which the owners simply forget about.
Required tools and materials
To make a cabinet, it is necessary to prepare particle boards (chipboards). It is advisable to choose laminated ones, as they resist moisture much better. An alternative could be MDF. You should also purchase an edge for gluing the ends. If you plan to order cutting in a carpentry workshop, the edge gluing must be done there. The production uses special equipment that ensures high quality results.
You will need the following tools:
- jigsaw or circular saw;
- drill;
- screwdriver;
- self-tapping screws or confirmations;
- loops;
- furniture corners;
- hexagon;
- pencil and ruler;
- drills of different diameters;
- sandpaper.
If the sink is ceramic, you will need a manual milling machine to make the cabinet.
What to prepare for work?
Before you begin making this design, you need to carefully consider where to start and what you will need to complete this work. Not everyone wants to buy this item in a store due to the cost savings. And made with your own labor and hands, it may turn out to be even better than the purchased option and will serve you for a long time. And it will be used not only as an additional element of the interior, but also as a place to store various detergents and detergents. In order to begin the manufacturing process you need to prepare the following materials and auxiliary tools:
- Wood silicate board.
- Door hinges
- Glass.
- Furniture corners.
- Self-tapping screws, preferably of different sizes.
- Primer
- Putty
- Varnish
- Hacksaw
- Double sided tape
- Regular and Phillips screwdrivers.
- Sandpaper.
- Hexagon
- Paint brush
- Graphite pencil.
- Putty knife.
- Glass cutter.
- Sand.
- Drills of various sizes.
- Roulette.
- Grinding wheel.
- Work gloves.
Manufacturing and assembly stages
First you need to transfer the dimensions of the parts of the cabinet under the sink to chipboard or MDF. If the elements will be cut out using a jigsaw, you need to choose a thin saw and set the speed to high. This will avoid chipping. A circular saw allows you to achieve high cutting accuracy.
If the sink is round, you should transfer its dimensions to the countertop and make an opening. To do this, drill a small hole in the chipboard into which a jigsaw is inserted. Then a hole of the required size is cut around the circumference.
After this, the doors, side walls, bottom and strip are made. When all the elements of the cabinet are ready, small diameter holes are drilled at the joints. They act as guides for self-tapping screws or confirmations.
Connecting communications
Connecting the mixer to water supply systems and installing a siphon has a number of subtleties.
- The most durable (up to 50 years of service) are flexible hoses with cross-linked polyethylene (PEX) cores. Slightly cheaper hoses with rubber cores last 8-10 times less;
Hoses with PEX cores
- It is advisable to wrap the connection of the hoses with the mixer body with FUM tape or thread sealant for threads. Standard rubber rings often tear or are squeezed out of the mixer body when installing hoses;
- If flexible hoses have to be connected to corroded, uneven edges of steel pipes, increase the threads with brass extensions (internal and external threaded pipes);
1/2" Thread Extension
- A pair of ball valves would not hurt on the connections to the mixer. Shut-off valves will allow you to turn off the mixer if it malfunctions and continue to use water on other plumbing fixtures;
- When installing the outlet and overflow, all sealing gaskets are located outside the sink. Only stainless steel grilles are placed inside;
- To connect the siphon to a plastic sewer, use a corrugated tube with a transition to a diameter of 50 mm. It is also suitable for cast iron sewers, but in this case you will additionally need an adapter sleeve.
Corrugation for connecting a siphon
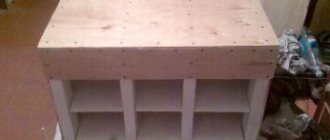
Frame assembly
After manufacturing the elements, the assembly of the structure begins. To make a cabinet for a sink, you must first assemble the frame. To do this, connect the sides of the cabinet and the bottom using corners and screws. Using corners, the elements are installed at 90° relative to each other.
Then holes are made with a small diameter drill at the joints. After this, the parts are fastened together, checking with a corner to see if any distortion has occurred. After assembling the walls of the cabinet, they begin to install the shelves and crossbars. The doors are hung after installing the sink. If the design of the cabinet includes special legs, they are attached to the bottom after assembling the frame.
Filling the cabinet under the sink
At the location of the washing unit, all communications necessary for its functioning are located. Because of this, such furniture, as a rule, does not have a blank back wall, such as a closet in the hallway. In ordinary rectangular structures there is enough space to organize a convenient connection for hot and cold water, as well as a sewer drain. If you plan to install filter systems, a grinder and an instantaneous water heater, it is better to pay attention to more spacious trapezoidal models.
Filters and a heater, as a rule, are mounted on the walls, and in trapezoidal structures they can be installed in that very far corner that is not easily accessible. Such access is needed quite rarely and is usually needed by specialists who are accustomed to working in cramped conditions.
In addition to placing communications and washing accessories, the underframe can be used to store kitchen utensils. Retractable lattice baskets and rotating grids (carousel systems) will help to properly organize the space at the base. If you plan to place a built-in container for household waste or a simple trash can under the washbasin, it is better to know in advance its size and the approximate location of other filling elements.
Making a countertop
The dimensions and shape of the countertop are selected taking into account the dimensions of the kitchen, the location of the table, and the relationship with other furniture. The standard width is 60 cm, the thickness does not exceed 5 cm, and the length is consistent with the kitchen set. The simplest tabletop is made of chipboard, which is lined with plastic.
The chipboard sheet is cut along pre-marked lines with a jigsaw. If the tabletop is made of two parts, they are connected to each other with screws or using a construction stapler.
The material can be lined with plastic, which is glued with polyester resin. If laminated chipboard is used, then after connecting all the elements of the tabletop, the ends are covered with an edge.
Organizing space for small items
Since such a cabinet contains elements of communication networks, it is difficult to store large items in it. Therefore, usually all sorts of little things are contained here, and different methods are used to organize space for them:
- a folding door can be made at the top of the cabinet, and sponges or brushes are stored in the opening space;
- attaching small-sized shelves to the door of the product, which are intended for storing small kitchen utensils;
- the presence of hidden drawers or blocks that are retractable and spacious, so even products can be placed here.
Thus, kitchen sink cabinets can be presented in numerous types. They are made from pine or other materials, and also have different sizes, shapes and prices. The choice depends on the existing kitchen set, the wishes of the users and their financial capabilities. The design must fit well into the room, and must also be convenient for constant use.
Sink installation
When the frame for the kitchen sink is made with your own hands, the sink is installed. Installation options will depend on the design features of the sink. The standard version is fixed in two ways:
- sealant;
- self-tapping screws.
The first option is only suitable if the sink is light. When the structure is heavy, it is necessary to use self-tapping screws. Otherwise, the sink may fall. Before installation on the sealant, all ends of the cabinet are coated with a connecting mixture. Then install the shell and press on it for better adhesion.
To mount the sink on self-tapping screws, buy special L-shaped fasteners. In total you will need 4-5 pieces. They are screwed at the same height from the inside of the cabinet. For accuracy, it is advisable to use a building level. To protect the cabinet material from moisture, the ends are lubricated with sealant, and a sink is installed on top. The fasteners are placed on self-tapping screws and moved along the slot. This presses the sink against the cabinet.
Assembling the cabinets
All cabinets have a depth of 500 mm, and with a tabletop depth of 600 mm. we get a front overhang of 50 mm. and, accordingly, the free space between the wall and the cabinet is also 50 mm. Is this too much or normal? 18 mm facades will be added to the front, but there will also be handles - in my case 30 mm, so the overhang is 50 mm. quite justified.
The pipes, hose for the hob and, in addition, the gas meter pass with a gap of 50 mm to the wall. (if we take into account the thickness of the tiles on the apron and the pressure of the countertop is not zero, then all 60). But the desire to gain a couple of centimeters of depth that arises at the design stage is not justified. For the section with drawers this does not matter, but with the rest of the cabinets it will only cause confusion. We simply order 12 sidewalls for six cabinets, all of the same size, convenient and understandable.
There are 3 connections in the corner cabinet, two of them are in the area of the back wall and are located vertically. The third, when positioned vertically, will reduce access inside, and when positioned horizontally, it will have to be sawn through along with the countertop to install the sink. I took the second route and had to shorten the confirmations, but when opening the door there is no bar closing the opening.
All cabinets are assembled according to the principle of a false bottom, that is, the sides stand on the base. Each cabinet is installed on 4 adjustable supports (under the sink - 6 pieces), which are subsequently closed with a plinth. In order not to rest your feet when approaching the kitchen work area, the base is recessed.
The distance from the front edge of the cabinet to the base of the support is 55 mm, which in practice gives a normal appearance and ease of use.
Having assembled all the cabinets on one side of the corner, they can be leveled and tied together with ties.
Features of the corner design
It is not difficult to make a corner sink according to the drawings. The main thing is to accurately observe the dimensions of the parts. Features of the corner sink assembly include the following steps:
- make holes for dowels to pre-fix all elements;
- parts are connected to each other;
- check the evenness of the connection and fasten the elements of the cabinet with confirmations;
- legs are installed if the design provides for them;
- guides for drawers are installed;
- At the end of manufacturing the frame for the kitchen sink, chipboard is attached to the back wall.
How to install in the kitchen? Instructions
To install an overhead stainless steel sink you will need:
- sealant;
- the cabinet itself;
- brackets;
- metal corners;
- wooden beam.
The installation procedure will look like this:
- Markings are carried out at the required height from the floor.
After the first marking, a second marking is made, which should correspond to the thickness of the rear walls of the sink. This way you will calculate the line for attaching the brackets. - Now we measure the distance between the brackets and draw lines.
- We drill holes in the wall and attach the brackets.
- Now we install the sink on the brackets.
The easiest way is to install an overhead sink on the pipe. Then you only need to install a sink on the sides of the pipes, pre-treated with sealant. This way you will completely hide the fins of the pipes. Once the sealant has dried, the sink will be locked in position and ready for use.
If you think that the brackets alone are not reliable, you can additionally secure the sink with furniture corners and wooden blocks. Wooden bars are placed in the sink box, and metal corners are attached along the entire perimeter to the bars.
Tip: it’s also worth making a table and a sofa for the kitchen. And if you are ready to experiment, then try making a tabletop from epoxy resin and a comfortable bean bag chair.
Making your own sink
You can make a concrete sink yourself. Despite the complexity of the process, this method allows you to realize any fantasy. For manufacturing, it is necessary to make formwork from chipboard or OSB. Then it needs to be securely attached to the wall. It is important that the flooring is able to support the weight of the sink. Fastening elements are made from reinforcement. After all the preparatory work, concrete is poured and waited for it to harden. The product will gain full strength 21 days after pouring.
Making a kitchen sink from artificial stone with your own hands is difficult. To do this, you need to have skills in working with stone and special tools. The stage of work is as follows:
- Borders are marked on the front side.
- A saw is used to make cuts in the places that need to be removed.
- Excess stone is removed with a chisel and hammer.
- Sand the surface. Levelness is checked by applying a sheet of plywood.
- Mark the bosom of the shell.
- The cuts are made with a saw, and excess material is removed with a chisel.
- At the end, a drain hole is drilled and the product is polished.
A stone sink is heavy, so to install it you need a base that can withstand such loads and reliable fasteners.