How to hang a shelf - step-by-step instructions with photo examples and descriptions
The wall shelf is an integral part of the interior. They hang shelves so that books, souvenirs and other decorative accessories do not accumulate on the tables.
Before hanging a shelf, many people start to worry, what if it doesn’t work out, or what if I damage the shelf or wall.
With the help of our article, you can easily and confidently hang any shelf yourself.
Shelf in the bathroom
The bathroom has its own nuances when working with shelves. If the walls are covered with tiles, then you can fix the shelf only at the seams. After all, if you try to drill a tile in the middle, vibration may cause it to crack or even fall off. Of course, there is special equipment that allows you to drill tiles, but it is expensive and it is not economically profitable to buy it. Even at seams, you need to drill the tiles carefully, and it is not recommended to turn on the vibration function until the drill reaches the wall. Only when you get to the base, then you can drill like a regular wall.
If you have a corner version of the shelf, then, as for a straight one, you must first make markings. But in the bathroom it is not necessary to use a level, since the anchors will still be in the seam, and even if it is uneven, it will still not be possible to retreat.
Sequence of work
Before you attach the shelf to the wall, you need to know that the thicker the shelf, the thicker the support should be. A hole is drilled in the end part an average of 5 mm below the surface. All holes for shelves in the wall must match, otherwise attaching them will be quite problematic.
Attaching the shelf to the wall:
- A strip of the required length is considered a template. It is applied to the end of the shelf and a hole of the required diameter is made, after which it is applied to the wall.
- The next step will be drilling, which must be done with maximum precision.
To attach the shelf you will need:
- electric drill,
- threaded coupling,
- brackets,
- lath - template,
- carpentry glue,
- screws.
Installation of a corner shelf (video)
Recommendations for the selection of hardware and their installation
Work on attaching the hanger to the wall begins by measuring the distance between the mounting points. Next, mark the holes for the dowels on the wall using a level and tape measure.
After this, you can drill holes in the wall for the dowels. Walls made of gypsum slabs or foam concrete blocks can be drilled with a simple drill. To prepare holes in a concrete or brick wall, it is better to use a hammer drill or drill with an impact function.
Typically, 6x40 mm dowels are used to attach shelves. For shelves with increased load, 6x60 mm dowels are used. In this case, part of the screw will extend beyond the dowel, and another part of it should protrude from the wall for fastening. That is, the self-tapping screw must be chosen longer than the dowel by 5-10 mm plus the size by which the hardware protrudes from the wall.
A self-tapping screw made of soft plastic compresses metal threads better than hard material. This ensures more reliable installation of fasteners. A regular dowel with a two-piece shank often doesn't work well, as the self-tapping screw can extend out of the plastic. As a result, the screw and dowel are not securely held in the wall.
It is better to use dowels, the diameter of which increases along the entire thread of the self-tapping screw as it is tightened. The simplest solution for choosing good dowels is to purchase products from a well-known company.
When drilling a hole for a dowel, you need to ensure the exact diameter and even hole. Ideally, the dowel can be pressed halfway into the hole with your finger, and then hammered in with a hammer. In this case, the plastic should not be deformed. To achieve the best result, you must first make a hole 1 mm smaller in diameter than necessary. Next, we work with a drill corresponding to the diameter of the dowel, that is, 6 mm in our case.
Source
Attaching shelves to the wall without visible fasteners
With all the variety of existing methods of interior design and modern design, it is almost impossible to imagine a modern room in which shelves would not be used.
Decorative and easy to store various small items, massive for books - shelves can not only be an additional useful surface, but they can also act as a decorative decoration for any room or office.
There are two main ways to attach shelves:
- traditional mounting of shelves to the wall
- invisible or hidden fastening of shelves to the wall
The traditional method of fastening using various types of brackets, metal or wooden racks is popular only when the fasteners, correctly selected in color, texture and material, also add their own “zest” to the artistic image of the room.
But often, the presence of additional decorative and technological elements is not always consistent with the overall design of the designer and the target orientation of the structures. In this case, it would be better to use the second fastening method.
The development of modern design craft and the construction industry makes it possible not only to quickly cope with the task of hanging shelves, but also to successfully use the fastening of shelves to the wall without visible fasteners, thereby creating the illusion of floating in space.
Invisible fastening of shelves to the wall
Let's consider the main stages of properly attaching a shelf to the wall, while hiding all fastening elements:
- First, you need to assess the strength of the wall or partition on which the shelf will be attached.
With a brick partition thickness of 250 mm or more, concrete partitions with a thickness of 100 mm or more can be safely used for hanging shelves without additional load-bearing structures.
Scheme of invisible shelf fastening.
1 – bracket for fastening the shelf; 2 – mounting holes; 3 – steel axle; 4 – suspension; 5 – shelf.
With thinner bricks, cinder block and plasterboard walls up to 100 mm, it is possible to use invisible fastening of shelves to the wall, but such shelves are suitable only for decorative purposes.
Since they simply will not withstand additional loads.
Then you need to determine the thickness of the shelf itself.
It can be determined by placing a load of expected weight on it. The absence of visual deflection and deflection to the touch indicates sufficient thickness of the board.
An exception may be cases when the choice of a thicker board is dictated by the general concept of the interior.
However, it is also necessary to take into account the fastening features, due to which the thickness of the board, as a rule, cannot be less than 30 mm. The thickness of the shelf must be selected depending on the load, for example, for books - boards with a thickness of 45 to 60 mm are suitable.
The board must be dry and processed in accordance with its purpose.
Types of fastening shelves to the wall
After this, the types of fastening the shelves to the wall are selected, depending on its purpose and the thickness of the board.
Bracket material
- metal or alloy (steel, aluminum, bronze, cast iron);
- natural solid wood, chipboard, MDF;
- gypsum.
From an operational point of view, a metal shelf bracket is an ideal choice. When choosing it, you can find strict, laconic models in the spirit of minimalism or elaborate forged supports. The latter will fit perfectly into fusion, gothic or rococo style. Although forging is becoming less and less common in interiors due to its high cost, a shelf with ornate supports will become the highlight of a living room or hallway.
For classic room design, plaster holders are recommended. They can be standard white or gold plated. Ceramic figurines, porcelain sets and elegant vases look harmonious on such shelves. There is no need to worry about the load-bearing capacity of the stucco molding: it is all reinforced with metal fittings.
For connoisseurs of country, shabby chic or Provence style, wooden brackets are suitable. The winning option is intentionally aged wood with a rough natural texture or painted to match the interior.
Designs of open wall-mounted shelves
You can make fastenings for shelves to the wall with your own hands, without purchasing special holders and brackets. It is enough to think over the design of the shelves itself and provide it with additional elements in the form of stops, due to which it will be attached to the wall.
Backs and sides
The simplest option is to attach sides to the shelf, in the form of short sides or a back wall. Then the shelf can be secured through these elements.
Behind the sides using hidden mirror loops.
Or by through-mounting the rear wall to the wall.
Duck stops
By analogy with cantilever brackets, special triangular or streamlined supports can be made from the same material as the shelf itself.
To attach the entire structure to the wall, you can use the simplest canopies.
Frame structures
Point fastening of a shelf to a wall is not capable of providing the same reliability and stability as fixing a horizontal surface in several planes. If multi-tier shelves with internal and external partitions visually seem too “heavy” to you, use frame structures. They look quite light and at the same time reliable.
There are similar options for “frames” made of metal. However, they are rarely found on sale in finished form; most often they are welded to order of the desired shape and size.
In an original way, you can fit into the industrial style of the interior the fastening of wall shelves using structures assembled from pipes.
Hanging fasteners for shelves to the wall
Various hanging multi-tiered shelves using twine, cord, chains and other materials look interesting.
Fits perfectly into the nautical style of a nursery or loft.
Fastening folding open shelves
Using the principle of a bar door that folds down and using the same end hinges, you can make original wall shelves from plywood.
Other interesting DIY wall mounts for shelves
In fact, the principle of a console, stop, suspension, frame or pin can be reproduced in any homemade fastener for attaching shelves, provided there is imagination, desire, the necessary materials at hand and “straight” hands available.
For example, hooks interpreted from wood and plywood may look like this.
And pegboards with a perforated panel and pin stops are like that.
The shape of the consoles and brackets (with no less reliable fastening) is reproduced from the remains of the timber.
In general, the imagination of people who know how to work with furniture materials and have a certain sense of style and proportion is easily translated into original solutions. And the fasteners for shelves to the wall turn into the main accent and a real art object of the interior.
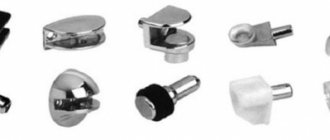
Pelican
This bracket is a mount with a part that looks like a pelican’s beak. With this beak, the bracket holds the shelf on the top and bottom sides. The lower part of the “beak” is much larger than the upper and looks like either a rounded elongated corner or a pelican’s beak.
- The shelf is fixed as follows: a horizontal part is installed on the large fixed part, and pressed on top with a small part of the beak. The small part is fixed with a screw-on element. This way the shelf is held quite securely.
- This is the most common bracket option for glass shelves, but these mounts can be used for other models. The advantage of the bracket is that it does not require much space under the shelf for its mounting.
These products are best suited for modern interiors in high-tech or modern style.
Required Tools
The tools you will need are: a level, a drill, or better yet a hammer drill, a screwdriver, dowels, self-tapping screws, a jigsaw, wood glue, a fastening set, a set of drills, a pencil, a hammer, and a wrench for anchor bolts.
If you use metal rods, you need to remember that the diameter of the fastening element should be 10-12.
Upon completion of all stages of work, we attach the shelf.
Useful tips
Even if you think that you don’t know how to hang a shelf correctly, you shouldn’t immediately call a professional. All you need to do is show a little effort and diligence, and you can easily get the job done. If, for example, you also need a shelving unit hung in the closet, then you can first practice on it, and then move on to working in rooms where there is finishing.
In addition, the greater the planned load on the fixed rack, the stronger the fasteners should be used. After all, over time, they may weaken, and the shelf will fall with all its contents. And this is extremely undesirable. Therefore, it is not recommended to skimp on bolts, as this can have negative consequences.
Choosing the right bracket
To ensure that your purchase does not disappoint, you need to find out in advance which bracket is best to choose. Some practical tips:
A high-quality shelf holder always comes with a manufacturer’s warranty card with the specified characteristics and maximum load. It would be a good idea to ask the seller about the possibility of replacing or returning an unsuitable product.
Before making a purchase, be sure to check the complete set of the bracket: in addition to the product itself, the composition must include the appropriate fasteners. Thus, manufacturers of shelf brackets complete corner models with four self-tapping screws and two dowels.
If for some reason the kit does not contain a self-tapping screw, you should purchase it yourself. The diameter and length of the hardware depend on the wall material (plasterboard, concrete or brick) and the load.
The free end of the shelf (console) should not protrude beyond the brackets by more than 10 cm. It is optimal if the length of the supporting part of the bracket is 2/3 of the total width of the shelf.
Don't forget about the decorative value of the shelf bracket. You can opt for hidden modifications that give the shelf weightlessness and lightness. Or you can go the other way - and choose a massive holder, making it a full-fledged element of the interior.
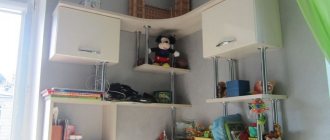
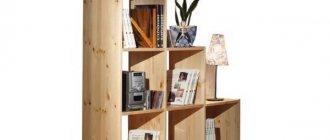
Corner shelves for books
You can often see corner shelves used to store books. It is not only convenient, but also beautiful. Such shelves complement the interior of the apartment and make it more aristocratic. The design itself can be varied; imagination will help make them original and practical.
A shelf made of wood looks impressive, parts of which are attached either on one side of the corner or on the other. It looks like a ladder. Such shelves are ideal for books, which, thanks to their shape, will fit perfectly into the right place.
Taking into account all the tips, making corner shelves yourself will not be difficult. This kind of work will only take a few hours. And the finished shelf will serve you for many years, delighting you with its beauty and practicality.
You might be interested in the following materials: