I finally had to develop drawings for the pendulum crib, which I hasten to share.
To make a pendulum mechanism you will need: 8 bearings with an outer diameter of 3.5 cm (in any case, I use exactly these because they fit perfectly with a Forster drill for furniture hinges, but you can take a smaller diameter); 8 metal bushings with 6 threads (used for fastening furniture corners, can be found in any furniture hardware store) Also needs to be turned to order; 8 metal bushings that are tightly pressed into the inner holes of the bearings; 8 countersunk screws for fastening the pendulum mechanism; 4 strips for the pendulum mechanism (I used planks from oak parquet); 8 washers are better than plastic ones (to prevent the crib legs from rubbing against the support structure). In addition, you need to make a box under the crib, or just a frame on which the crib will be “suspended.” At prices (approximately) bearing 1 pc. — 40 rub. bushings for furniture corners - from 5 to 10 rubles. Internal bushings (to order) about 50 rubles. each, and then agree on how much. Although. the problem can be solved more simply. Simply hang the crib on the support box using clotheslines. But in this case, you risk that the ropes may fray, and the crib itself will have play when it oscillates, and its legs will constantly touch the supports.
All dimensions of parts are given according to internal parameters, based on standard mattress sizes
Other works by Alexey (papa_Karlo) :
Even before the most important event happens in the family - the birth of an endlessly beloved and dear baby, the first concern of parents is arranging the children's room. Already at this stage, the main task of future mothers and fathers is to purchase a cozy and high-quality crib. The modern market for children's goods offers many options for organizing a sleeping place for newborns; a children's bed with a pendulum is in considerable demand among parents.
Crib with a pendulum swing mechanism - advantages and features
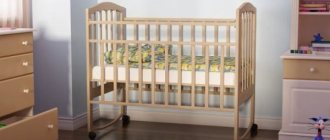
At first glance, a pendulum bed is very similar to a traditional crib; the key difference is the presence of a special device that creates oscillatory movements. The legs of the crib remain motionless, only the berth rocks, maintaining a horizontal position.
The pendulum mechanism imitates motion sickness in mother's arms, the baby quickly calms down and falls asleep. Thus, a bed with a pendulum mechanism simultaneously functions as a berth and a cradle.
A crib with a pendulum mechanism is characterized by a long service life and can be used as a sleeping place from the very birth of the child until he reaches 3-5 years of age.
The positive qualities of pendulum beds also include:
- smooth ride;
- silent operation of the pendulum;
- presence of a movement blocker.
Parents can fully appreciate the benefits of the pendulum system at night. To calm a cranky baby, a mother does not need to jump to her feet at night; it is enough to simply touch the crib located next to the parents with her hand, thereby starting the pendulum.
Design and types of pendulum mechanisms for cribs
The structural elements of the pendulum are bushings, hinges, and a pendulum bar. There are models of cribs on the market with three types of pendulum mechanisms:
The mechanisms differ in the swing trajectory. The longitudinal system creates oscillations of the bed from the head to the legs (back and forth), the transverse pendulum swings the crib in the right-left direction, the universal pendulum mechanism can make both longitudinal and transverse movements. Depending on the model, the vibration amplitude of the sleeping place ranges from 5 to 15 cm.
According to doctors, the best choice is a pendulum bed for newborns with longitudinal swing; vibrations in the back and forth direction are closest to human physiology. Oscillations along the body maintain normal intracranial pressure in the baby.
According to the method of swing, manual and automatic pendulum beds are distinguished.
A pendulum bed with a manual mechanism is activated by pushing the human hand. The oscillations of the sleeping place continue for about 10 minutes.
In electric models, a drive unit is used along with the pendulum mechanism to create oscillatory movements. The drive mechanism is a miniature electric motor equipped with electronics. The power source for the electric drive is the electrical network. The drive unit is mounted on the stationary part of the crib.
The pendulum mechanism can be controlled remotely using a remote control. In some models, a microphone is built into the drive unit; the bed with automatic electronic rocking is activated when the baby cries. After receiving a voice command, the electric drive starts the pendulum. The rocking cycle lasts for 10-15 minutes and the sleeping time stops automatically after the specified time has elapsed; if necessary, the movement of the crib can be stopped manually.
Varieties
Different types of cribs differ from each other, first of all, in reliability and service life. You should take a responsible approach to choosing a crib so that it lasts as long as possible and does not endanger your children.
Cradle
A cradle is ideal for a newborn baby. Your baby will sleep more comfortably in a small cradle than in a large bed. This crib takes up little space and can be moved freely around the room. However, it is worth remembering that the cradle is suitable for a baby no older than six months, and when he begins to stand on his feet, the child will need a larger crib. Many parents use a stroller cradle instead of a cradle. The shape of the cradle resembles a mother's tummy, so a recently born baby will sleep peacefully and pleasantly in such a crib.
Among other things, the cradle can be easily placed right next to the parents’ bed so that the mother can hear the baby’s call at any time. In addition, thanks to its lightness, the cradle can be moved anywhere at any time without disturbing the baby’s sleep.
Classical
The classic design of a baby crib will fit into any room design. Such cribs are usually quite simple and functional. The sleeping area is fenced on all sides with lattice walls, one of which can be dismantled. Most classic cribs are designed for children under three years of age.
Transformer
The advantage of transformers is the ability to adjust the size of the bed depending on the height of the child. Therefore, this bed has an increased service life. Transformers also have shelves for diapers and bottles. Thanks to the sides, the baby will not fall out of the bed while sleeping. Most models have a built-in mattress and storage cabinets.
The disadvantage of such models is their significant weight, which creates inconvenience when moving. In addition, their width cannot be changed - increasing the space is only possible along the length. The transformers have small shelves, so you won’t be able to put absolutely all of your baby’s things in them.
Manege
The playpen is a special folding structure. The playpens are suitable for children from six months to three years. As a rule, playpens are made of lightweight materials such as plastic, metal, fabric, due to which they are light in weight and can be moved from place to place without problems. Playpen models are equipped with a protective net that will protect the baby from midges and mosquitoes.
A playpen is a lightweight type of bed, so it is quite easy to move it from place to place. It is usually equipped with wheels for moving around the house. It will be easy for a young mother to move the crib with her baby without outside help, without distracting the child from sleep.
The playpen has a folding design, it can be easily folded so that it does not interfere with cleaning. The bottom of the structure is a stretched fabric, so you don’t have to purchase a separate mattress for it. The surface of the fabric is smooth and soft, which will have a beneficial effect on the child’s posture. Caring for the crib is very simple, since the fabric elements can be easily removed and replaced, and can be washed at any time.
General rules for choosing cribs
For many mothers and fathers, the decisive factor when buying children's furniture is visual appeal, however, this approach is fundamentally wrong. The main selection criteria are the convenience and safety of the little man. There are many things to consider when choosing a crib, including:
- material of manufacture;
- baby protection elements;
- features of the sleeping place arrangement.
Shapes, materials and sizes of frames
One of the main structural elements of a crib is the frame. Today, furniture manufacturers offer a huge selection of cribs for newborns; the range includes traditional rectangular models and somewhat non-standard products with a round or oval frame.
The strength and durability of a crib directly depends on the material used. In the production of furniture for small children, natural wood, MDF, plastic, laminated chipboard, and metal are used.
Of course, for a baby it is better to choose a crib made of natural material. Furniture with a wooden frame looks expensive and presentable, is characterized by a long service life and the ability to “breathe”. In the segment of wooden children's furniture today you can find quite affordable models; budget options include products made from pine, spruce and birch. More durable, expensive cribs are made from hard trees - beech, ash, oak. Wooden cribs vary in style and design. The market offers classic models made from unpainted wood and wooden cribs coated with paint and varnish, decorated with printed images.
Plastic frames are easy to maintain; the weight of a plastic crib is much less than its wooden counterpart. The affordable cost of plastic furniture also attracts buyers.
Before buying a crib for a baby, do not hesitate to ask the seller for quality certificates for materials. Unscrupulous manufacturers may use low-quality materials that are harmful to children in order to reduce the cost of furniture. To cover the structural elements of the children's bed, non-toxic, safe, water-based paints should be used.
Metal frames are famous for their strength and long service life. However, metal cribs are not widely used due to the “coldness” of the material.
The standard dimensions of a domestically produced baby crib are 120x60 cm. In imported products, the width and length of the sleeping bed are increased by 5 centimeters and amount to 125x65 cm.
Sides - types and rules of choice
Another important element is the sides of the crib; the main purpose of the design is to protect the baby from falling. The sides can be:
- stationary and removable;
- blind rack or combined (two solid sidewalls, two rack).
Most often, furniture manufacturers make the side walls of the sleeping bed in the form of a lattice structure; the side walls consist of a frame and cross bars installed at a certain distance. The crossbars can be made in the form of a round rod or be represented by wide slats.
When choosing a sleeping place for a baby, it is important to take into account two main requirements for enclosing structures:
- the distance between the vertical slats of the side parts should not exceed 5-6 cm;
- The height of the sides should be at least 60-65 cm, measurements are taken from the mattress to the edge of the side.
Additional protection for the baby will be provided by special silicone pads on the edges of the side and soft removable sides fixed around the perimeter of the crib. Elements of protection are especially relevant when the baby begins to actively move and during the period of teething. Silicone pads will not only protect the child’s gums from damage, but also maintain the integrity of the tree.
Some models of cribs are equipped with a front folding side. The folding sidewall allows you to move the child's bed close to the parent's bed; when the child grows up, he will be able to independently climb into his sleeping place. Unlike cribs equipped with runners to adjust the height of the side, folding designs use piano hinges. If necessary, the side can be folded down to the outer side and, when raised, is secured with latches.
Sleeping place - types and arrangement of bases
The base for the mattress of a baby crib can have a solid covered or slatted bottom. A solid bottom is considered more durable, and the cost of cribs with a solid base is lower than their slatted counterparts. A significant drawback lies in the design features; the solid base does not have gaps or holes, and therefore there is no air circulation between the mattress and the bottom. The mattress does not dry well and can quickly become unusable.
The slatted bottom consists of transverse strips fixed to the frame. The lattice design does not retain moisture inside the mattress and provides intense air circulation. The slatted base helps to properly distribute the load on the baby’s fragile spine.
Features of manufacturing different models of beds
Bed models differ in manufacturing technology. Babies need secure sleeping places that are closed and safe. Modern types of products, without excessive decoration, are suitable for teenagers. But any bed should be comfortable.
Children's beds for different age groups
Children's models are divided by age:
- for babies;
- for children of preschool and primary school age;
- teenage.
Cribs for newborns are manufactured according to the strict requirements of Sanpin. It is difficult to make this type of furniture yourself, but if you have the skills to work with the tool, you can try. The drawings are freely available. The crib is equipped with a pendulum or wheels.
For older children, open-shaped furniture is made. The mattress must be larger than 1200x600 mm.
Recommendations for creating a bed for children 3-10 years old:
- first purchase a mattress and only then make a bed frame;
- a transformer is a more suitable form, since the furniture “grows” with the child;
- for work it is worth choosing the most durable and safe materials, since children of this age are very active;
- the sleeping place is made rigid, since children’s spine is developing, but at the same time elastic enough to make it comfortable to sleep.
Teenage furniture should match the size of the child. You can make a bed according to the standards of an adult. For teenagers, a side bar covered with soft fabric is installed on the wall side.
Bed-sofa
Sleeping sofas have complex folding mechanisms. You can buy them and produce the rest of the components yourself. In addition to wood, you will need a hypoallergenic filler - holofiber, padding polyester and good fabric for covering the finished product.
Bed with storage drawers
Comfortable furniture that saves space. Drawers can be mounted on the side of the bed or under the bed. Additional boards and retractable mechanisms will be required for work. Boxes should not touch the floor. You will also have to purchase accessories.
Unusual children's bed
A bed with a slide is a child's dream. The model is simple, but more expensive in terms of costs: you need to purchase a ready-made slide. The staircase to the berth can be standard or in the form of drawers. Such interesting options are popular today, so finding a diagram will not be a problem.
Production recommendations:
- you can choose ready-made, colored facades;
- a slide is purchased from plastic, with special fastenings to the bed;
- child age 2-7 years.
A homemade children's bed is cheaper than a ready-made one. For the work you will need natural wood materials (timber, boards) and tools. Types of bedroom furniture differ in production technologies, and the single-bed option is the simplest. The decor will easily fit the product into the overall decor of the children's room.
Additional equipment for children's beds with a pendulum
Today, multifunctional furniture is valued, which allows you to optimize space as much as possible. Modern cribs for newborns can be combined with storage systems, a changing table, etc. Storage systems are represented by drawers and cupboards located at the bottom of the crib or on the sides of the bed.
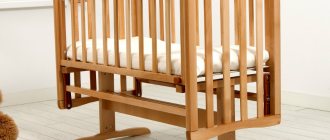
Instructions for assembling a crib on hinges
Smooth monotonous movements and rocking help the baby quickly calm down and fall asleep. And a crib with hinges is best suited for this. This furniture is intended for children under three years of age.
The lower part of the crib is usually orthopedic and has two levels. Thanks to a special mechanism, the child can be rocked parallel to the floor surface.
The bed assembly process is as follows:
- Assembling the base of the crib. To do this, we attach each of the three guides to the bottom of the structure. The grooved sides should extend to the outside of the crib.
- Using screws (three on each side) we attach the front and rear backrest (Fig. 1).
- Installing the bottom. It can be installed in two different positions, this allows you to change the depth of the crib (Fig. 2).
- Install the sidewalls (Fig. 3). We connect the moving elements on the sides with the base of the crib (Fig. 4-7).
- To prevent the crib on hinges from rocking, you can install special clamps at the bottom of the sides.
How to assemble a bed with a pendulum with your own hands - step-by-step instructions
You can assemble a bed with a pendulum yourself. At the first stage of work, you should prepare the necessary equipment, unpack the crib, carefully read the assembly instructions, and check the presence of all structural elements and fasteners.
It is better to assemble the crib at the place of its use.
Work equipment includes the following tools:
Here are the main steps
Prepare your work area. Usually it is covered with a light material, on which even the smallest details such as screws will be easily visible (this is done so as not to lose anything); Assemble the frame. To do this, first connect the back guide and two side walls together, and then the front
Don't confuse where is up and where is down! Important: if the front wall is assumed to be movable, it should be installed after the base has been installed; According to the attached instructions for assembling the crib, install the bottom (usually it consists of a lattice base and a plywood sheet); If the model has wheels, now is the time to turn it upside down and install the wheels in special grooves or simply screw them on; Now you can assemble and install the pendulum mechanism on those cribs that have it; Basically, everything is ready. All that remains is to check the reliability of the assembly, the operation of the mechanisms and equip a cozy and safe sleeping place for the baby
To do this, we invite you to visit the Sleep Therapy website, where you will find a wide range of different mattresses and bedding. Comfortable, modern, high quality!
Remember that assembling a crib is always based on the instructions. Follow the sequence of actions, carefully monitor the fastening of parts - and then everything will definitely work out! There is no rush to complete this task. A correct, thoughtful and unhurried approach is the key to its successful solution.
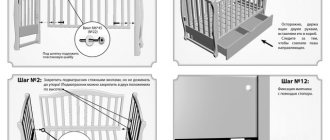
The crib assembly diagram is the fundamental document when purchasing this piece of furniture. Let's figure out how to read it correctly so as not to make a mistake in the end.
Here is one example of such a scheme that we will work on:
Here we show how to assemble the most common model of a bed for a baby: with a mechanical pendulum system (the wheels are removed and the swing is carried out by means of semi-arcs located at the bottom of the side walls), wheels and a removable front part. The first picture shows how to install the half-arches. On the second - fastening the side and rear walls. The third image explains how the bottom is installed, in the fourth we see the attachment of the front part. Figures 5 and 6 are more specific and show how to properly attach the bottom and make the box.
In fact, reading the diagram is perhaps the most difficult task in the entire assembly process
It is important to understand each stage and understand what conventional images convey. That is why we recommend that you carefully read not only the schematic images, but also the accompanying text.
Photos of children's beds for newborns with a pendulum mechanism
Video
Sleep is an important part of an infant's life, so it is very important to provide a comfortable environment for your newborn to fall asleep. A bed with a rocking system for babies imitates the tenderness of a mother’s hands; smooth rocking of the sleeping place in one plane will ensure a calm and sweet sleep for the baby.
- Details about do-it-yourself pendulum beds
- How to make a pendulum for a crib with your own hands?
- Procedure and necessary tools for making a crib yourself
- Completion of the installation process
So, congratulations to your family! All members are in joyful anticipation of a miracle. But, despite the anticipation of the holiday, someone close to you should take care of preparing a comfortable sleeping place for the newborn. Grandmothers can buy or sew bedding sets, grandfathers, uncles and aunts can give toys and clothes, but, of course, the future dad should make a crib for the baby!
Diagram of a baby crib with dimensions.
This process will be both pleasant and useful, and will also help save financial resources for a young family. Convenience, environmental friendliness and safety - these are the advantages of a do-it-yourself crib. The pendulum in her device will add functionality and comfort.
Details about do-it-yourself pendulum beds
Many people consider a device such as a pendulum unnecessary for a children's bed. And some parents, on the contrary, only want to purchase or make a rocking crib with their own hands. Opinions are generally divided on this issue. Which one you choose can be decided by familiarizing yourself with all the nuances of using such a device as a pendulum.
Scheme of the pendulum mechanism.
- Some modern mothers are of the opinion that rocking a child is an unnecessary and useless process. But the other half of parents think in a completely opposite direction and believe that it is impossible to do without it. But the choice is yours;
- It is wrong to assume that you will only have to rock a baby for the first few months of life. This may be true, but some children require rocking them before bed and at an older age. For example, your baby is already a year old, he weighs about 10 kg and does not fall asleep until you rock him. It's a bit heavy! At these moments, having a crib with a pendulum will save you. Making such a bed with your own hands will not be difficult, and if you wish, you can also purchase a swinging bed option in the store.
Today you can choose the design of the pendulum mechanism from two options. This is a transverse and longitudinal view of the pendulum. If you choose a longitudinal mechanism, the crib will move forward and backward. And if you like the transverse view, then you can rock the bed from right to left and back.
The main thing is to correctly calculate the free space in the room so that the motion sickness process is not interfered with by interior items and walls. A minimum of 10 cm of free space will be enough to install a crib with a pendulum.
Return to contents
Decoration
A home-made bed-house has an undeniable advantage - it includes original proportions, colors and sizes. For the boys' version, you can use a sea-colored canvas or thick curtains to organize a military headquarters, and for girls - decor with flags and a canopy made of organza or tulle.
The constructed crib-house structures can be open or closed. The first option is just some kind of imitation of walls and roof, but at the same time they seem light, without cluttering up the bedroom space. And the closed model of the bed house is more functional, with a roof, walls, fences and even lighting.
A children's bed of the described type can become not only an original place to sleep, but also for games. And the imagination of all family members will help in decorating:
- a house stylized as a fairy-tale palace for little princesses;
- nautical, military style for adventure lovers;
- castle for young knights;
- soft hut house and much more.
When decorating the bed of the house with color, one should not forget about harmony with the overall design of the room. A bright, rich palette with a variety of decorative inserts would be very appropriate. A beautiful house that fits seamlessly into the interior will contribute to a great mood in combination with the mental health of children.
How to make a pendulum for a crib with your own hands?
Let's figure out how to make a pendulum for a crib with your own hands. For these purposes you will need:
Installation diagram of the pendulum mechanism.
- bearings, the outer diametrical size of which corresponds to 3.5 cm. The required quantity is 8 pieces;
- metal bushings with 6 threads. You will also need 8 of them. You can buy these at any market that specializes in selling furniture fittings;
- countersunk head screws. With their help the pendulum will be attached. Need 8 pieces;
- strips - 4 pieces. Elements of parquet made of oak (planks) are suitable;
- washers in the amount of 8 pieces. The most appropriate choice would be to use plastic copies. They will be needed in order to avoid friction of the bed legs when in contact with the supporting structure;
- In addition to purchased ready-made materials, you will need metal bushings (8 pieces), which should be pressed quite tightly into the bearings, or rather into their inner hole. Such bushings are made only to order.
What else could you need? For the crib, it will be necessary to make a special box (frame), the design of which will serve as the basis for hanging the crib.
How to choose the right one
When choosing a bed for the bedroom, it is recommended to take an integrated approach
To ensure that furniture meets all requirements, you should pay attention to a number of basic criteria.
Company manufacturer
The furniture market offers a wide range of beds from different manufacturers. It is better to give preference to well-known brands whose product quality has been tested in practice. Since the bed is purchased for a long time, you should not experiment with products from little-known manufacturers.
Color
When deciding on the decorative characteristics of a bed, you must first take into account individual preferences
It is also important that the color of the furniture fits harmoniously into the existing style
Load
Depending on the person for whom the bed is intended, the load indicator is determined. For children with low body weight, beds that can withstand minor loads are suitable, while adults should choose among more durable structures,
Type of operation of a gas lift to a bed
There are direct action mechanisms, when lifting is carried out by compressing the retractable rod, and reverse mechanisms. The result of the operation of gas lifts is the same, so this parameter is not particularly important and depends on the manufacturer.
Procedure and necessary tools for making a crib yourself
Bed headboard size chart.
Before you begin making a crib, you need to evaluate your existing toolset. And if something is missing, it is better to take care of purchasing them in advance.
- Hammer.
- Roulette.
- Level.
- Jigsaw, the best option would be the electric one.
- Sander.
- Rasp.
- Woodworking tools.
- Any version of a milling machine and a set of cutters for it.
- Electric drill and drill bit set.
- Weight - will be needed to fasten the parts of the crib.
That's all for construction tools, but there is a separate list for materials. It includes:
- Edged board (40 mm). It is better if it is a coniferous tree.
- Beam (50x30 mm).
- Oak or beech slats (20x20).
- Glue, preferably epoxy.
- Self-tapping screws.
- High quality varnish for covering furniture and stain.
- Plugs.
- Corners for furniture.
- Plywood (3-4 mm).
- Nails.
If you have already purchased all this, then you can start making a crib with your own hands.
To determine the size of your future crib, you need to focus on the mattress.
Tools for making a baby crib.
The standard size of a mattress for a crib is 1200x600 mm.
This means that the sides of the crib will be located at a height of 900 mm from the floor. The back of the crib will be slightly higher - 1100 mm. So that the child, when he grows up, can climb into bed independently, the height of the sleeping place should not exceed 340 mm. And one more important point: the vertical slats of the end and side walls of the crib must have a gap of more than 120 mm. Only in this case will the child be safe, since he will not be able to put his head between the slats.
The process of making a children's bed begins with the manufacture of strapping parts for the transverse side and end walls. The boards are processed using hand tools or on a woodworking machine. Their width should correspond to 7 cm and thickness 3.5 cm.
- the frame for the mattress will be made of bars. For a standard size, you will need 6 cross bars;
- it is necessary to glue the frame parts using a clamp, and it is very important to ensure its squareness;
- Then you can start making the backrest for the crib. Its size is calculated using the following formula: to 60 cm, add the value of the double thickness of the side parts and plus another 2 cm. Everything is quite simple. Next, the back frame is assembled onto a 3.5 cm spike;
- to calculate the length of the transverse parts of the back, it is necessary to subtract the width of the bed leg, multiplied by 2, from the width of the back, and then add double the size of the tenon;
- to make slats for the crib, use slats. As noted above, it is very good if they are made from wood such as oak or beech. Next, the planks need to be connected to the transverse parts using a blind single tenon;
- After the headboard frame is assembled (without using glue), you need to measure the length of the slats. To the length that we got, we need to add 2 more values for the length of the spikes.
Please pay attention to the requirement for the quality of the crib, such as the absence of sharp parts, corners and burrs. Grind the rods very carefully, and all corners must be rounded using a special cutter. All these steps must be completed before you begin assembling the bed parts.
Return to contents
What material are beds made from?
When constructing children's furniture yourself, you need to decide on the materials that will be used in the work process. The main requirement is that the raw materials used must be environmentally friendly and not harm the baby’s development. Let us dwell on this issue in more detail, consider the optimal option for all components of the structure:
- Mattress. It is recommended to purchase it in a specialized store, since purchased models are produced taking into account the recommendations developed by orthopedic doctors. If you plan to use the bed for more than one year, then it is better to choose double-sided products with different degrees of hardness. For children under three years of age, a hard, rigid covering is required, which helps support the back and the proper development of the body. The filling should be wool; you should not take models that contain cotton wool and foam rubber. The upholstery should also be made of natural fabric and have an antiseptic coating.
- Frame, slats, legs, sides. For your beloved child, you should choose only a tree. Coniferous species are suitable for work: pine, spruce. Natural wood breathes, it is quite durable, and will suit any interior. Those who decide to use MDF or chipboard should remember that the boards contain phenol and formaldehyde resins, so it is necessary to take only models with emission class E-0.
- Protective means. To extend their service life, wooden surfaces are treated with special compounds, painted and varnished. For these purposes, nitro enamel, acrylic, and water-based paint for children's rooms are used. An excellent option would be to use wax. To preserve the wood texture, you can use acrylic varnish; other options are highly toxic.
Completion of the installation process
Assembling the headboard of a children's bed. To do this, place all the planks on glue and immediately finish assembling the back completely. Using a clamp, compress the resulting structure, not forgetting to check the correctness of the right angle.
- assemble the side walls of the bed in the same way. All internal corners of the assembled bed must be processed using a cutter (rounded);
- In order to assemble the side and end walls of the bed into a single whole, use self-tapping screws designed for woodworking. Their length is usually from 80 to 100 mm;
- The bottom of the crib must be covered with a sheet of plywood and secured with small nails.
Once the assembly is complete, the most enjoyable moment comes regarding the finishing. You will be covering our crib with varnish. For children's furniture, it is better to choose a more harmless option. For an aesthetic appearance, 3 layers are required. After each application, wait until completely dry before sanding. The crib is now ready for use. Sweet dreams and good health to your baby!
Instructions for assembling a transforming crib
A transformable crib will allow you to manually increase the sleeping space at any time, thanks to the ability to remove the bedside table. This design consists of a bed, a table, a bedside table and a chest of drawers. The bedside table and table can be detached, thereby increasing the size of the crib itself.
Frame assembly
First of all, we screw the guides to the side backs and connecting partitions of the future design. We assemble the frame. First of all, we screw on the back part and the connecting partition, then we install the right and left backrests. Finally, all that remains is to screw the front part of the crib to the frame structure.
Fixing the middle bottom
We install the bottom of the crib, again, in accordance with the age of the baby. For newborns, a high seating position is optimal; for older children, the bottom drops lower.
Assembling a chest of drawers or cabinets
Assembling the drawers of the transformable crib. We connect the walls of the box, nail the bottom, and screw the guides. We insert the finished box into the frame. Assembling the chest of drawers. We connect the back and side parts of the chest of drawers together. Two boards with holes for self-tapping screws are installed under the cover. Two similar planks are screwed at the base. Install guides for drawers. As a rule, markings are provided for the guides on the walls of the chest of drawers. Following the markings, we screw the guides to the walls.
We connect the back and walls of the structure together. Preparing the base for the pendulums. We screw the bolts into the prepared holes and secure them with nuts. We install the chest of drawers on the frame. Screw the lid of the chest of drawers using self-tapping screws.
Installation of grilles or limiters, headboard, top bottom
We make blanks for pendulums on the back of the cradle. We install the backrests. We collect the lamellas. We install the remaining structural parts. Screw on the folding side of the crib.