Furniture is now made from all kinds of materials, which are based on wood-shaving elements, although, however, you can even find furniture products made from plastic. But solid wood furniture still remains popular, although it is now less often seen in houses and apartments. This is due to the high cost of the source material. Do-it-yourself solid wood furniture will cost much less than if you plan to purchase it in a store or make it to order.
DIY solid wood furniture
Why is solid wood furniture still popular?
Some may call such furniture old-fashioned or boring, but the facts remain facts - they continue to be used to this day, although much cheaper and easier-to-process materials can now be found on the market. Why, despite this, such furniture products remain among the most popular? It's simple - solid wood as a material has a lot of advantages that other types of raw materials do not have.
It is better to make a do-it-yourself wooden bed for a child from coniferous wood.
Natural wood, first of all, is an environmentally friendly material. It does not contain harmful resins or other substances; it consists only of exclusively natural components. This means that you should not be afraid of allergies or any diseases when using solid wood furniture. This is especially true for people who already have certain pathologies, especially those related to the respiratory system, as well as for children whose bodies are quite sensitive to various influences. By the way, some of the wood species used to create furniture can themselves have healing properties, beneficially affecting the indoor microclimate and improving human condition.
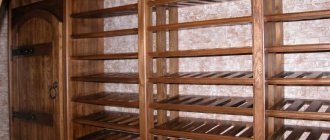
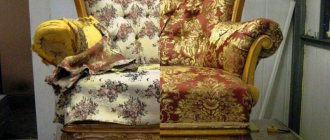
Solid wood furniture
Attention! Unlike chipboard or MDF, natural solid wood does not contain formaldehyde resins or other adhesive components, some of which can become a source of carcinogenic substances in the air.
The next advantage is the unconditional beauty of the array. What could be better and more pleasant than the color of natural wood? Of course, in certain interior styles, a bright facade will be the best option, but in general, natural wood has been and remains relevant and suitable for many styles. This color of furniture is especially appreciated when using country, ecological style, etc.
Handmade coffee table made of wood and glass
Next we should talk about the durability of the material. When properly used, an array can serve for decades without losing its strength and quality. And with proper processing of raw materials, it will remain just as beautiful and aesthetically pleasing. The average service life of wooden products is 40-50 years . So wood is an excellent material for those who want to get furniture that will last forever. Plus, if necessary, it is quite easy to repair.
A wooden table for the kitchen made of solid wood is a classic type of furniture, which now will not be cheap
Also, wood is a malleable material and quite easy to process. This means that you can make a bed or nightstand out of it exactly in the form and style that you would like to see in your home. No other material allows you to change yourself as easily and simply as wood. Almost all design solutions and even the most creative wishes can be brought to life. In addition, any wooden product created with your own hands can be made so exclusive that such a cabinet or any other piece of furniture simply will not exist anywhere else.
Making a cabinet like the one in this photo will require the use of quite complex tools.
On a note! The main disadvantage of solid wood furniture is its high cost. However, homemade furniture will cost several times less, because you only have to pay for the material.
Advantages of wooden furniture
Deciding on design and construction
The first thing such work begins with is determining the shape, design and functionality of the future table. We'll start with functionality. Here the carved tables differ from the rest only in their individual design. Otherwise everything is the same.
- Dining tables can be large or medium, there are no small dining tables. The main part of such a blizzard is made for the kitchen; happy owners of large houses make such tables for the living room.
Depending on the ornament and dimensions, dining tables can be used equally well for both the kitchen and the living room.
- Sliding - now they are also called transforming tables. They appeared in our country in the early 60s of the last century and, taking into account the square footage of most Soviet apartments, they immediately gained popularity. Carvings in transformers are often installed in open areas; there is no point in decorating the hidden, sliding part of the tabletop.
- Garden furniture - on tables for open terraces and gazebos it is customary to cut large, sometimes even deliberately rough, ornaments. The fact is that small elements of carving in the open air quickly become unusable. By the way, it is better for an amateur to start with garden furniture.
- Coffee option - the range and style of coffee tables is perhaps the widest. A miniature table on which you can play chess or put a cup of coffee is found in almost every home. It’s good to train on such furniture, you don’t need a lot of material, and the amount of work is small.
There is a place for a small coffee table in any apartment.
There is also a large niche that includes tables for catering establishments and administrative buildings, but exclusive handmade tables are extremely rare there.
As for the shape and appearance, tables are classified according to the tabletop. In relation to carved furniture, this is not entirely fair, since the texture is mainly applied to the legs and base, but from a practical point of view, it is more convenient to determine by the tabletop.
- Rectangular is a classic option that is equally suitable for any room. In production, models of regular, parallel-perpendicular shape are the most accessible.
A rectangular tabletop is considered a classic and is found in all styles.
- Square - among professionals it is considered a private version of a rectangular design, so all the rules for their arrangement are the same.
- Round - this shape requires a special approach; you can’t put a round table in a corner, it simply won’t fit into the interior there, but in the center a round tabletop harmonizes the space and makes it complete. For carved models, the best option would be a table with one central leg.
Oval tables are easy to use.
- Oval - Compared to round and rectangular models, oval tables are more practical. Firstly, they can easily be installed both in the kitchen and in the living room, and secondly, there are no corners, which means it’s easier to seat a large group at an oval table.
- Triangular – Triangular carved table tops are prevalent in coffee tables and garden tables. Their functionality is not the best, but they look original.
Triangular furniture is narrow-profile and is not suitable for every interior.
When does wood furniture look great?
Solid wood furniture is perfect for many styles, but it is worth highlighting three main ones when it is recommended to use such products. Brief information is presented in the table below.
DIY wooden kitchen
Table. Styles in which it is recommended to use solid wood furniture.
| Style | Description |
| Country | This style is somewhat rough and angular. Wood surfaces are usually not treated with any artificial materials. Most often, this design is chosen for private houses and cottages, as well as for kitchens. There is some primitiveness and antiquity in this style, and they are its highlights. |
| Provence | This style is well known to women. It is gentle, cozy, harmonious and, so to speak, affectionate. Decorative elements - vases, flowers, beautiful dishes. Wooden or wicker products are often used as furniture, giving the room completeness and charm. The main thing is to use fewer coarse and massive products. |
| Eco style | This is a natural style, where the first place is not beauty and fashion, but the naturalness and environmental friendliness of the materials used. It is similar to country, but has a lighter color scheme. There can be a lot of modern technology and products in an eco-style room, but natural wooden furniture is often used. |
| Loft | Simplicity and a kind of beauty, a combination of sophistication and some homeliness are the characteristics of the loft style. Wood here is an excellent option for the material used, and you can use not only wooden furniture, but also other wooden elements. The main thing is that there is no pretentiousness and a large amount of decor - the furniture should be extremely simple, comfortable and functional. |
Children's furniture made of handmade wood
On a note! Previously, it was believed that natural wood would fit only into country or classic style. However, modern designers have proven that this is not the case, and wood is an excellent option for other styles, not only those presented in the table. Often the most important thing is to choose the optimal design and decor.
Required Tools
Variety of tools for carpentry workshop
Do-it-yourself carved wood furniture is made using the following tools:
- chisel;
- blunt knife;
- jigsaw;
- drill;
- pencils.
To make furniture production faster, you should give preference to a jigsaw instead of a conventional tool. To improve the quality of markings, it is more convenient to use not just one simple pencil, but a set of colored ones.
Wood carving is carried out with special sets of carpentry tools, thanks to which the master can adjust the width and depth of the cut. However, when learning, you will need a standard set of tools, since at first you will only be able to create simple patterns.
Woodworking tools
Important! Under no circumstances should you carry out work with a poorly sharpened tool. Otherwise, you may ruin the appearance of the furniture.
What kind of material is there?
If you open a botany textbook, you will find a huge number of tree species and species, and the raw materials made from almost all of them can act as materials for creating wooden furniture. But there are certain breeds that are used most often. By the way, the use of some species may depend on the area of residence of a person.
Types of wood
Thus, in Russia and European countries the most common materials are walnut, pine, oak, beech, ash, and maple. They differ in their physical characteristics, as well as color, density and cost. Let's take a closer look at the most common types.
Table. Types of wood .
| View | Description and characteristics |
| Pine | It is the most common type of wood used for furniture. It is inexpensive, but at the same time it is quite durable and beautiful. Pine is easy to work with, and it is almost not afraid of mechanical impacts on furniture during its operation. Often used to create decorative surfaces. An excellent option for building cabinets. |
| Oak | The most durable type of wood, at the same time – one of the most expensive. Oak furniture can be used for centuries if it is made well. One of the most frequently used options for creating absolutely any furniture products. It is not afraid of insect attacks, and is not afraid of moisture, except in large quantities. Moreover, it is quite easy and pleasant to work with oak. |
| Birch | Soft wood with a pleasant light color, easy to work with, but can be a little finicky. Often used to create decorative items. Does not apply to expensive breeds. But it is not suitable for massive and heavy furniture, as it is too soft. |
| Willow | Willow can be an excellent option for creating light furniture - cabinets, armchairs, chairs. Beautiful, but soft. Willow furniture can give a room a special charm. |
| Cedar | Durable and elegant cedar, not afraid of water, is an excellent option for creating furniture for the bathroom and kitchen. |
| Beech | Durable almost like oak, but water-resistant material. So you should not place furniture made of such wood in the bathroom or kitchen, or you will have to treat the material with protective compounds. |
Features of choosing the type of wood for furniture
Console table
To make this item, you need plywood, the thickness of which is 1 cm. It is advisable to immediately cover the ends of the sheet with self-adhesive film. You can iron narrow strips with a flat, heavy object (an old iron, for example). Before starting work, the plywood should be thoroughly sanded.
Its surface should be smooth and even. Using a drill, you then need to drill holes in the connection areas. Self-tapping screws will be screwed into them.
The table will consist of 3 wide parts, arranged in the shape of the letter “P”. For greater stability, 2 narrow boards should be screwed to each element. For better joining, you should step back two to three centimeters from the edges of the plywood.
A thin narrow strip is glued to the sides. It will hide the joint areas. PVA or simple wood glue is suitable for fixation. Pre-prepared metal corners should be secured to the underside of the tabletop.
They are fixed with self-tapping screws. Having lubricated the joint areas with glue, you should attach the tabletop to the supports and tighten both sides at a right angle. For greater convenience, rollers are screwed to the legs at the bottom.
A hole should be drilled according to the shape of the wheel. The roller is fixed with bolts, which are usually included in the kit. Here you should try to fix the elements at the same level.
Material selection
When choosing the type of wood, it is important to decide in what conditions the furniture will be used. The microclimate in the room, as well as the load placed on the products, can play a significant role.
If you want to make durable and heavy furniture, then it is better to stick to hardwood. For example, it could be ash, elm, rowan, oak and others. These are strong and dense rocks that are perfect for making a wardrobe for clothes or books, or a massive bed.
Deciduous trees
Where the load on the furniture will be minimal, you can take softer and often cheaper species. For example, maple, willow, alder, birch .
If you want to create a very beautiful product, then you cannot do without expensive and noble breeds. These include mahogany, wenge, mahogany . These are truly beautiful materials in their texture, but you will have to pay a hefty sum for them, which not everyone can afford. Also, you should not get involved with expensive breeds if you have no experience in creating furniture yourself. In this case, there is a high risk of spoiling expensive and beautiful material - it is better to first practice on cheaper wood. Trial copies may well continue to serve in the country.
DIY wooden furniture
It is also important to purchase high-quality wood for products. It should be with a minimum of knots, well and properly dried, and dense. It is not worth purchasing cheap wood belonging to low quality categories for furniture, especially for its front parts.
Particular attention should be paid to the direction of the growth rings that define the pattern of the wood. So, it’s better to take the one where the rings are parallel. This wood is highly durable, will not warp and will last longer.
Tree core on the diagram
Important! Wood defects are clearly visible in the cut. You should not purchase material that is uneven in color or overly bright in color.
Interestingly, natural wood as a whole can be partially replaced with elements made from the same chipboard, but with a natural wood finish. The quality of the furniture in this case will not be much worse, but the material will be cheaper.
Chipboard
Hanger in the hallway
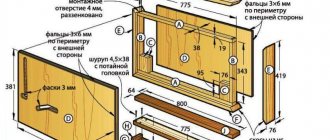
One of the simplest products that you can make yourself, even for a novice craftsman, is a clothes hanger.
Step 1. A design drawing is prepared. This stage is extremely important for calculating the necessary materials and correct manufacturing of the structure.
Hanger drawing
Step 2. Prepare the components: boards (4 main and 2 crossbars), hooks for clothes and bags (four large and 2 small), self-tapping screws for attaching the structure and hooks. The boards can be solid or glued together from lamellas.
Boards and hooks for clothes
Step 3. You will need tools: saw, jigsaw, blowtorch, grinder (you can get by with sandpaper), screwdriver. In addition, you need to prepare PVA glue, varnish and a brush for applying it (or spray).
The edges need to be rounded with a jigsaw
Prices for popular models of jigsaws
Jigsaw
Step 4. The planks are cut to size. For greater aesthetics, it is recommended to round the edges with a jigsaw.
Step 5. The wood is burned black using a blowtorch. This technology can significantly increase the durability of wood and resistance to adverse influences (climate, fire, insects). In addition to improving the functional characteristics of wood, firing helps make it more expressive, as the structure of the wood is more clearly revealed.
Burning wood with a blowtorch
Gasoline blowtorch
We make furniture from solid wood ourselves: features of creation
So, now that the decision has been made to create furniture yourself and the material has been selected, it is worth getting acquainted with some aspects of the construction of such structures. Namely, with the stages of work. In general, the list of work stages looks like this:
- idea formation;
- creation of a detailed drawing with all dimensions;
- selection and acquisition of materials;
- creating a product - cutting, applying certain compounds, assembly, finishing and decoration.
Cutting wood is one of the important stages. The appearance of the finished furniture will largely depend on the correctness and sequence of actions. It is most convenient to cut wood with a circular saw, but installing one at home is problematic. So at home it’s easier to get by with an electric jigsaw, and then mill the edges of the parts or process them with a grinding machine. As for the jigsaw, it is important to choose the right blade according to the technical characteristics.
Lumber cutting
Advice! Since when sawing with a jigsaw, unsightly chips often occur along the edge of the workpiece, it is recommended to make workpieces with a small margin, which is then ground off.
For those who want to make their own furniture for the first time, it is recommended to choose a product with the simplest possible configuration. Carved and figured shapes are extremely difficult to make with your own hands accurately and beautifully the first time. As a last resort, you can invite a master for cutting. Sometimes furniture factories also help with cutting.
DIY master class on making a table from solid ash
Also, do not forget that for wooden furniture you will need fittings, fasteners, etc. Special drills may be needed to install door awnings (this will depend on the type of awnings used).
Manufacturing stages
To assemble furniture yourself, you will need various tools, a suitable room and the right technology.
- Creating a project. You need to decide whether the furniture is intended for a gazebo or a house, where it will be placed, what it is made of: slabs, timber, slats, solid wood. The idea is embodied on paper.
- Marking. Now the drawings are transferred to the material.
- Sawing.
- Treatment with special impregnations that will protect the wood structure from moisture, atmospheric influences and insects.
- Coating with varnish or paint.
- Assembly. The parts are connected using slats, glue, dowels, and other technology can be used.
It doesn’t matter what the furniture and decorative items are made from: willow, slab, timber, boards or slats.
A little about finishing
If we talk about the finishing of finished furniture, then it is this that will allow you to achieve a finished and beautiful look of the product. Thus, wooden furniture can be varnished, tinted, or painted. Sometimes a procedure such as de-tarring may be necessary - treatment with acetone, gasoline or alcohol to remove traces of resin .
Painting will not preserve the natural color of the wood, but good varnishing will ensure the preservation of not only the shade, but also the structure. Moreover, the varnish will give you a glossy shine. Before painting wood, it must be primed. Tinting makes it possible to improve the color and give the wood a certain shade. The main principle here is maximum naturalness of the material.
Applying varnish to wood
On a note! The easiest way is to use varnish. This is an easy-to-use composition that will allow the wood to remain the color it naturally has, but will significantly extend its service life and will not allow it to darken.
Hand tools
The simplest is the ax. Using it, you can split wood, trim it, cut it.
A carpenter's ax must be properly sharpened. If the chamfer of the tool has a concave shape, then it will bounce off the material, thus reducing the quality of work. A tongue and groove tool is used when cutting on the edges of grooves. An end plane is needed for processing the end elements, respectively. A humpback (a type of planer) is used when working with shaped (oval, cylindrical, convex, concave and other) surfaces. The stanchion is used in the manufacture of gutters of different radii and sizes. The jointer is needed for planing and leveling a large surface. A set of chisels is used for artistic carving.
A straight chisel is used to clean up the background, and a “jamb” is used to make geometric patterns. To create the necessary relief, cranberry is used. To make three-dimensional elements and cut through contours, use jamb knives.
Making a children's bed from alder
Step 1. First of all, you need to purchase boards (in this case alder), as well as small fasteners and a mattress from a hardware store.
First you need to purchase all the necessary materials
Step 2. It is best to initially make a drawing of the crib, but in this case the master used the purchased mattress as a basis and, based on its dimensions (120x60 cm), created a crib. So if you have confidence in your abilities, you can do the same.
The purchased mattress is used as a basis.
Step 3. You need to apply markings on the boards. The long side of the bed should be 120 cm. Next, you need to saw off the excess using a miter saw. You need to make 3 such blanks.
Marking the boards
Sawing boards
Step 4. You also need to cut 10 blanks 60 cm long - these will be the slats for the mattress on which it will lie.
Cutting blanks 60 cm long
Future slats
Step 5. You also need to make the drawers. The blanks for the drawers in this case will be 90x67 cm.
Tsars are being made
Step 6. Now you can start assembling. You can place the headboard blanks first on a flat surface and see how everything will look, as well as figure out how to attach the parts.
Future headboard
Step 7. In the side planks at the ends you need to drill holes for wooden dowels, which will help connect the parts. For convenience, you can make a special simple template with holes equal to the diameter of the dowels and use it when drilling.
Drilling holes
Holes for wooden dowels
Step 8. Using wood cores, you can easily mark holes for other parts of the headboard. So, they need to be installed in ready-made holes for dowels in the planks, press the planks in the area where they will connect to the leg boards, and punch them along the edge of the board with a hammer. There will be traces that can be used to navigate and drill new holes. The cores can then be removed.
Carpentry cores Use of carpentry cores
The planks are punched with a hammer
Step 9. At the marks left by the cores, you also need to drill holes for wooden dowels.
You need to drill holes according to the marks.
Step 10. Now you can insert the dowels into their rightful place, additionally coating them with PVA glue.
Dowels are inserted
Step 11. To assemble the crib, long furniture ties 90 mm long are also used. With their help, you need to securely tie the elements of the backrest and other parts of the crib.
Long furniture ties are used
Step 12. You need to attach a 30x40 mm block to the lower side drawer using ordinary self-tapping screws.
The block is attached with self-tapping screws
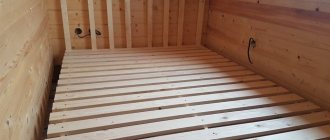
Step 13. Next you need to assemble the bed frame. The lamellas will be fixed to the bars installed along the sides.
Assembling the bed frame
Step 14. The crib is almost ready. Now you need to paint it with special oil, dry it and you can use it.
The crib is almost ready Painting the bed
Finished solid wood crib
Video - Children's bed made of wood
How to make the simplest option with drawers at home?
To make a simple design of a soft sofa with drawers with your own hands, you will need to make a preliminary drawing of the product, prepare consumables and tools.
Drawing and diagram
To make a sofa, first of all, a detailed drawing with dimensions is created. It is created:
- with your own hands (pencil on a piece of paper);
- ordered from a specialized company for the manufacture of custom-made furniture;
- is on the Internet;
- drawn in a special program on a computer.
Each consumer chooses the option that suits him best.
Attention: when drawing a drawing, be sure to consider whether the armrests will be hard or soft, whether your design will include linen drawers and other additional elements.
When selecting the dimensions of a sofa, the following characteristics are taken into account:
- back and seat height;
- width of the sofa;
- filler volume.
Tools
The following materials are prepared from:
- boards;
- plywood;
- self-tapping screws;
- furniture corners;
- glue;
- foam;
- upholstery fabric;
- foam;
- padding polyester;
- threads
Tools you will need:
- drill;
- screwdriver;
- hacksaw;
- pencil and tape measure;
- clean rag;
- sandpaper;
- scissors;
- knife for cutting foam rubber;
- sewing machine for sewing covers.
Preparation for production
First, the components of upholstered furniture (sidewalls, armrests, frame, back, seat) are manufactured according to the prepared drawing. Markings are made on the boards and materials are cut according to the marks. The back, sides and base are created from boards. You can also use 8 mm plywood instead of boards.
The prepared elements of the product are polished. For these purposes, use a grinder or sandpaper of different grain sizes. Next, the lumber is treated with antiseptics, stain and covered with paints and varnishes.
Step-by-step assembly instructions
The sofa is assembled in the following sequence:
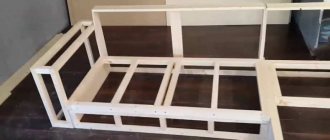
- First the base is assembled. For this, bars with a cross section of 40–50 cm are used. The frame is assembled with self-tapping screws and a screwdriver. When joining individual wooden parts, wood glue is used.
- Next, a rectangular frame is made from boards.
We glue the boards and reinforce them with slats along the entire length using self-tapping screws. The glued slats will later serve as support for the base of the sofa. Next, the product is set aside for several days until the adhesive composition has completely dried. - Now let's move on to making the back. It is covered with plywood.
- Next, we proceed to making the sidewalls from the same plywood.
- The back and sides are connected by metal corners.
- Boards are screwed to the base.
- After assembling the base, we proceed to the construction of drawers for things. For this, 4 boards and plywood are used, acting as the bottom.
- At this stage, all wooden surfaces are sanded again and their corners are rounded.
How to sheathe or upholster with leather?
The process of upholstering a sofa is as follows:
- The finished wooden frame is covered with foam rubber.
For these purposes, a material with a thickness of at least 3 cm is selected. First, the back is glued at the front and top, and then the sides. The glue is applied to the wooden surface with a brush or roller. Set aside the product until completely dry. - The next stage of cladding is pasting with padding polyester. The padding polyester located between the upholstery and the foam rubber will extend the life of the foam rubber itself and prevent wear and tear of the upholstery material. This will also give the furniture additional volume and make it softer and more comfortable to use.
- Now we move on to upholstering the sofa with leather. For this purpose, covers are sewn from fabric.
- After making the covers, they are put on the product and fixed with a furniture stapler.
That's the whole simple process of making a simple model of a soft sofa with spacious drawers. On average, its production will take from 3 to 5 days.
Tip: for comfortable seating, you can also make a rocking chair or a knitted ottoman. And at the dacha, you may need a chair made from pallets and a comfortable table for a gazebo.