creativecommons.org
Any ottoman, like other furniture, loses its visual appeal over the years. The fabric is worn out and snags appear. However, this is not a reason to throw away your favorite pouf - the product can be restored, and you can do it yourself. Before covering an ottoman with fabric or other material, it is advisable to pay attention to choosing the appropriate material. In specialized stores you can find a variety of fittings and decorative elements. They will help you create an exclusive case for any interior.
Chipboard ottoman cover
To perform finishing work you will need the following tools and materials:
- decorative fabric for upholstery;
- a piece of padding polyester or foam rubber;
- furniture stapler;
- glue gun;
- sewing machine.
Choice of upholstery fabric
First, you need to choose what stylistic solution your new upholstered chair will have. Depending on the style, I cover the ottomans with various fabrics of dense texture - tapestry, suede, velor, velvet, eco leather, eco fur and other materials.
For example, a pouf covered with satin or brocade-like fabric is perfect for a classic design.
If you are planning to decorate a room in an ethno style, then a matting pouf will look very good in it.
What you need
To update the ottoman, you will need:
- upholstery fabric;
- threads of the corresponding color;
- measuring tape or ruler;
- sharp scissors;
- tailor's pins;
- leather;
- furniture nails;
- stapler
It is better to choose fabric for replacing the upholstery of the ottoman that is not easily soiled, and one that can be washed. Below we will discuss how to make permanent upholstery for an ottoman. But if desired, such a cover can be modernized by sewing, for example, ties to it. In this case, the covering can be removed and washed in a washing machine if necessary.
Of course, only fairly dense and thick fabric is suitable for covering an ottoman. The thin one will quickly tear in the future. The color of the fabric for updating the ottoman should be chosen in accordance with the overall color scheme of the room's interior.
Simplified diagram for making an ottoman
If you have neither the time nor the desire to work with patterns, use this suggested option.
1. Cut out two circles of the same size from the material, not forgetting the seam allowances. This will be the bottom and top of the pouf.
2. Also cut out two identical rectangles. The length of the rectangle should be equal to half the circumference of the circle. The width of the rectangle is the height of the pouf.
3. Sew two rectangles on one side along the width from the wrong side. A long braid will come out.
4. Baste stitched rectangles to the circle bases, and then stitch. An uneven or sloppy seam can be trimmed with decorative braid.
5. Sew a zipper into the remaining unstitched edge of the rectangle and place the printed material. The ottoman is ready without wasting time.
The result of making a children's ottoman
Using this pattern, you can sew a pouf in the shape of a cube. The only difference is that the parts are cut out in a square shape. The sides will now consist of 4 parts. Sew these pieces together. If you use braid that contrasts the color of the base material, the edges of the cube will be clearer.
Stylish ottomans in the form of cubes
The best fabric is thick, it will give strength, and the pouf will keep its shape, for example, felt.
Drawing with dimensions
Before you start making an ottoman with a chipboard lid, you need to calculate its dimensions in advance, select manufacturing materials, and think through the design. After this, it is recommended to make a drawing with all dimensions on a piece of paper.
Tip : Having a drawing will simplify the work process and will prevent you from mixing up parts or spoiling consumables.
Knitted cover
If you don’t have a sweater in your closet that you are willing to sacrifice, but you love to do needlework, you can knit “clothes” for your furniture. Such things look especially cozy in winter, as they create the impression of warmth and comfort. If you knit well, the process will not take you much time. Perhaps all you need to do is sit in front of the TV for a couple of evenings - and the product is ready!
Regular garter stitch will do. Choose your favorite thread color. It is better if the yarn is mostly synthetic (70% acrylic, 30% wool). The product will not stretch or shrink when washed, and it is much easier to care for. If your ottoman is square or rectangular, knit two pieces of the desired size with knitting needles. On average, one centimeter of garter stitch is two loops. This way you can calculate the number of loops based on the width of the pouf. Throw on 4-6 loops so that the parts can be sewn together and the pouf fits freely into the finished product. In this case, the cover will be put on top. There is no need to sew on the bottom.
How to cover a round ottoman - options for leather covers
Restoring a leather ottoman is a more labor-intensive process, but it can be easily done. When choosing a model, it is important to consider the features of the material available:
- Covers made from scraps. If the fabric for the pouf is collected from scraps of leather, there are several options to create an original cape. You can work using the patchwork technique or make a multi-level cover. For example, the lower part can be made of a material of one color, above - a strip of a different shade, the seat - also different from the other elements;
- Working with applications. Burning leather is one of the common ways to create a unique design. Cut out a piece of skin, put it in a frying pan and heat it. The material will bend under the influence of hot air. You can work with it as with very soft raw materials. You can draw on the skin with a hot knitting needle or special stamps;
- Large piece of fabric. Working with a solid canvas is much easier. Simply sew the flaps, then attach them to the pouf and secure them. For fixation, you can use special nails;
- Lush covers. For such a product you will need a large amount of finely chopped fabric. These can be thin stripes, scales and other shapes. We sew all the parts together and fix them on a fabric base.
DIY ottoman cover
You can make a removable cover for an ottoman of any shape with your own hands. To do this, it is not necessary to make a pattern, just measure its dimensions and you can start working.
So, to sew a cover for a square ottoman you will need:
- textile;
- threads;
- adhesive tape or zipper;
- decorative elements for decoration.
Stages of work:
- Measure the size of the pouffe cover, cut the blank, making seam allowances of 3 cm.
- Cut a blank for the sides, the width of which is equal to the height of the pouf, and the length is equal to the sum of the widths of all its sides. At the same time, do not forget about seam allowances: 3 cm at the top and side edges, 5 cm at the bottom.
- Sew adhesive tape or a zipper onto the narrow part of the blank for the sidewalls.
- Sew both blanks, wrap the edges, and hem the bottom edge with a seam in the hem.
- Turn the product right side out. Sew your choice of decorative cord, ribbons or fringe along the seams. Decorate with decorations of your choice.
In this way you can sew a cover for an ottoman of cylindrical, rectangular or any other shape.
Ottomans, like all things made by yourself, will fill the room with positive energy and become its exclusive and stylish decoration. Thanks to their versatility, they will become an indispensable piece of furniture in any home. Making these practical and beautiful decorative accessories will bring true pleasure to their author, and his hand-made masterpieces will delight household members for many years.
A brief excursion into history
An ottoman or ottoman is a low item that belongs to the category of upholstered furniture that is designed for people to sit. It is also sometimes used as a footstool, or may even just serve as a decoration for the room. The shapes of the products are varied, but most often there are square and round ottomans, completely covered with upholstery fabric, except perhaps for the legs, which are usually made of wood.
Vintage delightful ottoman
Before we talk about how to make such a piece of furniture ourselves, let's study the history of this product. So, the history of the ottoman and furniture in general are very closely intertwined. The very first ottomans appeared in Ancient Egypt, and a little later they began to be used in rich homes in Greece and Rome.
English ottoman stand
Over the many years that ottomans have existed, they have changed dramatically. Previously, leather, fur, wood, and expensive fabrics were used to make poufs. Sometimes the pouf could have a beautiful design - such beautiful products can still be seen in museums. But gradually the popularity of richly decorated poufs faded away (around the Middle Ages). This was due to the promotion of an ascetic lifestyle, which the Catholic Church was actively involved in. Rougher and harder seating options began to appear, and sometimes people even sat on simple benches or chests. Separate chairs were only used by the nobility.
Antique ottoman with legs
Around the 18th century, beautifully decorated upholstered poufs came back into use in Europe. And this was facilitated by the fact that aristocrats could afford to decorate their homes with exquisite products, and asceticism faded into the background. Elegant poufs became popular among ladies who did not have to wrinkle their luxurious dresses to sit on them. So the ottoman was a frequent “guest” at the ball.
The pouf in its modern form, as we know it now, appeared around the end of the 19th century in France. And since then it has been and remains a popular piece of furniture.
You can make a pouf with your own hands quite simply
On a note! In Europe, this piece of furniture is called a pouf, but in Russia the more affectionate word “ottoman” has taken root.
Low price calculator for reupholstery
Type: Sofa Corner sofa Armchair Armchair (soft armrests) Chair (soft back) Chair (without soft back) Kitchen corner Banquette Pouf
Stages of reupholstering ottomans
Restoration work on ottomans and banquettes is carried out in the following order:
- Preparation. The client brings the upholstered furniture to the workshop or coordinates the arrival time of a measurement specialist. Based on the inspection results, the material is selected, the timing and cost of the work are calculated.
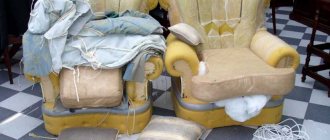
- Furniture dismantling. The technician dismantles the old sheathing and old filler if it has been subject to wear or damage.
- Making upholstery. When sewing a new fabric, old fabric is used as a pattern, which guarantees high accuracy of the tightening.
- Assembling the pouf. Soft filling is laid and the ottoman is reupholstered using new fabric.
- Quality checking. Upon completion of furniture repairs, specialists carry out quality control through a thorough inspection of the product. Next, we will coordinate the time for picking up the furniture if the work was carried out at the workshop.
Advantages of furniture restoration
Even the most thrifty housewife's furniture becomes unusable over time. To avoid throwing it away, you can resort to simple steps that will make the furniture last for many more years. Among the advantages of furniture restoration are:
- after the process, you will have new furniture in your apartment that can be used for many years;
- If the process is carried out correctly, you can get rid of scratches, chips, and dents formed during operation.
Any furniture that is in your home has the right to a second life, and you, in turn, can realize this by resorting to the simplest techniques.
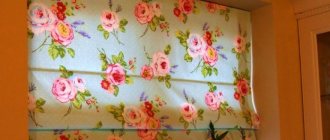
Why do you need spare covers?
Additional removable covers can be made
Having spare “clothes” will always keep your furniture clean. In addition, this is a great opportunity to change the situation. The interior of your home will be significantly transformed if you sew several covers and periodically put them on poufs. Also, such a decision will create your reputation as a caring and practical housewife. After all, you must admit that it is much easier to remove and wash a cover than to remove stains from its upholstery. This is especially true if there are small children in the house.
Any handmade products look original and attract attention. They add coziness to the apartment and create a special atmosphere. So if you want to update your interior and save yourself the hassle, sew one or more ottoman covers.
Cylindrical product
The user can also independently make a pouf from plywood and give it a cylindrical shape.
Assembly from base
The algorithm is simple:
- according to the desired dimensions, two identical circles are cut out of plywood;
- then the side walls are cut out: several narrow plywood elements.
Advice! The best option is to take 25 planks, it will not take so long to install and at the same time the shape of the cylinder will be beautiful.
Assembly
Having prepared and processed the parts, you can proceed to assembly:
- plywood boards are attached in a circle using special glue;
- then fastening occurs using self-tapping screws;
- after attaching them to one of the round bases, the workpiece is turned over;
- the second disk is generously smeared with glue along the edges and the finished product is attached to it;
This completes the work process.
How to make something hard soft
To do this, you need to wrap the cylindrical blank in several layers of soft fabric.
This will help smooth out all the sharp corners and make the future pouf more pleasant.
Work technology
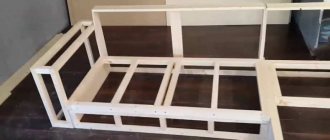
In order to make a frame for a pouffe from sheets of chipboard or plywood, you need to make patterns from the prepared material according to its dimensions:
- According to the size of the seat, you should cut out a piece of foam rubber;
- You should measure and then add the width of the sides of the pouf;
- Based on the measurements obtained, taking into account the height of the product, you should cut out a piece of padding polyester and cover the sides with it;
- Then you need to secure the padding polyester using a special stapler.
To make the work easier, you should first apply special glue to the walls of the frame. The foam rubber for the seat should be prepared in the same way. Patterns pre-cut from upholstery material must be stapled to a soft base, tucking in at the edges.
Choice of design and construction
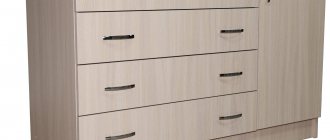
When deciding on the structure of the accessory, you should build on your own abilities and skill in needlework. For those who master carpentry skills, it will not be difficult to make a multifunctional wooden product with many convenient drawers.
Experienced seamstresses can easily create a designer ottoman of any size, shape and color.
For those who do not have special skills, it is better to get by with a frameless accessory made from simple materials. Tires, a regular household bucket or a wooden box are ideal for this.
When choosing the external design of an ottoman, you should take into account the overall interior design. The classic style is perfectly complemented by a simple accessory made of wood. The upholstery should ideally be made of expensive fabric, such as velvet or silk. Luxurious fringe cords will also luxuriously complement the product.
For apartments with a more modern design, a pouf with leather or fur upholstery is ideal. Accessories with an abstract print or an original patch will look interesting. Also, the decor in the Art Nouveau style will be perfectly complemented by a plain soft ottoman in a bright color.