Is it difficult to knit rugs with your own hands from threads? There are various options that you can use to knit the most suitable product for a particular room, such as a bathroom, hallway, bedroom, etc. You can choose the easiest option, which will allow you to produce this product in just a few hours. There are ways to knit longer. In any case, using the idea, you will end up with wonderful thread rugs for home comfort.
A thread rug will look appropriate in any part of the house - from the threshold to the bedroom.
How to crochet rugs on a mesh
For knitting, thicker threads of yarn are chosen. You need to knit, taking into account the size of the mesh cells, which will be the basis for the product. The knitting should completely cover the entire mesh, which should be invisible. When using thin strands of yarn, it is better to fold them, for example, in half.
Products made from different yarns are suitable for different rooms.
For example, it is best to make a rug for the bathroom using synthetic fibers in constant contact with water.
This type of thread is also suitable for a hallway rug. It is best to place a silicone mesh under the product to prevent slipping. It is inexpensive and is always on sale. For the bedroom it is better to use natural threads, that is, wool or cotton. This will make walking on the carpet with bare feet more pleasant. All that remains is to choose the right hook number, which should be larger, since it is inconvenient to knit small ones.
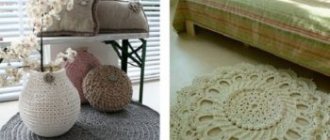
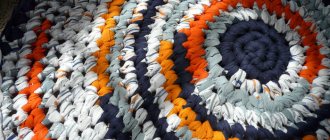
Rug pompoms can be made from various materials: wool, fabric, ribbons, and even bags.
If after knitting any items there is excess yarn left, you can make a rug from these leftovers with your own hands. The product can have a round square shape or any other. You can make a product using the following tools that should be on hand:
These materials can be used to create a rug made from pompoms using tools. It is best to take yarn of different colors.
To secure the pompoms, you need to crochet a mesh. To start making pompoms, take thick cardboard. Next, all work is performed in stages:
- Cut out a circle of suitable diameter from the pompom, in which a circle of smaller diameter is marked in the middle. After this, cut it out by making a hole in a circle of cardboard. Two such parts are made.
- Take the yarn and wind it around a cardboard ring. The amount of yarn should be large. When winding, the needle is threaded between the cardboard and the yarn.
- When the entire ring is wrapped with yarn, the last thread is secured and the thread is removed from the needle, putting it away.
- Take scissors to cut the yarn from the outside of the two wound rings.
- The two rings are separated, and the yarn is tied with thread in the middle.
- Having removed the cardboard, tie the pompom tightly, and leave the threads for tying long.
- Be sure to trim the pompom, cutting off excess threads.
Disadvantages that are important to consider
Choosing the right material plays a big role in making a rug. Each type of thread can behave differently when in contact with water. Therefore, when purchasing yarn for knitting in a store, you should consult with the seller about this. A product made from old rags that have survived more than one wash is not so susceptible to deformation.
The disadvantages include the loss of time, because it is much easier to go and buy a ready-made rug in a store. But it will no longer have individuality and will become an ordinary item in the interior.
How to make a base for a product
Weaving pattern for a rug based on.
A knitted mesh is used as a base. It is necessary to make a set of 4 air loops, connecting them using a connecting post. The mesh should be knitted in a circular pattern, the points of which correspond to each subsequent row.
- Starting from the center of the chain, single crochets are knitted 8 times.
- Knit 2 single crochets through each stitch of the first row.
- Knit 1 stitch on 1 loop without a crochet, on the other 2 stitches also without a crochet. This scheme alternates.
- In the fourth row, 1 stitch is already knitted as in the third row, but on two loops, again repeating the pattern of the third row, increasing the gap by 3, 4, 5 or more stitches in subsequent rows.
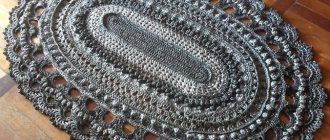
As a result, after knitting 19 rows, a circle d = 32 cm is obtained. Then it is set aside and the second one is knitted in a similar way. When both round products are ready, the pompoms are fixed on one of them, threading the pom-pom threads left after tying them through the holes obtained when knitting the columns. Each pompom should be tied on the wrong side of the rug with strong knots. After this, unnecessary threads are cut off. A second round product is sewn on the wrong side, after which the rug can be used.
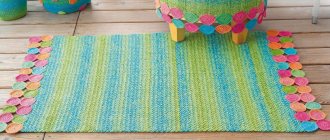
Braided rugs
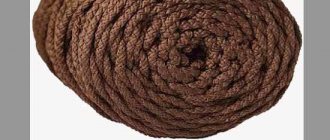
You can weave a rug in different ways, and to do this, the scraps again need to be joined into long strips.
Braid rug
This method is very simple, it does not require any tools or equipment other than a needle and thread.
Step 1.
Sew three patchwork strips together.
Sew three patchwork strips together
Step 2.
We braid them into a regular braid.
It should turn out to be quite long, so the strips will have to be extended as you work. Braiding
Step 3.
We secure the end of the braid with a pin and begin to roll it in a spiral on a flat surface.
Twisting the braid
Step 4.
We fasten each turn to the previous one on the reverse side, sewing it with threads.
Sewing the braids
Step 5.
You can do it differently: first twist the entire braid, and then carefully sew the turns in a spiral.
Making a rug
An oval rug is made in the same way.
Braided rug
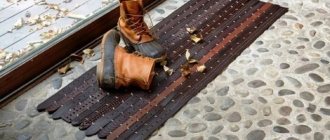
Terry rug-braid Rug figured from braids
Rug made of towels
But if you need a rectangular shape, it is better to weave several braids of the same length, lay them close to each other and sew them in a straight line. And weave the ends with cord or sew on a typewriter.
Scheme for making a rectangular rug
Rectangular woven rug
Advice. Such a rug will hold its shape better if you add a lining to it on the back side.
The lining can be an old towel
Braided rug
To make such a rug you need to make a frame for weaving. Its size should be slightly larger than the desired size of the canvas. Nails with small heads are placed on two opposite sides or wooden pins are installed to secure the base. The distance between them is 2-2.5 cm.
Weaving frame
Advice. If you add another intermediate crossbar to the frame, which can be attached at different levels, you can make rugs of different sizes.
Step 1.
We begin work by securing the warp threads. This can be cord, twine, thick yarn, or scraps tied into a long ribbon. The end of the tape is tied to the upper corner stud, after which it is snaked around all the pins of the upper and lower crossbars in turn. You need to stretch the base well, but not too tightly.
Attaching the warp threads
Step 2.
Preparing working threads. They should not be too long so as not to make weaving difficult. It is better to attach the next strip as you shorten the previous one.
Preparing working threads
Step 3.
We begin weaving by alternately passing a strip of working thread over and under the stretched warp threads.
Let's start weaving
Step 4.
Having reached the end of the row, we wrap the working thread around the outer warp thread and continue weaving in the other direction.
Weaving from the edge
Step 5.
Every few rows, compact the fabric by pulling the woven rows up. To do this, you can use a special device in the form of a wooden fork or simply use your hands. The denser the weaving itself and the smaller the distance between the rows, the less noticeable the warp threads will be.
Device for compacting threads
Step 6.
We make the required number of rows, periodically increasing the working thread or changing it to a strip of a different color.
Weaving a rug
Step 7.
If the color of the working thread needs to be changed at the edge of the rug, it is cut close to it and hemmed, or the next strip is tied to the cut end, and the knot is left on the wrong side.
But you can do it differently: tie the strips on the edge, leaving long tails. In this case, the edges of the rug will be fringed. Weaving a rug with fringe
For reference. The fringe on the other two sides can also be done at once, if you do not wind the warp threads around the pins, but tie them to each pair with separate strips.
Cape with fringe for a chair.
When finished, the fabric is carefully removed from the nails.
You can complicate the weaving by taking two working threads instead of one at once, and interweaving them both with each other and with the warp threads.
How to weave a rug without a loom
Video - Rug made of shreds on a frame
You can also weave a round rug in a similar way. A hoop can serve as a frame for it.
Round woven rug The process of weaving a rug on a hoop
How to make a rug from threads
Scheme for making a pompom for a rug.
A rug you make yourself will look great in the interior of the room, making it more comfortable. You can make it in a simple way in just a few hours. With minimal costs, the result is a unique soft product. You can make a rug if you use a fillet mesh, which is made using a regular mesh consisting of flax threads. The mesh is knitted by making double crochets and 2 chain stitches by alternating them. Fillet mesh is usually purchased at a building materials store.
To create a rug, cut threads about 10 cm long. You can cut the threads by winding them around a suitable object. The threads are cut on each side of the rectangular object for winding. To get started, you need to prepare a thick hook. To each cell, threads folded in half are attached to one of its sides. Each thread is grabbed with a hook and pulled into another adjacent cell. After this, the tails of the threads are pulled into the loops, tightening them. This method is similar to attaching tassels to a bedspread.
Basic manufacturing technologies
Electric floor heating mat
On the Internet you can see a huge number of products, which ultimately makes the choice very difficult. In order to simplify the search, it is worth dividing all products according to the main manufacturing methods:
- Sewing. The simplest method, but when using it, there is a need for additional tools, such as a sewing machine. With the help of such a very ordinary home device, you can produce a very beautiful and high-quality rug in a short period of time.
- Weaving. It will require perseverance, time and patience. But the result is amazing. To bring it to reality you will need the simplest loom.
- Crocheted. Knitting needles are generally not used for weaving such products, since they cannot bear such a load. But the hook is ideal because the structure is solid and durable.
- Knitting on a special basis. Rugs knitted using this technique will look perfect in any interior, as the result is soft and has an aesthetic appearance. This option will require the purchase of a special base, but it is worth noting that it is inexpensive.
You can clearly see the work process in the following video:
Master class on knitting rugs from threads and knitwear
If you have old T-shirts in your closet that no one will wear again, or other types of knitwear, you shouldn’t throw them away right away. You can make a rug out of them using leftover threads. It can be made very easily, all you need is mastery of a crochet hook. With the right amount of patience, you can knit a rug, just like our grandmothers did before us.
You should knit the product not from strips of knitwear, but using a hook and thread, tying them. At the same time, the product will not be rough, like only from threads, so it will be easier to wash. It will dry faster after this.
This is interesting: How to braid a girl’s hair
The materials and tools that we will need will be the following:
- Knitted T-shirts that are no longer needed.
- Yarn.
- A hook numbered according to the width of the thread.
First, strips of T-shirts are prepared. They must be cut to a width of 2 cm. You should not worry if the fabric of the T-shirts has already faded, since the threads used can hide all defects. You can make strips of different lengths. The first strip is folded into a ring, starting from the very edge. Then the resulting ring is tied with posts. You should make about 10 such columns, tying the ring you received at the beginning of the work.
Then they continue to crochet in the round. Loops are knitted without double crochet through each loop of the previous row. In this case, it is required to make each increase in loops evenly, knitting 2 single crochets from each loop. You can also make increases using a special pattern that allows you to crochet in the round.
If you have experience in crocheting, then you can add stitches by distributing them “by eye.” After inserting the hook into the loop in the previous row, pull the thread through it. The knitting technique in the round involves inserting a hook into a loop in the previous round. After this, the thread is pulled through both halves of the loop at once so that they cannot stretch too much. So you need to tie the thread around the entire circle.
As you finish each knit strip, you need to take the next one to attach it to the tip of the previous knit strip. You should continue knitting a rug from threads until all the strips are finished. At the end of knitting, a rug with the required diameter should be obtained.
Second life for old things
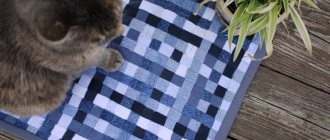
The house always accumulates a certain amount of old things that can be used to create an original, soft rug or runner. You won't find this product in a store - it is made by cutting out ribbons from unnecessary things and attaching them to a mesh.
Soft fabric rugs
Not much is required to get the job done:
- Net.
- Scissors.
- Masking tape.
- Fabric, things.
- Hook.
A set of tools and materials for work
First of all, prepare the material for work: fabric, old T-shirts, shirts are cut into strips measuring 200*25 mm, 100*15 mm, or as desired.
Attention! If the fabric is plain, then the ribbons can be painted with a special paint for fabric. You should choose high-quality paint so that when you walk, the paint does not remain on your feet.
The edge of the mesh is glued on both sides with tape along the perimeter of the base piece. You can crochet a rug and hem it with fabric - this is done so that the mesh does not fray.
Gluing tape along the edge of the base
For work, it is better to use a carpet hook, but if there is none, then use a regular one for knitting. The strips of fabric are attached as follows:
Step-by-step fastening of crocheted tapes
- The hook is threaded into the cell and the bent part is removed through the adjacent hole.
- With the curved end, they pry up the center of the tape, which was previously folded in half, and pull it through the cells.
Attaching by hand to a knot
- Both ends of the ribbon are pulled into the loop formed by hand, using a crochet hook.
- The fabric is pulled up well - the reverse side is smooth, without knots.
View of the rug from the inside
Start working from a corner horizontally. All ribbons are attached in this way - the product on the front side has a voluminous, fluffy appearance.
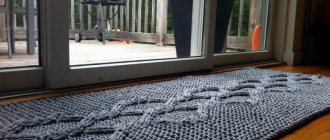
Knitted bath mat
This rug is suitable for the bathroom, hallway, even for a pet’s favorite place. It is easy to wash, dry and make.
Pet on the path