Do you want to diversify your interior, but don’t have the funds?
Then rugs made from plastic bags are your story. Minimum costs and maximum creativity. A budget and original way to decorate the interior, breathe new life, add bright colors. It would seem, what so unusual and useful can be made from the simplest recyclable materials? The concept of “skillful hands” means that a person can create a beautiful and useful thing himself, and not buy it in a store. It becomes doubly valuable when the material for creating a masterpiece is old things that are no longer needed, have outlived their usefulness. One of these illiquid items is used plastic bags. The imagination of creatively gifted people is limitless.
What are the benefits of a rug made from plastic bags?
In order for a thing to fit tightly into a person’s everyday life, it must have high performance qualities and other significant advantages for a person:
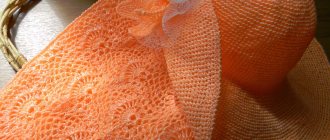
- Having traded its traditional flat surface for braids and weaves, polyethylene can truly become a cozy rug for tired feet. The product under your feet will give you a feeling of warmth, softness and comfort.
- Moisture never collects on the floor under the rug, even if you step on it with wet feet when leaving the shower. The looseness and presence of many gaps allows the floor to dry naturally, and the material itself is not susceptible to getting wet. This means there will be no high humidity in the room.
- Easy to care for, easy to wash and dry quickly outdoors. To wash such a thing, just soak it in a soapy solution and then rinse. Drains and dries quickly. Machine washable and wringable. The color of the rug will not be affected and will remain bright.
- A very durable and wear-resistant product.
- The color can be matched to the bathroom interior or towel sets.
- Non-slip, which means it is an ideal bathroom accessory.
- Keeps its shape well. The shape can be round, oval, star-shaped or square and rectangular, it all depends on the free space on the floor.
- Budget cost
Thanks to this decorative element, the room can be made cozy and stylish. The rug will “take root” not only in the bathroom or toilet, but also in the kitchen or hallway. And if an accessory loses its original chic, you don’t mind throwing it away and putting in a new one.
Finally, for those who like to create things with their own hands, this is a great opportunity to spend a couple of evenings doing something you love. Any craftswoman can make such a thing, even with minimal handicraft skills. Undoubtedly, polyethylene rugs are convenient, practical and economical.
A rug made from plastic bags will come in handy in a bathroom where water splashes constantly fly off. A kitchen half exposed to contamination during cooking can also be decorated with an original product. In the hallway, the rug needs to be cleaned from time to time to remove dirt and dust, so polyethylene is most suitable.
The problem of recycling polyethylene, which has a very long decomposition period and thereby causes irreparable harm to the environment, is quite acute on the agenda. We are accustomed to disposable bags that are needed to carry groceries from the store to our homes and, without a second thought, we send them to a landfill.
For many needlewomen, knitting items from accumulated unnecessary bags with their own hands becomes a real discovery. Having first tried to knit a product, they begin to improve it, using various innovations, ornaments and patterns. Plastic bags turn into a soft, comfortable and versatile mat.
Selection of bag material
There are a wide variety of packages available for sale. The manufacturer indicates the product parameters on the packaging. The first indicator is the capacity of the bag, expressed in liters. For handicrafts, this indicator is important from the point of view of quantitative measurement of raw materials. The second indicator on the package indicates the density of the package.
If we talk about the comfort and softness of the future base for your feet with your own hands, then it is preferable to choose bags with medium density. A high rate threatens to produce a hard and prickly rug. But, in this case, you can get out of the situation by cutting the threads thin.
By trying to knit a product from bags of different densities, you can very quickly learn to distinguish the quality of future yarn. Low-density rug bags are not very good due to the fact that they cannot hold their shape and stretch over time.
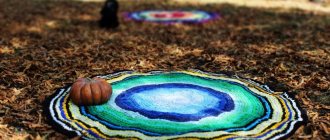
Examples of advantageous color combinations
Even for such a small product as a polyethylene foot mat, you need to choose colors that will be pleasing to the eye and will not cause visual discomfort.
Similar dim combinations
Red colors of polyethylene will look advantageous in tandem with pink and purple shades, orange and yellow-egg colors will emphasize the warmth of the color. The yellow color will be bathed in shades of green and light green, and orange will also suit it. Green will be favorably presented in a blue frame or sea green color. The purple hue will require proximity to blue, pink and lilac flowers.
A game for people who love contrasts
Red in combination with green will add pleasant moments. The brightness of orange will highlight the shade of sea wave. A calm blue color will be offset by a bright yellow tint. Sunny yellow will play in contrast with bright lilac color. The salad color goes well with a bright pink shade.
Methods for weaving rugs from garbage bags and plastic bags
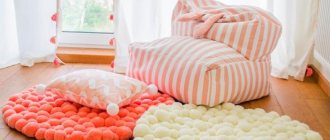
Pom pom method
Required:
- “threads” from bags;
- pompom base (round or square cardboard blank);
- sharp scissors;
- strong thread;
- base for the carpet (for example, mosquito net).
Many people know how to make a pompom from yarn. However, not every needlewoman realizes that this skill will help create an unusual and very functional interior element.
Lightly trim the hairs of the pompom and it is ready for use.
Or you can do it in a way that is more suitable specifically for polyethylene. To do this you will need a cardboard square. We fold it in half and place a strong thread inside. The main thing is that the thread is of sufficient length, since we will use it to both fix the pompom and tie it to the base.
One of the main advantages is moisture resistance; the mat can be used in rooms with high humidity. Wear resistance, ease of care, a successful tandem of stylish aesthetics and minimal costs - all these are the indisputable advantages of such a useful handmade item. When all the elements are ready, attach them to the base. It can be any mesh fabric. For example, a large window mesh (mosquito net) or a rubber lattice base.
And such a decorative element will adequately decorate a living room or children's room.
Knitting will bring true pleasure and will help you pass the time profitably.
As you can see, the color and shape of a polyethylene rug using the “pompom” technique is chosen at your discretion.
Savage costume for girls
For a Papuan costume for a girl, you need to make a bright skirt (the tulle version looks good) and the top of the outfit with your own hands. For the top use:
- Top or upper part of a swimsuit.
- Sew artificial or homemade tropical-style flowers onto the upper half of the clothing and on the elastic of the skirt.
- For decoration, use jewelry, but there should not be too much of it, literally 3-4 bracelets.
- You can make a headband or elastic band from bright colors on your head.
- So that the child does not feel discomfort in the Papuan costume, under the bottom of the clothes you need to wear tights or a T-shirt with flesh-colored tights.
If the image of an African woman is chosen, then the underwear should be the appropriate color. To make the outfit ready in the shortest possible time, you can make it from New Year’s rain or dissolve a bath sponge and make a skirt from the resulting material. You can sew a T-shirt using tiger or leopard print fabric.
Interesting How to properly dispose of energy-saving light bulbs?
Crocheting a rug from bags
Preparation of yarn in the first way
The work is carried out in the following sequence:
- The package is smoothed out and neatly folded lengthwise. Having aligned it along the edge and bottom and aligned the handles, it is smoothed out. Cut off the bottom of the bag and handle in a straight line;
- Transverse parallel strips about 2.5 cm wide are cut from the resulting workpiece . Do not use all the bags at once; first you need to try to knit a sample from the resulting yarn in order to accurately determine the width of the strips;
- try to cut samples of the same width so that the product is uniform in thickness. In the future, you can stack several bags on top of each other and cut them in one go. All cut strips must be unfolded and tied together;
- Fold the resulting ring in half and match the ends. We thread the new ring simultaneously through the two folded ends of the previous one. And again we fold and match the edges. Take the next strip and do the same action. It turns out a fluffy double thread for knitting, which needs to be wound into a random ball;
- you can tie the ends of the straightened strip together using neat knots. The result is a single thread with knots along its entire length. Experienced knitters know that the presence of knots does not interfere much with knitting ; you just need to learn to leave them on the wrong side of the work.
Making thread using the second method
For this method, you do not need to tie the strip pieces together in any way.
- We unfold the package and open it, as for packing things. Using scissors, we begin to cut the bag in a spiral in a circle , going lower and lower until we reach the bottom.
- You will only have to tie together the threads from two different packages. To obtain bulky yarn, you need to cut into strips of at least 5 cm, since the thread turns out to be a single thread.
- This method is suitable for cutting high-density bags.
Making a test sample for calculation
Knitting a trial section is required to determine the density of the future product; it may be necessary to cut wider threads. We put a chain of 20 loops on the hook plus one for lifting. After turning to the other side, we knit with the pattern that we chose for the product. We knit a height equal to 10 cm.
We fasten the thread and break it. Lightly iron the sample through the fabric with a warm iron. Now you can calculate how many loops to cast on for the product. We measure the width of the sample and consider that if 20 loops make up X centimeters, then to set, for example, the required 60 cm of the base of the rug, you need to make a simple calculation. Divide sixty centimeters by the number X and multiply the result by 20 loops. We get the required number of loops for the selected rug with a width of 60 cm.
A similar calculation can be made for the length if knitting is done in different colors. Then the colored inserts will not turn out elongated in length or, conversely, flat.
Important! If you have never knitted items like this before, try knitting a small piece from the bags you have. And if everything works out, you can take on a more serious project.
Process
First, start tying the first three strips of bags together. Then place a fairly heavy layer on the knot and then begin braiding. There are only three stripes (bags) in the center, so it won't take much time.
Don't forget to leave a tail for each stripe. This is where you get attached to the next bag. It's actually better if the tails are different lengths because this will force the continuous nodes to be in different places.
To begin shaping the braided bags into a mat, you must lay the braid in a spiral pattern. When you place the braid, use straight pins to temporarily hold the braid together.
You may be better off practicing this step first. Once you have attached the bags to the proper spiral, you are ready to fuse the backing.
The backing is just another plastic bag that has been split apart. You need to have a sheet large enough that everything overlaps. First, place the spiral side down on an iron safe surface. Then place sheets of plastic bags on the back of the spiral.
Be sure to iron only on wax paper. Then wet only on wax paper for a short time. (Time will vary depending on the thickness of each bag). After you separate the iron and wax paper, give the rug a minute or so to cool and harden. If you try to move it while the plastic is still melted, you may ruin the fusion.
As you continue weaving, pinning and merging, there are some things you should be aware of. When you reach the end of the bag, tie the next bag with a square knot (otherwise known as a reef knot). The bags will be tightly compressed so most knots will work.
It is much better if the tails of each bag are tied at different times. When you go to knit the next bag, your knot will make a tiny knot along the braid. This node is very invisible unless all three nodes occur simultaneously. If necessary, cut the strips of the bag so that the tails have different lengths. After the initial cutting, the nodes should fall at different times.
Once you reach the end of your rug, you simply pull the last tails under the rest of the rug and continue the merging process. Once you have merged the rest of the spiral and the final tails, you can trim off the excess support.
While this rug should be quite durable, it is still mostly a showpiece.
Rugs made from plastic bags: do it yourself
Rectangular rug
Alternatively, a rectangular rug can be knitted from multi-colored fragments. The finished fragment looks like this. And it's very easy to knit.
It is advisable to cut the workpieces of the same width, so the surface of the product will be uniform.
1 row. Knit 4 air loops and close them into a ring. 2nd row. Knit 8 single crochets into the resulting ring, “diluting” them with air loops. 3rd row. Mark the corner lines of the fragment with a knitting marker. 4 row. In the corners, knit 2 single crochets and 1 chain stitch between the stitches.
The size of the fragment depends only on your desire and the availability of “yarn”. You can change the color during the manufacturing process of a fragment either according to the same pattern or arbitrarily. The main thing is that the colors are bright, then the rug will turn out “cheerful”. After all the fragments are connected, you can begin to form the rug. To do this, the elements are laid out in the desired order and then stitched together.
For a clearer picture of how to make a crochet rug from bags of squares, watch the video master class below.
Or you can create such a rainbow masterpiece. This rug is made from different colored trash bags and is crocheted in a very similar pattern.
You can knit it in any size, the pattern does not change.
Learn interesting crochet patterns that can also be used to create rugs from bags. With minimal knowledge and skills, you are guaranteed to be able to turn these schemes into reality.
An interesting combination of a rectangular and round rug will not only create coziness, but also make the toilet room comfortable. In this case, a complex pattern is not used, but only multi-colored stripes.
Before you start knitting a rug, you can knit a test section, this will help determine the density of the future product.
Round rug
The most basic pattern for crocheting a rug is as follows: knit five air loops and close them into a ring. Make a lifting loop. Next, make one more single crochet in each of the five loops. To ensure that the circle is flat and not bowl-shaped, three to five loops are added in each subsequent row.
After each row, the product is laid out on a horizontal surface and checked how flat it lies.
The simplest rug made from plastic bags looks like this. Despite its brevity, such an accessory will appropriately complement the interior of a bathroom or hallway.
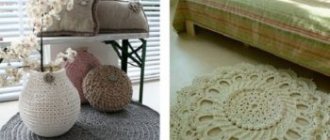
Rug made from fragments of “African flower”. Individual motifs are connected to each other either during the knitting process, or after the required number of elements are knitted, they are sewn together.
A fringe made of polyethylene “threads” looks unusual.
Here's an idea for a large rug. Multi-colored flowers of different sizes are attached to each other.
A suitable option for a children's room.
Round models, knitted according to a pattern for a tablecloth or large napkin, look especially impressive.
To work, you can use several colors or make the product monochromatic with a contrasting edging.
Such patterns can be easily “adjusted” to the size you need. For example, by tying a rug with several rows of double crochets, or chains of 5 (or 7) chain stitches. The main thing is to choose the right hook for your “yarn”.
A stylish, original, cozy rug is ready to delight the eyes of household members with its cheerful diversity. It can be openwork or dense, round or square, knitted in a solid fabric or from motifs. A do-it-yourself rug made from plastic bags is both a decorative element of the interior and a practical floor covering.
If the interior of your home is lacking in color, fix it with this rug.
Tools and materials
To cut bags and prepare strips, take:
- stationery knife;
- wooden ruler;
- large and functional scissors;
- a suitable hook for weaving a carpet (numbers: 3, 5 or 7) for products without pom-poms;
- cellophane bags of different colors or one color.
The packages need to be leveled and stacked. This makes it easier to cut them. When twisted, these strips become threads of approximately identical size.
This way of using bags is a small individual contribution to the issue of recycling materials.
More photos of ideas for homemade rugs made from plastic bags:
Patterns for knitting rugs from bags
Any carpet or napkin knitting pattern you like will suit you. For example, like this:
Why are plastic carpets needed?
Plastic bags are one of the worst offenders of wasteful products that pollute the Earth's oceans and take up limited space. This isn't new information, but Australians still produce around four billion recyclable plastic bags each year. The equivalent of 429,000 plastic bags are dumped into landfills every day; or 7250 are ejected every minute.
Opting for eco-friendly canvas bags for grocery shopping is an effective option, but many people still have excess plastic bags lying around. Instead of throwing them away, you can reuse them by investing them in multi-purpose mats.
In particular, plastic carpet can be used as sleeping mats for people who do not have access to shelter. As sleeping mats they are more hygienic, waterproof, easy to carry and provide protection against concrete. Several charities in Australia have taken up this initiative and have enthusiastically agreed to accept donations of plastic mats that will be redistributed to the homeless. So crocheting improves your quality of life.