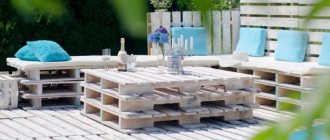
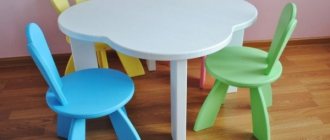
Parents of little princesses often wonder how to make a table for dolls. As you know, girls love to play with dolls. Their entire room is a place for Barbie to live, and handy things play the role of interior and furniture. In stores, one-piece dollhouses cost a lot of money, and their occupancy is not very high. A table and chairs for dolls with your own hands will be an excellent option for your daughters, because you can make them in a single copy, and you can decorate them together with your child.
How to make a table for dolls
This stylish doll table is easy to make. You just need a few things and you can put the table together in about half an hour.
Here the author used popsicle sticks, they are easy to work with. What's more, they add a beautiful, stylish look to everything you do! If you want, you can use colored sticks to make the doll table more colorful.
All you need is 16 standard 15cm sticks and a hot glue gun.
Carefully arrange the 8 popsicle sticks, one under the other, so that the shorter edges are in line. Apply hot glue along the line on both sides. Apply glue to the two sticks and press. Your tabletop is ready. Let's move on to the legs. Take two sticks and connect them into the letter “X”. Repeat the same with the other two sticks. Apply a bead of hot glue to one end of the sticks and place the other over it. Flip over and glue another stick matching the first one and place the tip of the "X" in between. Repeat to make the second leg. Apply glue to both sides of the tabletop. Place the leg and press firmly. Repeat the same with the other leg. Your doll table is ready!
Photo source: sewcraftyme.com/diy-doll-table-american-girl-doll-table-diy.html
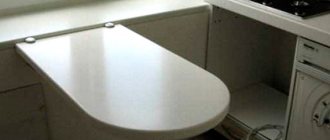
DIY doll table...from a photo frame
Are you looking for a fun and simple doll table that can be paired with chairs? Here! Transform an inexpensive photo frame into the perfect doll table, complete with a versatile tabletop that you can customize to fit your chairs. You'll need a photo frame with a removable back made of cardboard or chipboard (Tip: Flat frames with a plastic rather than glass panel work best as they are child-safe). PVC pipes with fittings and fabric. All details are on the website.
Photo source: matildajo.com/frametable/
Choosing material
You can make a doll house with your own hands from any sheet building material. The thickness of the material for a house about a meter high (on two floors) is 9-15 mm, for one-story houses it can be thinner. Let's look at the most common materials used in the construction of a dollhouse:
- Plywood. An excellent choice, as it is durable, holds its shape well, can be glued, connected using nails and self-tapping screws. Cut plywood with a metal saw (with a fine tooth) or a jigsaw (manual or electric). The ends will need to be sanded well so that there is no possibility of driving in a splinter. Upon completion of the work, you can varnish or stain, paint, wallpaper, etc.
- Drywall. After the repair, there are scraps left that can be used. To fasten the sheets together you will need tin corners (you can use a perforated corner). You will have to attach it with special screws, but they will stick out from the back, so this is not the best option. You can try to “plant” it with glue, but you will have to align the cut lines to reduce glue consumption.
- OSB (OSB). The properties of the material are similar to plywood, the only difference being that it is moisture resistant and made from wood chips. Working with it is approximately the same as with plywood.
- Cardboard. The most inexpensive and most delicate material that does not hold loads very well. The situation is better with cardboard for scrapbooking (you can buy it in craft stores). It is denser and more durable; it can be made into one-story houses or used for roofing. Connect using glue or staples from a stapler. To make the dollhouse more reliable, it is better to assemble a frame from planks and then cover it with cardboard.
- Regular chipboard or laminated chipboard (LDSP). The advantage of this material is that it can already be finished. If you wish, you can order sawing of the entire “box” of the house with gluing of the edges from some furniture company. Then all that remains is to assemble. Moreover, it will be possible to use screws or furniture fittings. There are three disadvantages - the material is too thick, which increases weight, formaldehyde emissions and fragility under lateral loads. If you can put up with the thickness and weight, then the release of formaldehyde should not be ignored. You need to look for ones with emission class E0-E1. Unfortunately, there is nothing you can do about fragility. Unless you use corners to connect parts, and this is not very beautiful.
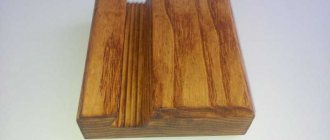
- Furniture panels. They are made from wooden planks glued together using wood glue. An ideal option for making a dollhouse: environmentally friendly, durable, easy to process. But furniture panels cannot be called cheap, although they are not as expensive as solid wood. In any case, it can be used to make a box - the bottom, side walls and ceiling. The roof and back wall can be made from other materials (for example, fiberboard, plastic, etc.).
There are also such options as laminate, wooden lining, thin planed board. But they don't work with them that often. In any case, the minimum thickness of materials is 6-7 mm. Then the dollhouse will be reliable and will even support your child.
Master classes on creating furniture for dolls: detailed instructions for your creativity
Any mother knows: her daughter’s best friend is a doll. This means that you will have to make every effort to create a worthy home for your princess’s favorite toy. And you can’t do without furniture filling. We offer you several master classes that will tell you how to make furniture for Barbie, Monster High dolls, Winx dolls, baby dolls and so on with your own hands, and all you have to do is choose the appropriate option.
In addition to wooden furniture, you can also make countless interior items or toy flowerpots with plants from scrap materials.
Transparent plastic lids from jars of cosmetics and household chemicals make it possible to quickly and easily make many decorative items for a doll's house
Microwave
A doll kitchen should look as realistic as possible, which means you can’t do without household appliances. Your children will be able to heat up their plastic food in a beautiful microwave, which can be made from a sharpener and decorative paper.
Choose a sharpener with a special removable box designed to collect shavings. Cover it with plain white paper or foil if you want to make a metal microwave oven.
You can make small buttons, toggle switches or levers from plasticine with your own hands. This toy microwave will decorate your miniature kitchen; it looks realistic and is quite functional.
Origami paper chair
To work, we will need a square sheet of paper (white or colored). When choosing a size, be guided by the required dimensions of the future chair.
Scheme:
To learn how to make an origami chair, we suggest using a video tutorial. Follow MK's step-by-step instructions and the entire manufacturing process will take you no more than 10 minutes.
Video: Master classes on creating an origami chair
Tools
To make doll tables we will need the following tools:
- ruler;
- pencil;
- compass;
- hand jigsaw or jigsaw;
- scissors;
- small brushes;
- sandpaper .
Attention! Carefully handle the parts of furniture for dolls so that there are no sharp or cutting edges and the child cannot get hurt during play.
How to make furniture for dolls? DIY dollhouse
Fold the fabric pieces face to face and sew, departing from the outline by approximately 0.2 mm.
4. Trim the seam allowance at a distance of approximately 0.2-0.3 mm from the seam and cut the fabric in the corners. Turn the workpiece onto the face and iron it. I didn’t photograph these steps, but I think everything is clear here.
5. Sew the padding polyester blanks on the sides and top with a simple seam between the edges, without tightening the thread too much, turn them onto the face, insert the cardboard blank and sew with the same seam at the bottom.
6. Place the fabric blank on the cardboard one and iron it.
img class=»topic-text-foto» src=»https://cs3.livemaster.ru/zhurnalfoto/e/4/2/141105004833.jpeg» alt=»» width=»431″ height=»369″ / >
7. In my bins I found half beads on a thread and glued them along the contour of the headboard.
8. It seemed a little empty to me, so I glued on more cabochons.
The headboard is ready.
Now let's move on to the bed itself.
9. From padding polyester, cut a blank for covering to the size of the sponge.
10. Glue the padding polyester to the edge of the sponge and sew the sides.
11. Cut a cover for the crib from fabric, I measured the size of the sponge 8 by 11 cm, plus added 4.5 cm on all sides.
12. Sew the sides of the cover, trim the corners and trim the edge of the cover, if required.
13. Put the cover on the crib and glue it along the edge with a moment.
14. Use a glue gun to glue bottle caps to the bottom of the crib - these will be the legs.
15. Sew a frill from ribbon, you can gather it, or you can make it with folds.
16. Glue the headboard to the crib with a glue gun.
17. Also use a glue gun to glue the frill around the perimeter of the crib.
The crib is ready.
All that remains is to sew the pillows and bedspread.
Author MK Nadezhda I.
Materials:
Tips for planning and filling a house
Most dollhouses have the following rooms:
- living room;
- bathroom;
- kitchen;
- bedroom;
- children's room.
In order for the rooms not to look empty, they need to be filled with basic interior items. If necessary, rooms are complemented with small decorative elements - mirrors, curtains, pillows, flower pots. A sofa, one or more bedside tables, armchairs, a miniature coffee table and a TV must be installed in the living room; lamps are also often installed.
The kitchen must have a set, stove, refrigerator, dining table and several chairs. The bedroom is equipped with a bed, a wardrobe, bedside tables, and a large mirror for dolls. The bathroom requires a toilet, sink, mirror, and shower. The filling of a children's room depends on the age of the baby doll. Typically, such a room contains a cradle or a miniature bed, toys, chairs and a desk.
Living room
BathroomKitchen
BedroomChildren's room
Design and decor
Considering the variety of materials and their unlimited possibilities, doll furniture can be made in any style. The main thing is that the products look harmonious in the toy house. It will be easier for beginners to create an interior with a minimum number of objects of simple shapes. To decorate the facades of doll cabinets, chests of drawers, bed sides, and other items, the following are often used:
- Solid or stencil painting, covering all or only part of the product.
- Decoupage, in which pictures of various themes are glued to the surface of furniture and secured with a special varnish.
- Colored or imitating natural materials self-adhesive film.
- Fabrics, leather for upholstery and decoration.
- Mirrors, glass, ribbons.
When making collectible miniatures, craftsmen, as a rule, fully duplicate original interior items. The same materials and types of decor are used. Compositions consisting of several elements are always performed in the same style.
hands for dolls with your own hands
Moms Many who want to give a surprise to their daughters are interested in the question: “ How to sew doll clothes
?. Everything is quite simple, if you are familiar with the basics of sewing.
Firstly, you need to stock up on the following set of tools: scissors, decorative needles, threads, measuring tape, sewing overlock machine.
Secondly, you should choose fabrics for the Child. It will be much easier to put on the accessories and remove things from the dolls if they are fastened with Velcro. Therefore, third parties should be prepared in advance.
B - Velcro, before making clothes for dolls
, you should take measurements. To do this, you need to use a measuring tape to measure the circumference of your chest, waist, hips, length of the product, armpits from the distance to the waist line. Measurements are taken with tension without tape. To the resulting dimensions on each side, add 0.3 cm for allowances.
If you are interested in making things for dolls or Barbie-like toys with “model appearance,” then it’s quite simple, let’s look at the example of Dress. The dress will consist of 2 parts: bodice and both. skirt parts are made in the form of rectangles, the edges of which need to be processed with an overlocker. After this we do a fitting. In front we pin the chest with needles from the line to the waist. We adjust the bottom to the waist line. After this, we hem the parts and secure them with Velcro. The straps are made in the same way. You can decorate the Dress with rhinestones, sequins, and complement the Items.
Do-it-yourself accessories for dolls are very quick and quite simple, you just need to show imagination and ingenuity. When making them, you can experiment with materials, textures and fittings.
DIY making
Before you start making a bed, you need to decide on its dimensions and, accordingly, choose the material for the frame. In addition, you will need decorations (various beads, ribbons, flowers, bows, etc.) and doll bedding (small fabric scraps will do). For the mattress, you can use foam rubber or padding polyester. When all the elements are collected, you can begin the creative process. Let's look at several of the most common options for making doll beds.
From cardboard
To construct this model, you can take any thick cardboard, but corrugated cardboard is best - it is thicker, but at the same time convenient to use.
Required tools and materials:
- cardboard;
- wire (for strengthening and fastening the structure);
- glue (PVA, “Moment”);
- tape (simple and double-sided);
- scissors;
- fabric or other finishing material.
You can first cut out the details of the future bed from a sheet of paper in accordance with the required dimensions and only then transfer the drawing to cardboard.
- Cut out the parts of the product from cardboard. It is better to duplicate each detail at least twice - the strength of the bed will depend on this. It is preferable to make 4 blanks for the base, and two for the backs.
- Glue the base using Moment glue so that there are two of four blanks.
- Cut four identical pieces of wire with a length exceeding the length of the base by 7-10 cm.
- Evenly position and attach the strips of wire with tape to one of the two glued base blanks.
- Glue both parts of the base with PVA glue so that the wire is between the layers of cardboard. Leave the product to dry under pressure.
- After drying, assemble all the elements of the crib together, mark on the two parts of the backs with dots where the wire coming out of the base will be inserted. Make holes at these points.
- Thread wire through them and glue the joints. Fasten (tie) the wire from the outside, cut off the excess ends of the wire.
- Glue the remaining two parts of the backs so that they hide the wire knots (this way the child will not hurt his hands).
- Carefully cover the resulting structure with any available material - fabric, paper, self-adhesive film, etc.
Making furniture from paper
If it is not possible to buy ready-made doll furniture, you can make it from paper. How to make a chair out of paper so that it is strong and does not immediately wrinkle? Roll the paper into tubes! Craftsmen have long been weaving anything from newspaper tubes. Sets for dolls will be no exception. Weaving patterns can be found on the Internet. Such items will decorate the house and look very cozy. In addition, they will be quite durable if painted or coated with several layers of varnish.
To make paper furniture you will need:
- Old newspapers or paper.
- PVA glue or glue gun.
- Threads.
- Paints for decoration.
- Varnish.
You need to roll thin tubes out of paper. This can be done using a knitting needle. They should dry well. Then the tubes need to be glued lengthwise using glue. It is better to use a hot gun, so the connection will be stronger and the paper will not get wet.
In this way, small blocks (walls) are glued together, which are then connected to each other. They are easy to cut into the desired pieces. For better fastening, you can use wire or thread.
Then the shelves and doors are made in the same way. The doors need to be secured with tape or wire.
The legs and arms are made from the same tubes, rolled into a roll. The edge needs to be glued with hot glue.
Making hangers
You don’t have to make hangers for doll clothes, but use ready-made ones, for example, from sock packaging.
The hook can be removed from the packaging
If desired, they can be wrapped in thin foam rubber and covered with fabric.
Decorating hangers
If there are not enough of them or the right size, you will have to take their production into your own hands.
Hangers made of paper clips or wire
The easiest way is to make hangers from paper clips. They come in different sizes, metal, colored, with plastic braiding - there are plenty to choose from. The manufacturing process is simple, you can do it with just your hands, but it is more convenient to use pliers.
It is enough to bend the paper clip slightly on both sides, and then lift the long part and bend it with a hook. For rigidity, the tip of the short part can be wrapped around the neck of the hook.
Clothes clip hanger
Video - How to make hangers for dolls
If dolls need hangers larger than those made from paper clips, use wire. It is quite difficult to make neat and even products out of it; a simple device made from a piece of plywood or a plank and several small nails will help with this.
| Image | Description |
| Step 1 | On the board, draw the outline of a hanger of a suitable size and drive several nails into it, without recessing the caps. |
| Step 2 | Cut a piece of wire and wrap it sequentially around the nails, forming hangers. |
| Step 3 | Remove the workpiece from the template, cut off the excess wire and make several turns with its tip around the neck of the hook. |
Cardboard hangers
You can make these hangers together with your child - the process is incredibly simple, and joint activities are very bonding. In the future, your daughter will be able to independently take care of storing her expanding wardrobe of dolls.
Step 1. Prepare colored cardboard, glue, scissors, ribbons and buttons, as well as a drawing or printout of the hangers.
Materials required for work
Step 2. Cut out the hanger pattern and transfer it to cardboard. Each product will require several parts depending on the thickness of the cardboard and the required strength of the hanger.
Pattern
Step 3. Glue the parts together by placing a narrow tape between them in the neck of the hook area.
Parts to be glued
Step 4. We pass the ends of the ribbon through the holes of the button and tie it with a bow.
The bow is tied, the hanger is ready for use.
You can make a lot of these hangers in different colors and with different decorations - to suit every doll outfit. And hang them on hangers you made yourself.
Doll hanger
Plywood doll products
A doll's wardrobe for clothes can also be made from plywood. He will serve his owner for a very long time. You can connect the walls and shelves together with hot glue or PVA. A hanger bar can be made from a wooden skewer or a Chinese stick. Hangers are made from straightened paper clips.
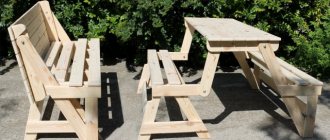
The bed, table and chairs can also be made from this durable material. Some craftsmen even carve beautiful patterns on such furniture, imitating carved furniture. It looks very nice. The plywood needs to be painted or covered with fabric.
It is better to stuff the sofa with cotton wool or foam rubber so that it takes shape, and then cover it with fabric.
The table can be made either square or round using a jigsaw. The legs will be wooden skewers or sticks. Chairs are made using the same principle.
How to make a doll cabinet from a box?
For such a locker you will need any cardboard box. In addition to the box itself, you will need:
- remnants of wallpaper or colored paper;
- empty matchboxes;
- toothpicks, sandwich skewers;
- wooden beads or buttons with “ears”;
- wire;
- paper clips;
- foil if you want a wardrobe with a mirror.
Preparing the base
Before you make a doll cabinet from a juice box or shoe box, you need to prepare the box itself.
Option 1
We remove the lid of the shoe box, straighten it and cut off the folds - it is better to do this with a sharp knife so that the edges are smooth. From the lid you can make:
- partition;
- doors.
Option 2
Carefully cut off the front wall of the juice box. If the box has a round hole on the top, remove the plastic insert onto which the lid is screwed. In fact, there is no need to do anything else - the thicker the load-bearing parts, the better.
You can make a partition from the cut out front part:
- Fold the cut wall in half, aligning the long sides.
- Bend the long edges outward by 1 cm.
- Glue the part, but do not touch the seam allowances.
- Hold the septum under pressure for some time.
- Glue the partition into the cabinet.
Decorating the interior
You can make a hanger in one half of the cabinet, and drawers in the other. Depending on the size of the wardrobe, the following are suitable for the crossbar:
- skewer;
- any round wooden stick;
- cocktail tube or paper roll.
It is best to glue it into the walls.
The other half may have drawers:
- To do this you will need several empty matchboxes.
- Their outer parts are simply glued one on top of the other.
- To make the drawers easy to open, semicircular cutouts are made on the sliding parts to fit the size of a child’s finger.
Making doors
Both doors are made the same way:
- Cut 4-6 strips of cardboard that are as long as the height of the closet and half as wide as the width of the doll clothes closet.
- Glue the strips together in 2-3 layers - glue should be spread over the entire surface.
- Keep the pieces under pressure until they are completely dry.
- Glue on handles - for example, small wooden buttons with “ears” or wooden beads.
- Place the doors on miniature hinges, 2 on each side.
Legs
Doll furniture can also be without legs. But if you have large beads, pawns from old small chess, or just wooden blocks of a suitable shape, why not make the toy cabinet look like a real one? The main thing is that the legs are the same and at equal distances from the corners.
A do-it-yourself doll cabinet is made from cardboard in almost the same way. You first need to glue the box from cardboard and attach the doors and other parts to it, that's all.
What available tools and materials may be useful?
To create doll furniture and decorate the interior of a toy house, the following will be useful:
- matchboxes - they will become drawers of chests of drawers, desks, dressing tables, cabinets, chests of drawers for linen;
- cigarette packs – suitable for equipping Barbie’s dressing room and storing her boots;
- shoe boxes - these will make beds, tables, cabinets for large dolls;
- boxes of baby cereal, perfume, and other cosmetics;
- colored plastic bottles, yogurt cups;
- soft foam sponges, viscose napkins;
- pieces of plywood, fiberboard, wood cuts, boards;
- scraps of fabric, leather, gauze;
- plastic “eggs” from Kinder surprises;
- remnants of wire, chains, foil;
- sewing, knitting threads, laces;
- metal tin cans;
- paper, cardboard, wallpaper, PVA glue;
- tape, colored self-adhesive film;
- polystyrene foam, plasticine, polymer clay;
- gouache, acrylic, nail polish;
- beads, buttons, LED lights.
Table
Do-it-yourself furniture for dolls cannot exist without such a necessary item as a table. It’s even easier to make than a kitchen or a bed. There are many options for drawings, photos, and diagrams for creating them. You can use ready-made ones, or you can just think and decide how to make a furniture table for dolls out of a box with your own hands from what you have on hand.
For example, this miniature table. To create it you need to prepare: • a plastic bottle; • a scrap of fabric; • cardboard sheet; • scissors and glue.
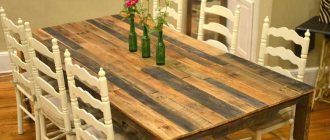
Step-by-step instructions: 1. Cut out 4 table supports from the bottle. For greater stability, bend the legs when cutting. 2. Next, cut out a circle from cardboard; it will serve as a tabletop. Glue it to the bottom of the bottle. 3. From a scrap of fabric prepared in advance, a tablecloth is cut out in the form of a circle, with a diameter slightly larger than the tabletop. 4. The table is covered with a tablecloth. For ease of use, we glue the ends to the supports. It’s also easy and quick to build a dining table from plywood. A diagram of do-it-yourself furniture for dolls made of cardboard and plywood is attached.
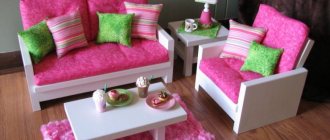
Still relevant Barbie
A beautiful and elegant doll named Barbie is never left alone. People often come to visit her in her living room, and friends come running to her kitchen for tea. But how to make a coffee table for Barbie with your own hands or a large elegant dining set?
To make a beautiful coffee table for your child’s favorite dolls, you will need:
- large sparkles;
- a bottle of penicillin;
- beads;
- screw cap with a diameter of 70 millimeters from a glass jar.
First of all, lubricate the front part of the lid with transparent glue and, without stirring, sprinkle with glitter. Press down lightly, then secure the surface with a thick layer of glue. Remove the rubber cap from the penicillin bottle and pour multi-colored beads inside. We apply silicone glue to the edges of the bottle, and then press the inside of the cap tightly to the neck of the glass bottle. The DIY coffee table for Barbie is ready.
For the next table you will need:
- pieces of cardboard 8 × 8 and 14 × 14;
- paper towel tubes;
- scraps of colored paper 1 × 1;
- shiny black tape.
We glue small scraps of colored paper in random order onto cardboard. We apply tape to a large piece of cardboard along the edge so that the tape bends inward by 1-2 centimeters. As a result, we get a beautiful hand-made variegated table top with black lacquered edges.
In a similar way, tape over a smaller piece of cardboard - it will be the floor part of the table. From the edge of the cardboard tube we cut a piece of 10 centimeters and wrap it with adhesive tape. We coat the ends of the tube with silicone glue and glue them to both parts of the cardboard. We install the resulting structure on the base. The table for dolls is made by hand.
From the remaining parts of the tube and cardboard you can make chairs. To do this, cut the tube into pieces 6 centimeters in height, and pieces of cardboard into 3 × 3 scraps, glue them together to make chairs.
We decorate non-standard furniture
After the furniture is assembled, you can move on to the decorating stage. There is no need to limit yourself here, and there can be a huge number of options. Starting from simple ones, among which we can highlight pasting with colored paper, to unusual decoration options, where we can mention painting with varnish and much more.
You can decorate assembled furniture using various techniques. Are you good at drawing? Don't deny yourself the pleasure of creating your own creation. Paint the surface some base color, and when this layer dries, apply a pattern or color image to it.
It can also be decoupage. Use multi-layer napkins with suitable patterns. A thin thread glued in several folds will look interesting.
Sofa made of newspaper tubes
For the sofa you will need: • approximately 200 blank tubes, about 30 cm long; • clothespins; • side cutter; • colored cardboard; • ruler.
The procedure for making newspaper tubes: 1. The newspaper is cut into pieces of the same width and length. 2. Each layer is coated with glue. 3. As a basis, you can use: a knitting needle, a sewing needle and a ballpoint pen. A strip of newspaper is wound around it. 4. The base is pulled out and the tube is given time to dry.
The process of assembling a sofa: 1. A base is woven from dry tubes - 15 pieces in the transverse direction and 5 in the longitudinal direction. 2. We form a side in 5 rows. 3. We increase the racks, making about 6 legs. 4. We cut off the blanks. 5. Add skewers to the middle posts for strength. 6. We break at a distance of 5 cm, first the first blanks, then the second - also at a distance of 5 cm, secure the racks - glue a clothespin to them. 7. Trim off the excess length of the legs. 8. We insert the racks in the back area. 9. We weave a few more rows - full, then 2 incomplete (shortened). 10. We form the height with strips of cardboard. 11. We weave 3 more rows and close them. 12. Fix the crossbar with cross-sections. 13. Wrap each leg. 14. We decorate the product at our discretion.
https://youtube.com/watch?v=sCyJMJJ7kW0
https://youtube.com/watch?v=sCyJMJJ7kW0
Dining area made from clothespins
To make this unusual dining corner for dolls, we will need wooden clothespins:
- 12–15 pieces for a chair with a back;
- 50–55 pieces for a sofa;
- 25–27 pieces for a table.
In total you will need about 100 pieces of clothespins.
If there are several chairs, then the number of clothespins should be increased .
Manufacturing stages
Step 1. Divide all the clothespins into halves.
Step 2. Using glue, we assemble the seats for the chairs (glue several halves to each other) and the sofa (its seat is longer than that of the chair). We dry them.
Step 3. We make legs for all the furniture. For chairs and a sofa, it is enough to glue 2 parts of clothespins together. For the table, between the two halves of the clothespin, you need to glue a third one, having first turned it over with the thicker side.
Step 4. we fasten 2 legs of the chair and sofa an additional transverse part of the clothespin (in the middle of the legs).
Step 5. Carefully begin to assemble the backs of the chairs and the surface of the table. Starting from the middle of the chair, in different directions we assemble a “peacock tail” from parts of clothespins. We also glue clothespins in a circle (for the tabletop).
Step 6. Glue the armrest on top of the connected legs . Let's dry it.
Step 7. We fasten all the resulting parts together. For preservation, it is advisable to treat the wood with a special impregnation.
You can make a sofa in the same way . This is what a doll kitchen corner will look like:
Table made of clothespins with
a rectangular tabletop:
Read also the article on how to make a shelf on the balcony with your own hands. You can find out how to make a comfortable and beautiful high chair for feeding your baby yourself here.
Master class on sculpting Monster High from polymer clay:
1. First you need to draw a sketch of the keychain. There are a lot of logos and emblems with the image of the Hi monster on the Internet, so it won’t be difficult for you to print out the finished drawing or redraw the image on a sheet of paper. You choose the size of the sketch yourself, based on the personal wishes of the child and his age. Cut out the drawn or printed design with scissors. Photo 2.
2. White polymer clay must be rolled out either using a pasta machine at its maximum thickness and folding a layer of clay into two layers, or using a rolling pin, but then make sure that the width of the layer is at least 7 mm. Photo 3.
3. Without removing the paper sketch from the surface of the plastic, use a blade to carefully cut out the figure along the contours of the sketch. Photo 4.
4. We put on disposable gloves and smooth out all the bumps and sharp corners. When working with white clay, wet wipes are necessary, since white plastic collects a lot of lint and fine dust, and by wiping the surface of the layer with wipes, you will remove all these specks without problems. Photo 5.
5. We make the decor of the bow - roll out raspberry-colored plastic on the thinnest setting of the pasta machine and carefully wrap it around the bow. In this case, we press the crimson plastic only in the upper part of the bow, carefully fixing it in each hollow. The layer that falls on the front side of the keychain - do not press it! Photo 6.
6. On the back side of the accessory, excess crimson plastic should be cut off with a blade or a stationery knife. Photo 7.
7. Place the paper sketch on the workpiece again and carefully press the outline of the lower edge of the bow with the point of a needle. Remove the paper design and carefully use a blade to cut out the bottom edge of the bow along the pressed contour. Photo 8, 9.
8. Take a modeling elastic stack and trim the bottom edges of the bow with it so that they become rounded and give the bow volume. Photo 10.
9. Use the sharp part of a needle or toothpick to separate the middle of the bow and press small grooves from the middle in the center of each half of the bow. Photo 11.
10. Form the eyes. Roll out black plastic to a minimum thickness and place a paper sketch on its surface. Use the point of a needle to push through the eye sockets. Photo 12.
11. Remove the paper sketch from the layer and use a scalpel to cut out the eye sockets according to the pressed contours, not forgetting about the two small eyelashes on the outer sides of the eyes. Photo 13.
12. Place the eyes on the surface of the blank keychain and use a modeling stack with a soft spatula to round all the sides of the eye sockets. Photo 14.
13. Roll a small ball out of black plastic and press it with your finger to make it flat (its diameter should not exceed 4 mm). Photo 15.
14. Place the flattened ball under the eye sockets and press it down lightly for better adhesion to the bottom layer of clay. Place the keychain blank in the oven for firing. Photo 16.
DIY cardboard bed for a doll
You can use any cardboard box for the product.
You will need:
- A4 paper sheet;
- A simple pencil, scissors;
- Ruler, cardboard.
How to do:
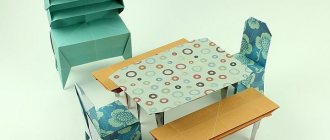
First we make a pattern for the future craft. On a sheet of paper we put the dimensions of the headboard, footboard, bottom of the bed, side slats of the headboard and footboard. This will be our diagram. In the drawing, the dimensions are given in millimeters, so it would be more advisable to initially measure the doll with a centimeter so that the crib fits it. In the presented drawing, the dimensions of the crib are 15x20 cm, these are standard for a baby doll.
We transfer the resulting patterns onto cardboard sheets. Be sure to make straight cuts along the marked lines, as shown in the picture. They will play a connecting role in the design of the future bed, so their width should be equal to the thickness of the cardboard.
An important point in the assembly, here we involve the child. Initially, we connect the bottom with two sides, inserting them into the cuts. The colored circles in the drawing example will help you orient yourself correctly.
Then strengthen the toy structure with both backs.
As a result of assembly, you get such a cute bed for dolls.
For additional stability of the toy, insert pieces of wooden sushi sticks into the sides under the cardboard, having previously glued them.
How to determine the size of furniture
A doll is a small copy of a person, so its furniture is the same as ours, only smaller.
To determine the scale you will need:
- meter;
- doll;
- a sample of the furniture you want to make.
Actions:
- We measure your height and the size of the doll.
- Let's find out the parameters of the existing furniture.
- The resulting numbers, for example, 168 and 14, must be correlated; for this we will find the quotient, 14/168 = 0.083. This will be the similarity coefficient of objects.
- We calculate the dimensions of the furniture for the doll; to do this, we multiply the height and width of the object by the resulting figure from the point above.
For a standard Barbie doll, this coefficient can be taken as 0.09.
Taking this into account, the following parameters will be acceptable (dimensions are presented in centimeters):
- single bed - width from 7.5 and length - from 16;
- double - width from 13, and length - also from 16;
- for a chair, the seat height starts from 4;
- the table must be at least 6.5.
How long does coronavirus stay on surfaces?
At the end of 2022, a new coronavirus began to circulate among people. This virus, called SARS-CoV-2, causes the disease known as COVID-19.
SARS-CoV-2 can be easily transmitted from person to person. It mainly occurs through respiratory droplets, which are produced when someone with the virus talks, coughs or sneezes near you and the droplets land on you.
You can become infected with SARS-CoV2 if you touch your mouth, nose, or eyes after touching a surface or object that has the virus on it. However, this is not believed to be the main way the virus spreads.
Many aspects of SARS-CoV-2 are still ongoing, including how long it can live on various surfaces. To date, two studies have been published on this topic. We discuss their findings below.
The first study was published in the New England Journal of Medicine (NEJM).
For this study, standard amounts of aerosolized virus were applied to different surfaces.
The second study was published in The Lancet. In this study, a droplet containing a given amount of virus was placed on a surface.
In both studies, the surfaces on which the virus was applied were incubated at room temperature. Samples were collected at different time intervals, which were then used to calculate the amount of viable virus.
Remember: Although SARS-CoV-2 can be detected on these surfaces for a period of time, the viability of the virus due to environmental and other conditions is unknown.
Plastic
Many items we use every day are made of plastic. Some examples include, but are not limited to:
- food packaging
- water bottles and milk containers
- credit cards
- remote controls and video game controllers
- light switches
- computer keyboards and mouse
- ATM buttons
- toys
The NEJM article found the virus on plastic for up to 3 days. However, researchers in the Lancet study found that they could detect the virus on plastic for longer—up to 7 days.
Metal
Metal is used in a wide variety of objects that we use every day. Some of the most common metals include stainless steel and copper. Examples:
Stainless steel
- door handles
- refrigerators
- metal handrails
- keys
- cutlery
- pots and pans
- industrial equipment