If you know how to make air loops and knit simple stitches, then it won’t be difficult for you to learn how to create a beautiful, cozy crocheted blanket from squares. Using this technology, you can recreate any pattern, unusual ornament, knit a sweater, scarf or home decoration.
The knitting pattern for such a product is very simple; you just need to take into account the peculiarities of the process. In this article we will look at several popular patterns for crocheting a blanket from squares, which will not take you much time to make. Based on them, you can come up with your own version and amaze guests and acquaintances with your skill.
Recommendations from experienced craftswomen
For beginning needlewomen, advice from more experienced craftswomen is of particular importance. This rule also applies to crocheting various decorative items, small openwork blankets, pillowcases, and toys for children. Today, one of the simplest knitting patterns is making blankets from squares.
To make such a product with your own hands quickly and without unnecessary hassle, you must consider the following recommendations:
- The main rule for knitting a blanket from squares is that all parts of the composition must be the same size (for this you should use a measuring tape or ruler).
- When choosing materials for a future product, consider the structure and thickness of the threads. So, for a blanket with parameters 90 by 140 cm you need about 1500 g of yarn of medium thickness.
- You don’t have to limit yourself to one shade of yarn; combine contrasting colors (white yarn in combination with blue or green looks very impressive, and such a blanket is suitable as a gift for both a boy and a girl).
- Most beginner patterns use medium-sized hooks (size 4 or 5 are best).
- A blanket for a newborn should be made only from natural threads, it can be cotton or wool.
Interesting models of products in patchwork style
You can create masterpieces using the following samples:
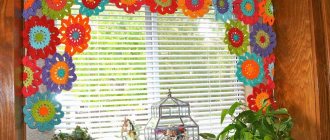
Knitting patchwork in small square format Source Uaomos.news
A beautiful small square bedspread, knitted in patchwork style in different shades, looks impressive in antique interiors, as well as those that are full of bright colors. The squares should intersect each other very harmoniously, both in shades and in size.
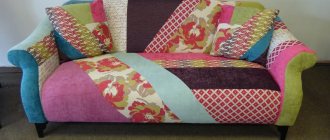
Contrast Patchwork Sofa Cover Source Creationsbycourtney.com
Bright capes with patterns look original on sofas in modern interiors. They complement the room so well that without them the decor seems empty and mediocre. Openwork versions of bedspreads, sewn from fragments of the same shape, will serve as such products.
Blanket knitted in patchwork style for hikes and picnics Source Zen.yandex.ee
A colorful outdoor blanket with many ornaments, shapes and complex patterns. You can take this for a picnic or just relax in nature. Such a product turns out to be quite complex. Can be linked from individual fragments or as a whole.
Cape for upholstered furniture with a patchwork pattern Source Hendmeid.guru
The cape for upholstered furniture is made with a very interesting pattern. Made from diamond-shaped pieces. There are contrasting tones and more delicate shades. The edge can be made in the form of a neat border of two colors. Bells or pompoms around the edges will add some showiness to the product.
Knitted home sweater in patchwork style Source Everything.kz
In the patchwork style, you can make various kinds of clothes, for example, jackets, sweaters, capes. Such wardrobe items can be both festive and homey. It all depends on what pattern will be chosen for the clothes.
What will you need for work?
On the Internet you can find a large number of patterns for knitting bedspreads from squares; anyone, even a novice needlewoman, can complete them. The main thing is to learn how to make air loops and introduce a new thread as you work. To make a blanket measuring 120 by 200 cm, you will need about 1700 g of yarn (we recommend buying several 300 g skeins of different shades).
It is important that all selected colors harmonize well with each other, which is why it is better to opt for cold or warm tones.
Most experts recommend using either wool blend yarn or acrylic, as well as a hook number 4, 5. You will need sharp scissors and several needles for your work. You can't do without an iron. This is the entire list of necessary materials and tools.
Color solutions for knitting patchwork
Patchwork is a fashion trend, so it has completely different shades of the palette. But in technology it is important to be able to combine colors correctly. In order for the product model to receive an entertaining and very original design, it is necessary to understand some color correspondences. The following are most successfully harmonized with each other:
- khaki, olive, yellow, golden, light yellow, yellow, sunny.
- red velvet, burgundy, scarlet, pink, pale pink, peach.
- green, turquoise, sea, light green, pistachio.
- purple, dark blue, blue, light blue, sky.
- blueberry, violet, eggplant, lilac, plum, lilac.
- brown, red, brick, rust, orange, bright peach.
Please note that all shades are used in descending order: from bright to more delicate and slightly saturated.
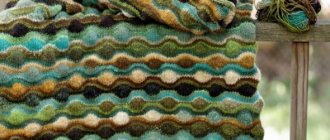
Bedspreads with an interesting pattern in a green-lilac patchwork style Source yandex.ru
See also: Catalog of companies that specialize in interior redevelopment.
Classic knitting pattern for squares
For one square you will need to make 8 chain stitches in a circle and connect the first and last with a special stitch. You need to tie the ring with single crochets. Initially, you should knit 2 air loops to lift the row and 11 sc to fasten the first and last loops.
Below in the photo you can see a finished crocheted square and a diagram for it, with which you can easily bring this masterpiece to life.
It is important to note that all subsequent rows are created using single crochet stitches. The second row involves a composition of 3 VP and 2 C1H (in each column of the previous row). Next, you need to knit 2 VP for the corner of the square and alternate 3 C1H and 2 VP until the part is completely completed.
The photo above shows the method of knitting connecting posts. It is necessary for the correct formation of the classic granny square. This point is as important as attaching a thread of a different color, which we will discuss later.
How to knit a square from colored threads:
1. To form the first square, you need to connect the first and last loops. Before doing this, be sure to attach a thread of a different color, then pull out the loop and make a connecting column.
2. To get a really beautiful square, make sure that the new thread does not show through in the second row (this often happens if you attach it at the beginning of the next row).
3. Move on to the third row - three chain stitches and two connecting stitches with one crochet are inserted into the previous row, then repeat the last step under the chain stitches of the second row and do 4 VP in the corner of the part (lifting VP) and again 2 C1H under the chain loops second row.
4. The next stage involves creating three half-columns, 2 Dcs and 4 VPs. This action is the most important and requires a responsible approach. Continue the operation as shown in the photo below. The fourth row is identical to the third, the only difference is the increase in the number of columns in the corners.
So we got a small square for the future knitted blanket, all that remains is to tie it with single crochets. To do this, make 2 VP for lifting plus a single crochet under the air loops, and in the corner make 5 RLS (or 3 RLS depending on the type of granny square picture chosen). Similarly, we make the remaining squares and proceed to the final stage - connecting the parts into a complete product.
In the video: a simple crochet motif: granny's square.
Openwork jumper
Sizes: 36-38; 42-44; 48-50.
We need to prepare:
- yarn containing 78% cotton; 22% silk, 50g per 80m, sand color – 150; 200; 200g;
- the same yarn of smoky color - 200; 200; 200g;
- the same blue yarn - 200; 200; 250g;
- straight knitting needles No. 6;
- circular knitting needles No. 6.
Connecting knitted motifs
Depending on the size of the product, the method of connecting the parts to each other may also differ. However, it is worth remembering that it is better to sew small elements first, and then large squares (each one needs to be ironed from the inside out with an iron).
When sewing the pieces together, make sure they are facing inward. Connect them with a crochet hook (as shown in the photo) or sew them with a needle and thread.
Next, you need to tie the entire blanket with single crochets, and the corners with 3 sc. Here it is worth explaining the next step, the so-called step row. To make it, you need to insert loops from left to right. When finished, simply hide the tip of the thread and continue the procedure alternately with each part.
As you can see, knitting a blanket from squares is not at all difficult. This is much easier than fiddling with patterns or using knitting needles that are already boring.
Main features of the technology
Even a beginner can cope with the work of making accessories, blankets and other types of textiles using knitting needles and knitting threads. To start knitting, you just need to decide on the geometric shape of the pattern that needs to be made. There are two versions.
- It is planned to knit ornaments and patterns in patchwork style with strict geometric shapes: rhombuses, squares, triangles, polygonal elements. First, these parts are knitted separately and then sewn into one fabric.
- This option involves connecting the parts at the knitting stage. This is usually performed during the completion of the creation of geometric shapes. In this method, squares are created from the corner.
Everyone chooses for themselves the method that is most convenient. For beginners, it is best to use the first option, since the second is more complex. It's easy to get confused.
Openwork knitting pattern in patchwork style Source milcreations.com
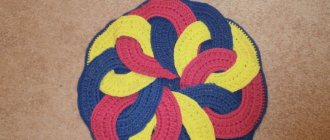
Plaid with a granny square pattern in a circle
The work can be done either in a straight line or in a circle. The latter option looks especially impressive when combining threads of different structures and colors. If you want to bring to life a classic example like a crocheted granny square blanket, then first of all you need to make a certain number of air loops located one after the other. After that, columns are knitted with and without double crochets.
Finally, you need to turn the knitted piece over and repeat the same steps until you get a square motif. When knitting in the round, the first few stitches are closed into a ring and several double crochets are made in a spiral. The result is neat square elements with the same number of rows at the corners of the square.
To connect the resulting squares, it is necessary to accurately measure each element and calculate how much will be enough to make a full-fledged knitted blanket with the intended pattern.
All parts must be carefully ironed and prepared for knitting; for this you can use a needle (then the seam will be completely invisible) or another device. Increasingly, sewn blanks are tied with red thread to make the product laconic. This method should only be used if you have chosen the right color transition for your granny square blanket.
A handmade blanket will bring comfort and well-being to your home and decorate any interior. To make it, you won't need a lot of time and effort. The main thing is to strictly adhere to the chosen scheme. You can also leave comments so that other visitors do not make stupid mistakes when starting work.
How to knit a square motif with a flower (2 videos)
Various schemes and finished works (45 photos)
Patchwork knitting
Patchwork with knitting needles is an original and stylish technique. Usually the fabric is knitted from separate parts on two knitting needles. In practice, each detail is called "motifs". Today, such a canvas is considered economical and practical. Using knitting needles, you can easily create different masterpieces, come up with individual styles, and combine them with other fabrics when sewing wardrobe items.
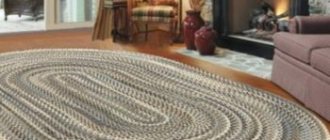
A small fragment of a rug in the patswork style, knitted Source Pinterest
Using knitting needles you can easily knit items such as:
- bags, key chains, wallets, cosmetic bags;
- cardigans, warm sweaters, sweaters with interesting colored patterns;
- bedspreads, capes, warm blankets;
- household items: potholders, napkins, decorations;
- socks, slippers, footwear.
All these details create warmth and comfort in the house, especially if used wisely.
In this style, you can easily create the most unusual bright gift sets: hats, mittens, felt boots, knee socks, scarves. All this can be placed in one kit.
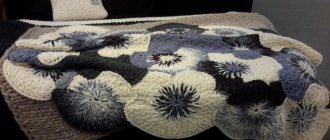
Contrasting star pattern on a patchwork bedspread Source: Pinterest
On a note! Masters recommend mastering technology only starting with simple things. It is advisable that the object you create be of a rectangular geometric shape.
How and where did the art of patchwork originate?
Patchwork is translated from English and means “thing made from scraps”, hence the corresponding name. Unfortunately, the person who guessed to sew masterpieces from the remains of fabric by assembling rags like a mosaic is not known. Because such sewing is very ancient, and known even in the ancient world!
Needlewomen in almost all countries have practiced and practice creating masterpieces in a similar direction; only the sewing technique differs. This creative activity is loved because it will not only help you create a toy or pillow, but can also become a clothing saver.
For example, hide torn places or a stain that cannot be removed.
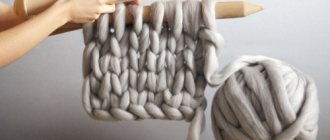
How to knit an airy blanket using just your hands
You can knit an airy blanket without having any knitting needles or a hook on hand. To do this, you will need special yarn that has ready-made loops. To work with it, you will need to manually pull the loops into each other in a given order. But first you should lay out the entire canvas evenly. The first row will be the length of the finished product. Take the outermost loop from the working thread and pull it into the outermost loop of the row, and so on. When they reach the edge, unfold the fabric and also knit in the opposite direction. This DIY blanket will be plush, light and warm.