Comfort in the house is created by any number of things, which include a blanket. It warms you up on cold evenings and allows you to hide or wrap yourself up in nature. A beautiful ornament, a combination of multi-colored threads and a blanket will decorate a sofa, armchair or bed and will delight you on a gray autumn day. A crocheted blanket is an original and unique gift. This article will introduce general recommendations for preparing to start work, offer descriptions and diagrams of the most popular patterns, and talk about existing types.
Recommendations from experienced craftswomen
For beginning needlewomen, advice from more experienced craftswomen is of particular importance. This rule also applies to crocheting various decorative items, small openwork blankets, pillowcases, and toys for children. Today, one of the simplest knitting patterns is making blankets from squares.
To make such a product with your own hands quickly and without unnecessary hassle, you must consider the following recommendations:
- The main rule for knitting a blanket from squares is that all parts of the composition must be the same size (for this you should use a measuring tape or ruler).
- When choosing materials for a future product, consider the structure and thickness of the threads. So, for a blanket with parameters 90 by 140 cm you need about 1500 g of yarn of medium thickness.
- You don’t have to limit yourself to one shade of yarn; combine contrasting colors (white yarn in combination with blue or green looks very impressive, and such a blanket is suitable as a gift for both a boy and a girl).
- Most beginner patterns use medium-sized hooks (size 4 or 5 are best).
- A blanket for a newborn should be made only from natural threads, it can be cotton or wool.
Preparatory stage
A blanket is a product most suitable for the first works of novice craftswomen. Before you begin, you should pay attention to the following factors:
- you should choose a double-sided pattern, since it will be visible on both one side and the other;
- The edges of the finished product must be additionally tied. The simple “crawfish step” technique is suitable for tying. Otherwise, the edges of the blanket will curl unsightly;
- It is more convenient to knit a large blanket on circular knitting needles. All loops will be conveniently located on the fishing line and will not constantly slip off;
- To insulate the product and get rid of the tartness, you should sew fabric of a suitable color on the wrong side.
Before starting work, each craftswoman must:
- Decide on the dimensions of the future product.
- Choose a pattern and knitting method.
- Calculate how much yarn you will need for your work.
- Choose the appropriate size of knitting needles or hook.
Yarn selection
The first step is to select threads for the blanket. Craftswomen advise buying acrylic threads that contain wool or cotton. This material will make a neat, warm cape, it will be soft and pleasant to the body. For children, they are made from a special mixed yarn consisting of acrylic, cotton and bamboo.
The blanket is also crocheted from thick yarn; some combine the remains of skeins of different colors. It is difficult to determine by eye how much material will be needed to create it.
For example, a meter-long crocheted blanket will cost approximately 700 to 1000 g. If its size is larger, then about 2 kg.
Features of the concept
A piece of furniture such as a bedspread is a combination of practicality and attractiveness. It perfectly warms on cold winter evenings, and is also one of the most important decorative details, since it is responsible for comfort, peace and tranquility.
Bedspreads can also be knitted. But things made with crochet look more elegant and have an openwork effect. One of the original bedspread ideas is a blanket knitted in squares.
Classic knitting pattern for squares
For one square you will need to make 8 chain stitches in a circle and connect the first and last with a special stitch. You need to tie the ring with single crochets. Initially, you should knit 2 air loops to lift the row and 11 sc to fasten the first and last loops.
Which makeup table with mirror and lighting should you choose for everyday use?How to choose the right washing machine?
What you need to know about inverters
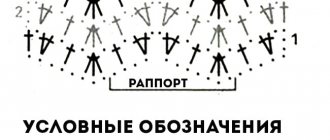
Below in the photo you can see a finished crocheted square and a diagram for it, with which you can easily bring this masterpiece to life.
It is important to note that all subsequent rows are created using single crochet stitches. The second row involves a composition of 3 VP and 2 C1H (in each column of the previous row). Next, you need to knit 2 VP for the corner of the square and alternate 3 C1H and 2 VP until the part is completely completed.
The photo above shows the method of knitting connecting posts. It is necessary for the correct formation of the classic granny square. This point is as important as attaching a thread of a different color, which we will discuss later.
How to knit a square from colored threads:
1. To form the first square, you need to connect the first and last loops. Before doing this, be sure to attach a thread of a different color, then pull out the loop and make a connecting column.
2. To get a really beautiful square, make sure that the new thread does not show through in the second row (this often happens if you attach it at the beginning of the next row).
Related article: Homemade products are the best gifts for loved ones (+42 photos)
3. Move on to the third row - three chain stitches and two connecting stitches with one crochet are inserted into the previous row, then repeat the last step under the chain stitches of the second row and do 4 VP in the corner of the part (lifting VP) and again 2 C1H under the chain loops second row.
4. The next stage involves creating three half-columns, 2 Dcs and 4 VPs. This action is the most important and requires a responsible approach. Continue the operation as shown in the photo below. The fourth row is identical to the third, the only difference is the increase in the number of columns in the corners.
So we got a small square for the future knitted blanket, all that remains is to tie it with single crochets. To do this, make 2 VP for lifting plus a single crochet under the air loops, and in the corner make 5 RLS (or 3 RLS depending on the type of granny square picture chosen). Similarly, we make the remaining squares and proceed to the final stage - connecting the parts into a complete product.
In the video: a simple crochet motif: granny's square.
Disadvantages of knitted blankets
Despite all the undeniable advantages, knitted blankets have a number of disadvantages:
- Making a blanket takes a lot of time and requires a lot of labor.
- Requires special care. The product is not suitable for machine washing, spinning should be gentle, and drying should not be in direct sunlight in a horizontal position.
- Dust accumulates in the fibers, and even dust mites may appear, so the product must be constantly cleaned.
Connecting knitted motifs
Depending on the size of the product, the method of connecting the parts to each other may also differ. However, it is worth remembering that it is better to sew small elements first, and then large squares (each one needs to be ironed from the inside out with an iron).
When sewing the pieces together, make sure they are facing inward. Connect them with a crochet hook (as shown in the photo) or sew them with a needle and thread.
Next, you need to tie the entire blanket with single crochets, and the corners with 3 sc. Here it is worth explaining the next step, the so-called step row. To make it, you need to insert loops from left to right. When finished, simply hide the tip of the thread and continue the procedure alternately with each part.
As you can see, knitting a blanket from squares is not at all difficult. This is much easier than fiddling with patterns or using knitting needles that are already boring.
Combination of style directions
A blanket knitted in squares is distinguished by its versatility. It harmonizes perfectly with a variety of stylistic trends. The main thing is to choose the colors, sizes and patterns wisely at the beginning.
How to knit a bedspread with your own hands if the interior is designed in the style of minimalism or modernism? In this case, you should focus on restrained, natural shades and weak texture.
Boho, country and Provence trends welcome products knitted in the patchwork style. You can use fringe and floral patterns as decoration. Yarn can be cotton, wool, synthetic.Threads can be selected from either synthetic or cotton. It is better not to use wool yarn - it does not go well with an abundance of metal and plastic surfaces.
Classic style is a lover of luxury and grandeur. It is appropriate here to use complex and fancy designs, the use of gold-plated and silver-plated yarn, beads, and beads. As you can see in the photo of the knitted bedspread, products in this style are the main detail of the entire setting.
This design direction, such as loft, is characterized by simple, laconic forms, muted solid colors, wool and cotton threads.
Large knitting of blankets
Knitting blankets in large knitted pattern
Today, large knitted blankets are very popular. For this product, combed tape is often used.
Positive qualities of the product:
- It is possible to knit a blanket without knitting needles, and use only your own hands.
- The blanket made using this technique is soft, light and airy.
- Untreated wool gives the product an extraordinary charm.
Negative qualities for beginners in knitting:
- It is very easy to tear the combed tape during operation.
- Pills appear on untreated wool, there is a possibility of the product losing its shape and the fibers delaminating during the knitting process.
- It is not recommended to clean this blanket by washing.
Blankets made with large knitting are recommended to be cleaned in specialized dry cleaners.
Benefits of knitted blankets
Knitted blankets have a number of undeniable advantages:
- can be used as a bedspread;
- completes the overall design of a bedroom or living room and adds coziness;
- warm, in the cold season you can hide and warm up;
- blankets made from natural wool have healing properties;
- The baby blanket can be used as an envelope for discharge from the maternity hospital.
Crocheting a blanket: patterns and descriptions
There are a huge variety of crocheted blankets, as are the styles of knitting these warming blankets. Even the simplest patterns look interesting on blankets, and are sure to be associated with one’s father’s home, warmth and care.
But you won’t surprise experienced needlewomen with simple patterns; interesting openwork motifs, patchwork-style blankets of incredible complexity and beauty, thin and delicate bedspreads for newborns, which are so interesting to pore over, have been invented for them. In this type of needlework there is a job for every interest and request. But let's start learning from the basics - the simplest patterns and patterns for crocheting blankets.
Model for beginners
In any business you have to start somewhere to learn. And to learn how to crochet a blanket, a master class for beginners is ideal. This blanket, completely made in the “granny square” style, will delight both adults and children. Let's look at how to knit it using step-by-step instructions as an example.
Tools:
- Yarn (in this case bright green, yellow and brown);
- Hook;
- Needle.
Abbreviations for knitting pattern:
- VP - air loop;
- RLS - single crochet;
- Dc - double crochet;
- SS - connecting post.
Work progress with step-by-step photos:
You need to start knitting with the main color of the blanket. We close six loops into a ring, then make three VPs and knit two more Dcs into a ring. We make two VPs (photo 1). After this, we crochet three DCs into a ring and make two VPs. We repeat two more times, resulting in a square being knitted (photo 2).
After this, we make three VPs (this is the first CCH) and in the corner in the arch we will make three CCHs, two VPs and again three CCHs (photo 1). We will knit this into the remaining arches. We will finish the last one with two dc and sl st (remember that the first stitch at the very beginning was knitted in the form of three VPs) (photo 2).
We knit a new row of squares and make three VPs from the arch in which we have the hook. We knit two dcs into it. Next we move on to the corner. And we knit into it everything that we knitted in the previous row: three DCs, two VPs and three DCs (photo 1). In the next arch we simply knit three DCs. And so on in a circle (photo 2).
In the corners you will always need to knit the same thing. And in the arches that are located on the sides of the square, we always simply knit three DCs. The result is a so-called granny square . We knit several rows for the desired size of the blanket. And, completing the granny square, we will change the color of the thread to yellow (photo 1). We knit two rows in yellow. And one more row in green. And then we’ll tie the edges. We will knit seven sc in one arch, and one sc in the other. And so we alternate the binding throughout the blanket (photo 2). Let's finish tying it in green. We will make three VPs and knit one sc in each stitch (photo 3).
Plaid decoration
To decorate this simple, but undoubtedly cute blanket, you can crochet a small decorative element, for example, a butterfly. This is how you can create it:
- We knit five VPs and close them into a ring. Next we knit three VPs and another DC. We make two VPs. And two more CCHs. In total we need to knit this eight times. That is, we will get sixteen CCHs.
- Let's move on to the arch from the VP. SS We knit three VPs and perform two DCs here. We perform three VPs and under the same chain we knit three CCHs. This is how we knit under all the arches from VP.
- Now let's attach the brown yarn. We knit six DCs under the VP chain. We make one VP and here we perform six more CCHs. We skip the bottom three dcs and knit a sc.
- And in the next chain we knit everything the same as we knitted before.
- We tie our butterfly with yellow yarn. We knit one sc in the six underlying stitches and one sc under the VP. We make picot from three VPs. And so we tie the whole butterfly.
- Fold it in half and secure it with a brown VP chain. Now you can sew it to one of the corners of the finished blanket.
Openwork of motifs
Lovers of beautiful designer items will love the openwork plaid made from crocheted motifs, which is fun and interesting to work on. The result will be a very beautiful product that will decorate the sofa in the living room or the bed in the bedroom, while warming and giving warmth on cold evenings. For example, you can knit a blanket from large floral motifs, which then need to be combined into a single whole.
Tools:
- Novita Isoveli yarn (75% wool, 25% polyamide, 65m/50g) - 2300g yellow-green color (334) or Novita Napko yarn (50% cotton, 50% acrylic, 104m/100g) - 1800g blue (013);
- hook No. 5-6.
Dimensions of the finished product: blanket made from Isoveli yarn -140 x 210 cm; blanket made from Napko yarn -110 x 180 cm.
Knitting density: diameter of one motif - 17 cm.
Work progress and diagrams
The blanket consists of separately knitted full and half motifs. For a complete motive, dial a chain of 6 VPs, close it in a ringSS. 1st row - cast on 3 VP lifts, knit 1 DC, 2 VP, *2 DC, 2 VP* into the center of the ring, repeat *-* 4 more times, close the SS row. Next, knit according to pattern 1 from the 2nd to the 5th rows. Cut the thread and fasten. Knit 104 motifs with Isoveli thread or 67 motifs with Napko thread.
For a half motif, cast on a chain of 4 VPs, close it in a SS ring. 1st row - VP, 2 SSN, 2 VP, 2 SSN. Next, knit in straight and reverse rows according to pattern 2 from the 2nd to the 5th rows. Cut the thread and fasten. Knit 8 such motifs with Isoveli thread or 6 motifs with Hanko thread.
Assembly
Lightly steam each motif. Connect the motifs to each other according to diagram 3 (motifs made from Hanko yarn are highlighted in grey). For a blanket made from Isovely yarn, crochet the fringe. To do this, cut the threads 45 cm long, fold them into 3 pieces and tie them at the edges. Make 7 tassels for each motif.
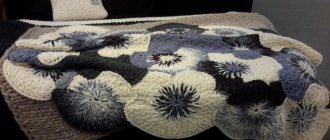
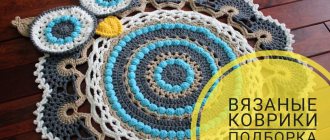
Knitted blanket made of squares
A very fashionable phenomenon that is loved by designers and housewives with taste is a crocheted blanket made from squares in a patchwork style . There are a huge number of crochet patterns in a wide variety of geometric shapes for patchwork, most of which look very interesting in their mishmash of colors and patterns, while others are elegant in one color but made with different complex motifs. Such a playful and uplifting blanket will look good not only in the nursery, but also in the living room, and in a chair on the balcony. In addition, you can give it to friends or relatives - let them also be happy.
Let's look at this blanket made of squares, which is easy to knit according to step-by-step instructions.
Tools:
- yarn - 200 g dark blue SMC BRAVO;
- 100 g each of beige, orange, red, lilac, green, blue, brown, yellow and pistachio yarn SMC BRAVO;
- hook number 3.
The main pattern is a square
Knit a chain of 6 VPs and close it into a ring using 1 SS. Knit a circle. in rows. Every circle. The row begins with 3 VP lifting and ends with 1 SS in the VP lifting of the previous row. Attention! 2 CCH + 2 VP + 2 CCH are designated in the instructions as a group of CCH.
1st circle. row: 3 dc, 2 ch, * 4 dc, 2 ch, repeat from * 2 more times.
2nd circle. row: 3 Dc, in an arch of 2 VPs, tie a group of Dcs, * 4 Dcs, in an arch of 2 VPs, tie a group of Dcs, repeat from * 2 more times.
3rd circle. row: 5 CCH, in an arch of 2 VPs, knit a group of CCHs, * 8 CCHs, in an arch of 2 VPs, knit a group of CCHs, repeat from * 2 more times, 2 CCHs.
4th circle. Row: 7 Dc, in an arch of 2 VPs, tie a group of Dcs, * 12 Dcs, in an arch of 2 VPs, tie a group of Dcs, repeat from * 2 more times, 4 Dcs.
5th circle. Row: 9 Dc, in an arch of 2 VPs, tie a group of Dcs, * 16 Dcs, in an arch of 2 VPs, tie a group of Dcs, repeat from * 2 more times, 6 Dcs.
6th circle. row: 11 CCH, in an arch of 2 VPs, tie a group of CCHs, * 20 CCHs, in an arch of 2 VPs, tie a group of CCHs, repeat from * 2 more times, 8 CCHs.
7th circle. Row: 13 CCH, in an arch of 2 VPs, knit a group of CCHs, * 24 CCHs, in an arch of 2 VPs, knit a group of CCHs, repeat from * 2 more times, 10 CCHs.
8th circle. row: 15 CCH, in an arch of 2 VPs, tie a group of CCHs, * 28 CCHs, in an arch of 2 VPs, tie a group of CCHs, repeat from * 2 more times, 12 CCHs.
9th circle. row: 17 CCH, in an arch of 2 VPs, tie a group of CCHs, * 32 CCHs, in an arch of 2 VPs, tie a group of CCHs, repeat from * 2 more times, 14 CCHs.
10th circle. row: 19 CCH, in an arch of 2 VPs, tie a group of CCHs, * 36 CCHs, in an arch of 2 VPs, tie a group of CCHs, repeat from * 2 more times, 16 CCHs.
11th circle. row: 21 CCH, in an arch of 2 VPs, tie a group of CCHs, * 40 CCHs, in an arch of 2 VPs, knit a group of CCHs, repeat from * 2 more times, 18 CCHs.
12th circle. row: 23 CCH, in an arch of 2 VPs, tie a group of CCHs, * 44 CCHs, in an arch of 2 VPs, tie a group of CCHs, repeat from * 2 more times, 20 CCHs.
Cut and fasten the thread.
Assembling motifs into a plaid
Knit 54 multi-colored squares. Connect the edges of the squares to each other, working across each other. side 1 row sc with dark blue thread. For the blanket, assemble 6 x 9 squares in the desired order.
Make a circle around the perimeter of the blanket. a row of dark blue thread border. Every circle. start the row with 3 VP lifting instead of 1 SSN (or 2 VP lifting instead of 1 SBN) and end with 1 SS in the last VP lifting of the previous row. Attach the thread to the beginning of the corner square and knit as follows.
1st circle. row: ** 2 dc, * 4 ch, skip 2 base loops, 4 dc, repeat from *, before the next corner knit 4 ch, skip 2 base loops, 2 dc, then knit a group of dc into an arch from 2 ch of the previous row, repeat from ** on each side of the blanket.
2nd circle. row: perform 1 SS in the next loop, ** 4 SS, * 4 VP, skip 4 base loops, 4 CS, repeat from *, before the next corner knit 4 VP, skip 4 base loops, tie a group of DCs into an arch of 2 VPs previous row, 4 VP, skip 4 base loops, repeat from **.
3rd circle. row: ** 1 dc, 4 ch, * 4 dc, 4 ch, skip 4 base loops, repeat from *, before the next corner knit 4 ch, skip 2 base loops, tie a group of dc into an arch from 2 ch of the previous row, 4 VP, skip 2 base loops, 3 dc, repeat from *.
4th circle. row: ** 1 RLS, * 4 RLS, 4 RLS, repeat from *, 4 RLS, 2 RLS, 4 RLS in the arch of 2 VPs of the previous row, 2 RLS, 4 RLS, 3 RLS, repeat from **. Cut and fasten the thread.
Blanket made of soft yarn for a newborn
A very responsible job is to crochet a blanket for a newborn. A warm blanket for a baby should be soft, warm and definitely beautiful. The airiness and delicacy of the yarn for a newborn will give the product a special look that will be remembered by young parents for the rest of their lives, because they will remember the baby during discharge from the hospital in this very blanket, created by caring hands. This blanket is suitable for both girls and boys. It can be used both at home and for walks with a stroller.
Tools:
- 325 g of white yarn for knitting children's clothing;
- hook No. 3.5.
Knitting density: one motif = 4.1 x 3.8 cm (fancy pattern in the central part).
Work progress and knitting pattern
The central part is knitted as follows: a chain of 171 loops is cast on and 73 rows are performed in a fantasy pattern in accordance with the diagram and explanations for the accompanying symbols.
Harness
At the end of the 73rd row, without cutting the thread, knit the 6th circle. rows of shells (2 dc (dc), 3 ch (chain loops), 2 dc), making additions in each corner, as shown in the diagram. Replace the last 2 VPs of the 1st and 2nd rounds. rows of 1 hdc (half double crochet), knitted in the 3rd of 3 ch, replacing the 1st dc. Close the 3rd - 6th circle. rows 1 SS (connecting stitch) in the 3rd VP from the beginning, and move forward, knitting additional. SS on the arch of the 1st shell.
After this, knit 4 rounds. a row of arches of 6 loops without increases or decreases, 1 circle. a row of simple shells (1 dc, 5 ch, 1 dc) separated by arches of 5 loops. Make fans of 13 DC in each simple shell. Replace the last 3 VPs of the 7th - 9th circle. rows of 1 dc, knitted on the 1st sc, and the last 4 ch of the 10th circle. row - 1 C2H, close the 11th and 12th circle. rows like the 3rd circle. row, and perform another SS in the 1st arch at the end of the 11th round. row. Complete 1 lap. next to the “crawfish step” pattern, as stated in the explanation, close 1 SS in the 1st RLS and cut the thread.
Knitting methods
One-piece patterns for a blanket
There is an incredibly wide variety of blanket crochet styles and patterns. All solid patterns are conventionally divided into:
- simple;
- openwork;
- mesh;
- shells;
- dense;
- embossed.
Even the simplest of them on blankets look original.
Motif plaid
Patterns with motifs are very popular and loved by needlewomen, regardless of age. This is partly due to the wide variety of attractive and original motifs:
- simple;
- round;
- triangular;
- hexagonal;
- openwork;
- Irish lace;
- floral.
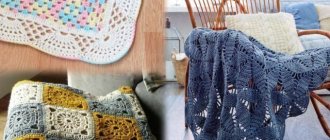
Simple patterns
In magazines you can often see unusual, but uncomplicated new items that combine simplicity and beautiful crochet motifs. A hand-made, large-knit blanket will be an excellent addition to a living room, bedroom or nursery. Various techniques are used to create ornaments, for example, Tunisian crochet.
Wool blanket for winter
Currently, voluminous wool blankets, crocheted or knitted, are very popular, for the production of which the thickest yarn from 100 percent merino is chosen. Such products turn out to be very warm, soft and not at all heavy, despite their impressive dimensions. It is noteworthy that they can serve as an elegant bedspread. As a clear example, we can cite modern photo studios, in which similar accessories are often found that serve as a backdrop for photographed couples in love or even for newborn babies.
Knitting such a blanket is so simple that, if desired, even the most inexperienced needlewoman can cope with the task. You will also be pleased with the speed of the process of making bedspreads from the thickest yarn, because if you get your hands full, you can finish it in one day.
Despite this, the cost of such handmade items is very high, so it is quite possible to turn your favorite hobby into a profitable business, successfully combining business with pleasure.
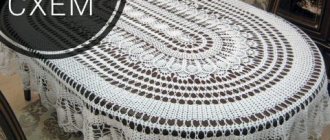
Light bedspreads with a fantasy pattern
What could be better than cool spring and summer evenings, which you can celebrate on the veranda, sitting in a cozy rocking chair, wrapped in a blanket as light as a cloud. Meanwhile, you can make such a bedspread with your own hands using the simplest diagrams and descriptions. Thus, openwork blankets, consisting of many identical elements, crocheted in the likeness of napkins, turn out to be very beautiful. To do this you need:
- Choose a pattern of patterns of the same size.
- Use a contrasting thread, fixing it on the wrong side of the element.
- Steam the knitted pieces.
- Connect them together using air chains.
These elements can depict the same or different patterns, designs and ornaments, the main thing is that they have the same size, otherwise it will be difficult to combine them into a common canvas. For example, this is what colorful summer blankets with a floral pattern look like.
The easiest way to crochet such simple flowers is using this pattern .
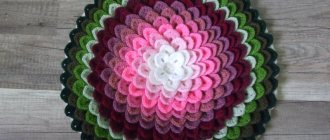
If you want something more original and unusual, then you can try to knit a 3D blanket, which will be decorated with voluminous flowers. The principle of making such bedspreads, which have been a fashion trend for several years now, is not much different from the previous model. Indeed, in this case it is also necessary to crochet many individual elements, which are then joined together.
At the same time, the result will be completely different, since the 3D voluminous knitted blankets look like a real flower meadow and it is really very difficult to take your eyes off such beauty.
These roses are knitted in a spiral. If a novice craftswoman cannot understand how this is done, then such an easy-to-follow scheme .
Alternatively, you can put together a real composition from multi-colored crocheted elements, using the principle of a kind of mosaic. Such blankets look amazing; they will look especially appropriate in an interior decorated in the delicate Provence or Shabby chic style.
If you look closely, it becomes obvious that the master class on making such a summer bedspread involves performing the simplest manipulations, because all the elements in the presented canvas are absolutely the same, only their colors are different.
Minor difficulties may arise when combining multi-colored motifs into a single canvas, but to avoid confusion, it is recommended to lay them out on a horizontal surface according to the scheme and only then begin to combine.
Beach mats
The so-called cruise bedspreads can be used not only at home, but also on the beach, because we are talking about a very practical thing that, in the vast majority of cases, withstands the test of water, sand and sun. There are many options for such bedding, but the most popular of them are striped models that combine all the colors of the sea.
In addition to straight horizontal stripes, you can knit zigzags, which look even more original.
Such products are most often knitted with single crochets or single crochets, although for a beach blanket with a Zigzag pattern it is best to use this simple pattern:
Knitting using it is much faster, and if you add one yarn over to the stitches, you can, in addition to everything else, save threads. In addition, you can knit beach rugs in a spiral, making your own model, which has been a real hit for the third summer in a row.
Thick synthetic yarn is ideal for this model. In addition to a bright watermelon, you can knit any other gifts of summer, be it bright strawberries or juicy kiwis and oranges.
Children's models
Elegant baby blankets have become especially popular lately, because they are used instead of envelopes when a new mother and baby are discharged from the maternity hospital. At the same time, patterns of crocheted blankets for a newborn amaze with their variety and their choice, as a rule, depends not only on the gender of the child, but also on the main purpose of the bedspread.
Thus, for discharge, plain bedspreads of a snow-white color are most often used, which can be openwork if it is warm outside, and also very dense (relevant for winter births). In the latter case, the blanket is supplied with a plain synthetic padding lining, which is hidden under the knitted fabric (it can be purchased separately).
There is nothing difficult in making thick winter blankets-envelopes of small size, since they are knitted with single crochets, which cannot be said about lace blankets. Nevertheless, it is not at all difficult to find a simple and understandable diagram and description of a crocheted children's blanket, according to which you can make both the main fabric and the openwork edge.
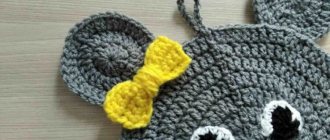
An older baby can be pleased with a blanket with some kind of pattern. An example is a bedspread with a three-dimensional image of a bear, which is equally popular among both boys and girls.
Knitting such an animal on a children's blanket is not at all difficult, and experienced craftswomen can sketch out a detailed diagram for its manufacture in just a few minutes.
As can be seen from the above figure, the body of the bear cub is knitted in the round, like a regular napkin, although all other elements of its body (head, paws, ears, etc.) can be knitted in the same way, combining them into a single composition upon completion of the work process.
Blanket manufacturing technology
The methods of knitting blankets are varied. If in mass production goods are made using a standard knitting machine, then in the case of hand knitting, 4 methods can be used:
- Straight knitting (this is when loops go from edge to other edge, and then move to another row)
- Circular (starts with a chain, then loops are added at the corners)
- Diagonal method (or also called oblique)
- Assembly method (stitching pieces together).
Of course, each technology is individual. Each needlewoman chooses the method that is closest and most familiar to everyone. But I want to dwell a little on assembling a model from old sweaters. This choice interested me. If you have unnecessary sweaters, sweatshirts and even other woolen items, do not rush to throw them away! They could make a good thing!
And the work will be as follows: you need to cut out squares of the same size and diameter from things. Each piece needs to be overlocked on a machine and sewn together (a little like Patchwork). Almost everything is ready! Just so that the blanket has a decent appearance from the wrong side, the craftsmen sew on a fur or fabric lining. The blanket looks very original! Look at the photo for yourself.
In any case, whether you crochet or knit, a blanket or any other thing will look beautiful. Moreover, a knitted item with your own hands gives much more pleasure and comfort. Good luck with your work!
Knitted blanket for the sofa
This blanket is also knitted in squares, very beautiful, and has long aroused great interest among needlewomen.
The leaf pattern uses embossed columns, which look very impressive, the center and diagonal braids are made of convex cones; they can be knitted either from several columns knitted together or with “popcorn”. We tried both options, it turns out good either way.
I answer a question that is sometimes asked: these convex bumps do not interfere with sitting at all)).
For one square (its side is 27 cm) when knitting from Caucasian yarn, it took me about 80 grams.
We have a separate post dedicated to this bedspread, which contains all the diagrams, description, master class and video.
Pros and cons of a hand-knitted bedspread
A hand-knitted blanket has a list of advantages:
- Coziness – a home-made blanket will provide more comfort than a purchased product.
- Uniqueness – a huge assortment of yarns, knitting patterns, colors will ensure the absolute uniqueness of the created bedspread.
- Full correspondence between expectations and reality - the process of creating a blanket is completely controlled. There is no need to choose between the required size and attractive design.
- Budget - making a blanket with your own hands is much cheaper than buying a finished product.
There are many advantages to such a handmade blanket. The disadvantages of such a blanket include only a large waste of time. But this aspect will not seem negative to many. After all, the process of creating things with your own hands greatly involves a person. He puts a piece of his soul into the product.
Do-it-yourself things like this have many advantages. Interesting, beautiful bedspreads are knitted by hand. This is a useful activity that allows you to create the right thing.
Beautiful crochet bedspread
I'll start with this beauty. Look how gorgeous this bedspread is, just fabulously beautiful!
The pattern of the squares from which it is knitted is very interesting, and upon closer inspection you can see that around the flower there is also a pattern with cones, which create a small volume and make the bedspread even more impressive.
This pattern is very convenient to knit: one square per day, and you can join them ready-made.
It is better to take cotton or acrylic yarn; the thread here should be of medium thickness. For example, soso yarn has 240 meters in 50 grams.
Since our product is large, the thread consumption will not be small, about 2 -2.5, or even more: I am immediately writing about this for all the following models, unfortunately, it is not possible to say the exact figure for each.
We select the hook number according to the thickness of the thread independently using the trial method.
Let's try to figure out how to knit.
Square
Unfortunately, the pattern is such that there is no beginning, the symbols are not clear, although the pattern itself is not difficult. These dashes, apparently, should still mean single crochets.
The “loop” in some rows is cones, knit them as you like: three to five stitches, knitted together or with popcorn.
The number of air on the sides of the square is two, and in the corners - 5.
Let's start as follows: knit into a sliding loop (1С1Н, 2 VP, 1С1Н, 2 VP, 1С1Н, 5 VP) - 4 times.
In the second row *1С1Н, 2 VP, 1С1Н, 2 VP, 1С1Н, another 1С1Н in the corner arch, 5VP, then turn the knitting to the other side: 1С1Н in the corner arch and repeat the pattern from * for this side.
In the third row in the corner arch you will need to knit 2C1H on each side and then all the other rows according to the diagram.
Border
You need to knit the border across the product, and this is very good, because you don’t have to make calculations.
We knit according to the pattern of the required length, and then sew the finished blanket around the perimeter.
(What is the difference between dark “loops” and light ones? I’m not sure, anyone has any thoughts, please share.)
Plaid with zig-zag pattern
This pattern for the ornament is one of the simplest. To create an original and beautiful blanket, you should use the instructions:
- Determine the expected width of the blanket.
- Cast on the required number of stitches on the knitting needles.
- Knit the first 5-6 cm with an English elastic band.
- The next two rows of fabric should be garter stitch.
- A zigzag pattern is made with threads of a different color.
- Pattern for the ornament: edge loop, 1 sheet. p., yarn over, 6 l. p., 3 loops knit together, 6 l. n. Repeat until the end of the row, finish 1 l. p., 1 edge loop.
- In the second row, all yarn overs are knitted with purl stitches.
The pattern of the ornament is repeated until the end of the entire blanket, and the last 5-6 cm are knitted with an English elastic band.
Photo instructions on how to knit a blanket
Sources
- https://mirrukodelija.ru/kak-svyazat-pled/
- https://DekorMyHome.ru/sdelaj-sam/elementy-dekora/pled-iz-kvadratov-kryuchkom.html
- https://vsesvoimirykami.ru/kak-svyazat-neobychnye-vyazanye-pledy-i-pokryvala-svoimi-rukami-kryuchkom/
- https://mysekret.ru/vyazanie/kak-svyazat-pled-kryuchkom-svoimi-rukami.html
- https://natrukodel.ru/vyazanie/pled-kryuchkom
- https://comfort-myhouse.ru/rukodelie/pledyi-i-pokryivala/pokryvalo-kryuchkom-15-shem.html/
[collapse]