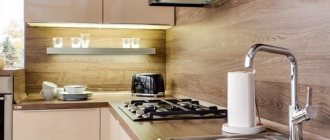
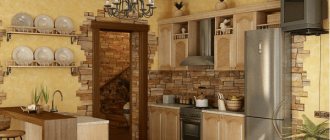
Kitchen renovation - a complex process that includes a number of works. Repair can be considered the following types of work: replacement of facades, replacement of fittings, restoration of facades and body frames, replacement of sinks, adjustment of fixtures and, of course, replacement of kitchen countertops in Moscow. The countertop is more susceptible to physical impact than other parts of the kitchen. Water and moisture have no less impact.
During intensive use, chips, cracks, swellings form on the countertops and, in general, the countertop loses its aesthetic appearance. As a rule, such countertops cannot be restored and in order to restore an attractive appearance to your kitchen, the countertop must be replaced.
Replacing a kitchen countertop
Countertop replacement prices
| Service | Unit | Price |
| Chipboard table top 28-30mm | 1 m2 | 2500 rub. |
| Postforming tabletop 38-40mm | 1 m2 | 4950 rub. |
| Plastic coating | 1m | RUB 1,350 |
| PVC ABS coating | 1m | 1,800 rub. |
| Drank under the sink | 1 PC | 1,600 rub. |
| Tabletop made of artificial stone, acrylic, quartz | 1m2 | 15700 rub. |
Wall mounting methods
The method of fastening will largely depend on the weight of the apron or its individual elements. Here are the different possible options:
Glue
One of the most popular is liquid nails. Liquid nails can be used to glue plastic, fiberboard, lightweight MDF panels, ceramic tiles and mosaics, artificial stone, and mirrors to a flat, grease-free wall. The main thing is accuracy: the glue should not be applied too close to the edge of the panel.
Installation of sheathing
This method is used when there is concern that the panel may fall due to its own gravity. The second reason is that the wall is too uneven. Third, it is much easier to dismantle and replace with another apron using sheathing rather than liquid nails. Both fiberboard and PVC panels can be mounted on the sheathing. But one of the heaviest materials is a thick MDF board.
Using lathing, you can install panels in several ways:
- installation of wooden beams to the wall (using self-tapping screws or glue), fastening panels to the timber with glue;
- fastening the panels to the timber using self-tapping screws or dowels;
- installation of an aluminum profile as a beam, fastening the panels to the profile with self-tapping screws.
Let's take a step-by-step look at how to install an MDF model with your own hands using self-tapping screws.
- Before starting work, the furniture must be moved away and the wall carefully leveled.
- A frame made of timber and metal profiles is mounted according to the level. The thickness of the timber should be no more than 0.5 cm so that the apron fits behind the tabletop.
- The wooden beams are treated with bioprotection.
- The apron is applied to the wall and markings are made for the holes. Holes are drilled on the MDF board - blanks for self-tapping screws.
- Only after this the apron is again applied to the wall and tightened with self-tapping screws. They begin to screw in the screws little by little: first in the corners, then closer to the center.
- For aesthetics, you can install caps on the screws.
Standard fasteners
Suitable for not too heavy panels. Loops are glued onto their reverse side using a suitable method (available in different versions). Markings are made on the wall where the hooks will be screwed under these loops. Using a drill, holes are drilled into which dowels with hooks are inserted. After which the panel is hung.
If hooks are made only along the top edge, then the panels will hang at different levels from the wall - the gap will be larger at the top, and the bottom will fit snugly against the wall. Not very beautiful, but easier to install the apron. Hooks in two rows will make the appearance more harmonious and attractive.
Using furniture glass holders
There are a great variety of them sold: in metal, plastic. To attach the entire apron you will need a large number of holders. In addition, it is worth considering that they will not withstand heavy material (thick glass or MDF) and will be visible after installation. But this is not a problem at all: nice mounts do not attract unnecessary attention. But the mounting method is simple - the holders are fixed on the wall (with glue or screws), and the apron is inserted into the holders.
Metal U-profiles or U-profiles
Such profiles are installed at the top and bottom of the apron, after which the wall panel is simply inserted and pushed forward, like a wardrobe door. In this method, the main thing is a clear calculation, otherwise the light canvas will warp, and the heavy one simply will not fit into the grooves.
Laying tiles and mosaics with cement mortar
The method is considered outdated, but properly installed tiles will last for decades. This method is chosen mainly because the cement itself is cheap compared to glue.
To learn how to install an MDF apron in the kitchen, see the following video.
Causes of wear
It is the kitchen countertops that bear the maximum load during the cooking process. There are many factors that contribute to surface wear, however, the most common reasons are:
- Penetrating moisture. Leads to the swelling of the chipboard tabletop, thereby collapsing and rotting from water, creating fungus and an unpleasant odor in the room.
- Frequent temperature changes in the area of the stove and sink. A tabletop made of chipboard dries out, which leads to distortion and deformation.
- Mechanical damage to the surface (cracks, scratches, chips). In general, the presentable appearance is lost, and cleaning such a surface becomes more difficult.
Even the most careful housewife will not be able to fully avoid the influence of these factors. Therefore, each countertop needs to be updated or replaced as it wears out.
Advice from professionals
- Do not purchase used items. Even if they are in good condition, the service life of such a part will be significantly less. And soon it will need to be replaced.
- Do not cut holes for sinks in expensive countertops yourself. The risk of making a mistake is too great, and it is almost impossible to correct the mistakes made. It's better to leave it to the professionals.
- Be careful when transporting the part. There are frequent cases of damage to the surface or even fracture of the slab during delivery to its destination.
When to change
Replacing a kitchen countertop
can be carried out both due to its wear and tear, and to update the interior of the room.
Updating the countertop is inevitable in the following cases:
- it is necessary to replace a part damaged or deformed during use;
- installation of a higher quality cooking surface is required;
- you need to update the design in accordance with the new kitchen interior;
- it is necessary to add a bright accent;
- a cooking area should be allocated.
Do not forget that using the turnkey countertop replacement
from Stolehof, you will receive an updated, modern, high-quality countertop at a price lower than the cost of a new set.
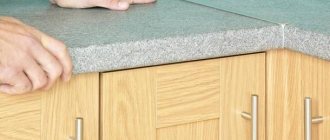
Dimensions
It is more profitable to order a single countertop that combines all the elements of the kitchen set. You will get a comfortable, flat surface without joints into which moisture, crumbs and other debris can get. The only difficulty that needs to be taken into account is transporting the product and bringing it into the kitchen.
The width of the tabletop should slightly overhang the cabinets in front and behind. This will allow you to safely place pipes and communications behind the kitchen unit. The front canopy will protect the ends of the furniture from moisture and debris from entering from above, and will reduce the risk of getting caught on handles and cabinet doors during active use.
The thicker the plate of the product, the stronger it is. But you should take into account the dimensions of the built-in sink or hob, and the height of the gas stove.
When installing it yourself, it’s better to play it safe and take the dimensions with a small margin: it’s easy to trim the part, but it’s unlikely to be possible to increase it.
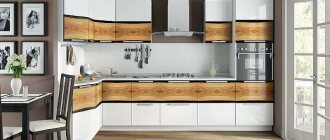
The most popular materials
The most popular materials for replacing countertops are artificial stone and chipboard.
- The first option, replacing an artificial stone countertop in the kitchen with an old one, provides maximum protection against the penetration of dirt, grease and moisture due to its non-porous structure. A distinctive feature of countertops made of artificial stone is the absence of seams, due to which a solid coating is formed during installation. In addition, artificial stone is pleasant to the touch and easy to maintain. To clean the surface from dirt, a sponge and detergent are enough. Also, a tabletop made of this material is completely resistant to chemicals.
- The second option is to change the countertop in the kitchen from laminated chipboard - sheet material coated with plastic. Chipboard is the most cost-effective covering for table tops and is characterized by ease of installation. A set made of this material can have either a straight or angular shape, depending on the layout of the room.
How to secure a plastic apron in the kitchen with dowels: instructions
Installation using the mentioned fasteners should not cause any problems. This installation method is best used on panels that have a pattern on them, as the same adhesive may cause some damage to the image. It is not necessary to move the furniture set during the work. Installation should be carried out according to the following plan:
- Use a drill or hammer drill to make holes in the wall and apron for the dowels. At this stage, a building level will be useful, with which you can make accurate markings.
- Clean the surface from any dust that has formed.
- Place the prepared apron against the wall and secure it with dowels.
- Mask the caps with furniture plugs, the color of which should match the plastic.
An apron installed in this way can be easily dismantled: to do this, you need to unscrew the dowels and carefully remove the product. In addition, dowels (concrete screws) or anchor bolts can be used for fastening.
Stages of work implementation
Replacement of countertop facades
is carried out in several stages:
- Dismantling the old coating. This stage includes disconnecting all household appliances and other fittings - stove, sink, oven, as well as cleaning the surface from sealant.
- The cutting of the new countertop according to the prepared sketch will be done at the factory. The master installer will process the material at home in accordance with the selected form and previously taken measurements.
- Installation of a new surface and subsequent connection of the sink, stove and electrical appliances.
Depending on the size of the surface, replacement may take up to 5 hours of continuous work.
Chipboard countertops are from 1 meter to 2 meters in length, calculated as a minimum of 3 meters. Egger countertops Skif countertops Union countertops Duropal countertops Remember that even the best quality furniture needs updating. By contacting the Stolekhov company, you can be sure of quick and high-quality restoration of the headset at reasonable prices. Contacts Price Delivery Call a technician Installation of a dishwasher
Replacement of kitchen facades
How to Remove a Kitchen Countertop - DIY Removal Steps
Before you begin, clear the area in which you will be working. To prevent dust contamination and ensure easy access to the countertop, remove drawers and items stored on the bottom shelf. To safely remove your old countertop, you first need to disconnect the water lines to the sink and the gas lines to the stove.
How to remove an old tabletop with your own hands? Turn the emergency shut-off valves for each device clockwise to the off position. Use an adjustable wrench to turn the valves. Make sure electrical outlets are covered and turned off. Place a bucket under the pipes to catch any water that drains.
How to glue a plastic kitchen apron with your own hands
The installation process itself is not difficult, but requires care.
At the marking stage, you should take several horizontal measurements, since walls are not always perfectly level.
How to properly glue an apron?
The process consists of several successive stages:
- Surface preparation. If there is wallpaper on the walls, it should be removed. The wall is cleaned of peeling plaster and various contaminants and covered with a primer. It is better to choose an acrylic primer for rooms with high humidity - it contains antibacterial and antifungal additives.
- Applying glue. Liquid nails LIQUID NAILS and any others are applied using a special gun only to a dry, grease-free surface. This should not be done in a continuous layer, but dotted or in a snake pattern.
- Gluing. The surfaces to be glued are pressed tightly against each other and immediately separated to ensure that there is enough glue. After 3-5 minutes, final gluing is carried out, pressing the panel tightly against the wall. The adhesive sets almost instantly, but the greatest adhesive strength is achieved within a day.
VIDEO INSTRUCTION
We glue an MDF apron in the kitchen
This procedure differs little from working with a plastic panel; it also consists of three stages:
- Surface preparation. The wall is cleaned and, if necessary, leveled. Highly absorbent surfaces are treated with a primer.
- Application of liquid nails. The workpiece is tried on in place and cut to the required size. A layer of glue is applied pointwise or in a snake pattern to the MDF panel.
- Gluing. The panel is applied to the wall and pressed lightly, after which it is removed and a technological pause is maintained (3-5 minutes). Then the panel is finally glued. For greater reliability, a heavy apron can be supported in several places with slats; after the glue has completely dried, they are removed.
VIDEO INSTRUCTION
Useful tips
Do not try to glue a plastic panel or MDF apron the first time, as this is not always possible. Place the panel against the wall, then lightly tap it and remove it.
After pausing for a few minutes, you can begin the final gluing. In most cases, it is enough to firmly press the surfaces at the joints once to achieve rapid setting of the adhesive.
Visible parts of the edge of the apron should be additionally refined with MDF corners of a suitable color.
Types of decorative coating for MDF panels
MDF is made by pressing wood chips with an adhesive composition. The resulting slab is subjected to further decorative finishing using various technologies. The result is: laminated, painted, laminated, veneered MDF boards.
Laminated coating is made by treating panels with PVC film or melamine paper. Laminated MDF panels can withstand various adverse influences without damage. They are used in furniture production, including for making kitchen facades.
MDF panels are also painted. And then they make furniture for bathrooms or kitchens. However, painted panels have a significant drawback: such a coating does not withstand temperature and mechanical factors.
Gluing plastic to a panel is called laminating. Such a panel becomes more moisture-resistant, wear-resistant and temperature-resistant. Due to their practicality, such panels are often used to make kitchen splashbacks and other kitchen elements.
By veneering MDF panels, they acquire the appearance of natural wood.
There is another way to decorate MDF panels. This is the application of various drawings and photographs to the surface using photo printing. Such panels are called skinali. Initially they were made of glass. Skinals are very popular and are used to decorate kitchen aprons.
Options for work wall
Plain
MDF aprons are incredibly varied in their color scheme. Single-color options are produced in a wide range and are suitable for both light and black interiors, bright and pastel, matte and glossy. You can choose a panel that exactly matches the kitchen unit, opt for a contrasting solution, or purchase an apron that is just 1-2 shades lighter/darker than the existing furniture. Read our tips on how to choose an apron for a white kitchen at this link.
Colored
A one-color solution is not for you? Pay attention to the colored aprons. Panels with imitation wood, cork, stone, parquet boards, ceramic tiles... The range is limitless
At the same time, there is no point in choosing a panel according to the principle “dark colors show less dirt,” because the MDF surface of any shade can be easily washed with water.
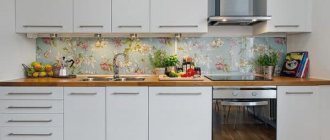
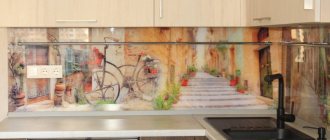
Photo printing or artistic drawing
This option is suitable for connoisseurs of non-standard solutions. A real painting will appear in the kitchen area, a canvas that will become a bright accent. You can choose panels with floral patterns, panoramas of metropolises, still life, picturesque landscapes of mountainous areas, or one of hundreds of thousands of other options. Read how to choose an apron for a white kitchen with a black countertop in this material.
For an interior decorated in red and black shades, a Japanese-style panel, options with imitation animal skins, black and white panels, white panels with large photographs of red berries, etc. would be acceptable.
For a kitchen in soft colors and with floral wallpaper, panels depicting fruits, a spring meadow, and bright butterflies would be appropriate.
Calculation of the width and height of the apron
The width of the apron depends on the size of the kitchen space. With height the situation is somewhat more complicated. This parameter is influenced by the following factors:
- the distance between the lower and upper tier of the headset. The height of this gap is most often no more than 112 cm;
- the presence of a domed independent hood - in this place the apron is laid out at a higher height, and if a skinali is used, the hood itself should be placed at a lower height;
- design features of the upper cabinets - if the facades are equipped with lifting mechanisms, a low apron with dimensions of 45-55 cm looks great.