DIY billiard table
Billiards has a long and very rich history. The game originated around the 15th century in Northern Europe, when it resembled croquet, and the court served as a grass field. The game developed and became very popular, and soon it was decided to move it indoors to be played on a wooden table with a green cloth simulating grass and a border around the edges. At that time, instead of hitting, the balls were pushed, and wooden sticks were called not a cue, as today, but a “mace.”
Today, billiards is entertainment for any age and a great way to unite the family and entertain guests. Making a pool table with your own hands is not easy , many are intimidated by the size, weight and technical nuances when it comes to specific functions. But nothing is impossible; the master classes and photographs presented in this article will certainly help if you want to make your own billiard table.
Where to begin
In order to make a good billiard table with your own hands, you don’t have to draw up the drawings yourself. You can find quite a lot of them on the Internet, from familiar craftsmen, or, in the end, turn to an experienced carpenter for help. He will definitely tell you and show you how to start correctly, how to calculate the stiffeners.
After all, a billiard table should be as strong and heavy as possible so that when playing it does not vibrate or warp when resting on it. Therefore, many people immediately have the first question of how to make a billiard table with their own hands so that it is strong, durable, has the correct geometric parameters and is as functional as possible.
The gaming table is also an element of the interior, so it must be done in the style of the room’s design. It also happens that the room is very small, and it must fit not only a billiard table, but also auxiliary furniture, then it should be designed as a collapsible one.
In general, in accordance with the room and spatial possibilities. Its overall dimensions are exactly the same. The optimal height is 80 cm, length 2 m and width 1 m. But if it turns out to be 0.83 × 190 × 90, then I am sure that you will not feel the difference from the original.
Advantages of a billiard room in a private house
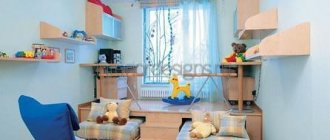
For those who are just going to study, it is better to make the room multifunctional so that the room is not empty.
For game professionals, the interior of a billiard room in a private house is arranged according to a classic model. Advantages:
- reflection of the status of the owner;
- an isolated room where guests are brought if there is no desire to show the secluded corners of the building;
- indicator of family wealth (a good table is very expensive);
- an excellent place for meaningful communication - teaching beginners how to play;
- the opportunity to have fun in bad weather, when a picnic or weekend away has been cancelled;
- the environment itself is visually pleasing, the game is interesting for relaxation, stimulates visual acuity and logical thinking, trains or normalizes the functioning of muscles that are not used in everyday life;
- the game introduces European cultural traditions;
- a good way to decorate an empty room.
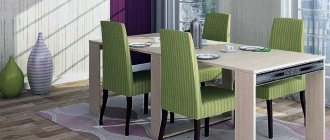
If there is a lack of an isolated room, you can play billiards in the living or dining area, if a transformable dining table is provided for this. The playing surface with green cloth is hidden under a hinged, sliding or removable cover. This is optimal for a small apartment with good sound insulation.
Blackout curtains and well-chosen lighting fixtures above the table will provide even artificial light so as not to distort the calculation of cue strikes on balls.
If there is a lack of isolated room, you can play billiards in the living or dining area
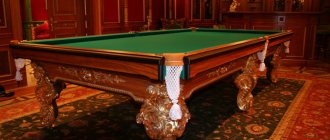
The design of the room is tied to the selected table - materials and style
Most classic tables are made from natural wood
Features of making a billiard table
When making a billiard table yourself, the following tasks are set:
- save money;
- achieve strength and reliability of the structure;
- make a compact table that will optimally fit into the interior of the room.
A professional billiard table is a complex product. To assemble it yourself, you need to have certain knowledge in the field of geometry and drawing. After all, first of all, you need to develop a drawing that will contain all the proportions of the product with maximum accuracy. If you find it difficult to create one yourself, then seek help from a good carpenter. An experienced craftsman will tell you how to correctly perform the calculations so that the structure is as strong as possible.
Billiards lovers dream of having a gaming table at home or in the country.
In order for a supporting structure to have high rigidity, it must have at least three stiffening ribs.
At the next stage, materials are prepared and the table is assembled. Here you will need skills in working with various carpentry tools, as well as the ability to handle wood, rubber and other materials.
Professional pool tables have the same dimensions: the length is 360 centimeters, the width is 186, and the height is 85. In Russian billiards, the dimensions of the playing fields may differ. Pyramid lovers play on tables with a length of 3 to 4 meters and a width of 1.5 to 3. As for the height, the distance from the playing plane to the floor can vary from 79 to 85 centimeters.
In a standard billiard table, the ratio of width to length of the playing field is 1:2. In this case, it is allowed to change the length of the sides by 3–5 centimeters.
The products also differ in the size of the pockets: for a pyramid their width ranges from 72 to 76 millimeters, and for a pool it reaches 88.6 millimeters. In addition, in Russian billiards the pockets have sharp corners, while in American tables they are made with rounded corners.
Pool tables are often covered with green synthetic cloth. The ball moves very easily on such material, with virtually no resistance. In Russian billiards, it is customary to use natural wool as a covering for the playing field.
Another difference between pool and pyramid tables is the material from which the tabletop is made. In Russian billiards it is made from a solid stone slab, and sometimes from concrete or hardwood. “Americans” prefer to use more budget-friendly materials, such as metal and plastic.
You can do the drawing yourself or use the services of a specialist.
Standard dimensions
Contrary to the belief common among those who are completely unfamiliar with the game, the sizes of billiard tables for different types of pool vary significantly. There are even official regulations and standards for athletes that unify them. Therefore, when planning to purchase a billiard table, you must first decide on your preferred type of game.
Length is measured in feet only, not meters. The proportion in which the width is related to it is always 1:2.
For the Russian pyramid
Tables for Russian billiards can vary in length and width. This is a significant advantage - they can be installed in rooms of different sizes. The height is always the same - 82 cm:
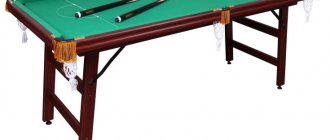
- The most compact option is 6 feet long (about 1.8 m) and always stands on four legs.
- An “intermediate” 8-foot table rests on 4 or 6 legs.
- The length cannot be greater than 12 feet (about 3.5 m). These tables always have 8 legs. Professional athletes play Russian billiards only on them.
- This is the standard option. If desired, you can purchase a model with a length of 7, 9, 10, 11 feet. But such billiard tables are not particularly popular, so you will have to look for them or make them to order.
The weight of the table varies depending on what its base is made of. Models 12 feet long on a slate slab weigh at least a ton (and sometimes 200-300 kg more). If the billiard room is located on the second floor or higher, it is worth considering in advance whether the floor will withstand such a weight. The weight of billiard tables made on the basis of laminated chipboard is significantly lower: it varies between 150–350 kg.
For American
The size of a professional billiard table in the American version must meet the requirements of the American industry federation. And even amateurs who make their own equipment need to be guided by generally accepted standards.
Pool tables come in the following sizes:
- 3.5 x 7 feet (1 m 7 cm x 2 m 14 cm);
- 4x8 feet (1 m 22 cm x 2 m 44 cm);
- 4.5 x 9 ft (1 m 37 cm x 2 m 75 cm).
It is easy to notice that the playing surface is twice as long as it is wide. In this case, an error of 125 thousandths of an inch is allowed. On the metric scale it will be 3.175 mm. The measurement is carried out from the extreme opposing points on the side tires. However, not only the general linear dimensions of the structure are strictly prescribed for the pool.
BCA is also promoting its standard regarding the dimensions of the pockets, as well as their opening. Solutions are calculated only after covering the sides with cloth. Reference points are extreme positions on opposite faces. You need to find the place where the playing surface meets the pocket. Holes at corners can be from 0.1238 m to 0.1302 m.
In the center they are 0.1365-0.1429 m. The minimum angular parameters for entering the holes (from all sides) for the corners will be 1.42 m, and for the center - 1.03 m. The error will reach 10 and 20 mm, respectively round trip. In this case, the vertical angles of the pockets vary from 120 to 150 degrees.
The shelves are measured starting from the middle of the imaginary strip. One end of this strip begins on one side of the mouth, and the other is located on the opposite edge. The extreme side point is the one at which the trajectory of movement towards the middle of the rounded vertical cut of the slab changes.
Other dimensions of the table for American billiards (not for pool):
- corner pockets minimum 0.0413 and maximum 0.0476 m;
- central holes up to 0.0095 m;
- radius of the slab slope – 0.0032-0.0064 m;
- The size of the playing field is 6-9 inches.
For snooker
When it comes to common snooker pool table sizes, they come in either 10 or 12 feet in length. The dimensions of the playing field correlate with these parameters. They are 2840 x 1420 or 3500 x 1750 mm respectively. There are always 8 legs, height – 85–87 cm. For amateurs, there are mini-models of 9, 8, 6 feet, but you need to select balls of the appropriate diameter for them. For example, for 9 feet it is strictly 6.8 cm, for 6 - 6.03 cm.
There are very small, 5-foot snooker tables, but they are not recommended even for amateurs. The difference is too noticeable, so the enjoyment of the game is questionable. In addition, you have to use an unusual shortened cue.
The large size of the snooker table determines its large mass. If a slate slab is used as a base, the weight exceeds a ton. Models made from chipboard weigh little - 180–400 kg.
Drawings and dimensions
It is quite easy to find a drawing of a table whose width is 3.6 m and length - 7.1 m. In this case, the distance between the two pockets at the bottom will be equal to 5.9 m. This design uses fabric and rubber. For Russian billiards, tables of three sizes are most often used:
- small (1.45x2.9 m);
- medium (1.6x3.2 m);
- large (otherwise “full”) – 1.75x3.5 m.
In classic billiards, the height of the table is strictly 0.8-0.82 m. In the “Russian” format, the height of the table will be 76 mm. The opening dimensions of the middle pockets should be 82 mm. In American pool, the playing field can be from 6 to 9 feet. In the first case, the table is equipped with 4 legs, and in the second, 6 supports are required; tables 2.84x1.42 and 3.5x1.75 m are used for playing snooker.
Speaking about individual drawings of billiard tables, it is worth mentioning the following requirements for one of the projects:
- total height (including tabletop) 0.86 m with a distance between the centers of the legs 1.752 m;
- the distance between closer legs is 0.76 m;
- total width – 1.274 m;
- total length – 2.266 m;
- width of the playing field (without sides) – 0.99 m;
- length of the playing field – 1.98 m.
Weight
The difference in weight is no less significant than the difference in dimensions. It is determined primarily by the material of the playing field. Almost everywhere you have to take into account the permissible load on the floors. The thickness of the main plates also matters. In production models it varies from 16 to 45 mm.
At the same time, a difference of a few millimeters immediately adds or removes at least 100 kg. The thicker the layer, the more securely the table is installed. The weight of the table with laminated chipboard is:
- with a playing field size of 6 inches - from 60 to 115 kg;
- 7 inches - from 145 to 190 kg;
- 8 inches – from 170 to 225 kg;
- 9 inches - from 220 to 270 kg;
- 10 inches - from 180 to 320 kg;
- 12 inches - from 210 to 390 kg.
The mass, even taking into account such a spread, is indicated only approximately. It is also determined by the peculiarities of the engineering policy of a particular manufacturer. Tables based on slate slabs with a playing field of 6 inches are practically not used and are not produced.
Weight for other sizes will be:
- 7 - from 320 to 400 kg;
- 8 - 400 kg;
- 9 - from 450 to 600 kg;
- 10 - from 470 to 900 kg;
- 12 - from 900 to 1250 kg.
Materials
In order to make a billiard table with your own hands, you will need high-quality materials. Previously, only high-quality solid wood of noble species was used, for example, oak or beech. Cheaper models used more accessible and easier to process species, such as pine. Moreover, the table was made entirely of it, from the legs to the tabletop. Today, it will be cheaper and much easier to use laminated chipboard with a thickness of at least 18 mm as a tabletop. It could be thicker, it would be even more reliable, but the table would also be much heavier.
List of materials:
- solid wood (slats and decorative strips made from it) for sides;
- Laminated chipboard (table top, supporting structure and legs);
- metal staples for pockets;
- lining and decorative fabric;
- hardware;
- mesh for pockets;
- rubber for impact edge;
- adjustable legs.
The list may not include all materials, so be prepared to purchase something in addition.
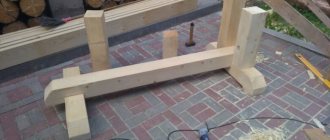
Frame
The base of the table must be assembled from strong and massive boards so that the structure dampens vibrations well
The procedure for making a supporting structure, which will be a lattice of wooden blocks 50x100 millimeters thick, is as follows:
- Using a saw or jigsaw, we cut the bars in accordance with the drawing data.
- Assembling the outline. We fasten the beams to each other with self-tapping screws using a screwdriver. We screw the hardware into the end to make a reliable connection.
- We install transverse and longitudinal bars, and then strengthen the structure with metal corners or small wooden blocks, fixing them with thin screws or wood glue.
Work on a flat surface, such as the floor. This way you can fix all the frame elements in one plane.
How to make your own frame?
First of all, you will need to start making the frame .
To do this, you will need to cut the prepared pieces of wood in accordance with the dimensions indicated on the prepared drawing. Accuracy down to the millimeter is important here: errors can subsequently cause inconsistencies. The tools you need to use for this are a saw or a jigsaw.
Or you can order cutting to the specified sizes at the place where the materials were purchased - this will save time and effort.
First, the outline of the table is assembled.
4 beams are attached to each other with self-tapping screws using a screwdriver. Then the internal bars are installed in the same way. In this way, a so-called grid is created, on which the tabletop will subsequently be installed. It is best to strengthen the structure, and it is recommended to use metal corners or small beams for this. They are fixed with self-tapping screws or special wood glue. Attention !
To achieve fixation of all elements in one plane, without bending, it is best to assemble on the floor. We move on to the stage of marking and installing the tabletop . If, at the time of purchasing a sheet of laminated chipboard or other material, cutting to the established dimensions was not ordered, it is necessary to cut the sheet to the required dimensions. To do this, you need to apply markings using a ready-made drawing, and do not forget to take into account several important factors.
- The diameter of the billiard ball is 60 mm, based on this, the size of the pocket should be slightly larger. Typically, the side pocket has a diameter of 70-72 mm, and the corner pocket - 64-66.
- The distance from the target line of the side pocket to its edge is 0-1 mm; for a corner pocket this value should reach 5-7 mm.
- The pockets can be cut already at the stage when the sides are attached to the tabletop.
Tabletop
When purchasing a sheet of chipboard, inspect it for cracks and check the evenness of the surface.
Let's move on to preparing the playing surface, the work is performed according to the following algorithm:
- According to the drawing, we apply markings to a sheet of laminated chipboard and use a jigsaw to cut out the product.
- Then carefully attach the tabletop to the frame using a screwdriver and self-tapping screws.
- We make holes in it for pockets. We use a jigsaw for this.
- At the final stage of preparing the tabletop, it is covered with cloth. First, we glue the lining fabric onto the plane, and then we stretch the decorative fabric. We fasten the latter using a construction stapler.
You can cut the chipboard sheet directly when purchasing the product. The cost of such a service is low, and using professional equipment, craftsmen will cut the sheet strictly to the required dimensions and with high accuracy.
Boards
The height of the side should be slightly more than half the diameter of the ball
The edge is considered a decorative part of a billiard table and consists of several elements: the main beam and a cloth-covered slats with a rubber bumper strip.
If you plan to use balls with a diameter of 60 millimeters, the height of the side should be approximately 37 millimeters.
- We cut the bars for the sides to the required length and give them the desired profile using a plane.
- We process the product with sandpaper to eliminate unevenness.
- We fix the rubber strip. The glue should be applied evenly, preferably in a dotted manner.
- After attaching the fender strip, we cover the sides with decorative fabric.
- We attach them to the tabletop using self-tapping screws or through bolts. In the latter case, you can easily dismantle the side at the right time and reupholster the table. The walls must be fixed to the tabletop very carefully so that all the pockets are the same.
- We install metal brackets using screws. Place them in leather cases for an aesthetically pleasing look. This will also reduce the force of the ball hitting the bracket.
- Finally, we attach the net to the pockets.
The sides are attached to the tabletop after covering
The width of the pockets can be from 65 to 83 millimeters (depending on the size of the balls). It is advisable to make corner pockets with a slight expansion towards the edges. This will allow the ball to hit the target after bouncing off the inner wall.
Legs
If you want to make legs of an original shape, then it is better to seek help from an experienced carpenter
It remains to equip the product with legs; the order of their manufacture looks like this:
- First, we turn the wooden blocks on a lathe in accordance with the drawing data.
- We screw flanges to the lower ends of the future legs. Fastening is done using four self-tapping screws.
- We weld M12 nuts to the flanges.
- We make heels. The metal used here is thick (10 millimeters), so it must be cut by a specialist using a plasma or laser cutting machine. It is necessary to drill small recesses in the center of the products.
- We screw the M12 bolts into the nuts welded to the flanges.
The stands can be equipped with rubber pads or rollers so that they do not scratch the floor, and the table can be easily moved.
Pockets
An integral element of each pocket should be the metal brackets and nets that are attached to them. The important thing to remember here is the force of the ball hitting the staple and the potential for damage to thin staples. Therefore there are two options:
- Purchase ready-made metal pockets in a specialized store.
- Cast from aluminum in a plaster mold to the required dimensions.
The mesh for the pockets must be strong . You can also purchase it ready-made in a store, or weave it yourself.
Advice . The sheathing will help reduce the impact force on the bracket. It can be made of leather - this way, it will not only further strengthen the staples, but also give the pocket an elegant look.
Rubber for sides
For those who do not want to save on the quality of manufacturing a billiard table, it is worth purchasing original side rubber - it is very expensive, but during the game it softens blows well and has a long service life.
Not only the impact force, but also the rebound force of the ball, which is important in professional billiards, depends on the quality of the chosen rubber. Therefore, the carpenter can choose a cheaper option, but subsequently he will have to get used to the rebound force.
Advice . Many of those who made the table themselves recommended replacing such expensive rubber with gas hoses.
Cloth
The tabletop coating must be wear-resistant , since impacts from balls can gradually wear out ordinary fabric, or simply tear it with a strong impact.
When choosing cloth, you don’t need to skimp, as low-quality material often needs to be replaced. It is better to take care of its quality in advance and take into account several important criteria:
- nylon in the fabric composition should not exceed 55%, the rest of the material should be wool;
- fabric density should not be less than 300 g/m
- For Russian billiards, natural wool is usually used as cloth.
If the manufacturer does not want to bother, you can go to a specialty store and purchase a special cloth for the billiard table. It will cost more than the above fabrics, but the owner of the table will be confident in its strength and durability.
Decorative part
So that repairing a billiard table with your own hands does not take you by surprise at the time of the game, all actions must be carried out as efficiently and conscientiously as possible, because you are doing it to yourself.
The edge of a gaming table is a decorative part and, as a rule, consists of many elements:
- sides;
- external decorative strip;
- a visible decorative strip with a glued rubber bumper and covered with green fabric;
- At the bottom there are lining strips made of the same laminated chipboard to increase the rigidity of the entire structure during impacts.
If you are making a billiard table with your own hands, the photos presented on the site will help you in difficult times. Because they depict all the most important moments with the necessary details.
Before installing the edges in the tabletop, you need to make slots for the pockets using a jigsaw. As a rule, their width is 90 mm with a ball size of 60.3 mm. Corner pockets are made with a slight expansion towards the edges. This will allow the ball to hit it 100% when it hits the inner walls. Then you need to glue the lining fabric onto the playing field, while the decorative fabric should be stretched and secured with staples to the tabletop.
When the work with the lid is completed, you should move on to covering the sides and processing the decorative strips. The board, as is known from the article, consists of fender rubber, a decorative strip and a profile strip onto which this same rubber is glued. This rubber is one of the most expensive materials.
To achieve 100% compliance with professional billiards, you must purchase the original one. But since it is very expensive, you can use a belt from a tractor. If you cut it in half lengthwise, it will be enough for the entire perimeter. It sticks naturally with high-quality glue, for example, moment. Before covering the resulting structure must be treated with sandpaper. The fabric on the billiard table is constantly exposed to mechanical stress. Therefore, you fasten the sides using self-tapping screws or through bolts. Then re-upholstering the billiard table yourself, if necessary, will not be difficult.
After attaching the sides, you can begin installing metal brackets and pockets. The staples are generally agreed to look nicer when wrapped in leather. Plus, this will soften the impact of the balls on the staples themselves. At the same stage, the mesh for the pockets is also attached, which you can also weave yourself, or you can buy something similar in a store. There is no point in special strength here, the main thing is that the balls do not fall on the floor.
If you are making a billiard table with your own hands, the video will become an integral assistant, because the article outlines only general principles.
Additional equipment and accessories
Just making a pool table is not enough. It is necessary to acquire additional equipment. Balls are selected according to the type of game. In Russian billiards, 15 white numbered balls are used, and in pool there are the same number, but without numbering. The diameter of the ball is selected to match the length of the table.
To play billiards at a professional level, each player needs 2 cues. In a home game, 1 cue is enough. When you plan to play in only one room, you need to choose an inexpensive one-piece type. For constant travel, composite cues are chosen. To be able to place all the balls, triangles are used, and in each type of billiards they have a special appearance.
We should also not forget about:
- grids;
- local table lighting;
- kievnitsa and a shelf on it;
- couplings;
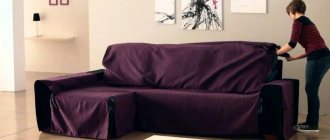
- bedspreads;
- brushes.
Rubber for sides
For those who do not want to save on the quality of manufacturing a billiard table, it is worth purchasing original side rubber - it is very expensive, but during the game it softens blows well and has a long service life.
Not only the impact force, but also the rebound force of the ball, which is important in professional billiards, depends on the quality of the chosen rubber. Therefore, the carpenter can choose a cheaper option, but subsequently he will have to get used to the rebound force.
Advice. Many of those who made the table themselves recommended replacing such expensive rubber with gas hoses.
Having dealt with the theory, let's start practicing
At the first stage, we cut out the laminated chipboard; this can be done in the same organization where it was purchased. This service is not that expensive, so you can use it. Moreover, with professional equipment you are guaranteed 100% compliance with geometry.
Next, making a billiard table with your own hands proceeds to the stage of assembling the entire structure. As a rule, one standard sheet of chipboard is just enough for the covering and supporting structure with sidewalls. In this case, the tabletop can have dimensions of 2.18 × 1.18 m, and the elements of the supporting structure from the remaining part are exactly 13.5 cm.
Many at this stage ask the questions “how to make a support structure to make a strong billiard table, how to properly fasten all the elements so that the structure does not play?” But the answer is quite simple.
The main thing is that the supporting structure has at least 3 stiffening ribs, i.e. it can be made in the form of a lattice, and all elements should be fastened together with ties with the ends glued. Then it is imperative to strengthen the structure with small metal corners and wooden blocks. Not visible from below.
For legs it is necessary to use reliable and thick elements made of solid wood. These can be bars with a thickness of at least 100 × 100 cm in my opinion. They can be carved or sheathed with the same chipboard with subsequent finishing of the edges.
Types of construction
The design of billiard tables can be of several types: classic, box-shaped and drawer.
Classical
The main body of a classic product most often consists of one or two frames, with the supporting elements having the shape of a square and secured in the corners of the frame with a wedge. Maximum stability and static stability of the table is also achieved due to special bosses installed in the corners of the frame in specially cut holes.
Many classic designs, in addition to wooden sheathing, have an additional metal frame. It guarantees higher strength and stability of the entire product.
Box-shaped
Box-shaped models are most often intended for installation in public places: bars, cafes, casinos. As a rule, they are equipped with special coin or token mechanisms that allow them to charge a certain fee for playing.
Their key features include an integrated internal system for collecting game balls and a special built-in counter that helps control the number of games.
Some models with a box design do not have a token mechanism. In this case, instead of baskets for collecting balls, special boxes are installed, located in the underframe of the product itself.
Tsargovaya
The main feature of drawer products is the mandatory presence of horizontal connecting strips in their design, which guarantee additional strength and stability of the entire gaming system.
As a rule, drawers, or strips, are placed under the frame, while the jumpers installed between them and the main body can be either adjustable or fixed.
How to assemble?
The tabletop slab is attached to the frame .
To do this, you can use silicone adhesive sealant. It is best to apply this glue evenly or even pointwise, and place the tabletop on it with 4 hands so that the glue does not smear. To secure it, when the sealant has dried, you can secure the slab from below with short self-tapping screws.
After this you can make the sides . We cut the wooden blanks, but we must not forget that leather pads will be glued to the ends. Therefore, if they were not taken into account in the drawing, you need to reduce the width of each side by the thickness of the existing overlay.
Rubber is glued to wood using universal construction adhesive; the main thing is to apply the substance to both surfaces to be glued and press as hard as possible. After the glue has dried, you need to cut the rubber in accordance with the drawing - for this you can use a simple sharp knife dipped in soapy water. We are not fixing the edges on the tabletop yet; it is worth moving on to this point after stretching the cloth.
Then you can start making the legs for the table . We cut the wood into bars of the required size. There are many design options, for example:
- make the bars a little thicker than indicated in the drawing and apply threads;
- processed on a lathe;
- frame it on both sides with trapezoidal pieces of laminated chipboard (if there are scraps left from the board), etc.
At the very bottom, rubber pads can be installed on the legs to prevent the wood from scratching the floor. If you want to move the table, you can use rubber wheels with brakes instead. To securely fasten the legs to the frame, use M6 bolts .
We move on to the stage of covering with cloth, which should cover both the table top and the sides.
The fabric is attached to the bottom of the tabletop with staples. Each side should be tightly fitted, with maximum tension along the entire length . For this:
- Place the border on the wrong side of the fabric.
- In the middle of the block we stretch the cloth and fix it on top with a stapler.
- In the same way we perform fixation on the right, then on the left.
- We move from the middle to the edge of the bead, gradually stretching the felt completely.
The remaining fabric is trimmed or carefully fixed. The sides are secured using self-tapping screws or through bolts.
Then we install metal brackets on the pockets, having previously covered them with leather. The final stage is to install the nets on the pocket brackets.
What to consider when applying
When thinking about the interior design of a billiard room, answer a few questions for yourself:
- How many people will be relaxing in this room at the same time?
- Is it necessary to provide space in the room for those vacationers who will not take part in the game?
- Will the billiard room combine other functions (for example, a bar)?
Do not forget that the billiard room is one of the living rooms, intended primarily for relaxation. You should not develop a design for this room that stands out sharply from the general background of the house. The design of the billiard room should be as close as possible to the other living rooms of the country house. This is necessary to create a complete interior.
As a rule, not only players, but also spectators come to the billiard room to enjoy the game and drinks on weekends and holidays, socialize and have a good time. Therefore, it would be a good idea to install a bar and a comfortable sofa in this room. An excellent option for a billiard room would be a bar counter. The height of the chairs should be sufficient so that vacationers can easily watch the game.
Assembly
Having described the previous stages in detail, we must pay attention to this point. The frame must be perfectly level. The accuracy of installation should be carefully checked by level. Installation in an inverted position helps to simplify the work. The joints of the slabs are covered with wax or putty, after which everything is leveled again.
Tabletop
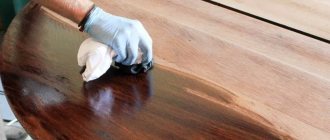
They start making a billiard table with their own hands from the table top. The slab will be processed according to the drawing for you at a hardware store if you are not ready to take on this part of the process yourself. Otherwise, use a jigsaw and a guide bar to bring it to the required dimensions.
For those who purchased a non-laminated board, you will need to level its surface using polymer putty and sandpaper. After drying, it is covered with another layer of varnish.
To prevent the tabletop from deforming, it will need a backing. Cut out the underframe from 20mm pine planks or OSB boards. Four are made along the length of your table, and the same number for the width.
Then the planks are glued in pairs with a shift. Regular PVA is suitable for this. For better fixation, parts are clamped with clamps.
The frame is assembled from the blanks, additionally fastening the parts with self-tapping screws. Holes for pockets are cut out in it and then screwed to the tabletop with bolts.
Finishing
The cloth should be thoroughly shaken and rid of threads and debris. Then the cloth is laid face up and secured around the perimeter with special staples. You need to focus on the standard mounting holes. The fabric should be stretched from the middle to the corner. There should be no folds or wrinkles, but excessive tension is not necessary.
The sides are installed only after the cloth has been stretched. First, they bait the board and see if it turns out right. When the goal is achieved, you can attach pockets and glasses. This procedure is sequentially repeated for each side. The whole thing is completed by installing decorative trim.
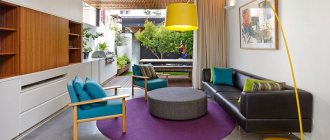
The main subtleties of arrangement
Dividing into zones is a characteristic technique for arranging a billiard room; Usually a play area, viewing area and resting place are provided. If the central part belongs to the game, then a cue box and racks for balls are placed around the perimeter. If the room combines the functions of a playroom and a relaxation room, an area for a home theater is provided and a music center is installed. The original part will be a slot machine.
An important part of the playground is areas for recreation and spectators. To zone the space, floor coverings of different colors and textures, wooden partitions, and lighting are used.
A special atmosphere here will be created by paintings, stylish furniture and a bar counter. From furniture choose armchairs, sofas, coffee tables. The bar counter in the billiard room is part of the viewing area, from which those present can watch the game without fear of disturbing the players. It is made high enough for a good view of the playing field.
Proper lighting is important for the game. Regardless of the number of windows, laconic lamps are hung above the table according to the following principle:
- Number of lamps. Depends on the size of the table. To ensure uniform lighting, a 12-foot table requires six lamps; a 7-foot table requires three.
- Height. Lampshades are placed at a distance of at least 0.8-1 m from the cloth, at eye level. This way, the light does not disturb the players, and the playing field remains brightly and evenly illuminated.
In the billiard room, additional lighting is provided with the help of floor lamps, chandeliers, and spotlights that are in harmony with the style of the room. Autonomous switches in each zone are an indispensable condition for a comfortable stay, and 40-50 square meters is not a lot of extra space.
Test of strength or moment of truth
A properly designed and conscientiously assembled billiard table should not sag under load, vibrate or resonate when heavy balls fall on the surface.
The table should be leveled; for this, the legs must be equipped with this ability. You can also make them yourself; for this, durable wheels on a bracket are purchased in the store. As a rule, they have a pin that must be screwed into a nut or cage. It can be made from a piece of metal bent into a profile and a welded nut.
Properly selected rubber does not allow the ball to bounce far from the board and the board does not deteriorate.
Pockets
As for the pockets, you can make them gradually yourself, or you can go to the store and buy ready-made ones.
- In the first case, you must find a mesh that will suit your strength. Next, you need to secure it to the sides and table. Depending on the design, an additional frame may be required.
- In the case of the ready-made option, you will have a high-quality hand-woven mesh and a metal frame for fastening, which is very convenient, because it will help you avoid doing the independent repair of billiard tables if the pocket is damaged.
Photo
A billiard table may well become the central piece of furniture:
Design
The billiard room (if a separate room is allocated for it) is designed based on the following criteria:
- Dimensions, weight of the table.
- Soundproofing. They try to place the playroom away from the bedrooms and children's rooms, since the sounds of impacts and collisions of balls will interfere with the rest of the household. Otherwise, you will have to think about increasing sound insulation.
- When designing, it is necessary to take into account how the large parts of the billiard table will be installed - the frame and the plate (the basis of the playing field). An obstacle could be, for example, a spiral staircase.
- TU (technical conditions) for the operation of billiard tables. Ventilation may be required to maintain constant temperature and humidity.
Tools
To ensure that in the process of creating such complex furniture there is no downtime searching for one or another tool, the following items should be prepared in advance:
- screwdrivers;
- hammer;
- pliers;
- spanners;
- drill;
- screwdriver;
- wood saw;
- plane;
- jigsaw;
- construction stapler;
- Bulgarian.
To save your energy and time spent on creating a table, it is best to take an electric tool (jigsaw, saw, plane).
Recommendations for placement
When installing a finished pool table indoors, you need to consider the following points:
- the floor in the room must be as strong as possible in order to withstand the weight of the product itself and the possible fall of the ball;
- the table must be located at a distance of at least 1.8 meters from the wall;
- a carpet should be laid around;
- lighting fixtures must be installed evenly above the playing field at a height of 80-90 centimeters.
Making a billiard table with your own hands is not an easy task. This work requires certain skills and abilities, and also takes a lot of time. But in the end, you get the opportunity to have a great time playing billiards in the company of friends or colleagues.