In a previous article, we showed how to make paper wicker by turning piles of accumulated newspapers and other waste paper into raw materials for creating spectacular wicker masterpieces.
And today you will learn how to weave from newspaper tubes. We will talk about weaving patterns of different patterns and types of bends. You will learn how to start and finish work on your product correctly.
Since the stages of creating crafts of any level of complexity are the same, you will have to learn how to weave the base, make the transition to the walls, weave them in various patterns and perform a neat fold. Now let's talk about everything in order.
Round bottom
This version of the bottom is used in various crafts from candy bowls to baskets. Let's look at different ways to weave it.
Option #1
We recommend that beginners get acquainted with paper wicker weaving by watching a useful video in which Olga Lagoda explains how to start weaving a round bottom. You will also learn how to calculate the number of racks for your first product.
Option No. 2
Weaving the bottom based on a cross made of 8 tubes. Take 4 tubes, stick 4 more in the middle at right angles. The result is a cross-shaped base for weaving. To work, you will need additional tubes - working ones. Lubricate the tip of one of them with glue and insert it into the second. Bend the resulting elongated tube in half.
Hug her 4 top bases. Its ends form two working tubes at once. This method of weaving is called “rope in two tubes.”
You can start braiding the base. Place the upper working pipe behind the 4 side bases, and run the lower one over them. To avoid confusion, look at the step-by-step photos.
In this way, braid the remaining warps, making a full circle.
Braid the second circle according to the same pattern, but insert working tubes for every 2 base tubes.
Make three full circles of the bottom.
Continue weaving with a rope, braiding each tube of the base. Weave the bottom until the distance between the base posts reaches 2 cm. Now the round bottom is ready.
If its size is not enough to realize your idea, you need to add additional racks
. If this is neglected, the weaving will become too loose, untidy and will not hold its shape well.
Additional stands are needed when the distance between the base tubes exceeds 2 cm
. Near each base, open a wider hole with an awl. Insert an additional tube into the hole with the sharp end, having previously lubricated it with glue.
For these purposes, it is better to take polymer glue, for example, Titan, Master or Dragon. Regular PVA will soak the paper and you will have to wait a long time for it to dry before continuing to work. Look at the photo to see what the process of adding additional racks looks like.
Having finished this work, braid a couple more rows of double racks with rope. And only after that they can be pulled apart one at a time and continued, braiding each separately. Thus weave the bottom to the desired size.
Finishing the weaving is very simple: hide the ends of the working tubes in the braid, cut off the protruding ends and glue them.
Option #3
This method also requires 8 tubes. Intertwine them to form a tight cross as shown in the photos.
Take the working tube, bend it in half and wrap it around the four base tubes.
Next, weave with a rope you already know, covering four tubes of the base.
In the second row you need to braid 2 tubes. Thus, you need to complete 2-3 rows.
When the distance between the pairs of posts reaches the cherished 2 cm, they need to be carefully moved apart and continued to be braided one at a time.
Carry out weaving until you obtain the bottom of the desired diameter, do not forget to introduce additional posts if necessary.
Craft ideas
Using homemade paper vine, you can make a lot of original products, from children's themed crafts to various souvenirs and household items.
It’s easy to use twigs to form a house and a fence, a frame for a mirror or a photograph, or a wall panel.
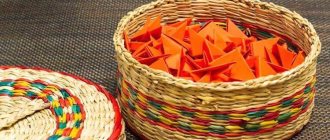
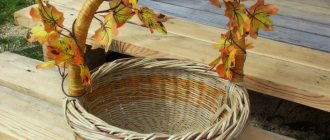
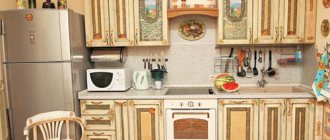
Convenient boxes and baskets for storing various small items, created by yourself, will effectively complement your home interior.
It’s easy to weave an unusual vase, flowerpot, decorative tray or plate from a painted rod.
They are often used to make decorative baskets, various containers, and also weave balls, mushrooms, doll furniture, hearts, flowers and New Year’s crafts.
Using a creative approach, it is easy to make many interesting products from old newspapers.
Oval bottom
If you decide to make a product with an oval bottom, in this case everything is even simpler.
First of all, lay out the required number of racks parallel to each other at a distance of about 2 cm. Take 2 working tubes and braid the racks with a rope.
Now you will need another working tube. Fold it in half and braid it around the first row of braid. In this case, the first two working tubes (or rather their ends) play the role of side posts.
Next, follow the step-by-step photo diagram of weaving an oval bottom.
Want more visual examples? A detailed video is at your service.
Edge decoration
The appearance of the craft largely depends on how the top edge looks.
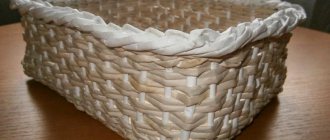
First of all, you should remove the ends of the working tubes, carefully tucking them inside the intertwined tubes. It is convenient to use a crochet hook, knitting needle or skewers for this. The part is pressed tightly, the excess is cut off. You can also use glue for a strong fixation.
In order to hide the guide straws, it is easy to bend them too and hide them inside the braid. Or you can make an additional braided row along the top edge, intertwining vertical guides with each other. The tubes are bent one by one and pulled to the right, intertwining the two. They bend it and hide it down on the third twig. The tip is cut off and glued if necessary.
Transition from the bottom to the walls. Raising the racks
Once the bottom is done, sound logic dictates that somehow you need to move from it to the walls to continue working. We'll look at several ways to raise racks to create beautiful pieces.
Smooth or imperceptible rise
The easiest way for a beginner is to simply lift the posts up about 30 degrees with your hands and continue to braid them with rope. After the first circle, the racks need to be raised another 30 degrees and continue to weave with a rope.
By the third, or maximum fourth, row you need to completely align them and continue braiding. This will create a smooth rise.
This method is used when it is necessary to achieve a smooth transition of the bottom into the walls of the product.
In the finished product, such a smooth rise of the racks will look like this: the transition is not sharp, the bottom gradually turns into walls:
Simple vertical lifting. Establishing a stand for the next
To master this technology, take an additional tube, preferably in a contrasting color, so as not to confuse it further, and place it on any rack; we will henceforth call it the first one. This manipulation will allow you to “reserve” a place for the last raised rack.
So, bend the first post, bend it through the additional tube and bring it up through the next one.
Bring the second rack up through the third in the same way.
Repeat these steps around the entire perimeter of the bottom. When you reach the extra tube, take it out and insert the last post in that place.
All the racks are already up. Before weaving the walls, pull each of them up a little.
A clear and sharp transition from the bottom to the walls will be visible in the finished product:
Using a string of three tubes
If you are new to newspaper crafting, this method may seem overwhelming to you. Therefore, we suggest you start your training by watching a clear video master class from Lada Ligai.
The transition made using this technique (a rope with three tubes) will be neat and smooth:
Fungus for the garden
To decorate the garden with decorative wicker fungus you need to prepare:
- newspaper tubes;
- glue;
- scissors;
- deep bowl.
How to do:
- We take 8 tubes as a basis. For a stronger base, you can insert wire inside. The base is like a square that needs to be braided.
- To give the base a convex shape, place the base over a bowl and braid until a mushroom cap is formed.
- To create a leg, bend the tubes as in the photo and continue braiding. In the middle of the leg you need to make a small bulge and braid it to the end.
Weaving walls: simple types and weaving patterns
Work on the base and transition to the vertical is completed. The time has come to turn the blank into a decorative product. This means that we will tell you about the types of weaving walls from newspaper tubes.
Straight rope
This is what products made using this technique look like. A clear, neat pattern adds elegance to even such banal things as a simple basket or a cute candy bowl.
To weave using this method, you will need two working tubes (one comes from one stand, the second working tube from the other). Take the working tube that is closest to you (the one to the left) and place it behind the first free post on top of the second tube. Do not forget to look at the illustration picture so as not to get confused in the weave.
This weaving method is suitable for strengthening the transition between the bottom and walls of the product. They can be used to weave individual elements into openwork patterns. However, you can safely complete the entire craft using this technique.
The peculiarity of straight rope is that the working tubes are intertwined with each other, which gives additional strength and density to the knitted fabric.
Do you have any questions? We are sure that you will find all the answers to them after watching the video lesson from Lagidna Maisternya.
Reverse rope
The essence of this method is similar to the previous one. But with this weaving method, the first working tube is inserted from below under the second
, and then behind the counter.
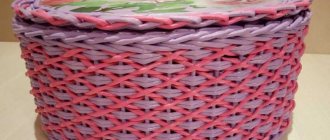
Craftswomen alternate rows woven with straight and reverse ropes. The resulting pattern is called “herringbone” or “braids”. Two-color ropes look especially interesting.
The photo shows a decorative vase made using this technique:
By tradition, we offer you a video of MK to illustrate the above. From it you will learn the secrets of weaving from multi-colored newspaper tubes for beginners and more.
Simple chintz weave
To get started, check out examples of work done using this technique.
Do you recognize Grandma's old wicker basket in this pattern? Impressive, isn't it? With a little perseverance, you can create these paper masterpieces with your own hands and proudly show them to your admiring friends.
The essence of the method
: Glue a working tube behind the counter. Go around the neighboring posts one by one. The working tube should alternately pass in front of one rack and behind the next. Look at the illustration and repeat.
To ensure everything works out right the first time, prepare dry
racks and
moisten
the working tubes in advance. Another key to success is an unmatched number of racks.
If you did not take this point into account in advance and you have an even number of them, there is a way out: you can weave chintz with two tubes to match. How to do this, watch the video tutorial, which will teach you the basics of calico weaving.
Chintz before two for one
This pattern looks more complex and voluminous compared to regular chintz.
In the finished product this type of weaving looks like this:
If the work is carried out with three tubes
, then the number of racks must be
a multiple of three
.
Take the rightmost working tube, pass the two posts in front and bring it behind the third. Then also bring the second working one behind the third rack, passing two in front. Repeat these steps until you finish weaving.
If you braid with one tube
, then for the pattern to work out, the number of racks must be a multiple of
three PLUS or MINUS 1
. For example, you might have 20 or 22 racks. 21 is a multiple of 3, and 21-1=20. In the case of 22 racks, the pattern will also work, since: 21 + 1 = 22, but the slope will be in the other direction.
You can watch the execution of this pattern and how to correctly calculate the number of racks in the video tutorial:
Note that the number of risers affects the inclination of the pattern. If their number is a multiple of 3 minus 1, then there will be a slope in one direction. In the case when their number is a multiple of 3 plus 1, the slope will be in the opposite direction. Only practice and sober calculation will help you understand this.
Rope of three tubes
Another spectacular type of weaving, which a visual master class will help you quickly master. After watching it, you can easily weave three or more tubes, extend them correctly and finish the job.
Preparatory work
Products made from newspaper tubes, photos and weaving techniques of which are presented below, are made using the simplest and most affordable materials and tools.
| Material/tool | Purpose |
| Newspapers or paper | to create paper vines - tubes from strips. |
| Knitting needles (diameter no more than 1.6 mm) or wooden sticks | for twisting strips into tubes. |
| Simple pencil or marker | for marking paper before cutting into strips. |
| Scissors or stationery knife | for cutting marked sheets into strips, for trimming the ends of the tubes of the finished product. |
| Ruler | for convenient marking of paper before cutting into strips. |
| Glue | to secure the edges of the formed tube. |
| Brush | for uniform distribution of glue. |
| Super glue | for fixing individual small parts during weaving or decoration. |
| Varnish | to open the finished item. |
| Paints | to give paper vines or finished items the desired shade. |
| Wide brush or sponge | for even distribution of paint. |
| Boxes, buckets, volumetric figures | to give future products a certain shape during work. |
| Tweezers | to direct the tubes in the desired direction during work. |
| Latex gloves | for keeping hands clean when painting or varnishing. |
| Tall or wide deep tank | for coloring a large batch of tubes. |
| Wide tray or baking tray | for drying colored tubes. |
| Clothespins or paper clips | for fixing the tubes while the glue dries. |
| Decorative elements | for the design of finished products. |
The main material for creativity is paper sheets of newspaper or writing products.
The most accessible and inexpensive material, and most often free, are newspapers and paper advertising publications. An interesting effect can be achieved by making crafts from wrapping paper, glossy sheets of unwanted magazines or advertising brochures.
Office paper for printing or writing is also suitable - it can be easily painted in the desired colors. The format of newspaper and paper sheets can be any: A2, A3, but not smaller than A4.
For fixing the edges of a rolled newspaper tube, the most practical option is PVA glue in a soft tube with a special tip. Canned office glue (it can be of any color and consistency) should be applied using a small brush.
If you only have a glue stick, you can use it, but only if it is of excellent quality. Otherwise, the tubes will come apart.
Cutting newspapers or paper is done with ordinary or tailor's scissors or a stationery knife - it is more convenient and faster to cut not one sheet at a time, but a whole stack. The thickness of the cutting tool depends on the size of the stack: the larger the stack, the thicker the blade should be.
Cutting is performed in one of the following ways:
- First, you need to cut the double pages of an A2 newspaper into 2 parts along the center fold line.
- The resulting 2 A3 sheets should be folded in half, unfolded again and cut into 2 more pieces to make 4 A4 sheets.
- Next, you need to perform the ruling - this way the cutting will be more accurate, but the ruling process itself will take a lot of time. To save time, many craftswomen cut sheets along the fold line, folding them in half each time until strips of the required width are obtained.
- After ruling, the sheets are cut into strips of the width required for making a specific craft. Thin straws, twisted from strips measuring 5 by 30 cm, are suitable for souvenirs and small items. To get tubes of a wider diameter, you need to cut strips 7-9 cm wide.
Tube extension. Important points
Growing a paper vine is an important stage of work. After all, even if you twist it from whatman paper, this length will still not be enough to weave even a small candy bowl.
To ensure that the finished craft is neat, try to make neat, inconspicuous extensions. The algorithm of actions is as follows:
- a) flatten the end of one tube where there is a “corner” twist or b) cut it at an acute angle; a) b)
- Apply glue to the cut end, we recommend using PVA or polymer glue Titan, Dragon;
- Insert the first tube of glue, cut side down, into the wide end of the second.
We recommend watching a video about the invisible extension of working tubes during weaving. After this, your weaving will be flawless on both the front and back sides.
If you need to increase your stand, be sure to check out the detailed video tutorial on how to solve this problem:
Newspaper processing
Before you start weaving, you need to process the newspaper strips - twist them into tubes.
This is done in a certain sequence of actions:
- You need to drop a drop of glue on the edge of the newspaper strip, then place the knitting needle on it. It should form an acute angle with the lower long edge of the sheet. The diameter of the tube depends on the size number of the knitting needle: the thinner the knitting needle, the denser the tube will be.
- Twisting should be done in a circular motion, starting to rotate the knitting needle from the corner of the strip and maintaining a certain angle of inclination of the tool. The size of this angle determines the type of tube obtained as a result.
If the angle is less than 30 degrees, the tubes will be short and very dense - they are good for forming the frame of the product. If the angle is more than 90 degrees, the tubes will come out long and fragile - it is extremely difficult to work with them. The optimal size of the knitting needle angle is 45-60 degrees: the result will be a standard length, and the density of the tube will be moderate.
- When rolling the strip into a tube , you need to hold it by the edge and after each turn around the knitting needle, carefully tighten the paper. This way it will be wound tightly, which will ensure good quality of the tube.
- Having formed the tube completely, you need to carefully pull out the knitting needle and drop a strip of glue onto the corner, then press it with your fingers. One edge of the tube (from which weaving began) should be narrow, and the opposite edge should be slightly wider.
This is important so that during work, if the need arises, you can increase the length of the tube. This is done by inserting one tube with a narrow edge into the wide edge of another tube, after dropping a drop of glue.
There are types of products such as small panels, frames, decorative rugs and others, the manufacture of which requires flat tubes, which must be prepared taking into account certain nuances:
- When securing the edge of the strip with glue before twisting, you need to make sure that it does not fit too tightly to the entire length of the strip. The opposite edges of the tube should be the same in width.
- To twist, you must use a knitting needle of the required size, not forgetting that the diameter and density of the tube depend on the thickness of the knitting needle. And the wider the initial tube, the wider the flat tube formed from it will be.
- The required number of finished tubes should be laid out in one layer on the table, after which you need to walk over them with a rolling pin.
If desired, newspaper tubes are painted in the desired color. Gouache or acrylic paint diluted with water are suitable for these purposes. You can use watercolors and wood stain - but they do not paint over the letters of printed text well.
Painting each tube separately is a rather long and labor-intensive process, so you need to find a suitable container for the job:
- long tray;
- 5-liter bottle with the top cut off for long straws;
- 2 or 1.5 liter bottle for shorter straws;
- small bucket.
Before painting, you need to prepare a solution of the required shade and saturation and pour it into a container. After this, you should place the tubes in the solution for as long as it takes for them to fully color.
If staining occurs in a 5-liter bottle or bucket, a stack of tubes is dipped into the solution with opposite ends alternately. If you are painting short tubes in a small bottle, then after placing them in the solution you need to shake the bottle, then turn the tubes over with opposite ends to the bottom and shake again.
Simple bends: how to finish weaving
Everything good, even our weaving, tends to end. We propose to analyze the main options for finishing work on the edge of the product.
After weaving is finished, unnecessary posts always remain. You can take the path of least resistance and just cut them off. But protruding stumps will make the edge sloppy and will negate the overall impression of the quality of your work.
Obviously, the remaining racks need to be laid correctly. This is what we will do.
By default, you have already figured out the working tubes yourself: you trimmed off the excess, hid the ends in braid and glued them.
The easiest way to complete weaving
For the first time, the easiest way is to bend each post into the hole from which the next one comes out.
The process of such lazy bending is clearly presented in step-by-step photos.
Simple folding
Reserve a place to finish bending with a piece of tube.
With the rack, go around the next rack and bring it out. Repeat this around the entire perimeter, bringing the ends of the posts outward.
To join the weaving, insert the last post into place of the additional segment, having first removed it.
Now the protruding ends of the racks need to be pulled through the gap into the product. This time, tuck them under the posts. Spread the weave evenly with your fingers (walk along each post and pull it out with your fingers), cut from the inside and glue the remaining ends.
Rod
This type of bending is more difficult than the previous ones. If you decide to take it on for the first time, be sure to check out the recommended video.
Isis
Isis can be considered a relative of the rod. They are performed similarly, but there are some differences. The rod is made from the racks included in the product, and for isida you will need additional tubes
.
Watch all the details of the process in a detailed video tutorial.
In our next article we talk in detail about how to weave a basket from paper wicker From and To >>
Hedgehog
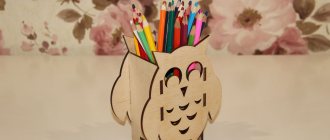
From pre-painted newspaper tubes you can make small crafts - animal figurines.
For the hedgehog you need to prepare:
- 8 tubes - 4 light and 4 dark;
- glue.
How to do:
- We fold the light tube in the shape of a drop and glue the ends together. The result is a blank - a body and a muzzle. We place the second light tube on top so that its tip becomes a tail.
- Using the long end of the second tube, we braid the body in a figure eight: bend it back, draw it around the base on one side of the tail, pass it through the middle of the body, draw it around the base on the other side of the tail, etc. During operation, it is necessary to ensure that the body maintains the shape of a drop.
- We leave the hedgehog's face unbraided. We fix the working newspaper tube with glue.
- We wrap the tip of the muzzle with a piece of dark tube to form a nose and secure it with glue.
- For the eye, roll a small piece of dark tube into a spiral and glue it.
- From short tubes folded in half we make legs for the hedgehog, threading them between the turns.
- We use the same principle to make hedgehog needles, cutting off the edges of the tubes at an angle.
Advice for beginners from experienced craftswomen
Of course, every needlewoman has her own secrets for perfect weaving. Their number is directly proportional to her experience and the number of crafts made. Not everyone wants to share their secret finds and tricks.
But we managed to collect the following basic recommendations:
- The distance between the posts should not exceed 2 cm; if this condition is not met, you will get a loose, fragile weave.
- Treat the posts with care, do not crush or bend them during work - the appearance of the weaving depends on this.
- To avoid holes and gaps in the pattern, after each row, align the posts and press the rows of weaving closer to each other.
- It is better to hide the places where the tubes join together in the weaving, ideally in the middle between the posts.
- Dense and inflexible tubes can be sprayed with water from a spray bottle and kept in polyethylene for 15-20 minutes, after this manipulation the paper vine will become obedient and will not leave creases, and its strength will return after complete drying.
- A wet vine becomes “shaggy” during weaving; if you overdo it with moisture, let it dry a little and continue working.
- Try to trim the ends of the bent posts inside the product.
- The stump of the cut post can be covered with the solution you used to paint the paper vine (stain or color). Therefore, always leave a little coloring solution to mask blemishes if necessary.
- For a neat appearance of the finished product, it is advisable to bend with freshly extended racks. Those. Towards the end of the weaving, cut off the old posts, insert fresh moistened tubes and bend them. They will fit well and will not wrinkle. If you see that the old racks have retained their presentation by the end of the work, spray them with water from a spray bottle, let them moisten a little and only then bend them.
- Sometimes the place where the tubes are glued together may turn out to be unpainted. This is due to the fact that PVA prevents the paint from penetrating into the paper. To avoid this, try to glue the twist with a glue stick or Titanium. When adding extensions, cut off unpainted ends mercilessly.
Today we looked at only the basic patterns, basic techniques and methods of newspaper weaving.
We will reveal to you the features of working on various products in the following articles. *when copying text, please indicate an active link to the source mirpozitiva.ru
What to paint with?
It is better to color the tubes in advance. To do this, you need to immerse them in a container of shallow depth, and then fill them with the selected dye, water-based wood stain will do, for 3-5 minutes. Dry the products on a wire rack or mesh. A brush will help distribute the paint evenly. It is easier to tint finished baskets using a spray bottle.
You can get a blue tint using regular blue dissolved in a water-alcohol base. The color can be varied individually. When using wood stain, the color match will be as follows:
- maple - red-orange;
- oak - brown-red;
- ebony gives a dark gray tone;
- larch – yellow;
- fern – green;
- mahogany – pink.
When using stain, the easiest way to paint the workpieces is to dip them directly into the container with the composition, from each end. This way the products will also be painted on the inside. The paper has time to become saturated with color, but does not get wet.
It is better not to pre-tint newspaper tubes. During initial painting, they still retain visible remnants of printing ink. When repeated, they become brittle. The problem can be solved by applying varnish tinted in the desired colors after weaving, in 2-3 layers.
Decorative balls
To make openwork balls for a garland or decoration, take colored tubes from newspaper, pre-painted with acrylic. Place them on a flat surface and roll them well with a rolling pin so that they are flat. Stay a little short of the edges to build up the tubes as you go.
To make the balloons the same, make blanks from balloons. Start wrapping the first piece with a flat tube and glue the joints with PVA or wood glue. The main thing is to make the base frame even, because the balls can become deformed in the process.
Photo: izhevsk.ru
First, make meridians for further winding - like tangerine slices. Then use the free end to walk around the ball in a circle, covering all connections and joints. In the process, hide the first tip, and then tuck the last one under other layers.
Do not overuse the number of tubes so that the ball is not too rough and massive. When the blanks are dry, carefully pierce and pull out the balloon, straighten the shape and leave them to dry completely. At the end, prime the balls in a bucket with primer, dry and clean with a dry brush to remove any smudges.
Did you like the post? Subscribe to our channel in Yandex.Zen, it really helps us in our development!
Photo frame
You can use newspaper tubes twisted into spirals to update an old photo frame.
What do you need:
- newspaper tubes;
- old photo frame;
- glue;
- clear nail polish.
Step-by-step instruction:
- We make spirals of different sizes from flattened paper tubes. The end of the tube on each spiral is secured with glue.
- Glue the spirals in random order to the photo frame, starting with the largest ones, and filling the remaining space with the small ones.
- Once the glue has dried, coat the frame with clear varnish for durability.
History of the craft
Weaving from plant stems was used already in Neolithic times. Archaeologists have found household items made in this way both in Africa and throughout Eurasia. It is assumed that people used thin tree roots and flexible vines for weaving.
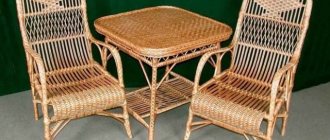
Much later, the interlacing of long rods began to be used in construction. In the nineteenth century, many roofs were made using this technology. Ordinary people made fences near their houses, the rich could boast of wicker furniture.
Today, decorative wicker souvenirs can often be found at folk craft exhibitions. However, you don't have to stop at history alone. Using the weaving technique using newspaper tubes, real designer objects are created.