Kitchen furniture can be installed in two ways: on supports or legs. The first method is very rare; it is mainly used for furniture in a classic style. The rest of the furniture - cabinets, furniture - is placed on adjustable legs. From an aesthetic point of view, they do not look very attractive, and a lot of debris and dust get underneath them. Therefore, for beauty and convenience, they are covered with special bases. To install or repair kitchen furniture, you can find a specialist with good reviews on the website Kabanchik.ua.
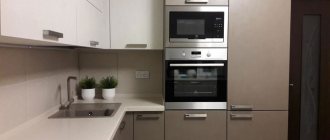
How comfortable is a kitchen up to the ceiling: interior design with tall cabinets
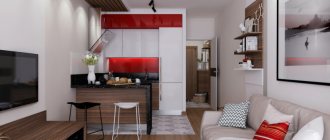
A kitchen with high ceilings makes it possible to create an interior that is particularly functional.
A large area of the room will be a plus. But even in a six-meter steel frame, you can recreate a design for a kitchen up to the ceiling that will be the envy of owners of large square meters. Before you start selecting furniture, you need to determine the requirements for the room: whether it will be used only for cooking, whether you need a dining area and how many zones it is optimal to allocate for storage. Let's find out which kitchens to the ceiling are popular among housewives and how to arrange your own personal culinary paradise at home.
Practical option: video of a kitchen plinth with a drawer
If the kitchen is small and there is a need to use literally every corner of the free space for storage, then you can use the plinth. Well-known manufacturers even have special guides to install convenient full extension plinth drawers in the kitchen.
The front of such a box can also be a plinth, with a sealing tape installed. But more often they use facade material, which is quite reasonable.
The SPACE STEP plinth system from Blum deserves special attention. The well-known Austrian manufacturer has taken care of the quick and simple installation of the drawer - it can be installed in the base not only of the kitchen, but also of any other cabinet furniture. It also serves as a “step” and extends with a light touch of your foot.
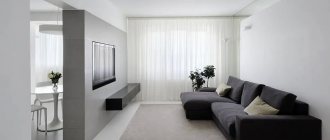
Top projects: 7 best minimalist kitchens
Minimalism is a style that is liked not only by ascetics. Much more often it is chosen by those whose lives are oversaturated with impressions: residents of megacities get tired of visual noise and prefer to surround themselves with the calmest and simplest solutions at home. Light shades, geometrically adjusted lines and an almost complete absence of decor help create a comfortable mood: the rejection of unnecessary objects and textures is more a philosophy of life than an interior style, and every year more and more people find this approach close.
First of all, this concerns the kitchen, since it is in this space that the whole family usually gathers. Strict monochrome, contrast of opposite colors or natural textures – kitchens in the minimalist style can be different: which design scenario is right for you? We have collected seven models of kitchens with a laconic character, which we advise you to take a closer look at.
Whiter than white
the Alto kitchen is a traditional view of minimalism: a set in the design of which there is nothing superfluous. The
canonical interior in the minimalist style is matte white facades and ideal simplicity of forms: in such a space there can be no flashy details. It seems that a minimalist kitchen does not want to be noticed at all, and prefers to please owners with practical features rather than pretentious design.
In fact, a laconic space will not forgive minor flaws, ill-thought-out technological components and negligence in details. That is why we always design kitchens in a minimalist style with special attention to nuances. In the Alto project, we did not waste a single centimeter of a small linear kitchen and carefully designed all combinations of elements to give the kitchen a long service life, and the owners the opportunity for easy and quick cleaning.
Functionality is a priority
kitchen "Cento" - a corner set with an emphasis on practicality
When talking about minimalism, it is important to take into account not only the aesthetics of simple lines and shapes, but also the functional component. Minimalism is about carefully thought-out systems, and in this case, visually simple solutions turn out to be the most labor-intensive to implement.
How is the plinth attached to the kitchen legs?
Fastening the plinth is most often trusted to professionals, but if you carefully study the instructions, you can carry out the installation yourself, saving the family budget. Before starting work you need to prepare:
- glue;
- screwdriver for mounting PVC panels;
- silicone sealant for aluminum or plastic base;
- self-tapping screws;
- any marker;
- ruler.
Installation work begins only after the kitchen furniture has been placed in the chosen location:
- The slats are attached to the cabinet legs with special fasteners that come with the furniture. On a plastic or chipboard strip you need to make marks corresponding to the distance between the cabinet legs. You can only attach the plinth to the outermost ones, and if its length is more than a meter, you still need to make a mark in the middle. If fastenings are made too often, the bar may bend, which will affect the appearance of the headset.
- On the inside, the plastic and aluminum boards have special gaps into which clips are inserted at the required distance. The fastenings are screwed to the chipboard base using self-tapping screws with small heads. When the clips are located at the desired distance, you just need to snap them behind the cabinet leg.
- Aluminum strips along the edge can be sealed with a transparent sealant to prevent the possibility of water getting under the set. And special silicone pads (base plates) are put on PVC strips, which ensure a tight fit to the floor.
- The depth of the base in front of the edge of the cabinet should be approximately 15 centimeters so that it is comfortable to stand while cooking. The side panels can be mounted at the same level as the furniture, but it is better to “sink” them at the same distance.
- Aluminum planks require the use of special plugs and corner structures, the assembly of which does not require much time and effort.
The color of the base may match the main shade of the kitchen unit or differ from it. Whether to use slats or leave the legs open is a purely personal matter. It depends on the taste of the housewife, the interior and style of the kitchen. According to design projects, the plinths can be used for retractable baskets, and lighting or LED strips of various colors can be built into them. But the main thing remains - they help to recreate a single image of the kitchen set and give the kitchen a unique look and special charm!
Subtleties of the process
Whether you install the base boxes yourself or call a professional, you will still have to spend money on fittings and raw materials. The cost of the project will depend on many factors: the complexity of the work itself, the size of the components and even their location. But in the case of a small kitchen, where every centimeter counts, this will be a long-term investment that will fully justify the cost.
Plinth made of chipboard or MDF
Its main advantage is its low cost. Most often it is made together with furniture and matches it in color. Its production does not require additional specialists - wall manufacturers themselves cut the necessary strips, which are easy to install yourself. Despite the ease of installation and low cost, such a false panel has a big drawback.
Kitchen plinths made of wood look great on wooden furniture in the classic style
Its service life is short-lived - it does not tolerate moisture, so in the first two years it can greatly increase in size and become unusable. For protection, the manufacturer can laminate the bottom section of the plank, which is in contact with the floor, with a PVC edge. Better yet, attach a special water-repellent seal or plastic transparency to the bar. But it also has a drawback: it is difficult to attach it so that it fits tightly to the floor, and therefore dirt will inevitably get behind such a bar. And externally, a panel that is not adjacent to the floor looks less impressive. Over time, the gap will only widen.
If you choose between chipboard or MDF, then the second “simulator” of wood is better - it lasts longer, looks more solid and is less susceptible to deformation from moisture and sun, but is more expensive. MDF coated with enamel will last longer.
An excellent solution to a modern approach
You can extend the life of a chipboard plinth with proper care:
- try to protect it from moisture, not leaving puddles on the floor after washing the floors;
- periodically remove the slats and dry them in the sun or under a radiator;
- cover the base with a special anti-mold and mildew agent.
Corner Loft kitchen with an angle of 135 degrees - photo
Tolubeevsky proezd, 14, bldg. 1
After taking measurements, we developed a project for a corner kitchen in the Loft style. The kitchen has a ventilation shaft in the corner, and they also decided to use an angle of 135 degrees.
For the kitchen we used MDF facades in the color Dark Concrete. The lower modules are covered with a moisture-resistant 38 mm tabletop in dark Castillo color. The wall panel and sealing corner are in the same color.
Below in the photo is the process of cutting out for the sink. The countertops arrive at the address intact and the hole is made on site. The client's wishes can be taken into account.
Next in the photo is an angle of 135 degrees. The module was finalized at the address.
The working process. The upper bodies are leveled, tightened with clamps and tied with furniture ties
The lower tables were raised, installed on 15 cm supports, which were covered with a plastic base with a black silicone seal.
Two plinth design options for a stylish kitchen
Kitchen design can be very different in terms of placing the main accents. An inconspicuous element such as a plinth can also become a bright accent. If you equip it with LED backlighting.
The luminous base of the kitchen creates the effect of furniture “hovering” in the air. This design option for the base looks very futuristic and stylish.
It is appropriate to effectively design the kitchen base in a classic design. In this case, the base is given an interesting carved shape.
Even if the kitchen itself is quite restrained in design, a carved base with curly legs will make it more elegant and unique.
Wall cabinets
On the wall. Wall kitchen cabinets also go by other names: hanging cabinets or shelves, wall shelves or modules, wall or kitchen shelves, etc. In general, we are talking about the upper modules of the kitchen unit. As a rule, wall cabinets are relatively lightweight and not too large cabinets.
- Cupboard for dishes. There are shelves inside and doors outside. In such a closed module, plates, cups, sugar bowls and teapots are constantly stored. If the doors are glazed, the dishes need to be beautifully arranged on the shelves.
- 1 of 4
On the picture:
Upper modules are often equipped with sliding or hinged doors. They are much more convenient and safer than swing ones, since they move to the side or rise up. Some models are equipped with a gas lift mechanism.
- Drying cabinet. Located above the sink. Freshly washed dishes are placed in it. To prevent the cabinet from getting wet from the inside, it is equipped with a special drying rack - a rack for plates and cups - and a tray for draining water. Some models have a shelf at the very top for brushes, sponges and cleaning products.
- Open shelf. Beautiful plates, jars of spices, souvenirs, etc. are placed on it. Often such kitchen shelves perform purely decorative functions.
- 1 of 6
On the picture:
Using open shelves is very convenient - you just need to reach out to the items on them. But dust quickly accumulates on such surfaces.
Kitchen island.
In a sense, it can also be called a module. But it is not so. In most cases, the island consists of several modules for different purposes, combined into a separate structure in the center of the kitchen.
In the photo: kitchen AV 5090 Silver-gray metallic from the Haecker factory.
What if you make a kitchen without a base at all? Look at the photo!
Often, kitchen design involves the absence of a plinth panel at all. In this case, the lower cabinet tables are “placed” on beautiful metal legs.
But, according to reviews from many housewives who have used this solution, it’s still not worth doing.
- Something is constantly rolling under the kitchen . For example, onions, potatoes, nuts, children's balls and other items that both children and pets play with. But getting it out from there is quite problematic - after all, the depth of the same corner modules is rather large.
- There is more cleaning . If the space behind the plinth is practically not dirty, just symbolically wipe it with a mop. Then with open legs it becomes a natural extension of the kitchen.
- And about pets. Kittens love to hide in this secluded place. And when they grow up and can no longer physically fit in such a narrow space, they begin to mercilessly tear apart the floor covering with their hind paws, trying to squeeze into their favorite place.
Modern wall-mounted kitchens are a completely different matter. There are absolutely no problems with cleaning underneath them. The photo of kitchens without a plinth shows that this solution also adds visual lightness to the furniture.
The only thing is that there is a limitation when developing a design project for floor-standing household appliances. Washing machines and dishwashers will need to be somehow placed in attached cabinets. Which is not always feasible if there is not much space in the kitchen. But a professional designer will always be able to find the optimal solution if you like this particular design option for the lower kitchen cabinets.
What does the base consist of?
The kitchen plinth is a solid plank consisting of mandatory and additional elements. The first includes the strip itself, the seal and the fixing clips (brackets). The rest include connection elements and radius elements, which allow you to position the base at a certain angle and make the structure smooth, completely repeating the dimensions of the furniture. The connection elements can be at angles of 90, 135 and 180 degrees - due to them, the base is adjusted to any shape of furniture.
The most popular types of kitchen plinths
The base strip can be of three sizes - 10, 12 and 15 centimeters. There is no need to make it higher, but if the owners wish, this is possible. If the kitchen has high ceilings (more than three meters), then a higher plank will look more harmonious. And in standard kitchens, the height of which does not exceed 2.5 meters, a base larger than 10 centimeters will look ridiculous and visually reduce the size of the room.