A large selection of ready-made furniture, pleasing the consumer, is overshadowed by the impressive cost of designs or difficulties in selecting a model that fully satisfies requests. For many, searches on selling sites and trips to furniture stores end not in a successful purchase, but in the clear realization that making the desired cabinet is easier than buying it. The reason may be either the very high cost of the item you like, or the lack of furniture from a trusted manufacturer on sale. Making an individual order to a specialized company is also not a cheap pleasure. Users of the FORUMHOUSE portal are not afraid of difficulties and undertake to make furniture themselves, and share their successful experience with like-minded people.
Features of wardrobes with sliding doors
Unlike the usual swing doors, the sliding version of doors became popular at the beginning of the century before last. According to one version, the authorship belongs to Napoleon. The commander was pedantic and obsessed with order. In the last century, his idea was modernized. Nowadays, sliding wardrobes are an integral attribute of bedrooms and hallways.
Reasonable use of every centimeter of free space and extreme functionality are the main differences from traditional bulky chests of drawers. Since opening doors does not require a reserve of space, this type of furniture will save “living” space in the room.
The sliding door system is the main advantage
Sliding wardrobes are made both in full depth, with a volume of at least 630 mm, and in a shortened version.
Varieties
The main types of wardrobes include the following:
- Built-in. This is a stationary structure that allows you to use the entire useful volume of space in which it is located. Its boundaries are the floor, walls and ceiling of the room. Such cabinets can be built into any place that is rarely used, and can also be used to disguise communications. However, it cannot be moved without disassembling it.
- Semi-built. This design is characterized by the absence of some supporting parts, for example, the rear and side walls. This will allow you to mount the cabinet even if there is no niche or opening. The frame is attached to the wall, so moving such a cabinet is also problematic.
- Corpus. This type of cabinet contains all the necessary elements: a supporting frame, a back wall, four panels and sliding doors. It is usually placed along the wall.
You can place a cabinet wardrobe in the center of the room, thereby zoning the space.
Cabinet cabinets are mobile, and often transported in assembled form. They use less usable space and require more material to manufacture than their built-in counterparts.
Angular
Placing it in a corner also saves space
An excellent solution for small apartments where every meter is valuable. Repeats the shape of the corner and allows you to rationally use the space of the room.
Rectangular wardrobe
Such models have a straight and strict façade that will be appropriate in any style direction. They are universal and have an extremely simple design, including installation. At the same time, rectangular cabinets are not original, as they are used everywhere.
Such rectangular cabinets are considered universal.
Spherical wardrobe
Sliding wardrobes with a spherical or radius façade came into use relatively recently, but have become quite popular due to their external originality and practicality. They combine the advantages of other types of cabinets, and also have a complex mechanism, which determines their high cost.
Spherical cabinets are original and practical.
Trapezoidal
This type of wardrobe looks like a trapezoid, which can have different shapes - isosceles or rectangular. This design has fewer doors than L-shaped models. This, along with other design features, leads to a reduction in the cost of the finished product.
The trapezoidal cabinet is shaped like a geometric figure.
Note! Trapezoidal cabinets occupy a fairly large area, while having relatively small capacity.
Sliding wardrobe in the form of a square
This is a modular type of cabinet, consisting of several modules in the same style. They are autonomous, which allows you to freely change the configuration of the structure.
The components of such cabinets are autonomous.
Five-walled (pentagonal)
The shape of the structure resembles an equilateral pentagon. This model is similar to the trapezoidal one, but differs in an additional side wall. The five-wall wardrobe is the most massive, very deep and convenient to use. This made it quite popular, especially for placement in the bedroom, because everything from personal items to household appliances can be stored in the design.
The five-wall cabinet has one additional side.
Standing separately
In this case, the cabinet is not tied to the wall
Has sides, top, bottom, back and sliding doors. This is a complete separate piece of furniture. It can be moved and is not tied to any design elements.
Device inside
When designing the filling of a sliding wardrobe, first of all, zoning of the internal space is done. The figure shows a universal diagram of the breakdown into storage areas for various things:
It is important to correctly distribute the internal space of the wardrobe
When purchasing a finished product, you will have to agree with the filling configuration proposed by the manufacturer. Self-production will allow you to take into account as much as possible the dimensions, functionality, location of various zones and much more, which, ultimately, will ensure maximum operational comfort.
Below is a table with examples of frequently used elements of internal filling and zoning of a sliding wardrobe with their help.
| Zoning | |
| Shelves | Shelves are one of the main filling elements. They can be stationary and retractable, solid and ventilated, half and full depth, etc. |
| Boxes | Drawers are the second most important element of a cabinet. |
| Barbell | Hanging rod - necessary for clothes on hangers. The material used varies, most often metal. |
| Baskets | Convenient storage baskets. All things are clearly visible in them, which creates a certain convenience. |
| Trouser | This device is called a trouser. Pants are always ironed and ready to wear. |
| Tiemaker | A bar (hanger) for storing ties is convenient to choose, does not wrinkle, and proper hanging prevents them from changing shape. |
| Belt hanger | Convenient placement of belts, as an alternative - storage on a shelf in rolls. |
| Underwear | Compact and convenient storage of underwear. |
| Wrinkle-resistant items | Placing bed linen, towels, and some clothes in piles on shelves. |
| Things on hangers | A significant part of the internal volume is allocated for storing blouses, light blazers, and short sundresses. A pipe with hangers is installed in the opening. You can make several such sections - for short and long things. |
| Accessories | Department for accessories - bracelets, watches, glasses, etc. It is recommended to store these items in drawers. Inside, the space can be divided into separate cells. |
| Shoes | Shelves for storing shoes. In the upper (mezzanine) part you can place shoes in boxes. |
| Bags | Hooks, hangers, carabiners, rings and other accessories for bags. |
| Travel suitcases | Place rarely used (once a year during vacation) suitcases on the far (top) shelves or mezzanine. |
| Bed sheets | One of the options for bed linen. Shelf width up to 80 cm, height up to 60 cm. |
Characteristics of the main filling elements:
- retractable and stationary shelves. For convenient use, the distance between them is from 350 to 450 mm;
- drawers. Two types - fully retractable (100%), partially retractable (80%). They can be equipped with closers that provide smooth semi-automatic closing of the drawer;
- mezzanines, known as hard-to-reach shelves. Located at the top. Rarely used and bulky items are stored on them;
- Barbells are needed for hangers. Mounted along the width of the cabinet;
- pantographs or special “furniture elevators”. Thanks to them, clothes are stored at the required level and can be easily pulled out using a special rod. They can be electrical or mechanical;
- Baskets are convenient for storing small items. Equipped with rollers and guides.
Wardrobe filling options
And here we show how to effectively organize storage in your closet so that all things are accessible, and the storage is convenient and functional.
This is the advantage when you make a wardrobe with your own hands. You can arrange shelves, hooks and rods so that they fit your wardrobe as comfortably as possible. The gallery below shows the main elements you can use for your wardrobe.
Or here’s another example of how to effectively organize the contents of a closet. What do the numbers in the photo mean? 1 - Pantograph. 2 – For now the shoe rack. 3 – Plastic tray for shoes. 4 – Pull-out tie rack. 5 — Retractable trouser holder with side fastening. 6 – Longitudinal aluminum rod. 7 — Three-tier retractable stand. 8 — Two-tier retractable stand. 9 – Pull-out hanger. 10 - Carob carob.
When you make a wardrobe with your own hands, you must plan the organization of storing things yourself based on the size of the structure.
The location of shelves, drawers and hanger bars must be planned in advance. There can be an endless number of options.
Choosing the optimal combination
To optimize the space inside the cabinet, various combinations that are more efficient from a storage point of view are often used.
For example, in a preliminary wardrobe design scheme, you can designate separate sections to place short and long clothes of different sizes at a convenient height for easy removal and hanging of the hanger. If mezzanine shelves are not needed, you can use the upper space of the cabinet for a hanger by installing a lift - a special pantograph that lowers the level of the hanger.
And also combine shelves and drawers, baskets for storing shoes and linen.
Again, there are sizing considerations (these are shown in the diagram). Deep drawers are best placed underneath. Medium-depth drawers are typically used for storing linen and are placed on the middle level of the closet. But it is better to have narrow drawers in which small items (jewelry, documents, ties, belts and other accessories) will be stored at tabletop level (from 750-850 mm from the floor). This will make it easier to find and place things in them without having to bend over.
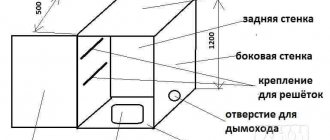
Front view
On this sketch you must indicate the dimensions (width and height of the cabinet). Also pay attention to the height of the base, the width of the sections and the distance between the shelves. Dimensions must be entered directly at the attachment points along the length of the side wall.
That is, in order to secure a shelf or partition in a cabinet at a certain height from the floor or edge, you must specify the size from the beginning of the workpiece to the attachment point.
Think about how you are going to attach these parts, at what distance and from what. The size indication will help you with this.
Top or side view
This sketch should first show the overall depth of the cabinet.
Also indicate the depth of the internal shelves. By the way, they will be 100 mm less than the total depth, because to install sliding system doors you will need exactly 100 mm. This sketch should also show all round and R-shaped flanges.
When making a wardrobe, do not forget to show on the diagrams and drawings the dimensions of the opening in which the sliding system will be installed. You will need this when ordering sliding doors.
Materials
We won’t go into a long discussion about how sliding wardrobes differ and what other types they come in – this is already clear. Let's get straight to the point - the durability and reliability of the structure depends on the chosen material. And there are several basic options here.
Chipboard
Particle boards are the most affordable, simple and common option for making furniture. They differ in thickness, texture and colors, and can be laminated or not. The veneer layer is a thin coating of natural wood, which makes the chipboard look expensive and noble.
For sliding wardrobes, laminated chipboard or veneered boards are better suited. But fiberboard can only be used for individual internal elements - they are too sensitive to moisture. Do not forget that the edges need to be sealed with a special tape so that they do not crumble, swell or crack.
Solid wood
Wood is the most natural, noble and environmentally friendly material, but the array also costs accordingly. There are relatively inexpensive species, such as pine, but here you need to take into account the strength characteristics. Most often, wood is not the best option for a built-in wardrobe, because all its beauty is hidden in a niche and behind the doors.
MDF
MDF is more expensive than chipboard, but this material is more environmentally friendly, because formaldehyde is not used as a binder. The second plus is high resistance to moisture: it’s not for nothing that even kitchen sets are made from MDF. These slabs can be bent and shaped, making them suitable for more complex designs.
Plywood
Also quite durable and versatile material. In addition, there are moisture-resistant options that are optimal for the pantry. Plywood is durable and easy to process, because soft wood species are used for its manufacture. To prevent deformation when screwing in self-tapping screws, you should use washer-shaped gaskets.
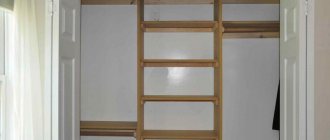
Drywall
Typically, plasterboard is not used to make furniture, but sliding wardrobes built into niches or into the wall structure are an exception. In addition to sheets, you will need beams or metal profiles for the frame, which you will then sheathe. This is a budget-friendly and convenient option for dry rooms, such as a bedroom or living room.
Do you have a plan?
Making furniture with your own hands is done in the following order:
- Selection of material (depending on the material, the work process can fundamentally change, so this operation should be the initial one).
- Determining the method of placing the filling (the convenience of the cabinet and the durability of its operation depend on the successful layout).
- Designing doors, choosing a method for hanging them (the most complex and responsible procedure).
- Choosing a method for attaching shelves.
- Preparing the niche (you may have to do a small amount of construction work).
- Measurements and drawing (by drawing the type of cabinet, you can avoid sawing work at home; nowadays it is easier and cheaper to order sawing of blanks).
- Purchase of accessories, materials and cutting of blanks.
- Assembling the cabinet and installing interior lighting (220 V wiring in a clothing closet is not allowed).
- Exterior finishing.
Before starting work, look through the various cabinets available on the Internet. Colorful photos, whether of a straight or angular design, will certainly be found and will help you decide on your wishes. Perhaps the most functional and harmonious option has already been found. In addition, the range of modern multi-colored materials is wide enough to satisfy the most sophisticated taste.
Facades
The interior content, thought out to the smallest detail, will be in sharp dissonance with poorly chosen facades. It is the facades that give the entire cabinet a special finished look. Let's consider several options for their implementation.
Mirror
A mirror visually enlarges the space and makes the room brighter. Can be whole or divided into several parts. The large weight of the mirror determines the need to select high-quality and reliable rollers. Such a facade creates additional maintenance hassle - the mirror quickly gets dirty. It will have to be wiped and washed regularly, especially if the family has small children.
A variety of finishes are used for facade mirrors - sandblasting patterns and designs, spraying of various shades (silver, emerald, gold, etc.) for glass, printing color images and much more. For safety reasons, the inside of the mirror is covered with shockproof (armor) film. If the mirror breaks, the pieces will not fly away.
Glass
Frosted glass original solution
Glass is no less popular than mirror; facades are equipped with unbreakable ones. Frosted glass with a pattern is mainly used. Vertical and horizontal stripes that divide the canvas into separate squares look original.
The use of stained glass technology for decoration
The door panels of the wardrobe can be decorated using stained glass. The cost of manufacturing such facade decorations varies; it directly depends on the degree of complexity of the technology used. In any case, inexpensive options for stained glass cabinet design will look great, but only if they are made of high quality.
There are three main types of stained glass that are most often used for decoration:
- Classic stained glass. It will look best framed in a wooden or metal frame. Glass can have any pattern or different colors. The manufacturing process of such stained glass is very labor intensive, which gives it both prestige and a fairly high price.
- Tiffany. Its difference from classic stained glass is that it is possible to use this option if there is no frame on the facade. In this case, the drawing turns out to be more intricate and original. Technically it is no less complex than the classic, but aesthetically very beautiful. Even its obvious fragility may not be considered a serious drawback compared to its beauty.
- Filled type of stained glass. It is also called contour. One of the popular imitations of expensive Tiffany, performed on a large glass canvas. This stained glass window, due to its simpler manufacturing technique and low price, is the most popular among consumers. It is resistant to external damage and very practical, which allows it to be successfully used when decorating the simplest furniture options.
Sandblasting drawing
This technique involves applying a design to glass using a jet of air and sand released under very high pressure. The sandblasting pattern leaves a residue on the glass, a bit like frozen frost on windows. Thanks to the use of this processing method, the resulting pattern looks very sophisticated and minimalistic.
Facade made using sandblasting technique
This option is perfect for those people who want to bring something unusual into the interior, and at the same time do not want to experiment with bright colors and large shapes. The cost of this type of work is high, but it can last for many years, so if you like this delicate and unobtrusive ornament, then this option is for you.
MDF and chipboard
MDF and chipboard are excellent for making facades
These materials are laminated with film. The facades look massive and heavy. To install them you will need reliable roller systems. One of the advantages is a huge selection of colors, shades and patterns, texture - from matte to bright glossy.
Photo printing can be applied to MDF and chipboard facades.
These are the main types of facades used in the manufacture of sliding wardrobes. You can combine them with each other. This article contains photographs with a considerable number of original ideas for making facades.
Natural materials
The use of bamboo, rattan and leather to cover the facade of sliding wardrobes is an innovation, and therefore quite rare. One of the main features of this technique is its high cost - sometimes ordering such textures can cost more than the cabinet itself. However, if desired, all these materials can be replaced with artificial analogues.
Combination of leather and mirror surface on the front of the wardrobe
As a rule, bamboo is used in most cases for “upholstery”, since it is most softly integrated into almost any interior and complements it with its woody motifs. If you want to settle on such an exotic option as leather, then you should make sure that it correlates with other leather products (for example, a sofa).
Sliding wardrobe with rattan and bamboo trim
Vinyl stickers
An excellent and easiest way to decorate the facade of a wardrobe if you cannot afford to order stained glass or sandblasting. Typically, such stickers look like transparent photo wallpaper. A special film is used in their production. Thanks to its transparency and monochromatic design, you can easily match the sticker to the color of any cabinet.
You can replace an old, boring sticker with a new one at any time - it can be easily removed without leaving marks on the mirror or glass.
Thus, thanks to modern technologies, it is possible to use many interesting solutions for both practical and aesthetic design of a wardrobe. Even with minimal financial investments, but with ingenuity and creative ingenuity, it becomes quite possible to implement any projects, achieving excellent original results on your own.
And if you want, in addition to assembling furniture on your own, you can also master the technology of applying simple stained glass or a pattern.
Lighting
Before working on the frame part, it is necessary to take into account the desired lighting principle. Based on the design drawing, a diagram for connecting the lighting to the wiring is worked out. For a built-in cabinet, a plasterboard structure is constructed on the ceiling, based on a profile support.
The light can be installed in the upper part of the cabinet, having previously cut the required diameter for the lamps. To ensure safety, internal wiring must be enclosed in corrugated tubes.
Assembling a sliding wardrobe with your own hands at home is quite simple if you make the drawings correctly and follow the calculations.
When the main installation of the product is completed, lighting is installed and the furniture is finished. Fluorescent and LED lamps are used to illuminate products.
Such lamps do not heat up, creating safe operating conditions for the product. When choosing to install recessed lighting inside a built-in cabinet, you need to take care of it before installing the frame. You can illuminate furniture from the outside, which is achieved by installing lamps in the furniture's cornices.
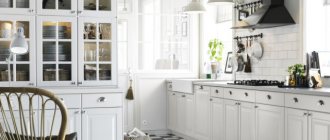
Style
For each style there is a specific purpose, that is, for which rooms this or that showcase is most suitable. For example, for a small living room, it is recommended to choose light-colored furniture that visually enlarges the space. The right choice of display cabinet largely depends on the style of the living room itself, which come in several main types:
- Minimalism. Fully glazed display cases look harmonious with such rooms, opening up the space even more. Primitive cabinets made of chipboard, MDF or plastic with the least amount of finishing will also go well together.
- Classic. This style will always be in trend as it represents wealth. As a rule, this is handmade furniture.
- Modern. In such living rooms, stylish display cabinets with laconic shapes and luxurious patterns and decorations look best.
- Scandinavian. It is made with an emphasis on environmental friendliness and naturalness, so the cabinet should be chosen in light and cool colors.
- Country. Creates a warm and cozy atmosphere in the living room, provided by natural materials.
Measurements and calculations
Before drawing up a drawing, you will need to take correct measurements. Since niches, walls and corners of modern housing rarely have regular geometric shapes, measurements should be taken using a certain algorithm:
- first of all, you need to measure the back wall: upper part, middle and lower levels;
- then the façade is measured taking into account the setbacks.
Measurements should be taken at three levels from the back and front.
It is important to understand that installation without preliminary measurements can cause problems. There is a possibility that the cabinet frame simply will not fit into the space provided for it. In addition, large gaps may form in the joint area.
Corner wardrobe requires measurements:
- along the back on both sides, which extend from the corner;
- sides;
- the front side along the corner facades.
The main types of doors for wardrobes, their features, pros and cons
If you want to place furniture in a niche, it is important to measure the sides that will go into it - all calculations must be done in three levels, even if the cabinet is planned to be made to cover the entire wall, and a corner will be involved.
Cabinet width
Height
Depth
Calculation of door width
When the door slides to the side, it should allow full access to the section and not interfere with the pull out of a drawer or the lowering of a scissor lift. Let's take an example of a 2100 mm wide compartment consisting of three parts:
- Measure the width of the inner hole. In our example with chipboard it will be 2068 mm.
- 2. subtract twice the width of the protective tape glued to the edge of the housing door. Each one is 6mm thick, so you get 2068 minus 12 - 2056mm.
- 3. This takes into account the overlap of the doors, which in a three-section cabinet is 26 mm on both sides, giving a total of 52 mm. The total width of all doors is: 2056 mm plus 52 mm or 2108 mm. Divide the total width by three and you get 703mm.
This simple calculation will ensure easy access to partitions.
Calculation of cabinet door width
Design examples
The big advantage of assembling a wardrobe yourself is carte blanche to choose a design. Despite the fact that the furniture market offers the widest choice of models, there are situations when serious individualization is necessary. And if you need to decide on the shape and dimensions at the design and drawing stage, then you can start thinking about how to decorate it after installation. Changing the color, adding or removing decorative elements, adjusting the appearance of the model to your desires - this becomes possible when you make it yourself.
The traditional location for installing a wardrobe is the hallway. To save space, the cabinet is usually installed in a niche, where it occupies the entire space from floor to ceiling. In a narrow hallway, two-leaf or three-leaf cabinets with mirrored doors are usually installed, which allows you to visually expand the space. In addition, the internal structure of the closet usually involves the use of a large number of shelves and additional compartments for storing a large amount of clothes and shoes.
In modern apartments, frame wardrobes can be located in the bedroom, in the living room, in the office, and even on the loggia or balcony. The decorative features in each case are determined by the general style in which the interior is designed. Sometimes sliding wardrobes can even be used as a partition, dividing two rooms or one room into zones.
Sliding wardrobes fit well into the interior of small spaces such as an attic or dressing room. In cases where the room is not well lit, it is possible to install lighting directly in the cabinet itself.
The design of a homemade wardrobe is determined only by the imagination of the creator, but you should remember that it does not stand out from the interior and forms a harmonious furniture ensemble.
It is worth noting a simple wardrobe with three doors and external lighting with spotlights. This project does not take up much space and is easy to install.
Elegant homemade corner cabinet. This model will allow you to store the entire family wardrobe in one place.
A more complex option is a multi-door wardrobe with external shelves, a cabinet and a figured mirror. It has external lights and looks very chic.
A sliding wardrobe made of plasterboard with a complex design covering the entire wall.
Cabinet wardrobe made of natural wood. Despite the high cost, it looks amazingly prestigious.
Conclusion
It is not only the material side that forces forum members to take up the instrument. Making cabinets with your own hands is a way to get an exclusive, high-quality product that will fit well into the decor.
The topic of making sliding wardrobes with your own hands is discussed on the forum, and you can find out what tools you may need for home carpentry from the article “Furniture workshop for beginners...”. If you want to experiment with natural wood, you should read about gluing technology - furniture panels are stronger and cheaper than solid wood. In a video about the manufacture and assembly of a sliding wardrobe, a designer who is professionally involved in creating furniture shares the intricacies of the process.
Subscribe to our Telegram channel Exclusive posts every week
Tools and accessories
Having selected the materials, the next step is to ensure the availability of the tools necessary for installation. You will need the following set:
- tape measure, electronic rangefinder;
- level;
- screwdriver;
- jigsaw for cutting;
- screwdrivers;
- electric drill;
- hammer;
- pencil.
It is better to collect all the tools in a separate plastic box in advance.
In addition, you will need:
- screws and dowels;
- Double-sided tape;
- wipes for degreasing surfaces.
It is better to purchase consumables in excess; they tend to run out at the most inopportune moment.
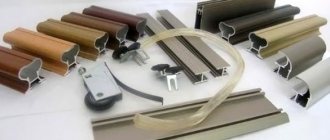
Also, the manufacture of a sliding wardrobe requires the presence of fittings, such as:
- metal guides for the sliding mechanism;
- friezes to the guides;
- rollers for the mechanism;
- racks;
- rod holders;
- mounting angles.
In addition, to attach the shelves you will need special elements - shelf supports.
What should the fittings be like?
When deciding how to assemble a built-in wardrobe with your own hands, pay attention to the selection of accessories. This includes rods, rails, mounting pins, screws, and support elements. But the most important issue remains the purchase of a roller system. There are three options.
- Bottom rail - The door rests on the bottom roller, and the top frame simply prevents the panel from falling out. The simplest and most reliable option.
- Top rail - the sliding system is located at the top, so it operates quietly and less dust accumulates on it. However, it is more difficult to install, and if handled carelessly, the roller can break.
- Monorail - the structure is equipped with two pairs of rollers. This is a fairly reliable, but more expensive and difficult to install option.
Tip: If you are interested in how to make a built-in wardrobe with your own hands, but have no experience in furniture making, it is advisable to entrust the manufacture of the doors themselves to specialists. In this case, all you have to do is screw the roller mechanism and install the panels in place.
Assembly
Assembly should begin by installing the main walls and forming an opening around the entire perimeter using pre-prepared chipboard strips.
How to make a frame yourself?
There are two steps to complete:
- The frame is attached around the perimeter to the walls, floor and ceiling using dowel nails .
- The elements are fastened together with special corners.
If you want to make it beautiful, you can use furniture or plastic corners. If reliability is taken as a basis, then simply buy steel corners.
Advice . A modern way of fastening parts is furniture euroscrews, but for them you first need to drill holes, but this is very difficult to do by eye. In this case, you will have to buy a special drill.
As soon as the base of the cafe is assembled, they begin installing the partitions, and only then proceed to the shelves.
Shelves
Special shelf holders made of metal or plastic are used. We list the most common options for mounting shelves:
corners - not beautiful, but quite simple. This method is used only in extreme cases when other options cannot be used;- Euroscrews are a reliable method, suitable for shelves that will be subject to heavy loads.
Comfirmats can be used only in the most inconspicuous places so that the hats do not spoil the appearance of the cabinet; - eccentrics are a very labor-intensive method, although quite reliable. It is worth keeping in mind that the screw plug will be visible on the underside of the shelves;
- shelf supports - they will not be visible, but this option is simple and reliable.
Once you have decided on the mounting option, you can begin installation. The shelves are installed according to a pre-planned plan.
Important . The shelves should be slightly smaller than the overall depth of the cabinet so that nothing interferes with the closing of the doors. As for closed drawers, it is worth leaving space for handles, that is, they should be 10 cm smaller.
Crossbar
Before starting installation, cut the rod to the required length from the workpiece.
- Mark its location.
- Install the holder on the main wall and the laminated chipboard wall.
- Install the crossbar into the holders.
The holders need to be installed not only with screws, but also with glue. To do this, before fastening, apply glue to the inside, apply it to the markings and screw it on.
Shoe net
If we compare the grids with shelves made of chipboard, they are much lighter and create less load on the entire structure.
In addition, mesh shelves for shoes make the design very convenient and ergonomic. The mounts are very convenient, there are several types :
- support brackets;
- clips;
- pockets;
- brackets.
When installing, shoe nets are cut in the middle, as plastic tips are installed on them. The pitch of the shoe rack should be a multiple of 25 mm. The clips are installed in increments of 245 mm.
Often, shoe nets are installed at an angle of 45 degrees for easy storage of shoes and boots.
Coupe doors
Assembling and installing doors is the most difficult stage in this design. In this case, you cannot save on fittings, otherwise the door may jam or fall out.
Manufacturing
Usually the wardrobe in the hallway consists of two doors, less often they have three doors. Each door is a leaf, which is framed on 4 sides, made of special aluminum profiles.
It is worth noting right away that the canvas may be heterogeneous, but the material must be compatible. For joining, a connecting profile is used. The door profile is designed for a material thickness of 10 mm .
It is very easy to insert a profile into such a profile, despite the fact that its thickness is only 4 mm; the missing 6 mm are simply supplemented with a silicone seal.
You need to buy a special mirror for doors, with a protective film, so that upon impact it does not shatter into small fragments.
Doors should not be wider than 1 meter, because:
- it's quite inconvenient;
- It is very difficult to deliver material this wide without damaging it.
You can order doors from a furniture store, or you can assemble them yourself. This is not difficult to do - a frame is put on the canvas and screwed together.
The algorithm of actions is as follows:
- It is better to start assembly with transverse profiles . To do this, prepare a wooden spacer, onto which the profile is pressed using a rubber hammer.
- As soon as the horizontal profiles are ready, proceed to the vertical ones, they are secured with 6x35 or 5x30 mm self-tapping screws. Before finally tightening the frame, do not forget upper and lower rollers
- If you want to make the fasteners invisible, you should use drills of several diameters: the first hole is made with a diameter of 9 mm, under the screw head, the second 5 mm, under the leg.
- It is worth immediately warning that vertical and horizontal profiles are very different. Three holes are made in the vertical ones for attaching the profiles to each other and for the rollers.
- The rollers will move along the guides - they are installed in the same plane at the top and bottom. The upper guides provide fixation of the blade relative to the depth, and the lower rails ensure closing/opening. Often the lower rollers are made of plastic with a shock-absorbing spring and a screw for height adjustment. Upper rollers with rubberized surface.
- A door stopper is installed in the bottom rail, and closers can also be installed upward, which will smoothly close the door themselves.
Installation
To install the door, you must first install it in the far recess of the top track, and then install it in the lower corresponding channel.
The second canvas is installed using the same principle.
After the canvases are installed, you need to adjust the rollers so that there is no gap between the canvas and the walls. Apply buffer tape to the handles.
We check the doors - if the movement is free and the rollers do not cling anywhere, then the work on installing the doors can be considered complete.
Step-by-step instructions for assembling a sliding wardrobe
Let's consider the process of assembling a structure installed near a wall, which will serve as the back wall. The work is carried out in several stages.
We carry out the markings
First you need to accurately mark the marking lines on the wall. We do it like this:
- We measure the length of the cabinet from the corner and put a mark. We do this in several places at different height levels, which guarantees an even straight line. Connect the marks by drawing a vertical line. This will be the edge of the cabinet.
- Similarly, we mark the location of all vertical sections inside the future cabinet.
- We outline the location of the horizontal shelves.
Installing fasteners
At this stage, you need to place fasteners for shelves and partitions on the marked lines. We do it like this:
- We take the fasteners, try them on to the marking line, determine and mark the areas where the dowels should be located.
- We drill holes at the designated points and insert plastic inserts into them.
- We put the fasteners in the place intended for them and secure them with self-tapping screws.
Installing the cabinet filling
It is necessary to install all the shelves and vertical racks. We do it like this:
- We put up the side wall of our closet. We try on the workpiece and adjust it if necessary. We install and secure.
- We place each dividing post near the fastenings and fix them with screws.
- Let's start installing the shelves. We try on each one, install additional fasteners if necessary, put the part in place and secure it.
- We install round racks and hangers in special mounts and fix them.
Installing cabinet walls
We mount the side, top and, if necessary, bottom wall of the cabinet. We do it like this:
- We mark and drill holes on each part in which the fasteners will be located.
- We try the panels on the wall and mark holes for installing fasteners.
- We drill holes and install plastic inserts in them.
- We put the part in place and fix it with fasteners.
Installation of guides and doors
By this time, the door leaves should be ready. If it is assumed that they are assembled, for example, from clapboard, then the work should already be done. Installation is carried out in the following sequence:
- We take measurements of the top and bottom walls of the cabinet. We measure the guides and trim them if necessary.
- We fix the guides on the walls of the product.
- We fix the parts of the sliding mechanism on the doors.
- We install the prepared sashes on the rails. Depending on the type of suspension, the procedure will be slightly different.
- We regulate the movement of the valves, achieving smooth, silent movement.
Once again we check the quality of installation of each part, the operation of the doors and the strength of the fasteners. The work is completed.
Self-assembly of a sliding wardrobe is quite within the capabilities of a home craftsman. Especially if you choose a simple model. Cutting the material will make the work as easy as possible, then all that remains is to bring the parts home and assemble a cabinet from them.
Interesting solutions
In order not to be limited by standard rectangular shapes when creating a cabinet, you can use creative ingenuity in working with such a soft and pliable material as plywood. You can create a smooth and unusual shape of a shelf or other element of a piece of furniture by moistening a sheet of plywood with water and placing it on a special form - a blank. Within 12-14 hours, the sheet will acquire the desired smooth outline and will be ready for use.
In addition, there is the simplest and most uncomplicated way of attaching shelves to a cabinet using pieces of the most ordinary baseboard. MDF plinths are characterized by increased strength, sometimes not inferior in reliability to metal fittings. To ensure that such fastening of the shelf is not too conspicuous, a piece of plinth can be made one third shorter than the depth of the shelf, and its end can be cut off at an angle.
In this case, the self-tapping screw farthest from the edge of the shelf will have to be screwed in from above, through the shelf board.
Drawings and detailing
If you have the skills and abilities, draw your wardrobe yourself using a special computer program. This will allow you to work in more detail and clarity. If this is not possible, draw sketches manually, taking into account all previously performed calculations. This is called “detailing”, that is, working on furniture in detail. Be sure to indicate in the sketch the thickness, width and depth of shelves and partitions, the length of the rods and their position, etc. Put all the information in a table to better organize it.
In general, whether we design our wardrobe on a computer or draw up a diagram by hand, we carefully take measurements, organize them and proceed to purchase the materials and tools needed for construction.
Expert advice on assembling and embedding a coupe
When making a wardrobe, consider the following:
- The more apartment walls and dowel fastenings are used, the more reliable the structure.
- When assembling, constantly check the vertical/horizontal level of the surfaces with a level to prevent distortion.
- If the cabinet is built into a niche with uneven walls or floors, it is better to first make minor repairs to achieve the geometric correctness of the niche itself. This will save time and effort when assembling the structure.
Sources
- https://mebel-expert.info/shkaf-v-prihozhuju-svoimi-rukami/
- https://severdv.ru/mebel/shkafy-i-shkafy-kupe/proektirovanie-i-izgotovlenie-shkafa-kupe/
- https://StroySvoimiRukami.ru/kak-sdelat-shkaf-kupe-svoimi-rukami/
- https://severdv.ru/mebel/shkafy-i-shkafy-kupe/poetapnoe-opisanie-izgotovleniya-shkafa-kupe-svoimi-rukami/
- https://novamett.ru/shkaf/shkaf-kupe-svoimi-rukami
- https://lafoy.ru/kak-sdelat-vstroennyy-shkaf-kupe-svoimi-rukami-467
- https://decorinfo.org/shkaf-kupe-v-prixozhuyu-svoimi-rukami-podrobnaya-instrukciya-sborki-shkafa-kupe-svoimi-rukami-dlya-prixozhej.html
- https://stroy-podskazka.ru/shkaf-kupe/svoimi-rukami/
- https://mebel-expert.info/vstroennyj-shkaf-kupe-svoimi-rukami/
- https://mebel-v-nsk.ru/shkafy/skaf-kupe-svoimi-rukami-certezi-opisanie-56-foto-proekt-i-shema-s-razmerami-posagovaa-instrukcia.html
- https://mebel-sovet.ru/shkafy/kupe/590-skaf-kupe-svoimi-rukami
- https://dekoriko.ru/shkaf-kupe/svoimi-rukami/
- https://spb.deshevaya-mebel.ru/kak-sdelat-vstraivaemyj-shkaf-kupe-svoimi-rukami/
- https://made-box.ru/samostoyatelno/vstroennyj-shkaf-kupe-svoimi-rukami.html
- https://FurniLux.ru/gostinaya-i-prihozhaya/sdelat-shkaf-v-nishe-koridora.html
- https://okcomfort.com/mebel/shkafi/kak-sdelat-vstraivaemyy.html