A dressing room is a specially designated space in a room where items of clothing will be stored. Typically, dressing rooms are made in the bedroom, where people most often change clothes, but it can be built in another convenient place. A dressing room made of plasterboard saves not only space, but also money.
When there are too many clothes and they are scattered literally everywhere, then even a small dressing room of 3-4 square meters saves the situation. Using drywall to create it, you can significantly save on building materials.
Final finishing of a plasterboard dressing room
Now all that remains is to bring the design to the final stage. For this we:
- We seal all joints between the slabs with serpyanka;
- We putty all the places where screws are screwed in and the joints between the sheets. After the material has dried, make the surface even and smooth using sandpaper;
- prime the dressing room;
- Apply the final layer of putty.
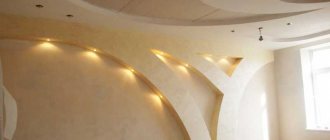
After this, all that remains is to give our structure a more aesthetic appearance that will allow it to fit into the surrounding environment. The dressing room can be painted, covered with wallpaper, decorated with decorative stucco and artificial stone, etc. This will help avoid the feeling of foreignness and emptiness behind the false wall.
Now we insert the doors. Experts recommend using sliding doors, which will help avoid a lot of problems, especially in small rooms. Next, we install the lighting - and your dressing room is completely ready.
As you can see, making your apartment more functional and comfortable with the help of drywall is quite simple. The main thing is to follow the instructions exactly and everything will work out with your wardrobe.
Finishing
The finishing work of a sliding wardrobe consists of applying a primer, putty mixture, as well as sealing joints and visible defects. The whole process looks like this:
- edge trimming;
- priming;
- sealing joints;
- surface putty;
- priming;
- Finishing work.
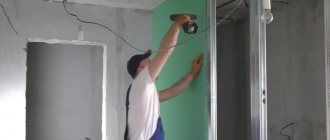
The first thing you need to do is cut off all the joints with a sharp knife. To do this, you should go over all the seams with a tool and cut off the edge. If this is not done, then all the defects will come out during operation. When the edges are cut, carefully inspect the surface: if there are remnants of plaster sticking out somewhere, they must be removed.
Next, take the soil, dilute it with water and treat all cut edges and the entire surface of the drywall. This will provide better adhesion to the putty. The next stage involves sealing the seams using putty and sickle. When the joints are sealed, the surface is puttied. This is done using a spatula. After the mixture has dried, it is recommended to sand the coating.
The final step will be priming over the putty to increase adhesion to finishing materials. For finishing, you can choose paint or wallpaper to match the color of the room.
Metal corner profile Processing of joints
Protecting corners from destruction
Dressing room in the bedroom: placing things comfortably
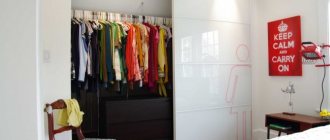
The storage area can be separated from the bedroom by sliding doors. When they are opened, the area of the room will not decrease, which cannot be avoided by installing a swing structure at the entrance to the dressing room. Sliding door leaves can slide on rails towards each other or slide onto an adjacent wall.
Standard straight wardrobes are an excellent solution when arranging large rooms. And in a small bedroom, finding a place to create an area where you can store clothes and change clothes can be difficult. If the entire space of a tiny room is already filled to capacity, but you still need to allocate space for a wardrobe, then you can’t think of anything better than creating a corner dressing room.
A room for storing clothes inside the bedroom is the dream of every housewife, because she will be able to admire order and cleanliness at any moment. By combining a dressing room with a bedroom, you can eliminate the problem of storing and sorting clothes, bed linen, shoes and other accessories. The material for creating racks and shelves should be selected depending on the requirements of the project.
Most often, when arranging a dressing room, chipboard is used, which is produced in various colors and textures. When purchasing this material, you should also acquire suitable fittings. A win-win option for the final finishing of the dressing room inside the bedroom is paneling with wood material. Decorating the clothing storage area with wallpaper or paint emulsion will be equally beneficial. You won’t have to regret such a decision as decorating your wardrobe with paintings, picturesque images or glass.
Also, the entire frame is reinforced around the perimeter with the help of jumpers, which are inserted into the assembled box in increments of 60 cm. The racks are attached to the frame with metal screws 25 mm long. Capacity and versatility are important components when planning a dressing room.
If the apartment is small, you can store an ironing board, dryer, and vacuum cleaner in it. The issue of construction cost is very relevant. Everyone's capabilities are different, and expenses should not undermine the family budget. Since the plasterboard wardrobe will need finishing, primer and putty will also be required. In addition, you will need the following working tools: Since there is no convenient storage room, you need to find another suitable place.
A plasterboard wardrobe in the bedroom is an obvious option. Let's look at all the possible places.
Choosing a place in the apartment
Since there is no convenient storage room, you need to find another suitable place. A plasterboard wardrobe in the bedroom is an obvious option. Let's look at all the possible places.
If properly decorated, the dressing room in the bedroom will be invisible
- Bedroom. Usually has a large area and is an ideal option. Things are always at hand and in quick access.
- Pantry. A very economical option if available. Problems arise only with dimensions (they are predetermined) and ventilation.
- Dead end of the corridor. If there is a long corridor that ends in a dead end, then this is an ideal place for a plasterboard dressing room. But such situations are extremely rare.
- Hall. If the apartment has a hall, then it always has the largest area. You can also make a dressing room in it, but not everyone has such a room.
- A balcony or loggia can be a good place for a plasterboard dressing room. However, for this they must be insulated. It is also necessary that there is heating there, otherwise in winter things will simply deteriorate. You will have to use moisture-resistant drywall and insulation between the sheets.
Location rules
You should think about the design of a bedroom with a dressing room in advance, for which a competent project is drawn up. It is permissible to do it yourself, for which a lot of photos are posted. A specific project is selected, to which the apartment owner makes additional changes. It is often impossible to carry out all the steps on your own, and photo design does not help either, and at the same time it is advisable that a dressing room in a small bedroom be created by professionals.
The first stage of the project is choosing a location for the dressing room in the bedroom. To do this, select one of the options:
along the wall with a window - dividing the space next to the window is considered a good solution. It is optimal to build a small niche structure. A dressing table is installed next to the window, making it possible not only to try on clothes, but also to comb your hair, paint, or perform other actions that require a mirror and high-quality lighting. corner option - the structure occupies a free corner of the room. Most often it is closed with swing or sliding doors. This design looks great in any room and works well in the corner at the head of the bed. A suitable option for a square or non-standard room; along a long empty wall - this option is suitable for a large room
The partition will be created from plasterboard or plywood, after which it will be covered with any pre-selected finishing material. It is important to pay attention to proper lighting, since there will be no natural light in a separate space;
Along the wall with a window
Along the wall Corner
Most often the rooms are quite large, so the bedroom is 18 sq. Bedrooms of 18 square meters are considered easy to renovate, since you can allocate a lot of space for a compartment with things. If this space is organized correctly, it can be effectively used not only for storing clothes and shoes, but it will also be possible to place various suitcases and bags, a sewing machine and other household items that are used quite rarely.
Layout features
Before starting work, you need to find out how much material is needed for the job. To do this, you need to understand the layout. Only by solving this issue will it be clear how many sheets of drywall, screws, profiles and other things are needed.
If nothing limits you in the layout, then it might make sense to order a huge wardrobe or hire workers to do everything. If the financial issue is acute, then every detail should be thought through. A DIY dressing room made of plasterboard will help you save money if you think economically.
Corner dressing room is an economical option
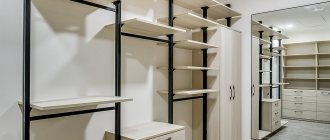
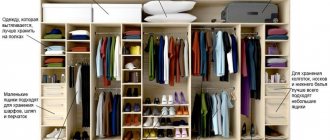
The first step is to understand how much free space there is. If it is possible to allocate 6-8 square meters, then this is ideal. If not, then you will have to get out. After determining the footage, you need to decide how many compartments will be allocated for shelves, and how many for clothes hangers. Usually they make 1-2 shelves at the bottom, then on top there is space for hangers with clothes, and above that there are 1-2 more shelves for other things. And this is done in several sections.
A characteristic feature of the dressing room is the presence of doors. They need to be designed so that it is convenient to enter. Poorly designed doors reduce the usable area of the room.
To summarize, we can say that it is necessary to know in advance the area of the dressing room, as well as its layout. Ideally, draw a sketch where everything will be provided. This sketch will be needed in the work to create a frame from metal profiles and cover it with sheets of plasterboard. Therefore, you need to know where the opening for the door will be created, where the fastenings for the bar will be, and where the shelves will be attached.
What should a plasterboard dressing room look like?
Before you begin installing a dressing room with your own hands, you need to understand what requirements exist for organizing such a room.
When planning your dressing room you should consider:
- room size. It should not be less than 1.5 m (minimum size), otherwise it will not be comfortable to be in;
- the depth of the compartment under outer clothing should not be less than 0.5 m;
- the ability to comfortably change clothes in it. This is a desirable but optional parameter;
- good ventilation;
- perfect fit of the dressing room into the interior of the room:
- convenient access to things;
- Great capacity and versatility.
Note! Before making such a room with your own hands, you must clearly understand its purpose in order to equip it as conveniently as possible for yourself. Taking these requirements into account, you can create a comfortable and practical dressing room
Direct organization of the dressing room
What consumables and tools will be needed?
For consumables, purchase:
- a guide profile to ensure that the plasterboard wardrobe is level;
- profile 50 to 50 to give it stability;
- sheets of plasterboard with a thickness of 12 to 15 mm, there is no point in moisture resistant;
- mineral wool;
- serpyanka, putty and paint;
- electrical wire, switches and sockets;
- chipboards for structures for storing clothes and shoes;
- door and fittings for it.
And from the tools:
- building level and plumb line;
- construction knife;
- screwdrivers;
- drill;
- screwdriver;
- mixer;
- putty knife;
- fasteners.
Project development and markup
Project development includes:
- drawing up a sketch;
- calculation of the length, width and height of structures for storing clothes and shoes based on the sketch (shelves should be made 50 cm deep and at a distance of 40 cm from each other, also do not forget about the bar for outerwear).
Once the sketch is ready, you can begin marking. First of all, mark the points for the guide, then the rack profile. Do this using a building level, a plumb line and a pencil. The pencil, if it is hard to see, can be replaced with masking tape.
Construction of the frame
The construction of the frame looks like this:
- laying a guide profile on the floor with drilling recesses for dowels in increments of 30 cm, installing and tightening screws;
- laying the guide profile on the ceiling according to exactly the same principle;
- laying a vertical profile with drilling recesses for dowels in increments of 60 cm, strengthening corners (double profile or wooden block), installing and tightening screws;
- strengthening the door area with lintels, shown in the photo.
Wiring
Wiring can only be laid in a special casing. It is brought out to where the lighting fixtures, switches and sockets will be located.
Sheathing with plasterboard
Sheathing with plasterboard is not as difficult a task as it might seem at first glance:
- make the outside of the dressing room: lean a sheet of drywall against the profile, stepping back a little from the wall (about 1 cm) and fasten it with drywall screws; if it is large, then cut it with a construction knife; fasteners are screwed in in a checkerboard pattern;
- put mineral wool;
- you do the inside of the dressing room the same way as the outside.
Final finishing
Final finishing includes:
gluing the seams, to do this, embroider them at an angle of 45 degrees, glue the serpyanka and cover everything with putty; applying the first layer of putty; applying a second layer of putty, it is considered the finishing layer; Please note that several hours should pass between applying the first and second layers of putty; sanding the surface; primer (to reduce paint consumption) and surface painting.
Installation of doors and structures for storing clothes and shoes
As noted above, for a plasterboard dressing room you should buy a sliding door type. Its installation will not be difficult, as instructions are included with this furniture.
As for structures for storing clothes and shoes, it all depends on your needs and taste preferences. You can construct literally anything from chipboards. The shelves are attached to corners or confirmations, and to make the racks look great, use edge tape (glued with an iron).
We hope that in our article you found everything you need to make a modern dressing room from plasterboard with your own hands! Good luck.
What to consider in the project
Constructing a dressing room from plasterboard is much faster if you have a project or sketch. In the project, you need to designate in as much detail as possible both the entire dressing room and each section separately. You need to be especially careful when drawing designs with a beveled corner. What a dressing room layout might look like:
The standard depth of the shelves is 50 cm (no longer required), and the distance between them does not exceed 40 cm. The space parameters for the clothes rail depend on the type of clothing. Perhaps you will only have shirts and jackets there, or perhaps you need to provide space for evening dresses.
In the project, we do not forget about the thickness of the walls, otherwise it often turns out that the dimensions turn out to be smaller than planned. The thickness of the walls consists of the width of the profile used and the thickness of the plasterboard with which it is sheathed.
Often a dressing room made of plasterboard is left without doors. At least they are not taken into account in the project. The door width should be 80 cm (in extreme cases - 60 cm). Many people get into real trouble with them. Doors made of plasterboard or other material are always a problem area in the dressing room due to the complexity of their installation. Some people use a sliding door system, others choose a swing design. Some people refuse doors altogether to avoid fooling around. Everyone makes this choice independently.
Dressing room arrangement
Before starting work on creating a dressing room, you need to decide on the place where it will be located, as well as the size of the future building, which, in turn, depends on the functions that the building will perform.
The main function of a dressing room is to store and organize things and clothes.
In addition, such a structure will help you make other rooms of the apartment more free: clear the corridor from outer clothing, remove unnecessary things from the bedroom, etc.
Photo:
With the help of a dressing room, you can save a lot of space by giving up large closets in other rooms, because now clothes can be stored in one place.
Finally, a DIY walk-in closet can be an eye-catcher in the bedroom or other room where you decide to place it.
The bedroom is not the only convenient place to place a dressing room. Moreover, in some apartments it is small and physically cannot accommodate such a structure.
If your apartment has a dead-end corridor, then the dressing room can be located here.
The presence of niches in the house is another great opportunity to place a dressing room. However, here you need to take into account that the depth will be exactly the same as the niche.
And if it is not too deep, then it is better to refuse this option.
Another interesting option is to equip a dressing room on the balcony or loggia.
The downside of this idea is that its implementation will require a lot of financial investment from you: the balcony will need to be insulated and have a high-quality finish so that it is insulated from moisture.
However, if you do it all yourself, it won’t be so expensive, and placing the dressing room on the balcony will save you living space.
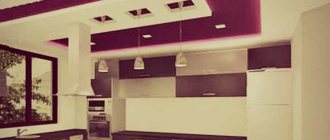
One of the most common and convenient options for placing storage space is the living room. Most often, dressing rooms are made in the bedroom, simply fencing off part of the space.
The disadvantage of this method is obvious - loss of living space. However, if the room is not too small, then the dressing room will fit in organically, given that plasterboard products are quite compact and take up minimal space.
You can see what dressing rooms look like in the bedroom and other places in the apartment in the photo in the section.
Photo:
Look through as many options as possible to give you ideas on where to lay out your structure to make the most of your space.
To make a high-quality dressing room, you need a plan that will reflect all the internal modules and cabinets for storing clothes so that the design is convenient to use.
A standard dressing room includes several required elements. First of all, it is a crossbar equipped with trempels on which outerwear is hung.
At the top of the structure there is usually a place to store hats, and on the sides there are shelves on which everyday clothes will be placed.
It’s also a good idea to make several drawers where you can store underwear, socks and other small items.
If the whole family will use the dressing room, then you need to take this into account and make it more spacious and functional.
Creating a facade
Decorative finishing of the cabinet is one of the most pleasant moments of the whole process. Here you can use your imagination and figure out how to make the closet beautiful and original. Let's consider several finishing options for this product.
| Painting | It is considered the simplest option for finishing work. For this, acrylic or water-based paint is used. After processing the background, you can use a stencil and draw funny pictures. |
| Mirror surface | If there are no mirrors on the doors, they can be made on the sides of the cabinet front. Designing a full-length mirror will provide the opportunity to fully see your reflection. |
| Decorative plaster | If the rest of the room is made of plaster, do not deviate from the plan. |
| Wallpapering | Choose contrasting or plain wallpapers that are similar to the main materials. |
| Imitation of natural stone | Stone masonry is the choice for antique interiors or loft style. |
| Decorative film | A simple way to diversify the surface of the cabinet is to stick a film. It is recommended to do this using a rubber spatula. |
Most types of cabinet finishes are applied directly to the primer, so be sure to complete this step before decorating.
How to make a dressing room from plasterboard with your own hands
Before starting installation work, it is necessary to prepare the tool for work and purchase materials.
Tools and materials:
The construction of any plasterboard structure begins with the assembly of a strong, stable frame
After covering the frame with plasterboard sheets and preparing the surface, it can be decorated with any facing material
- Drawing. A competent sketch is half the work in this case, so it is imperative to draw a plan of the room to scale and indicate all the dimensions and details of the dressing room.
- Marking. Checking the location of the nodes with the drawing, you need to transfer the dimensions to the walls with a pencil. The position of the profile can be marked with adhesive tape.
- Frame installation. The supporting strip is attached to the wall with dowels, checking the horizontal level. Vertical profiles with brackets for shelves and hooks are inserted into the grooves. Distribute them in increments of 60 cm and secure. Using a hammer drill with dowels, guide profiles are fixed to the floor and ceiling. Vertical posts are inserted into the supporting profiles, orienting them parallel to those attached to the wall. Using a screwdriver and self-tapping screws, secure the crossbar and hooks to the brackets.
- Cutting drywall. Using a knife, cut the gypsum boards into the required sizes and secure them with self-tapping screws on the inside of the frame.
- Covering the frame with gypsum plasterboard sheets. Before covering the other side, you can lay a layer of mineral wool between the sheets for insulation.
- Electrical wiring. If there is a ready-made socket in the wall, this is an ideal option for installing a lamp. If this is not possible, you can agree with the electrician on the possibility of installing spotlights or LED strip. All that remains is to sew up the walls on the other side, screwing the sheets to the profiles. If the frame does not have wires and sound insulation, you can not sheathe the inside, but simply paint it.
- Door installation. The best option for a dressing room would be a sliding door. If you make it mirrored, it will not only save space, but also create the appearance of its expansion. A spectacular curtain made of thick fabric is also suitable as a budget option.
You can equip your dressing room with custom-made metal structures or hand-made shelves and brackets
Dressing room equipment
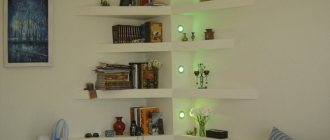
It is advisable to treat the entire surface of the drywall with putty (seams are a must). Then the gypsum board is coated with a primer. After drying, they move on to finishing - painting, wallpapering, wood paneling and other materials. The quality and choice of material depends on preferences and material capabilities.
The choice of cladding should take into account the style and decor of the room, because the outer wall should become the logical conclusion of the remaining walls. In this version, it can even expand the space. The interior space is decorated with light pastel colors, since the contents of the dressing room will add diversity.
The space saving is obvious - after the construction of the wardrobe, the shelves of cabinets, drawers of chests of drawers and bedside tables, which were previously overcrowded, can be completely removed
If you have inspiration, you can also decorate boxes with containers. Decoupage, painting, patchwork - many fashionable ideas can be easily found online.
A full-length mirror is a must in your dressing room. It can be hung on the wall or made into a mirrored door. If there is enough space in the room, you should place an ottoman in the middle of the room. It will help make fitting comfortable and enjoyable. If the banquet is hollow, then you can place belts, clutches and other accessories inside.
The plan diagram is depicted on a regular sheet or graph paper. Based on the design and dimensions, markings are applied to the surface using a laser level, pencil, or meter. The door leaf is installed into the mechanism after covering the partition and finishing coating. Installed doors are checked for unhindered opening. After this, the fittings are installed and the flooring is laid. Options for the design and size of a dressing room for an apartment
Shelves and racks – their choice will depend on the project you are putting together. The most popular material for this is chipboard; it is practical and also comes in a lot of shades. If you do not have a tool at home for sawing the material, you can order it to be cut at the place of purchase to the required dimensions.
The contents of your dressing room will depend on which system you choose. Usually ordinary chipboard is used, and the work is done like this:
Assembling a frame from a metal profile
This is what a simple frame for a dressing room looks like.
Now it’s time to talk about how to make a dressing room from plasterboard with your own hands. You need to transfer the drawing to the wall, floor and ceiling so that you can see where to attach the profiles. The frame will be assembled from a metal profile, so you need to mark everything correctly. Since the dimensions of the structure are small, you can manage it using a level, tape measure and pencil. The profile is used instead of a ruler.
The places where the profile will be attached to the wall are marked on the floor, wall and ceiling. A step of 40-60 cm is quite enough. In these places, the surface is drilled for dowels (dowels themselves measuring 6x40 mm are quite suitable). The profile is applied to the surface and holes are also drilled in it, and then it is secured with driving screws. This is how the profile is attached in all places where it touches the wall, ceiling or floor. Some people use a rack profile for these purposes, and the rest is assembled into a structure from guides. Others prefer to carry out all work with a guide profile. Neither option is wrong.
Before installing profiles to the wall, ceiling and floor, it is advisable to lay sealing tape at the fastening points. It is used for additional sound insulation and reduces the level of vibrations of the entire structure. When things are put on a shelf, doors are closed or coats are hung up, there will be much less noise.
When assembling the box, it is important to take into account the space under the door so that the profile does not run along the floor. Since the dressing room is made of plasterboard, additional reinforcement of the frame in the doorway may be required. Also, the entire frame is reinforced around the perimeter with the help of jumpers, which are inserted into the assembled box in increments of 60 cm. The racks are attached to the frame with metal screws 25 mm long. You need to make sure that one of the posts goes through the place where the tramp rod is attached.
If the dressing room already has an outlet, then great. If not, then you need to think about how to bring it through profiles. You should also do the wiring at this stage if there are several light sources in the dressing room. If you also make shelves from plasterboard, then it will be a very labor-intensive dressing room. And such shelves take up a lot of space. But built-in partitions for dividing the dressing room into sections can come in handy. They are made in the same way as the base frame.
Plasterboard covering and finishing
Drywall is fastened with self-tapping screws in increments of 15-20 cm
Sheathing the entire structure with plasterboard begins from the inside. Where possible, whole sheets are used, and in other places they are trimmed
It is important that the edges of the sheets fall on the profile, otherwise their fixation will be problematic. Self-tapping screws 25 mm long (maximum 35 mm) are used for fastening.
Drywall must be screwed in all places where it comes into contact with the profile. The screw heads should not stick out; they should be slightly deepened so that the surface remains smooth.
When a plasterboard dressing room is lined from the inside, you need to provide space for sockets, lamps or wire outlets. Depends on the project. A cavity is formed between the sheets of drywall (inside and outside the dressing room), in which it is convenient to route wires for future lighting. Some people carry out additional insulation and sound insulation, but for a dressing room in the bedroom this is clearly a waste of time and money.
When all the sheets of drywall are secured, you need to putty all the joints and screw heads. The joints are additionally strengthened with reinforcing tape so that they do not cause cracks in the future. It is also necessary to putty all corners. Trimmed seams must be primed before puttying to prevent the mortar from falling off. After puttying, the surface of the dressing room will become uniform and ready for finishing.
Dressing room before and after finishing
Further work depends on the type of finishing coating chosen for the dressing room. Its walls can be simply painted or covered with wallpaper. Some people add additional decorative panels or plywood. Some people like covering walls with mirrors.
Preparation of materials, tools and other devices
When all the preliminary work has been completed and there is an understanding of how much of what is needed, then it’s time to move on to purchasing. For work you will need the following consumables:
- ordinary drywall 12.5 mm thick. It is necessary to calculate the required area in advance and convert it into the number of sheets, taking into account cutting;
- metal profile 50x50 mm. The design is quite simple and without additional burdens, so you can get by with one type of standard profile;
- metal screws 25 mm or 35 mm for fastening drywall;
- dowels for attaching profiles to the floor and ceiling.
Since the plasterboard wardrobe will need finishing, primer and putty will also be required. In addition, you will need the following working tools:
- knife for cutting drywall sheets;
- metal scissors for cutting profiles;
- cutter for fastening profiles together (you can use small metal screws);
- screwdriver and drill for screwing in screws and creating holes for dowels;
- roller with spatula for primer and putty;
- level.
Some advise for some reason to insulate the dressing room, but if it is in the bedroom, then there is no point in this. Even in other heated rooms, insulation will only be an additional expense that will not bring any benefit. An important point is lighting. It is not necessary for small areas, but for a large dressing room light is necessary. Therefore, you should purchase the necessary wires and lighting fixtures.
This is a more or less standard list of what is needed, but it can be expanded. For example, hinges, door handles, sliding door systems, etc. may be required.
Installation of door and storage structures
Once the finishing is complete, we begin installing the doors. There are several options for installing the door structure:
- Hinged doors are installed using conventional hinges. Before attaching the canvas, a box is installed onto which the hinges are screwed;
- If you purchased a sliding door, its installation is carried out based on the manufacturer's instructions. Following the instructions, it will not be difficult to install the sliding door yourself.
The contents of your dressing room will depend on which system you choose. Usually ordinary chipboard is used, and the work is done like this:
- The shelves are fastened with the help of corners that hold the shelves, or with the use of confirmations.
The second option is more reliable, but you will have to spend more labor on it - drill special holes in the material for the comfermat; Options for sliding doors for a dressing room - Also, for the aesthetics of the structure, it is worth gluing all the ends of the shelves with edge tape. The work is simple, just apply the edge to the edge of the shelf and heat it with an iron;
- The rods are made from furniture pipe, which can be bought in a store of the required length. Drill a small recess, insert flanges into them and hang the pipe.
You can install drawers that are assembled from chipboard and plywood, which is installed on the bottom of the drawer. There are a lot of photographs of various types of similar structures on our website.
Ventilation and lighting
Even in mini-dressing rooms, and even more so in large ones, ventilation is necessary: in a closed room, a musty smell quickly appears, which no perfume can mask. Therefore, even when planning, find a way to make ventilation in the dressing room.
The principle of its design is no different: in the upper part of any of the walls, preferably further from the door, an exhaust hole is made into which a fan is inserted. The inflow is provided either into the gap under the doors or into special inlet openings located just above the floor level. They are closed with decorative grilles. The outlet of the ventilation duct should be into the general ventilation system; you can use plastic boxes to take it outside or under the roof of a private house. Air exchange organized in this way effectively maintains the normal state of things.
Principles for organizing ventilation of a dressing room through a bathroom
When choosing a fan, you should pay special attention to the noise level. Since dressing rooms are often located in or close to bedrooms, noise should be kept to a minimum. It can be controlled automatically or turned on/off using conventional or walk-through switches.
The lighting should be bright. Firstly, this is necessary to quickly find things, and secondly, dressing rooms are often used as fitting rooms to immediately see how well the selected items fit together. The mirror is usually placed on the door or mirrored doors are made. In this case, the light should be directed not only to the shelves and storage systems, but also to the fitting area.
One of the lamp options
You can use lamps of any type, but it makes sense to make them turn on from motion sensors. They opened the doors - the lamps came on, there was no movement, they turned off. There is another option for swing doors: there are lamps with buttons that light up when the door is opened and turn off when they are closed.
Why do you need a dressing room in the bedroom?
By replacing the closet in the bedroom with a full-fledged dressing room, you can significantly save space not only in the bedroom, but also in part of the hallway and other rooms. A dressing room is a multifunctional room, a kind of storage room in which you can store many things.
Namely:
- Clothes;
- Linen;
- Toilet accessories;
- Cosmetics;
- Shoes;
- Outerwear;
- Bags;
- Cosmetics, etc.
In many apartments, the space is not enough to store the same supplies of household chemicals and other household items, so often all this is placed in the dressing room.
So, where do you start building a plasterboard closet in your bedroom?
What needs to be calculated before starting work on organizing a dressing room?
There are several things that need to be considered before you begin organizing your closet. These include:
- Location. This has already been addressed.
- Square. It’s good if you can allocate 6 square meters. Minimum – 2 square meters. When deciding on the area, think about what you will put in the dressing room. For example, if only casual clothes and shoes, then a minimum of 2 square meters will be more than enough.
- Door. It should not create obstacles. Choose a coupe type door (sliding in different directions).
- Designs for storing clothes and shoes. They should be attached wisely and not in a chaotic manner.
Making a dressing room from plasterboard with your own hands
As an example, we consider a room measuring about 20 square meters. m., which is a passage. During the major renovation, it was decided to isolate it (make it non-passable, with its own door) and separate a part for the dressing area. The size of the dressing room was 3 square meters. m., the remaining residential part is 15 sq. m. m, with 2 sq. m. became a corridor. The initial ceiling height was 2.5 m; after installing the plasterboard suspended ceiling, the height decreased to 2.4 m. The photo shows that along with the structure for the dressing room, a decorative ceiling element for the room was erected, but it is not considered in this article. Frame The future walls and ceiling are ready, you can start attaching the plasterboard sheets.
In this example, sheets of size 150 by 60 cm, 12.5 mm thick are used. They are no different from the usual large sheets, but they can be brought from the store in any passenger car and fit in a small elevator. In addition, they are convenient for one person to attach.
Are you wondering how to make a dressing room in your room, but don’t know what material to choose for the walls? To build a dressing room in an apartment, lightweight plasterboard partitions that you can build with your own hands are suitable. The article shows photos of the process of building the walls and ceiling of a dressing room measuring about 3 square meters. meters.
The width of the PN and PS profiles is selected depending on the desired thickness of future partitions and can be 4.2, 5, 6.6, 7.5, 10, 12.5, 15 cm.
Wardrobe sizes
Our realities are such that most people live in small apartments, where every centimeter counts. Therefore, issues of size often play a decisive role. The smallest dressing room can have an area of 1.2 - 1.5 square meters. meters. It is a rectangle with sides 1.5 * 1 meter or so. Also, a small dressing room can be corner - this option is even more spacious than a rectangular one of similar size: with an equal area, the length of the sides on which shelves and storage systems can be placed will be greater.
Small dressing rooms: 1.5 by 2.5 m and 2 by 2 m
A rectangular mini-dressing room should have a width of at least 1.2 m when things are placed on one side, and at least 1.5 m when placed on both sides. The depth should be such that it is possible to “enter” there. This is what mainly distinguishes dressing rooms from sliding wardrobes, and also the ability to install any doors.
What to pay attention to before starting work
There are several recommendations that it is advisable to consider before installing a dressing room. This is necessary in order to install the structure in a place more convenient for everyone, while choosing the right dressing room configuration:
Drawing with dimensions for arranging a plasterboard dressing room
- Consider the location, which should be chosen very carefully. The difficulty is that in old apartments it is very difficult to find a place for this structure, due to the small area of Khrushchev-era buildings. If there is a pantry, then there will be no problems, but if there is nothing like that, then you will have to separate part of some room.
- Square. The optimal size for a dressing room is 6 square meters. m, but few can build such a structure. But at the same time, making a dressing room less than one square meter is unacceptable. Before choosing a size, decide what will be in the dressing room, which will help determine the size.
- The door - its design and location. It should be easy to enter the dressing room, so you need to install the door in such a way that it does not create obstacles.
- High-quality planning of space inside the dressing room.
Design and layout with the dimensions of the dressing room This aspect should not be missed, since the ergonomics of the entire space will depend on the correct layout of the storage system. - Saving. Of course, you can simply order yourself a wardrobe made of plasterboard and pay for its installation, but we will consider an economical option - a do-it-yourself wardrobe made of plasterboard. It will be much cheaper.
Requirements for a dressing room
It’s easier to make a plasterboard dressing room without an open top.
Before you dive into work, you need to understand what a dressing room should be like. Everything is thought out in order to organize the storage of clothes and shoes, as well as to have quick access to them. It’s clear that you need to save space as much as possible. Let us immediately note that a dressing room is made with your own hands from plasterboard in large rooms. There is no point in creating it in a 2 by 3 meter room.
You may not need to do anything at all, because often closets are converted to store clothes. But if there is no pantry, then you will have to create everything yourself.
There is no point in making a dressing room less than 1x1.5 meters. If it is even smaller, then no layout will help to properly store things in it. The more things, the larger the area. If you need to store a lot of dresses, then the space for the dressing room should correspond to this volume. The fact is that long clothes take up height, which means there will be fewer shelves and, accordingly, less space for other clothes or shoes.
Where to do
Even in small apartments there are “appendicitis” that cannot be used normally. This is where you can make a dressing room.
Another popular option is a pantry. In this case, everything is generally simple. You remove everything unnecessary, change the doors and install the appropriate content: racks, racks, baskets, shelves.
Dressing room from the pantry
If there is nothing like this in the apartment, they fence off part of the room - the end or the corner - you need to look at the layout. The good thing about a corner dressing room is that it allows you to use the most difficult areas to arrange, namely the corners. Especially if there are closely spaced doors in two adjacent walls. This zone is considered “dead”: you can’t put anything there except a small corner shelf: everything will get in the way. About the same option - two windows or a window and doors.
Corner dressing room
If the area turns out to be too small, it is possible to increase it a little, making the wall not flat, but with the middle extended slightly. This will not reduce the area of the room much, but much more things can fit.
A way to increase the area a little
They are also made on the loggia - by making part of the glazing opaque or by building a wall. Only here you can’t do without insulation - it’s unpleasant to wear cold clothes in winter.
Dressing room at the end of the balcony or loggia
The second option is suitable for wide loggias. In them, shelving can be placed along a long wall.
Option for using a balcony
In the corridor or hallway, a corner or “appendix” is also fenced off, if the layout allows. Here everyone can decide only by location: there is a place for this or not.
A dressing room is most appropriate in the bedroom. This is simply the best place to store things: in the sense that it’s more convenient to dress here. Therefore, for these purposes, part of the room is fenced off. In this case, a partition is needed and most often it is made of plasterboard. This technology has long been known and worked out to the smallest detail. It won’t take much time even if you have no experience: a maximum of two to three days for assembly and finishing.
If you make a partition from gypsum board or gypsum board according to all the rules, you will need double cladding, and this will “eat up” centimeters, or even meters, of area. Therefore, most often they are sheathed only on the outside, but in two sheets with overlapping seams. When assembling the frame, do not forget to make reinforced racks for fastening the door. With single cladding, exposed profiles remain inside, but it is convenient to hang shelves-baskets for things on them. If you plan to do this, then take them with a thick wall so that they can hold the weight properly.
Plasterboard partition for dressing room
The partition can also be made from laminated chipboard or OSB, or MDF board. This is an option for those who do not like to bother with putty. But you need to choose a lamination that will fit into the interior without any problems.
The interior design of a one-room apartment is described here.
Arrangement: filling and storage systems
If the area is limited, there is no point in making furniture from wood, MDF or chipboard into the wardrobe. They take up precious centimeters of space and also interfere with air movement. Another disadvantage is that redoing something is problematic.
“Standard” type furniture takes up too much space
Recently, the general trend is the installation of lightweight metal storage systems. They are modular and assembled on special racks. Racks can be attached in two ways - to the walls or to the ceiling and floor: different manufacturers make different systems. And everything that is needed is hung on these racks.
The racks can have notches along the entire length, which makes it possible to install any element at any height. These are the most mobile systems that can be modified easily and simply - simply by moving them from one row of notched hooks to another, arbitrarily changing the height of the shelves and baskets, and other elements.
Convenient modular system
There are racks of rectangular cross-section, with grooves cut on both sides. The necessary components are attached to the clamps in these grooves.
Different type of racks and different mounting system
Please note that there are different shelves and drawers - made of wood or wood materials, metal - chrome-plated or painted. They can be retractable, they can be placed one on top of the other or on shelves.
All these systems are sold: racks and a list of various components. But they are produced mainly in European countries, so the price is high. An economical option for dressing room equipment can be made independently from a round chrome-plated furniture pipe and various fasteners for it. It turns out that this furniture is not as mobile as we would like, but it costs significantly less.
Accessories for a wardrobe made of round furniture pipe
Devices for placing clothes
In addition to standard and not so standard drawers and shelves, there are interesting special options. For example - skirts or trousers. Special guides on which the transverse strips are attached, sometimes they have clips. They allow you to hang your skirts/pants straight and not be afraid that they will fall. It is convenient if such a hanger extends, allowing you to inspect all the contents.
One of the options for filling a dressing room is a bracket for skirts or trousers
This device can be replaced with a simpler one, but much cheaper - a hanger with crossbars located one below the other. It's not as convenient, but it allows you to organize your clothes just as well.
Budget option for hangers for trousers and skirts
There is a retractable design for ties, only it is usually oriented differently and extends out in length, although not everyone likes such a system, but prefers folded drawers into cells.
Tie devices
There are several ways to place hangers. The simplest are pipes, the more economical (in terms of space use, but not in terms of money) are tie-like retractable brackets.
Pull-out brackets for clothes hangers
Another device is a pantograph for clothing. This is also a pipe, but capable of descending. A kind of lift for clothes. This device allows you to use the space right up to the ceiling, without compromising your comfort. It can be attached either to the side walls (the more common option) or to the wall. There is a handle-bar attached in the middle of the pipe, by pulling which you lower it to a horizontal position. The carrying capacity of such devices is usually small (up to 18 kilograms), so they are used for lightweight clothing.
Furniture pantograph - for light (by weight) clothes
Shoe storage systems
Problems often arise with storing shoes: some people have dozens of pairs of them, so it’s time to arrange separate dressing rooms for them. But among the standard sets of equipment there are several interesting ones for storing shoes.
Let's start with the retractable system. IKEA has it. Pins with shoe modules mounted on a movable frame. Convenient, compact.
Retractable shoe system
There are mini chests of drawers that do not take up much space, but are hung on the walls, and there are hanging organizers that can be easily placed on a horizontal pipe.
Shoe storage systems in the dressing room These are mini chests of drawers on the wall
In general, there are many interesting ideas for shoes that allow you to place them compactly and at the same time conveniently. See photo:
Wheel for storing shoes. Rotating round cabinet. Excellent use of space in the corner. Such “rotating” drawers are very convenient not only for shoes, but also for small items and linen.
The way to store boots is on hangers with clothespins
Devices for compact storage of shoes Such systems are mounted on doors or walls
There are very inexpensive options. For example, the seasonal one, which is currently in use, can be stored on a grid with rearrangeable hooks or wire shelves. You've probably seen similar ones in stores. This is a mesh or perforated panel on which hooks/shelves are hung. Convenient: you can move it under any type of block, make the distance larger or smaller.
An economical option for storing shoes - a mesh with hooks and shelves
Hanging such a grid is not a problem - even on a wall, even on the side surface of a cabinet or door. Hooks and shelves simply cling to the crossbars. This option is ideal if you are short on money and space. If you like the idea but need something more presentable, make or find a perforated metal shield on the frame. Hooks are also inserted into it with a bang.
Modification - shield with hooks
In general, when arranging a dressing room and on a limited budget, you should look for storage systems not in furniture stores - online or offline. It’s better to look at sites that sell commercial equipment. There are many interesting devices that save space: stores also try to display the maximum amount of goods in a minimum area. For example, these are shoe racks.
Shoe stands
If you attach wheels to the first one, you get an excellent retractable system. The price of such equipment is much less than similar equipment, which is sold in furniture stores.
Design options
Creating a dressing room from plasterboard will take you no more than 2-3 days, but before installing the structure, you should carefully consider all the important aspects: convenient location, dimensions of the structure and its functional content. All these factors must be taken into account at the design stage in order to avoid mistakes.
Selecting a location
Many apartments have ready-made “cubbies” and storage rooms that can be used as a dressing room. In this case, you only need to worry about constructing shelves and installing the necessary fittings. If your apartment or house does not have suitable premises, you can allocate space for a dressing room in one of the rooms or in a wide corridor.
Most often, such storage rooms are installed in spacious bedrooms. For the construction of the structure, so-called “dead” corners are allocated - areas that are either not used at all or are occupied by cabinets and chests of drawers.
When choosing a location, keep in mind that the optimal size of the structure should be at least 1 * 1.5 meters; in a smaller area you simply will not be able to conveniently place all the things that need to be removed.
Configurations
There are several configuration options for storage space:
- "Corridor". With this option, the new room is stretched along one of the free walls. Racks with shelves and rods are built in a fenced-off area. Although such a design allows you to remove all things from the bedroom, it is considered not very convenient - in a cramped passage you will most likely feel uncomfortable sorting out your wardrobe.
Square. In this case, a square or rectangular area is allocated in the room. The spacious design will allow you to conveniently place shelves with shelves, shoe racks, and even - if the bedroom area allows it - an ironing board or dressing table.
Corner. Another option for creating a spacious room for storing things, which does not stand out so clearly in the interior and does not take away useful space from the bedroom.
Polygon. The free configuration of the contours of the new room will optimize the consumption of usable space in the bedroom and dressing room. “Growing” out of the corner, the structure with its walls will create a comfortable room geometry.
The choice of configuration should be based on the availability of free space in the bedroom
It's important to strike a balance here so that new additions to the room don't make it even cramped than the cabinets you're trying to get rid of.
Doors
Since the very concept of a dressing room includes a certain isolation, you should think about the design of the entrance to it. The door should be comfortable and not take up useful space both in the new room and in the bedroom.
It is clear that using swing doors is not the best choice. The optimal option would be retractable canvases or lightweight folding structures. A specialist store will help you choose the perfect door.
But you don’t have to use the doors at all, leaving the passage to the room open. In this case, the opening can be designed in the form of an arch - the rounded shape will give the structure intimacy and airiness.
Space planning
So, you have decided on the configuration and area of the future plasterboard dressing room. After this comes the most critical design stage: planning its internal space.
First, the depth of all shelves is included in the drawings: as a rule, 55 cm is enough. This size is enough to optimally place things, seasonal blankets on horizontal surfaces, and also conveniently place longitudinal rods for hangers.
After this, the space is distributed into several functional areas, usually divided into three levels:
- upper, for storing bulky and rarely used items (tourist equipment, tools, hat boxes, etc.);
- medium, for storing clothing itself;
- bottom, for storing unused shoes.
The last two levels are predetermining when planning. The height of shoe racks or shelves for storing shoes should be set aside from the floor, and then distribute the remaining space for shelves and areas with rods:
- the optimal height of shelves for things is 40 cm;
- height of the area for shirts, jackets and blouses - 100 cm;
- the height of the area for storing dresses, suits and outerwear is 150 cm.
In addition, when planning the space, it is necessary to select one of the walls for a large mirror and organize optimal lighting in the created room, since there will be no natural light in it.
Construction of the structure
So, you have thought through the location of the dressing room, determined how much area you are ready to allocate and know exactly the dimensions and configuration of the future structure. This information is sufficient to begin work. Do them in the correct order, then you will not have miscalculations and shortcomings due to the fact that you did not do what was needed.
Design
The most important step, if you make a mistake here, you will get so many problems in the future that a situation may arise that it will be easier for you to demolish the structure and make a new one than to eliminate the shortcomings caused by ignoring the planning process.
Let's figure out what needs to be done:
- First of all, you need to draw a sketch of the compartment in which the dressing room will be located . If it is a niche or an old pantry, then everything is simple: you need to take measurements of the actual area and transfer the results to paper. If you are finishing part of the room, then you need to carefully plan the size of the structure down to the centimeter and determine its configuration; the example shows a complex but practical option with a beveled corner;
Mark the outlines of future walls in the room to visually see how much space it will take up
- Next, you need to determine the optimal sizes of racks, shelves and compartments for storing outerwear. The depth of the shelves should not be more than 50 cm, the distance between them 30-40 cm, for bulky items the height should be 10 cm greater than their size . Compartments for outerwear are calculated based on their number and length of clothing; usually their height is about one and a half meters. The minimum width of the passage should not be less than 80 cm;
- Based on all the above information, you can create a rough sketch of the future storage system. If you cannot decide on its configuration, then look at ready-made solutions on the Internet and take a separate option as an example, or assemble your project based on several sketches you like; finding a ready-made solution for certain sizes can be difficult;
An example of a competent sketch for a rectangular room measuring 2.9x1.6 meters
- Don’t forget to take into account the position of the door and its size; this can be either a regular swing version or a sliding design, as in sliding wardrobes . To implement it, you don’t need to be a pro - there are ready-made kits on sale with guides and rollers that are suitable for ordinary door leaves and are installed according to simple instructions. The price of such a set is around 2-3 thousand, depending on the quality;
This is what this mechanism looks like; it’s perfect for a dressing room
- In order for all your racks to be strong and reliable, they need to be very well secured to the wall. Having a ready-made project will help you determine in which places the storage structure will be fixed; there it is worth laying additional frame elements, if necessary. By doing so, you will make your life easier and get rid of the headache of how to attach the shelving without breaking the wall.
If you have two loggias, then one of them can be used as a dressing room, so you can deal with the trash by placing it in closets, and additionally get a full-fledged wardrobe without reducing the living space at all.
The option using a loggia will require minimal investment in refurbishment
Necessary materials
Now let's figure out what is needed to carry out the work, let's start with the materials for arranging the partition:
- The PS-2 rack profile is 50x50 mm in size, it is quite enough to build a strong wall , and we do not need a large thickness, since a thick partition takes up extra space. We don’t need special heat and sound insulation; in the dressing room these indicators have absolutely no meaning. In the kit you need to purchase a guide profile, it is attached around the perimeter and sets the position of the future wall;
The PS-2 profile is an ideal solution for constructing a partition
- To cover the structure, you need plasterboard with a thickness of 12 or 15 mm, choose for yourself. In fact, there will be no load on the structure, and the humidity in the room should not rise above normal. Therefore, there is no point in spending money on moisture-resistant drywall or gypsum fiber boards;
- The internal cavity of the partition will be filled with mineral wool, this is necessary in order to create a minimum thermal insulation layer that will allow maintaining an optimal microclimate in the compartment. And the walls won’t ring when hit, like an empty bucket, which is also important;
- To finish the surface we will need putty, mesh for seams and primer to strengthen the base after work. As a finishing coat, I recommend using washable paint; this is the simplest and most inexpensive option, which is both reliable and attractive, because you choose the best color yourself and can change it from time to time;
- Lighting is also a must, so don’t forget to purchase wires, a switch and an outlet. It is best to use LED lamps, they are economical, safe and very durable;
LED lighting for the dressing room is not only practical, but also beautiful
- Don’t forget about the door and the set of fittings for it; it all depends on what type of structure will be used. As for the door leaf, choose an option that suits the interior; you don’t need expensive products, and there won’t be any stress on the structure.
As for racks and shelves, it all depends on the project you choose. The cheapest and most popular option is chipboard, which is good because you can choose any color and texture. Another plus is that if you have a ready-made design project in hand, then they will cut the material into the required pieces, you don’t have to worry about sawing, you will get elements of an ideal shape.
Naturally, a set of fittings is also purchased, which can be selected in the same place as the chipboard.
Chipboard is an excellent option for constructing a storage structure
At one time I assembled shelves from cut-up material, and I liked the process for its simplicity and high speed of completion of the work. The main thing is to have an assistant who will hold the elements while fastening.
Frame construction and wiring
Now we will figure out how to make a dressing room from plasterboard, the work begins with the construction of the frame, and this process consists of the following steps:
Construction of a frame is a simple but responsible process
- First you need to use a level to mark the future position of the guide profile . You can mark using a construction pencil, and for better visibility, stick masking tape along the line in some places. To quickly and accurately apply markings, you can use a tapping cord; it is very convenient to use;
The chopping cord must be pulled away from the surface and released; the chalk will leave a straight line
- Then you can start drilling holes for the dowels; it is best to attach a profile and make markings along its holes so as not to drill holes in it either. For fastening, quick installation dowels 6x40 or 6x50 mm long are used. Accordingly, the diameter of the drill should be 6 mm, and the working length should be at least 10 mm longer than the dowel;
- The profile is fastened quickly and reliably: dowels are inserted into the holes, after which an impact screw is driven in, which pushes the structure into the concrete, ensuring reliable fixation. If your floor is wooden, then you don’t need to drill anything, you can simply screw the guides using ordinary wood screws 25-30 mm long;
The profile is attached to wood, chipboard and other soft materials with self-tapping screws
- Then you need to install the vertical posts; to do this, they are inserted into the guides in increments of 60 cm and fixed with special screws called bugs. If you have a corner in your structure, then you need to strengthen it by installing and connecting two profiles, this will make the wall much stronger;
Corners should always be reinforced for reliability.
- At the location of the doorway, the structure should be strengthened with additional lintels. Also, jumpers are placed throughout the entire structure, do not forget about the location of shelves and racks and place horizontal elements at the desired height so that you can later attach to them.
The finished frame must be motionless and not bend when pressed.
When the profile structure is ready, it’s time to start laying the wiring; it can be laid directly inside the frame in a special corrugated hose , and as for the walls, you need to make grooves in them. If you have a good finish and you don’t want to spoil it, you can put the wire in a box, it will still hide behind the shelves, and the dressing room will look neat and attractive. Wires are routed to the locations of lamps, switches and sockets.
Holes are drilled in the profile and corrugated wires are pulled through, this is safe and reliable
Sheathing of the structure and its putty
When the frame of the future wall has been built, you can begin covering it; the instructions for doing the work yourself are as follows:
- Fastening drywall is quite simple: the sheet is placed so that its edges are located on the profile . Next, you need to use self-tapping screws with a fine pitch of 3.5x25 mm to attach the material to the profile, the fastener spacing is 20 cm, you need to tighten the hardware so that the cap does not stick out above the surface, but you shouldn’t recess it too much, since the sheet may crack or break ;
- Where a whole sheet does not fit, it is necessary to cut pieces of the required size and secure in the same way. Try to join the elements as best as possible so that there are no wide gaps between them, which will have to be sealed later;
- When the structure is already sheathed on one side, you can begin work on the other side. In this case, before attaching the sheets, mineral wool is placed in the internal space of the frame, which is cut into pieces of the required size. Otherwise, the work is carried out according to the same algorithm as in the points described above;
As a result, you should have a multi-layer structure with mineral wool inside
- Putty begins with gluing all seams with self-adhesive sickle tape, which strengthens the joints and avoids the appearance of cracks on the surface . Also, before starting work, check whether all the screws are recessed below the plane; to do this, simply run your hand over the surface; if there are no protrusions, then everything is fine;
Serpyanka reinforces sheet joints
- The putty is first applied to all joints, and the screw heads are also covered. If you have corners in your design, then, in order for them to be perfectly smooth and durable, use a putty corner, which is placed and covered with the compound;
- The second layer is applied to the entire surface in a thin layer, after which you need to wait for it to dry and rub it with sandpaper. If there are still many flaws on the plane, you will have to go through the putty again to get a smooth surface;
- After sanding, the surface is coated with a strengthening primer, which will reduce the absorption of the base and improve paint adhesion. Painting is done in two layers, the easiest way is to use a roller, it allows you to carry out the work quickly and efficiently.
Painting gives our dressing room a finished look
Installation of door and storage system
After finishing, you can begin attaching the door. If you use ordinary hinges, then a box is placed in the opening and everything is done as with ordinary canvases. But if you have a sliding structure, then the work is carried out as prescribed by the instructions, which always come with the kit. It has detailed diagrams, so completing the job will not be difficult.
As for the storage structure, the list of work depends on the configuration of the system; I will give some tips on assembling products from chipboard:
- Shelves can be attached to vertical posts either using special furniture confirmation screws or using corner shelf holders . The first option is more reliable, but requires drilling holes with a special drill, the second is simpler, but the strength of the connection is somewhat lower;
The confirmant firmly tightens the perpendicularly located chipboard sheets, and the fastening point is closed with a plug
- When you assemble a cabinet from cut pieces, do not forget to glue the ends that face outward . To do this, a special edge is used, which must be heated with an iron so that the adhesive composition melts and firmly adheres to the chipboard; the work is not difficult, but requires care; I personally touched the iron several times the first time and got burned;
Iron and pressure roller allows you to securely glue the edge
- To construct rods for hangers, purchase a furniture pipe of the required length, which is attached using flanges; this is a simple and reliable design option. The main thing is to use a pipe with thicker walls so that it does not bend under the weight of heavy things;
Using flanges you can easily fix the pipe in the required place
- If you decide to install drawers, then they need to be assembled according to the diagram shown below , it is best to use fiberboard as the bottom, and the side walls can be made of uncoated chipboard; only the outer element, which is attached to the front, will be visible. On the sides it is necessary to install guides, the length of which depends on the depth of the drawers;
Drawers allow you to conveniently store small items
- There is no point in installing doors in the dressing room, which simplifies the work; an open system is more convenient and allows you to quickly find the things you need.
This module will allow you to place a lot of things